Table of Contents
Advertisement
Quick Links
3/8" CORDLESS DRILL with DRIVER
19.2 VOLT
Model 93142
OPERATING INSTRUCTIONS
®
3491 Mission Oaks Blvd., Camarillo, CA 93011
Visit our Web site at: http://www.harborfreight.com
TO PREVENT SERIOUS INJURY,
READ AND UNDERSTAND ALL WARNINGS
AND INSTRUCTIONS BEFORE USE.
©
®
Copyright
2005 by Harbor Freight Tools
. All rights reserved. No portion of this
manual or any artwork contained herein may be reproduced in any shape or form
without the express written consent of Harbor Freight Tools.
For technical questions or replacement parts, please call 1-800-444-3353.
REV 05/05
Advertisement
Table of Contents

Related Manuals for Chicago Electric 93142


Summary of Contents for Chicago Electric 93142
-
Page 1: Operating Instructions
. All rights reserved. No portion of this manual or any artwork contained herein may be reproduced in any shape or form without the express written consent of Harbor Freight Tools. For technical questions or replacement parts, please call 1-800-444-3353. -
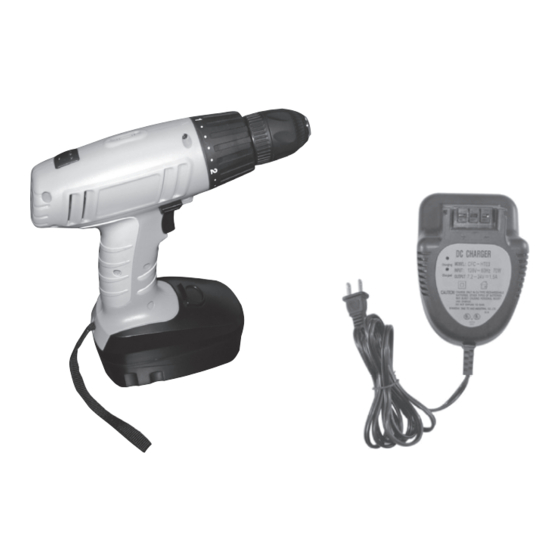
Page 2: Product Specifications
When unpacking, check to make sure all the parts shown on the Parts List on page 11 are included. If any parts are missing or broken, please call Harbor Freight Tools at the number shown on the cover of this manual as soon as possible. -
Page 3: Electrical Safety
Use clamps (not included) or other practical ways to secure and support the workpiece to a stable platform. Holding the work by hand or against your body is unstable and may lead to loss of control. SKU 93142 For technical questions, please call 1-800-444-3353 ELECTRICAL SAFETY... -
Page 4: Specific Safety Rules
Always keep the work area free of obstructions, grease, oil, trash, and other debris. Do not use the Cordless Drill in areas near flammable chemicals, dusts, and vapors. Do not use this product in a damp or wet location. - Page 5 Maintain labels and nameplates on this product. These carry important information. If unreadable or missing, contact Harbor Freight Tools for a replacement. When using the Cordless Drill, always maintain a firm grip on the tool with both hands. Hold the tool by its insulated gripping surfaces when performing an operation where the Cordless Drill may contact hidden wiring.
-
Page 6: Product Features
NOTE: For additional information regarding the parts listed in the following pages, refer to the Assembly Diagram on page 12. WARNING! Always make sure the Trigger of the Cordless Drill is in its “OFF” position, the Battery Pack (15) is removed from the Cordless Drill, and the Charger (21) is unplugged from its electrical outlet prior to making any adjustments to the tool. - Page 7 Drill Bit with the Cordless Drill pointed away from your body, hold the Chuck Sleeve firmly in place and turn the Chuck clockwise . Insert the shank of a Drill Bit all the way into the Chuck. While holding the Chuck Sleeve in place, turn the Chuck counterclockwise to lock the Drill Bit in place.
- Page 8 When drilling in light gauge metal or wood, use a wooden block to back up the material to prevent damage to the workpiece. Mark the center of the hole to be drilled with a center punch to give a Drill Bit a start and to prevent it from “walking”.
-
Page 9: Top View
FIGURE B Make sure to hold the Cordless Drill firmly with both hands, as torque from the Motor will cause the tool to twist. Observe the top of the Cordless Drill. (See Figure C.) The Cordless Drill is equipped with a Level that helps the operator drill holes parallel to the floor. -
Page 10: Inspection, Maintenance, And Cleaning
Drill Bit breaks through the workpiece. When you have drilled the hole, remove the Drill Bit from the hole while the Cordless Drill is still running. This prevents the Drill Bit from getting caught in the hole and causing damage. -
Page 11: Please Read The Following Carefully
Note: Parts 10, 12, 13, 14 and 19 are a Pre-wired Assembly. Note: 6 Drill Bits, 6 Hex Drive Bits, Hex Drive Extension, Carrying case (not shown) NOTE: Some parts are listed and shown for illustration purposes only, and are not available individually as replacement parts. -
Page 12: Assembly Diagram
NOTE: Some parts are listed and shown for illustration purposes only, and are not available individually as replacement parts. SKU 93142 For technical questions, please call 1-800-444-3353 ASSEMBLY DIAGRAM REV 05/05 PAGE 12...