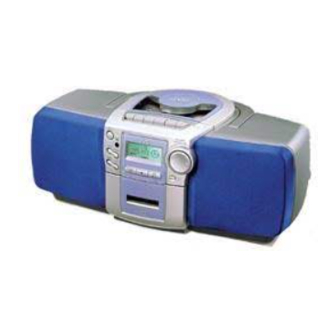
JVC RC-BZ6BU Instructions Manual
Cd portable system
Hide thumbs
Also See for RC-BZ6BU:
- Service manual (61 pages) ,
- Instruction manual (39 pages) ,
- Instructions manual (39 pages)
Table of Contents
Advertisement
Quick Links
Advertisement
Table of Contents

Summary of Contents for JVC RC-BZ6BU
- Page 1 CD PORTABLE SYSTEM RC-BZ6BU INSTRUCTIONS For Customer Use: Enter below the Model No. and Serial No. which are located either on the rear, bot- tom or side of the cabinet. Retain this information for future reference. Model No. Serial No.
- Page 2 Warnings, Cautions and Others IMPORTANT FOR LASER PRODUCTS IMPORTANT for the U.K. DO NOT cut off the mains plug from this equipment. If the plug fit- REPRODUCTION OF LABELS ted is not suitable for the power points in your home or the cable is too short to reach a power point, then obtain an appropriate safety approved extension lead or consult your dealer.
-
Page 3: Table Of Contents
The controls and operations have been redesigned to make them very easy to use, freeing you to just enjoy the music. With JVC’s COMPU PLAY you can turn on the System and automatically start the Radio, CD Player, or Cas- •... -
Page 4: Getting Started
Getting Started Accessories Check that you have all of the following items, which are supplied with the System. Power Cord (1) Remote Control (1) Batteries for Remote Control (2) If any of these items are missing, contact your dealer immediately. How To Put Batteries How To Put Batteries In the Unit Open the battery cover on the back of the Unit by pulling it toward you while pressing the tabs as shown by the arrows. -
Page 5: Common Operations
COMPU PLAY (AC power only) JVC’s COMPU PLAY feature lets you control the most frequently used System functions with a single touch. With One Touch Operation you can play a CD or tape, or turn on the radio, with a single press of the play button for that function. One Touch Operation turns the power on for you, then starts the function you have specified. -
Page 6: Adjusting The Volume
When power is supplied from the batteries: Showing the Time (DISPLAY) When the Unit is turned off with the button on the Unit (the In standby mode, both a digital and an analog are displayed. button on the Remote Control is ineffective), the Standby in- In Standby mode, both clocks are displayed on the display. -
Page 7: Using The Tuner
Using the Tuner JOG dial Number keys ¢ TUNER BAND PRESET TUNER BAND Band display, Frequency display, Preset channel ¢ Analog clock REMOTE CONTROL RM-SRCBZ6E (Display when using the Tuner) You can listen to FM and AM stations. Stations can be tuned in Preset Tuning using the Remote Control (Possible only after presetting stations) manually, automatically, or from preset memory storage. -
Page 8: Using The Cd Player
Manual Presetting (Using the Re- 4. Repeat steps 1 - 3 for each station. mote Control) ——————————— To change the preset stations, repeat the same steps as above. To Change the FM Number key(s) (hold for 2 seconds) Reception Mode The “STEREO”... -
Page 9: Repeat Play
Skip Play (4 or ¢)———————— During playback, enter the number of the track you want to listen to using the number keys. ¢ During playback, press the button to select the The selected track starts playing. track you want. • Example: For track 5, press 5. -
Page 10: Things To Know Before You Start Recording
Using the Cassette Deck (Recording) REC indicator TAPE indicator Analog clock (Display when using the Cassette Deck) ¶ § PLAY ¡ To pause the recording, press the 8 PAUSE button on the Unit. Things To Know Before You Start To cancel pause, press the 8 PAUSE button again. Recording Recording —————————————... -
Page 11: Using The Timers
To stop recording, press the § STOP/EJECT button. To Continue Recording to the Other To remove the tape, stop the tape, and press the § STOP/ Side of the Tape——————————— EJECT button again to open the cassette holder. When the tape reached its end and stopped, carry out the following Notes: to continue recording to the other side of the tape. -
Page 12: Setting The Sleep Timer
You can only set the Sleep Timer when the Unit is on and a 3. Setting the OFF time (Example: 10:15) source is playing. 1. Press the CLOCK/TIMER button on the Unit. The “ ” indicator lights up and the current OFF time 1. -
Page 13: Care And Maintenance
Care And Maintenance Handle your CDs carefully, and they will last a long time. Cassette Tapes Compact Discs • If a tape is loose, it may get stretched, cut, or • Only CDs bearing this mark can be used with caught in the cassette. -
Page 14: Troubleshooting
Troubleshooting • If you have a problem with your System, check this list for a possible solution before calling for service. • If you cannot solve the problem from the hints given here, or the System has been physically damaged, call a qualified person, such as your dealer, for service. -
Page 15: Specifications
Specifications Amplifier Output Power 14 W (7 W + 7 W) at 3 ohms (Max.) 9 W (4.5 W + 4.5 W) at 3 ohms (10 % THD) Output Sensitivity/Impedance (1 kHz) Phones 16 ohms - 1 kohm 0 mW - 20 mW/ch output into 32 ohms Cassette Deck Frequency Response 80 Hz - 12,500 Hz Wow and Flutter 0.15% (WRMS) - Page 16 VICTOR COMPANY OF JAPAN, LIMITED 0300IMMCREHIT...


