Table of Contents
Advertisement
User's Guide
Information in this document is subject to change without notice and does not represent a commitment on the part
of Creative Technology Ltd. No part of this manual may be reproduced or transmitted in any form or by any means,
electronic or mechanical, including photocopying and recording, for any purpose without the permission of
Creative Technology Ltd.
Copyright © 1999 Creative Technology Ltd. All rights reserved.
Version 1.0
April1999
SoundBlaster is a registered trademark of Creative Technology Ltd.
Microsoft, MS-DOS, Windows and the Windows Logo are registered trademarks of Microsoft Corporation.
FourPointSurround is a trademark of Cambridge SoundWorks, Inc.
Cambridge SoundWorks is a registered trademark of Cambridge SoundWorks, Inc.
All other products are trademarks of their respective owners.
1
Advertisement
Table of Contents

Related Manuals for Creative FourPointSurround FPS2000 Digital


Summary of Contents for Creative FourPointSurround FPS2000 Digital
- Page 1 Information in this document is subject to change without notice and does not represent a commitment on the part of Creative Technology Ltd. No part of this manual may be reproduced or transmitted in any form or by any means, electronic or mechanical, including photocopying and recording, for any purpose without the permission of Creative Technology Ltd.
-
Page 2: Table Of Contents
Contents Important Safety Instructions ................3 FourPointSurround Warning ........................4 Introduction ......................5 Speaker Placement ....................6 FPS2000 Digital Speaker Wiring Diagram ..................7 Satellite Connections .................... 8 Attaching The Floor Stands .................. 9 Power Supply Adapter ..................10 Audio Signal Connections .................. 11 Connection to Sound Blaster Live! via DIGITAL DIN ........ -
Page 3: Important Safety Instructions
WALL OR CEILING MOUNTING - The equipped with a polarized alternating-cur- SERVICING - Do not attempt to service the or table recommended by Cambridge FourPointSurround FPS2000 Digital satellites Sound-Works, or sold with the product. rent line plug (a plug having one blade... -
Page 4: Warning
IMPORTANT The lightning flash with arrowhead, within The exclamation point within an equilateral TO PREVENT THE RISK OF ELECTRIC an equilateral triangle, is intended to alert SHOCK, DO NOT REMOVE SUBWOOF- triangle is intended to alert the user of the the user of the presence of uninsulated ER’S COVER. -
Page 5: Introduction
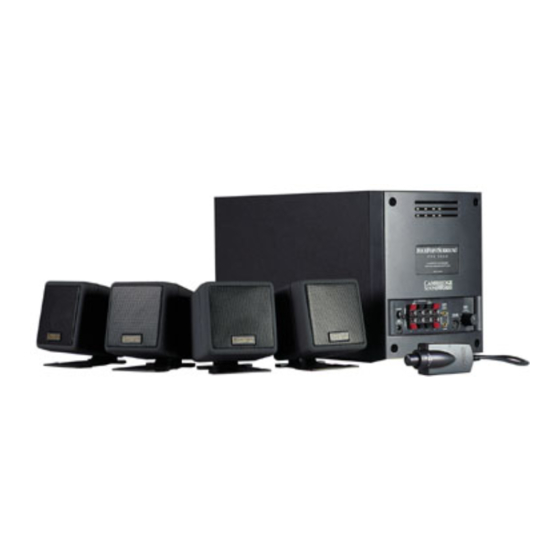
Introduction Safety & Regulatory Information Thank you for purchasing FourPointSurround™ FPS2000 The following sections contain notices for various Digital. countries: The FPS2000 Digital is the first multimedia speaker system to CAUTION: This device is intended to be installed by the user in a support DirectSound 3D and CSA/TUV/UL certified/listed IBM AT or compatible personal... -
Page 6: Speaker Placement
Speaker Placement The front left and front right satellites satellite placement to the left and right location. The rear satellites do not have should be placed to the sides of the side of the listening position will to be at exactly the same height, nor at monitor. -
Page 7: Speaker Wiring Diagram
Speaker Wiring Diagram Your plug adapter may vary depending on your country... -
Page 8: Satellite Connections
Satellite Connections Typically, the 3 meter speaker cables Remove the backing from the will connect the front satellites to the remaining, longer “FRONT subwoofer and the 5 meter cables will LEFT” label and wrap it connect the rear satellites to the around the opposite end of the subwoofer. -
Page 9: Attaching The Floor Stands
Attaching The Floor Stands 3. Insert the two solid legs into the 5. Holding the ends of the apex joint, The rear satellites (with their cable inside one of these legs by outside sockets in the push on the front of the desktop stand desktop stands attached) may be feeding it down the length of the apex joint. -
Page 10: Power Supply Adapter
Power Supply Adapter Confirm that the power switch is in the “OFF” position. Insert the power supply’s AC plug into the appropriate receptacle. Insert the small DC connector into the “15V DC IN” receptacle on the back of the subwoofer. Your plug adapter may vary depending on your country... -
Page 11: Audio Signal Connections
Audio Signal Connections The FPS2000 Digital comes with a Note: If you have a stereo sound card front/rear audio signal cable. (one without a rear stereo minijack line Connect this cable between your output), connect a green miniplug cable sound card and the subwoofer (see to the LINE OUT minijack of your diagram J). -
Page 12: Connection To Sound Blaster Live! Via Digital Din
Connection To Sound Blaster Live! Via DIGITAL DIN If your Sound Blaster Live! sound card Note: The FPS2000 Digital will detect includes a Digital I/O card, you can take the presence of a plug connected to advantage of the clear, distortion-free the DIGITAL DIN input and give the audio available from its Digital DIN DIGITAL DIN input priority. -
Page 13: Usingthe Volume Control
Using The Volume Control Adjusting Output Level In most instances, the FPS2000 If the FPS2000 Digital’s maximum The Volume Control has a Front/ Rear Balance Control, a Master Digital Master Level Control will be output is still not sufficient at the Level Control (see diagram M), and the most convenient way to adjust extreme setting of its Volume... -
Page 14: Bass Level Control
The output of the subwoofer can be adjusted to suit the listener’s taste. Playback Levels Start with the control in the 12 FourPointSurround FPS2000 Digital o’clock position (see diagram N). is intended for individual or small After using the system for a couple... -
Page 15: Mounting The Satellites
Mounting The Satellites Specifications FPS2000 Digital’s on the back of each cube (as shown To a flat surface: Four-channel below). Amplifier Specifications To mount the satellites the side of a The plastic anchors supplied will monitor or other flat surface, use be needed to secure the screws in Subwoofer: 25 watts RMS. -
Page 16: If You Have A Problem
If You Have a Problem Please retain all contents including packaging and proof of purchase until you Note: Creative may replace or repair the product with new or reconditioned are fully satisfied with product. parts and the faulty parts will become the property of Creative. The warranty If you find that you have a problem with your Creative product and believe period for your repaired/replacement items is 90 days from the date of that it needs to be repaired or replaced, you should verify the purchase date... -
Page 17: Limited Warranty
Limited Warranty Creative Labs (Ireland) Limited (“Creative”) warrants to you, the original purchaser only, that the hardware product will be free of defects in materials and workmanship for a period of two years after the date of purchase, or such other period as may be required by applicable law (“Warranty Period”).