Pioneer AVIC-HD3 Operation Manual
Hdd av navigation head unit
Hide thumbs
Also See for AVIC-HD3:
- Operation manual (202 pages) ,
- Installation manual (181 pages) ,
- Hardware manual (22 pages)
Table of Contents
Advertisement
Quick Links
Advertisement
Table of Contents

Related Manuals for Pioneer AVIC-HD3


Summary of Contents for Pioneer AVIC-HD3
- Page 1 Operation Manual HDD AV NAVIGATION HEAD UNIT AVIC-HD3...
- Page 2 The screens shown in the examples may differ from the actual screens. The actual screens may be changed without notice for performance and function improvements.
-
Page 3: Manual Overview
Chapters 9 to 13 describe how to operate the AV functions. Please read these chapters when you use a disc in the built-in DVD drive or operate the Pioneer audio equipment connected to the navigation sys- tem. -
Page 4: Overview For Each Chapter
Overview for each chapter Before Using the System For safety reasons, it is particularly important that you fully understand your naviga- tion system before using it. Be sure to read this chapter. Basic Operation Please read this section if you want to operate the navigation system immediately. It will explain the basics of this system. - Page 5 ® Using the AV Source (M-CD, iPod , TV) This chapter describes the audio source operations that can be used when Pioneer audio ® equipment featuring IP-BUS (Multi-CD player, Interface adapter for iPod , TV tuner) is con- nected. Using the AV Source (AV, EXT, AUX)
-
Page 6: Terminology
Terminology Before moving on, take a few minutes to read the following information about the conventions used in this manual. They will help you greatly as you learn how to use your new equipment. • Hardware buttons on your navigation system are described in ALL CAPITAL, BOLD lettering: e.g.) MAP button, MENU button. -
Page 7: Licence Agreement
INSTALLED ON THE PIONEER PRODUCTS. BY The Software and related documentation are pro- USING THE SOFTWARE INSTALLED ON THE PIO- vided to you “AS IS”. PIONEER AND ITS LICEN- NEER PRODUCTS, YOU AGREE TO BE BOUND SOR(S) (for the purpose of provisions 2 and 3, BY THE TERMS OF THIS AGREEMENT. -
Page 8: Limitation Of Liability
Some countries do not allow the exclusion or lim- in this Agreement shall be effective unless itation of incidental or consequential damages, agreed to in writing by Pioneer. If any provision of so the above limitation or exclusion may not this Agreement is declared invalid or unenforcea- apply to you. -
Page 9: Whereis® Navigation Digital Road Map Data Licence Terms
Licence, you will not terms and conditions carefully before you com- acquire any intellectual property or other mence using the Pioneer In-Car Navigation Sys- ® rights in or to the Whereis Data or any part tem (“Navigation System”) containing the... -
Page 10: About The Data For The Map Database
5.2 Subject to clause 5.3, Sensis accepts its liabil- cancellation, you must immediately cease ® ity to you for breach of these terms and condi- using the Whereis Data. tions or negligence under the principles Any rights or remedies which existed before applied by the courts. -
Page 11: Copyright
Copyright functions. You may use Gracenote Data only by means of the intended End-User functions of this application or device. technology was used in You agree that you will use Gracenote Data, the developing this product Gracenote Software, and Gracenote Servers for your own ®... -
Page 12: Other Precautions
Other Precautions • Part of the data cannot be acquired. The con- ® tents of the data in the Gracenote Database included in the hard disk drive are not 100% guaranteed. ® • The Gracenote Database included in the hard disk drive contains the titles for the 300 000 most frequently accessed albums worldwide as of November 2006. -
Page 13: Table Of Contents
Switching the view mode 31 Licence Agreement 5 How to view the map of the current location 31 PIONEER AVIC-HD3 5 Changing the scale of the map 35 Whereis® Navigation DIGITAL ROAD MAP Scroll the map to the location you want to... - Page 14 Registering/deleting POI Shortcuts 48 Registering the Home Location and Favourite Registering a POI shortcut 48 Location 71 Deleting a POI shortcut 48 Changing the Background Picture 72 Using the Demonstration Guidance 73 Chapter 6 Correcting the Current Location 73 Restoring the Default Setting 73 Registering and Editing Locations Registering Locations Overview 49 Chapter 9...
- Page 15 Chapter 13 Stopping CD recording 90 Notes on CD recording 91 Customising the Audio Setting re- Music Library Play 91 lated with Audio Visual Selecting [LIBRARY] as the source 91 Screen configuration 91 AV Setting Overview 111 Touch key operation 92 How to Operate the Audio Settings screen 111 Creating a playlist with a customised order 94 Customising the Audio Settings Items 111...
- Page 16 Voice commands related to AV operation 132 [Audio Settings] menu 169 Location screen (A) and (B) 133 [System Settings] menu (Page 1) 169 Other Voice Commands 134 [System Settings] menu (Page 2) 169 Index 170 Other voice commands for navigation operation 134 Other voice commands for AV operation 136 Category list for vicinity search 137...
-
Page 17: Before Using The System
Chapter 1 Before Using the System Important Safety Information ❒ Do not operate this navigation system (or the rear view camera option if purchased) if doing so will divert your attention in any way from Before using your navigation system, be sure to the safe operation of your vehicle. -
Page 18: Additional Safety Information
❒ Keep this manual handy as a reference for • When applying the handbrake in order to operating procedures and safety information. view “Video image” or to enable other functions offered by the navigation sys- ❒ Pay close attention to all warnings in this tem, park your vehicle in a safe place, and manual and follow the instructions carefully. -
Page 19: Features (Characteristics Of This Software)
Features (Characteristics of this Compatible voice recognition system software) Connecting the supplied microphone will enable voice operation for both the navigation and AV functions. Touch panel key operation It is possible to operate the navigation functions Original image assignment and the Audio functions by using touch panel You can store your own pictures on a CD-R in keys. -
Page 20: Points About Recording
Points about recording In Case of Trouble ❒ Pioneer does not compensate for the contents Should the navigation system fail to operate prop- that could not be recorded or any loss of erly, contact your dealer or nearest authorised recorded data due to a malfunction or failure Pioneer Service Station. -
Page 21: Basic Operation
Chapter 2 Basic Operation Flow from Startup to Termina- Assign a destination by using the touch tion panel key and beginning route guidance, or operating the Audio source. At first, please confirm the positions of the follow- ing features using the “Hardware Manual”. •... -
Page 22: How To Use Navigation Menu Screens
How to Use Navigation Menu [Info/Phone] menu Screens The basic navigation is performed by using menus. The navigation menu is divided into four menus: [Destination], [Info/Phone], [Map], and [Settings]. If you are using a mobile phone featuring Blue- tooth technology by connecting the Bluetooth Displaying the Navigation menu unit (ND-BT1) (sold separately) to the navigation system, you can configure Bluetooth settings or... -
Page 23: Basic Navigation
Basic Navigation [Settings] menu • For safety reasons, you cannot use some of these basic navigation functions while your vehicle is in motion. To enable these functions, you must stop in a safe place Customise the navigation functions so they can and apply the handbrake (see page 16 for be used easily. -
Page 24: Calculating Your Destination By Using Address Search
Calculating your destination by Operation of street name or city name using Address Search input screen (e.g. QWERTY keyboard) The most frequently used function is [Address (11) Search], in which the address is specified and the destination is searched. This section (12) describes how to use [Address Search] and the basics of using the navigation system. - Page 25 Touch the street from the list. (11) [Street]: Touch if you want to return the street input mode. (This is available only when city name is blank.) (12) [Centre]: This can be selected when you enter a city or area name first. Touch this button to display the central point of the entered city or area.
- Page 26 Checking the location on the map “Location confirmation screen” Route calculation starts. (1) Calculating the route to the destination Route calculation starts. When the route cal- culation is completed, “Route confirmation screen” appears. ❒ If you press the MAP button or MENU button during route calculation, the calcu- lation is cancelled and the map screen When the route calculation is completed,...
-
Page 27: Checking And Modifying The Route
Touch [OK] to decide your route. • shows that ferries could not be avoided when the setting [Avoid Ferry] is [On]. (2) Distance to the destination (3) Travel time to destination (4) Set the displayed route Sets the displayed route as your route, and starts the route guidance. -
Page 28: When The Route Guidance Starts
(8) Check the shape of route Basic items on the screen This section describes only the basic items that You can check the overall shape of your route and are displayed on the Map Mode screen. the location of destination on the map. ➲... -
Page 29: Modifying The Route Calculation Conditions
Modifying the Route Calculation Items that users can operate Conditions Settings marked with an asterisk (*) show that these are default or factory settings. You can modify the conditions for route calcula- tion and recalculate the current route. Route Condition This setting controls how the route should be cal- Touch [Destination] in the navigation culated by taking into account the time or the dis-... -
Page 30: Checking The Current Route
Touch [Profile]. [Off]*: Calculate a route that may include motorways. [On]: Calculate a route that avoids motorways. ❒ The system may calculate a route that includes motorway even if [On] is selected. Learning Route Touch to scroll the list. The system learns the travel history of your vehi- Scroll the list as necessary. -
Page 31: Editing Waypoints
Touch the screen and place the scroll cur- Touch [Add]. sor on the point where you want to view the detail or the entire picture. Or zoom in or zoom out the map scale. The “Select Search Method” screen appears. After searching for a point, display it on a map, then touch [OK] to add to the way- The map around the scroll cursor is zoomed in... -
Page 32: Sorting Waypoints
Sorting waypoints Skipping a waypoint You can sort waypoints and recalculate the route. If points are set, the next waypoint along the route can be skipped. Touch [Destination] in the navigation menu, and then touch [Route Overview]. Touch [Destination] in the navigation menu, and then touch [Cancel Route]. -
Page 33: How To Read The Map Display
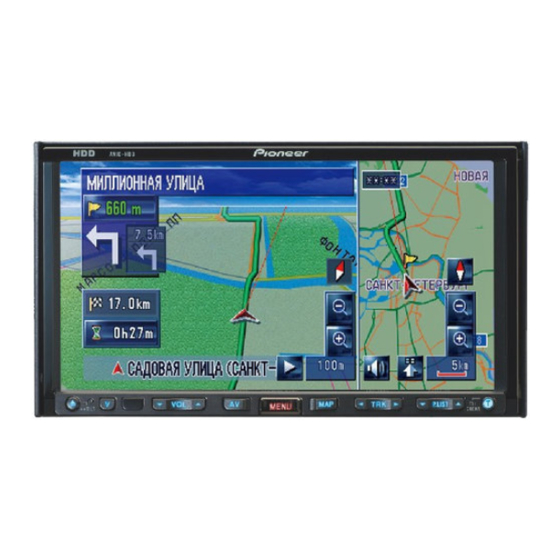
Chapter 3 How to Read the Map Display How to Use the Map How to view the map of the cur- rent location Most of the information provided by your naviga- ❒ This example shows a case where [Second tion system can be seen on the map. You need to Maneuver Arrow] is set to [View]. -
Page 34: Rear View
Twin Map View Rear View You can split the screen in half. The right screen Rear view image is displayed on the left-hand and the left screen can display a map in different side of the screen, while the map of your sur- scales. -
Page 35: Enlarged Map Of The Intersection
Enlarged map of the intersection (1) Name of the street to be used (or next guidance point)* This screen is displayed only when [Close Up View] in the [Map] menu is [On]. (2) Distance to the guidance point* Enlarged map of the intersection Touching allows you to hear the infor- mation again. - Page 36 (10) Estimated time of arrival (or travel time (17) Mute Voice Guidance icon to your destination)* Touch to turn on or off the mute setting of Voice The display alternates by pressing it. Guidance. You can select between display and non-display.
-
Page 37: Changing The Scale Of The Map
Changing the scale of the map Touching allows you to change the map scale. Touch and holding allows you to change the scale in smaller step within a range of 25 meters to 500 kilometres (25 yards to 250 miles). When the view mode is set to Map Mode or Mixed Mode, “Direct scale key”... -
Page 38: Shortcut Menu
Shortcut menu Viewing the information of a specified location Shortcuts allow you to perform various tasks, An icon appears at registered places (home loca- such as route calculation for the location indi- tion, specific places, address book entries) and cated by the scroll cursor or registering a location places where there is a POI icon. -
Page 39: Setting The Vehicle Dynamics Display
[Acceleration]: : Overlay POI Acceleration in a forward direction is dis- Displays icons for surrounding facilities (POI) played. The + sign indicates acceleration on the map. while the – sign indicates deceleration. ➲ “Displaying POI on the Map” ➞ Page 41 [Lateral Acceleration]: : Volume Acceleration in a side direction such as when... -
Page 41: Modifying Map Configurations
Chapter 4 Modifying Map Configurations Close Up View You can select the method to display the close • For safety reasons, these functions are not up view of the intersection. available while your vehicle is in motion. To enable these functions, you must stop Displays the close up view. -
Page 42: Selecting The Shortcut
Selecting the Shortcut 3D*: Displays the 3D map. Select shortcuts to display on the map screen. In the list displayed on screen, the items with red tick marks are displayed on the map screen. Touch the shortcut you want to display and then touch [OK] when a red tick mark appears. -
Page 43: Displaying Poi On The Map
Touch the desired detailed category. : Dial Favourite 1 to 5 ❒ You can select up to 100 items from the Make a call to the phone number registered in detailed category. [Dial Favourites]. ➲ “Registering a phone number in “Dial Favourites””... -
Page 44: Changing The View Mode For The Navigation Map
Changing the Setting of Naviga- [Night]: tion Interruption Screen You can check the colour of the Night screen. ❒ To return the previous screen, touch [Back]. Set whether to automatically switch to the navi- gation screen from the AV screen when your vehi- Changing the View Mode for the cle approaches a guidance point such as an Navigation Map... -
Page 45: Setting A Route To Your Destination
Chapter 5 Setting a Route to Your Destination • Searching for POIs by specifying a city name first • For safety reasons, these route-setting Searching for a POI directly functions are not available while your vehicle is in motion. To enable these func- from the name of the facilities tions, you must stop in a safe place and put on the handbrake before setting your... -
Page 46: Searching For Pois By Specifying A Category First
Searching for POIs by specify- Touch ing a category first Touching sorts the items in the list in the order of distance. Touch [Destination] in the navigation menu, and then touch [POI Search]. Touch [Category]. Category Sorts the items in the list in the alphabetical order. -
Page 47: Searching For Pois By Specifying A City Name First
Searching for POIs by specify- Touch the desired category. ing a city name first Category Touch [Destination] in the navigation menu, and then touch [POI Search]. Touch [City]. Input the name of the city that has the facility you want to search for. Previously set categories will have a red tick mark. -
Page 48: Searching For The Facilities Around The Scroll Cursor
Searching for the facilities Touch the desired detailed category. around the scroll cursor Searching range is approximately 16 km (10 miles) square from the scroll cursor. ❒ This can be used when Vicinity Search is selected in Short-Cut Selection. ➲ Changing Shortcut ➞ Page 40 Previously set categories will have a red tick mark. -
Page 49: Route Calculation To Your Home Location Or To Your Favourite Location
Route Calculation to Your Home Selecting Destination from the Location or to Your Favourite Destination History and Address Location Book If your home location is registered, the route Any place that has been searched before is home can be calculated by touching a single key stored in [Destination History]. -
Page 50: Registering/Deleting Poi Shortcuts
Registering/deleting POI Short- Touch the POI selection method. cuts You can register up to six shortcuts as your favourite POI. You can also change or delete the registered shortcuts. ❒ You can register a POI shortcut by touching on the Shortcut-menu. The steps for reg- [Select All]: istration and deletion are almost the same as Selects all detailed categories that are... -
Page 51: Registering And Editing Locations
Chapter 6 Registering and Editing Locations Registering Your Home and Your Favourite Location • For safety reasons, these functions are not available while your vehicle is in motion. You can register one home location and one To enable these functions, you must stop favourite location. -
Page 52: Registering A Location Into Address Book
Registering a location by Address Touch [OK]. Completes the registration. Book Registering a Location into Touch [Destination] in the navigation Address Book menu, then touch [Address Book]. Touch [Add]. The Address Book can store up to 400 regis- tered locations. These can include your home location, favourite places, and destinations you have already registered. -
Page 53: Viewing The Address Book
Viewing the Address Book Sorts the items in the list alphabetically. This Touch [Destination] in the navigation is the default sorting order. menu, then touch [Address Book]. ❒ Active if there are items in the list and cur- (4) (5) rent sort is not alphabetically. - Page 54 (1) Name You can enter the desired name. (2) Pronunciation When you approach a registered location You can enter the desired pronunciation inde- while travelling pendently from the name. The registered pro- When a location with a registered sound nunciation is used for voice recognition. effect and image comes within an ❒...
- Page 55 [Repeat]: ❒ If nothing is entered in the text box, you You can reconfirm the pronunciation of the cannot use that item as the voice com- name you entered. mands. No sounds can be output during Entering or changing a phone number ❒...
-
Page 56: Deleting The Entry In "Address Book
Deleting the entry in “Address Check that no disc is inserted, and insert your CD-R (-RW) to the disc loading slot. Book” Touch [Picture], and then touch [Import Items registered in the Address Book can be from Disc]. deleted. All entries of the data in the Address The list of the pictures stored in the Book can be deleted at once. -
Page 57: Destination History Operations
Destination History Operations Deleting the entry in “Destination History” The points to which a route has been calculated Items in the Destination History can be in the past are automatically saved in deleted. All entries in the Destination History Destination History. can be deleted at once. -
Page 59: Using Hands-Free Phoning
Chapter 7 Using Hands-free Phoning Hands-free Phoning Overview ❒ Please read “Notes for hands-free phoning” for your reference. ➲ “Notes for hands-free phoning” ➞ Page 66 ❒ When the power of the navigation system • For your safety, avoid talking on the phone turns off, the Bluetooth connection is also dis- as much as possible while driving. -
Page 60: Setting Up For Hands-Free Phoning
➲ “Connecting a registered mobile phone” ➞ Page 59 ❒ The default device name displayed on the mobile phone is [PIONEER HDD NAVI]. The default password is [1111]. ❒ If registration fails, repeat the procedure Operating from the navigation system from the beginning. -
Page 61: Connecting A Registered Mobile Phone
Editing the device name the mobile phone selected as a target of connec- You can change the device name to be displayed tion. However, connect the mobile phone manu- on your mobile phone. (Default is [PIONEER ally in the following cases: HDD NAVI].) -
Page 62: Receiving A Phone Call
Answering an incoming call Touch [Info/Phone] in the navigation menu, and then touch [Phone Menu]. The system informs you that it is receiving a call by displaying a message and producing a ring Touch [Phone Settings]. sound once. The phone settings screen appears. When there is an incoming call, touch Touch [Device Name]. - Page 63 Input the phone number, and then touch To end the call, touch at the top right to make a call. of the screen. ❒ Up to 30 entries for each of the dialled number and received call histories are recorded automatically. When the number of entries exceeds 30, the entries will be deleted from the oldest one.
- Page 64 ❒ Before using this function, you need to set the Perform [POI Search] or [Vicinity Search] phone number from the phone book to “Dial and display the detail information. Favourites”. ➲ Operation of [POI Search] ➞ Page 43 ➲ Operation of [Vicinity Search] ➞ Page 45 ➲...
-
Page 65: Transferring The Phone Book
Transferring the phone book [No]: Keeps the current entries and then adds new You can transfer the data from the phone book data to the phone book. (Duplicate data can- stored in your mobile phone to the phone book not be consolidated.) stored in the navigation system. -
Page 66: Editing The Entry In "Phone Book
Touch [Info/Phone] in the Navigation Select the entry you want to edit. menu, and then touch [Phone Menu]. Touch [Dial Favourites]. Touch [Set] on any of [Favourite 1] — [Favourite 5]. (1) Name Enter the name to be displayed in the phone book. -
Page 67: Editing The Received Call Or Dialled Number History
Customising the incoming call picture Deleting data for a phone book entry Touch [Info/Phone] in the Navigation Be sure to read “Limitations for importing pic- menu, and then touch [Phone Menu]. tures” before creating a CD-R (-RW). Touch [Phone Book]. ➲... - Page 68 Deleting data • If the person on the other end of the phone call cannot hear the conversation due to an echo, Touch [Info/Phone] in the Navigation decrease the volume level for hands-free phon- menu, and then touch [Phone Menu]. ing.
-
Page 69: Modifying The General Settings For Navigation Functions
Chapter 8 Modifying the General Settings for Navigation Functions Beep This setting controls the beep tone volume for • For safety reasons, these functions are not navigation. available while your vehicle is in motion. Phone Ringtone To enable these functions, you must stop This setting controls the incoming ring tone in a safe place and put on the handbrake volume. -
Page 70: Setting The Keyboard Layout
The time difference between the time origi- [ABC]: nally set in the navigation system (Australian Eastern Standard Time) and the current loca- tion of your vehicle is shown. If necessary, adjust the time difference. Touching [+] or [–] changes the time difference display in half- [AZERTY]: hour increments. -
Page 71: Checking The Setting Related With Hardware
Touch [+] or [–] to set the speed. (3) Phone Connection Status Indicates the connection status of the Blue- tooth unit (sold separately) and the signal strength between the Bluetooth unit and the mobile phone. If the Bluetooth unit is con- nected correctly, [OK] is displayed. -
Page 72: Checking Sensor Learning Status And Driving Status
Checking sensor learning status To clear values... and driving status If you want to delete the learned results stored in [Distance], [Speed Pulse] or [Learning Sta- Touch [Settings] in the navigation menu, tus], touch the relevant result, then touch [Yes]. then touch [Hardware]. -
Page 73: Checking The Device And Version Information
Touch [Settings] in the navigation menu, Touch [Settings] in the navigation menu, then touch [Hardware]. then touch [Hardware]. Touch [Installation Angle Setup]. Touch [Hard Disk Info]. Hard disk space (%) Check the direction the LCD panel faces, and touch the corresponding item. Registering the Home Location [Left]: and Favourite Location... -
Page 74: Changing The Background Picture
Point the scroll cursor to the location you Touch [Navigation Background] or [AV want to register and touch [OK]. Background]. The location is registered, and the Edit regis- tered information screen appears. ➲ “Editing the entry in “Address Book”” ➞ Page 51 Touch [OK]. -
Page 75: Using The Demonstration Guidance
Using the Demonstration Guid- ❒ When the picture starts to change, do not ance turn off the vehicle engine until the mes- sage appears to indicate that the picture has finished changing. This is a demonstration function for shops. After a route is set, the simulation of the route guid- ance to a destination is automatically displayed. -
Page 77: Using The Av Source (Built-In Dvd Drive And Radio)
Chapter 9 Using the AV Source (Built-in DVD Drive and Radio) Selecting a source You can play or use the following sources with the navigation system. • DVD-Video Select a source on “AV Source Menu” • CD Press the AV button to switch Audio oper- •... -
Page 78: About Steering Remote Control
Select a source by using AV button If the [Auto ANT] mode is set to [Power], the You can press the AV button to switch the vehicle’s aerial can be stowed or turned off source. only when the ACC is set to “OFF”. ➲... -
Page 79: Viewing The Audio Operation Screen And Display- Ing The Audio Settings Menu
Viewing the audio operation screen and displaying the Audio Set- tings menu Normal screen (e.g. CD) Touch (1) Information plate Displays the information (e.g. track title) about the source being played. (2) Touch panel keys Touch to operate the source being played. (3) Detailed information Displays the detailed information about the source being played. -
Page 80: Operating A Music Cd
Operating a Music CD Screen configuration You can play a normal music CD using the built- in DVD drive of the navigation unit. This section describes that operations. Selecting [CD] as the source Press the OPEN CLOSE button and insert a disc you want to play to disc loading slot. -
Page 81: Touch Key Operation
*: Some discs have text information encoded on Touch and hold: Fast rewind or forward the disc during manufacture. These discs may Keep touching or to perform fast rewind contain such information as the CD title, track or forward. title, and artist’s name. -
Page 82: Operating The Cd-Rom (Mp3 Disc)
Operating the CD-ROM (MP3 disc) (4) Track indicator Shows the track number and file name of the track currently playing. When an ID3 tag has You can play an MP3 disc using the built-in DVD been encoded on the file, the track title will be drive of the navigation unit. - Page 83 rent track. Touching again will skip to the previ- ❒ The information marked with an asterisk (*) is ous track. displayed only when an ID3 tag has been Touch and hold: Fast rewind or forward encoded on MP3 files on the disc. If specific information of the ID3 tag has not been Keep touching ...
-
Page 84: Notes On Playing Mp3 Disc
Notes on playing MP3 disc Operating the DVD ❒ When playing discs with MP3 files and audio data (CD-DA) such as CD-EXTRA and MIXED- MODE CDs, both types can be played only by • For safety reasons, “Video image” cannot switching mode between MP3 and CD-DA. -
Page 85: Touch Key Operation
(3) Repeat range indicator ❒ With some discs, the icon may be dis- Shows which repeat range has been selected. played, meaning that the operation is not valid. (4) Title number indicator Shows the title number currently playing. (1) Playback and Pause Touching ... -
Page 86: Searching For A Desired Scene, Starting Play
• Chapter Repeat — Repeat just the current (16) Decide the item When you select a certain video item, play- chapter back starts from the selected item. When you • Title Repeat — Repeat just the current title select an item with a submenu, the next menu ❒... -
Page 87: Entering The Numerical Commands
Entering the numerical com- Operating the Radio (FM) mands You can listen to the radio by using the navigation You can use this function when you need to enter system. This section describes operations for a numerical command during DVD playback. Radio (FM). -
Page 88: Touch Key Operation
Touch key operation (4) Store the strongest broadcast frequen- cies Touch the source icon and then touch ➲ “Storing the strongest broadcast frequen- [FM] to select the radio (FM). cies” ➞ Page 86 When the source icon is not displayed, you (5) Tune in strong signals can display it by touching the screen. -
Page 89: Operating The Radio (Am)
Operating the Radio (AM) Touch key operation Touch the source icon and then touch You can listen to the radio by using the navigation [AM] to select the radio (AM). system. This section describes operations for When the source icon is not displayed, you Radio (AM). -
Page 90: Storing The Strongest Broadcast Frequencies
Storing the strongest broadcast frequencies BSM (best stations memory) lets you automati- cally store the six strongest broadcast frequen- cies under preset tuning keys P1 — P6 and once stored there you can tune in to those frequencies with the touch of a key. Touch and hold [BSM]. -
Page 91: Music Library Recording
Chapter 10 Using the AV Source (Music Library) You can record tracks from a music CD to the (3) Recording indicator Shows the recording status. (Red) indicates hard disk in the navigation system. The Music that recording is in progress. (Blue) indicates Library function enables you to record music CDs preparing recording. -
Page 92: Recording All Tracks In A Cd
Recording a CD manually ➲ “Assigning another candidate for title infor- mation” ➞ Page 100 You can record only your favourite tracks in the ® ❒ If no title information exists in the Gracenote Database on the built-in hard disk drive, the [REC Mode] is set to [Manual]. -
Page 93: Notes On Cd Recording
Music Library Play — When you switch to another source, and then return to the CD source. — When you turn off the ignition switch of the You can play back or edit the tracks recorded in vehicle, and then restart the engine. the hard disk drive in the source named Music When REC Mode is [Manual]: Library (LIBRARY). -
Page 94: Touch Key Operation
“Playlist”, and the icon indicates that the item If you try to record one playlist more than the is a “Track”. number listed above, the oldest playlist will be deleted. Title display Music recognition technology and related data Touch key operation ®... - Page 95 (5) Display group selection screen ❒ When the range of repeat play is Track You can search a track from categories. Repeat, if you perform scan play, the repeat- ing range changes to Playlist Repeat. ➲ Search for a playlist ➞ Page 93 ❒...
-
Page 96: Creating A Playlist With A Customised Order
Creating a playlist with a cus- Searching the playlist by artist Select a playlist formed by an artist, and play it tomised order back. You can register your favourite tracks as a playl- Touch [Search]. ist, and play them back in desired order. The group selection screen appears. -
Page 97: Editing A Playlist Or Tracks
Editing a playlist or tracks Registering multiple tracks at a time You can edit the tracks or playlist recorded in the Play back the playlist that contains the Music Library. tracks you want to register. Only the playlists and tracks in the [Albums] Touch to display the list of playl- group and the [My Favorites] group can be... - Page 98 Touch (5) Delete the playlist The system enters the playlist edit mode. ➲ “Deleting a playlist” ➞ Page 99 (6) Delete the selected tracks from that playl- ➲ “Deleting a track from the playlist” ➞ Page 99 (7) Update title information ➲...
- Page 99 (4) Change genre Enter a new character string, and then touch [OK]. ➲ “Changing the genre of a track” ➞ Page 100 (5) Change the order to play back tracks ➲ “Sorting the tracks in “My Mix” (“My Favorite”) playlist” ➞ Page 99 (6) Delete the current track ➲...
- Page 100 Sorting the playlists Enter the playlist edit mode or track edit mode. The playback order of playlists in the group can be changed. ➲ “Switching to the edit mode” ➞ Page 95 ❒ If there is only one playlist, the playback order Touch cannot be changed.
-
Page 101: Deleting A Playlist
Deleting a track from the playlist Repeat Step 3 to Step 5 to change the playback order of other playlists. You can delete tracks from the playlist. ❒ If you delete a track in the [Albums] group, Touch [ESC]. the track is deleted from the hard disk drive. (It The new order is fixed, and the system returns is deleted from [My Favorites] group at the to the normal playback screen. -
Page 102: Assigning Another Candidate For Title
Database ➲ “Switching to the edit mode” ➞ Page 95 will be available in the future. You can download the latest update from Pioneer Touch [Genres]. website by using your PC. To install the Select the desired genre from the list. -
Page 103: Using The Av Source (Music Li- Brary)
Chapter 11 ® Using the AV Source (M-CD, iPod , TV) When Pioneer audio equipment is connected to (4) Playback method indicator Shows which playback method has been the navigation system using IP-BUS or AV-BUS, selected. such equipment can be operated from the navi- gation system. - Page 104 (1) Change the disc in the magazine (8) Scan play The first 10 seconds of each track of the current (2) Playback and Pause disc (or the first track of each disc) are played. Touching switches between “playback” and “pause”.
-
Page 105: Operating The Ipod
® iPod (10) Song title, Artist name, and Album title ❒ When you use the iPod (sold separately) with indicator this Navigation System, Pioneer Interface When playing a song, Song title, Artist name, and ® adapter for iPod is required. -
Page 106: Browsing For A Song
(4) Narrow down the songs to play back ❒ If you select [Songs], proceed to step 4. You can narrow down the choices of songs to ❒ When you select [Artists], [Albums] or play from five categories. [Genres], you can start a playback of all songs in the selected list. -
Page 107: Operating The Tv Tuner
Operating the TV tuner (5) Preset list display Shows the preset list. Touch key operation • For safety reasons, visual images cannot Touch the source icon and then touch be viewed while your vehicle is in motion. [TV] to select the TV tuner. To view visual images, you must stop in a When the source icon is not displayed, you safe place and put on the handbrake... -
Page 108: Storing And Recalling Broadcast Stations
Selecting the country group (4) Change band Touching [Band] switches between “TV 1” and “TV 2”. Touch [Area]. (5) Select the country group Touch [Up] or [Down] to select the appro- ➲ “Selecting the country group” ➞ Page 106 priate country group. Storing and recalling broadcast stations If you touch any of the preset tuning keys P1 —... -
Page 109: Using The Av Source
(EXT) ➲ “Switching the automatic and manual func- tion” ➞ Page 109 The term “external unit” refers to future Pioneer devices that are not currently planned for, or devices that allow control of basic functions although they are not fully controlled by the navi- gation system. -
Page 110: Touch Key Operation
Touch key operation Operate the external unit by using 1 key — 6 key Touch the source icon and then touch The external unit can be operated by transmitting [EXT 1] or [EXT 2] to select the external the operating commands set to 1 key — 6 key. unit. -
Page 111: Switching The Automatic And Manual Function
Switching the automatic and Operating the AUX input source (AUX) manual function You can turn automatic and manual function on An IP-BUS-RCA Interconnector such as the CD- or off. You can switch between Auto and Manual RB20/CD-RB10 (sold separately) lets you connect functions of the external unit connected. -
Page 113: Customising The Audio Setting Related With Audio Visual
Chapter 13 Customising the Audio Setting related with Audio Visual How to Operate the Audio Set- Various settings are available with the audio source according to your audiovisual needs. This tings screen chapter describes the methods of changing the various settings and setting the LCD panel. Press the AV button. -
Page 114: Adjusting Equaliser Curves
Recalling equaliser curves • A Custom2 curve can be created common to all sources. If you make adjustments when the There are six stored equaliser curves which you Custom2 curve is selected, the Custom2 can easily recall. Here is a list of the equaliser curve will be updated. -
Page 115: Setting The Simulated Sound Stage
Touch or to select the equaliser band ❒ When you set staging to an option other to adjust. than [Off], the high pass filter (HPF) set- Each time you touch or selects equaliser ting turns [Off]. bands in the following order: ➲... -
Page 116: Using Subwoofer Output
Using non fading output When the rear output setting is Rear SP Sub.W, you cannot adjust front/rear speaker When the non fading output setting is on, the balance. audio signal does not pass through the naviga- ➲ “Setting the rear output and subwoofer tion system’s low pass filter (for the subwoofer), controller”... -
Page 117: Adjusting Source Levels
Customising the System Set- Touch or to select cut-off frequency. tings Items Each time you touch or selects cut-off fre- quencies in the following order: 50 — 80 — 125 (Hz) System Settings lets you perform system set up When Preout (the subwoofer controller set- of different settings for navigation system. -
Page 118: Setting Up The Built-In Dvd Drive
Setting up the built-in DVD Setting assist subtitles on or off Assist subtitles offer explanations for the aurally drive impaired. However, they are only displayed if they You can change the preference for playing a DVD are recorded on the DVD. on the built-in DVD drive. -
Page 119: Changing The Wide Screen Mode
❒ When playing discs that do not hove a pan- ❒ The parental lock level is recorded on the scan system, the disc is played back with disc. You can confirm it by looking at the [Letter Box] even if you select the disc package, the included literature or the disc itself. -
Page 120: Setting For Rear View Camera
[Cinema] (cinema): A picture is enlarged by the same proportion as Full or Zoom in the horizontal direction • Pioneer recommends the use of a camera which outputs mirror reversed images, and by an intermediate proportion between Full and Zoom in the vertical direction; ideal... -
Page 121: Switching The Auxiliary Setting
❒ When a Pioneer external unit is connected • Off — The volume does not change ❒ Operation returns to normal when the cor- with an IP-BUS cable, select [EXT]. When respond action is ended. the audio source is [EXT], the “Video image”... -
Page 122: Changing The Voice Output Of The Navigation Guidance
Changing the voice output of the • Audio SCRN — The clock is not overlaid on the “Video image” navigation guidance Setting the CD recording mode You can set the speaker to output the navigation guidance and phone voice, etc. You can set whether to start recording tracks automatically when you play a CD, or to manually Touch [Guide/Tel SP] in the System Set-... -
Page 123: Other Functions
Touch [Rear SP] in the System Settings Each touch of [REAR SCREEN] changes the menu. settings as follows: • MIRROR — The video on the front screen Touch [Full] or [Sub.W] to switch the rear of the navigation unit is output to the “Rear output setting. -
Page 124: Operating The Picture Adjustment
Operating the picture adjust- — Built-in DVD drive — TV image ment — AV INPUT/EXT — Rear view camera image — Navigation map and menu screen • For safety reasons, these functions are not ❒ The picture adjustment may not be availa- available while your vehicle is in motion. -
Page 125: Language Code Chart For Dvd
Language Code Chart for DVD Language (code), input code Language (code), input code Language (code), input code Japanese (ja), 1001 Guarani (gn), 0714 Pashto, Pushto (ps), 1619 English (en), 0514 Gujarati (gu), 0721 Quechua (qu), 1721 French (fr), 0618 Hausa (ha), 0801 Rhaeto-Romance (rm), 1813 Spanish (es), 0519 Hindi (hi), 0809... -
Page 127: Operating Your Navigation System With Voice
Basics of Voice Operation pronounces it in some cases. Your Pioneer navigation system uses the latest in voice recognition technology. You can use voice As necessary, repeat Step 3. commands to operate many of its functions. This... -
Page 128: To Start Voice Operation
To start voice operation ❒ If no voice icon is displayed, check to see whether the microphone is properly con- nected and turn the power on again. No sounds can be output during ❒ If there are multiple pages, the voice help Touch the VOICE icon. -
Page 129: Tips For Voice Operation
Tips for Voice Operation An Example of Voice Operation For your voice commands to be correctly recog- Search for POI in vicinity nised and interpreted, ensure that conditions are In this example, you want to search for the near- suitable for recognition. est petrol station and set it as your destination. -
Page 130: Search For The Playlist
Search for the playlist The message “Vicinity search. Please request POI category.” appears, and the In this example, you want to search for a playlist navigation system pronounces that message. and play that playlist. Say “Petrol Station”. Touch the VOICE icon when the audio The message “Vicinity search. -
Page 131: Available Voice Commands
Available Voice Commands This section describes the flow and available commands of each voice operation. ❒ For <Registered location’s pronunciation> shown on “Voice commands related to hands-free phoning”, say the registered pronunciation. For example, if the registered pronunciation in address book is “My office”... -
Page 132: Voice Commands Related To Navigation
Voice commands related to navigation Give the following verbal commands after switching to the navigation screen. Search by entry on the address book Destination* ➞ Address Book* ➞ <Registered location’s pronunciation> ➞ Location Screen (A) Search the facilities in vicinity Destination* ➞... -
Page 133: Voice Commands Related To Hands-Free Phoning
Operating the view mode Map Operation* ➞ Change View Mode* ➞ Map Mode, Twin Map View, Street List Mode, Mixed Mode, Rear View, Vehicle Dynamics ➞ Map screen will be changed to selected view mode. Operating the map orientation Map Operation* ➞ Heading Up, North Up ➞ Map orientation will be changed. Recalculating the route Route Options* ➞... -
Page 134: Voice Commands Related To Av Operation
Voice commands related to AV operation The following verbal commands can be used both in navigation screen and audio operation screen. Common AV commands AV Operation* ➞ Change Display* ➞ Navigation Screen ➞ Switching to the navigation map or menu screen. AV Operation* ➞... -
Page 135: Location Screen (A) And (B)
Location screen (A) and (B) Location screen (A) The following commands can be vocalised: Set As Destination If there is no route, the system starts the route calculation. If the route is already set, touch the VOICE icon to start route calculation. Set as Waypoint Touch the VOICE icon to start route calculation. -
Page 136: Operation
Other Voice Commands The navigation system also can recognise the words in the following list. Other voice commands for navigation operation Preferential voice command Other voice command Back Return, Previous Cancel Escape, Skip Current Location My Location Voice Help Recognition Help, Help Next Page Next, Following Previous Page... - Page 137 Preferential voice command Other voice command 10 miles Scale 10miles 25 miles Scale 25miles 50 miles Scale 50miles 100 miles Scale 100miles 250 miles Scale 250miles 25 yards Scale 25yards 50 yards Scale 50yards 100 yards Scale 100yards Change View Mode View Mode, Change View Map Mode Normal Map, Flat Map...
-
Page 138: Other Voice Commands For Av Operation
Other voice commands for AV operation Preferential voice command Other voice command AV Input Video Input CD Changer Rock/Pop Rock, Pop Hip-Hop/Rap Hip-Hop, Rap Soul/Urban Soul, Urban... -
Page 139: Category List For Vicinity Search
Category list for vicinity search ❒ If you say the category name (category title), the system searches for vicinity POIs in that category without taking the chain into consideration. Category name: Restau- Category name: Sport Category name: Trans- rants port Sports Centre Italian Golf Course... - Page 140 VOLVO, Repair Vehicle Repair Facility, Others Category name: Rental Car Agency AVIS BUDGET EUROPCAR HERTZ THRIFTY Rental Car Agency, Others...
-
Page 141: Appendix
Appendix Returning the Navigation Sys- Method 3: [Reset] on start-up Clears the setting values stored in the hard disk tem to the Default or Factory drive. Settings You can return settings or recorded contents to the default or factory settings. There are four methods to clear user data, and the situations and the cleared contents are different for each method. -
Page 142: Setting Items To Be Deleted
Setting items to be deleted The items to be deleted vary depending on the reset method. The items listed in the following table return to the default or factory settings. The items not listed below will be retained. However, if you carry out [Clear user information from hard disk], all the settings related to the navigation function including the items not listed below are deleted. -
Page 143: If System Errors Frequently Occur
Method 1 Method 2 Method 3 Method 4 Audio functions Music Library Repeat, Random settings ✓ — ✓ ✓ [LIBRARY] Track data — — — ✓ Playlist — — — ✓ Last playback position — — — ✓ [DVD] All settings —... -
Page 144: Adjusting The Response Positions Of The Touch Panels (Touch Panel Calibration)
Adjusting the Response Posi- Press the MENU button and then touch tions of the Touch Panels [Settings]. The setting menu appears. (Touch Panel Calibration) Touch [Hardware] and then touch [3D If you feel that the touch keys on the screen devi- Calibration Status]. -
Page 145: Positioning Technology
Positioning Technology Press the V button. The adjusted position data is saved. ❒ Do not turn off the engine while saving the The navigation system accurately measures your adjusted position data. current location by combining the positioning by GPS and by Dead Reckoning. ❒... -
Page 146: How Do Gps And Dead Reckoning Work Together
The method of positioning changes as follows ❒ If you use chains on your wheels for winter depending on whether the speed pulse of your driving or put on the spare wheel, errors may vehicle is detected or not: suddenly increase because of difference in wheel diameter. -
Page 147: Handling Large Errors
Handling Large Errors • If a car phone or mobile phone is used near the GPS aerial, GPS reception may be lost tempo- rarily. Positioning errors are kept to a minimum by com- • Do not cover the GPS aerial with spray paint or bining GPS, Dead Reckoning, and map match- car wax, because this may block the reception ing. - Page 148 • If there is another road very nearby, such as in • If you take a ferry. the case of an elevated motorway. • If you are driving on a long, straight road or a gently curving road. • If you take a recently opened road that is not on the map.
- Page 149 • If your vehicle’s wheels spin, such as on a • When you go round a roundabout. rough track or in snow. • When starting driving immediately after start- ing the engine. • If you turn your navigation system on while driving.
-
Page 150: Troubleshooting
While this list is not comprehensive, it should answer your most common problems. If a solution to your problem cannot be found here, con- tact your dealer or the nearest authorised Pioneer service facility. Problems in the screen... - Page 151 Symptom Cause Action (See) Signals from the vehicle’s speed Check that the cables are properly pulse are not being picked up prop- connected. If necessary, consult the erly. dealer that installed the system. The navigation system may not be Check that the navigation system is mounted securely in your vehicle.
- Page 152 The [AV Input] setting is incorrect. Please read the following page and set the setting correctly. ➞ Page 118 The audio skips. The navigation system is not firmly Secure the navigation system firmly. secured. Failure hard disk drive. Consult your Pioneer dealer.
- Page 153 Symptom Cause Action (See) “Rear display” picture disappears. The setting for [REAR SCREEN] is Please read the following page and incorrect. set the rear screen setting correctly. ➞ Page 121 There was a problem with the “Rear Check the “Rear display” and its con- display”...
-
Page 154: Messages And How To React To Them
When What to do Irregular speed pulse signal If the navigation system does not Consult your Pioneer dealer. detected. Please power off the sys- receive the vehicle speed pulse. tem and check the installation. Then, please re-boot the system and press “OK”. - Page 155 Route calculation was not possible. Route calculation has failed because • Change the destination. of a malfunction in map data, soft- • Consult the Pioneer Local dealer if ware, or hardware. this message persists. Route calculation not possible The destination is too far.
- Page 156 Failed to make the route profile. In rare cases, a route calculation • Retry. error may occur. • Consult the Pioneer Local dealer if this message persists. There is no pictures folder. Please Cannot load the image because the Use the appropriate data after read-...
- Page 157 Message When What to do Bluetooth unit error. It is not possible If the Bluetooth unit (sold separately) • Check the connection and retry. to find any mobile phones. is disconnected from this navigation • Establish that connection tempo- system or Bluetooth unit carries out rarily and retry later.
-
Page 158: Messages For Audio Functions
When problems occur in the audio source, a message may appears on the display. Refer to the table below to identify the problem, then take the suggested corrective action. If the error persists, contact your dealer or your nearest PIONEER Service Centre. Built-in DVD drive... -
Page 159: Other Sources
Message When What to do This track cannot be added The Music Library component is abnor- Consult your dealer. to MyMix mal. Name cannot be used for Some invalid characters have been Enter different characters so that the sys- voice recognition. Try again. entered and the system cannot convert tem can pronounce it. -
Page 160: When The Hard Disk Drive Is Disconnected
When the Hard Disk Drive is Dis- Route Setting Information connected Route search specifications If there is no hard disk drive because of repair or Your navigation system sets a route to your desti- service, you can operate only the Radio source nation by applying certain built-in rules to the without the hard disk drive. -
Page 161: Route Highlighting
Roads not used in calculations • In some cases, the route may require you to travel in the opposite direction to your current Even though displayed on screen, the following heading. In such cases, you are instructed to roads are not included in route calculations. turn around, so please turn around safely by •... -
Page 162: Avchd Recorded Discs
ROM discs or DVD-RAM discs. Only DVD-ROM cation.) discs authorised by Pioneer can be read. • Playback of CD-R/CD-RW discs may become • Playback of discs recorded on a personal com- impossible with direct exposure to sunlight,... -
Page 163: About Folders And Mp3 Files
• The folder selection sequence for playback and other operations is the writing sequence used by the writing software. For this reason, the expected sequence at the time of playback may not coincide with the actual playback sequence. However, there also are some writ- ing software that permit the setting of the play- back order. -
Page 164: Glossary
Glossary This stands for Digital Theatre Systems. DTS is a sur- round system delivering multi-channel audio from up to This glossary explains some of the terms used in 6 independent channels. the manual. 3D Hybrid sensor The built-in sensor which enables the system to estimate your vehicle’s position. -
Page 165: Route Setting
ISO9660 format Multi-session This is the international standard for the format logic of Multi-session is a recording method that allows addi- CD-ROM folders and files. For the ISO9660 format, there tional data to be recorded later. When recording data on are regulations for the following two levels. -
Page 166: Voice Guidance
Tracking Marks on the map indicating the route you have trav- elled. TV system (NTSC, PAL, SECAM) Different areas of the world use different TV systems. North America uses NTSC, Europe uses PAL and SECAM, and Australia and New Zealand uses PAL. Almost all are incompatible with each other. -
Page 167: Display Information
Display Information Navigation menu [Destination] menu P.22 P.47, 49 P.47, 49 P.43 P.27 P.47, 49 P.47, 55 P.45 P.26 [Info/Phone] menu P.60 P.64 P.61, 63 P.63 P.61, 65 P.61, 65 P.58... - Page 168 [Map] menu P.40 P.41 P.41 P.42 P.42 P.42 P.42 P.39 P.39 P.39 P.40 P.40 P.40...
- Page 169 [Settings] menu P.67 P.68 P.68 P.68 P.69 P.70 P.70 P.71 P.71 P.67 P.49 P.72 P.73 P.73 P.73...
-
Page 170: Shortcut Menu
Shortcut menu ❒ The shortcuts displayed on screen can be customised. ❒ Items marked with an asterisk (*) can not be removed from the shortcut menu. ➲ Changing a shortcut ➞ Page 40 Shortcut menu : Destination* P. 36 : Route Options* Route Condition P. -
Page 171: [Audio Settings] Menu
Menu in the Audio Screen [Audio Settings] menu P.111 P.113 P.113 P.114 P.114 P.114 P.115 [System Settings] menu (Page 1) P.116 P.117 P.118 P.118 P.119 P.119 P.119 P.120 P.120 [System Settings] menu (Page 2) P.120 P.120 P.120... -
Page 172: Other Voice Commands For Navigation Index
Index Cancel Route 26 CD 78, 90, 120 Numerics CD (CD-DA) 81 10key mode 85 CD-R (-RW) 65, 72, 73 10Key Search 84, 85, 156 CD-TEXT 78, 89 3D detection 70 Chapter 83, 162 3D hybrid mode 144, 152 clock display 120 3D Hybrid Sensor 143, 162 Close Up View 33, 39 Connecting icon 60... - Page 173 Map Colour 42 Genre group 92 Map Legend 41 Genres 92, 94 Map matching 144 GPS 143, 144, 162 Map Menu 20, 39, 166 GPS aerial 69 Map Mode 31 Gracenote® Database 78, 89, 92, 100 Messages 152 Gracenote® Music recognition service 162 Mixed Mode 31 Group 92 mobile phone featuring Bluetooth wireless tech-...
- Page 174 playlist edit mode 96 Steering Remote Control 57, 76, 125 POI 17, 34, 36, 41, 43, 45, 127, 159, 163 Street List Mode 31 POI Search 43, 44, 45, 62 street list screen 24 POI shortcut 45, 48 street name or city name input screen 22 position effect 113 Stylus 142 Power Voltage 69...
- Page 175 TEL: (03) 9586-6300 PIONEER ELECTRONICS OF CANADA, INC. 300 Allstate Parkway, Markham, Ontario L3R OP2, Canada TEL: 1-877-283-5901 PIONEER ELECTRONICS DE MEXICO, S.A. de C.V. Blvd.Manuel Avila Camacho 138 10 piso Col.Lomas de Chapultepec, Mexico, D.F. 11000 TEL:55-9178-4270 Published by Pioneer Corporation.