Table of Contents
Advertisement
Two by One Room Air Conditioner
AB212BCBAA
*
N o .
0010571570
Please read this manual carefully before using
Please keep this manual for future use
CONTENTS
Before Use
************* 3-4
************** 7
Maintenance
*************14-18
Installation of Indoor Unit
*********** 1-2
********** 5-6
************ 8
************ 9
************* 10
******** 11
******** 12
************ 13
*********** 19-20
****** 21
****** 23*36
*
22
Advertisement
Table of Contents

Related Manuals for Haier 10571570


Summary of Contents for Haier 10571570
-
Page 1: Table Of Contents
Two by One Room Air Conditioner AB212BCBAA N o . 0010571570 Please read this manual carefully before using Please keep this manual for future use CONTENTS Before Use Operation Points *********** 1-2 Name of Parts ************* 3-4 Safety Precautions ********** 5-6... - Page 2 There is a pre-set far distance control communication interface on the control panel of indoor unit. After installing the peripheral equipment according to the manual attached with the Haier made far distance control detector, the computer management or other place monitoring can be achieved to the air conditioner.
-
Page 3: Operation Points
There is a pre-set far distance control communication interface on the control panel of indoor unit. After installing the peripheral equipment according to the manual attached with the Haier made far distance control detector, the computer management or other place monitoring... -
Page 4: Operation Points
After finishing defrosting, the air conditioner will automatically resume operation. Hint When the air conditioner is in Heating mode, it absorbs heat from outside and release to indoors. So the outdoor temperature may affect the Heating effect. -
Page 5: Name Of Parts
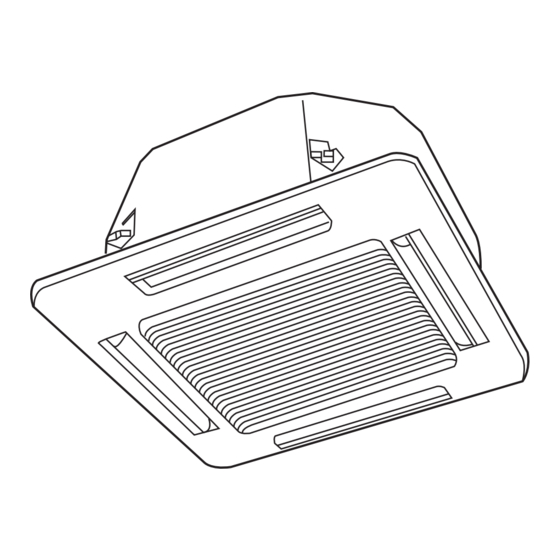
Name of Parts Indoor Unit Air outlet Air filter (inside of air inlet grille) Wire Controller Drain hose Louver Louver (inside of air outlet) Connection pipes and electric wire Air inlet grille AUTO **** **/**... -
Page 6: Name Of Parts
Name of Parts AUTO 1.ON/OFF button Used to turn on/off unit 2.Temperature display 3.Clock display 4.Timer ON/OFF display 5.Humidity display 6.Air filter cleaning display When there is too much dust collected on the air inlet, the wire controller will show this display to remind the user to clean the air inlet. -
Page 7: Safety Precautions
The following safety precautions must be observed. This safety precautions should keep in hand for reference. If the air conditioner is given to a new user, this manual should be attached with unit to the new user. If finding abnormal phenomenon (e.g. - Page 8 Do not put or use any spray near the air conditioner, otherwise it may cause fire. Only after cutting off the power, can the cleaning of the air conditioner be performed to avoid leading to electric shock or injury. Notice...
-
Page 9: Operation Instruction
**** **/** About FAN operation: FAN operation refers the air conditioner does not perform COOLING and HEATING operation, but FAN operation. In this mode, the air conditioner cannot perform AUOT FAN operation, and does show the temperature value on the wire controller. -
Page 10: Auto/Cooling/Dehumidifying/Heating Operation
+ 2*, the unit will operate in mild dehumidifying operation. In Heating operation, after start the unit, the air conditioner will sending warm air a moment later to prevent the cold air blowing out. In Dehumidifying, when the room temperature drops... -
Page 11: Swing Operation
”, the louver of the air conditioner begins automatic swing and air sending. Fixed air sending direction When the Auto SWING of the air conditioner swings to an appropriate angle, press SWING button, the display “ ” on the LCD of the wire controller will disappear, the air sending direction is fixed. -
Page 12: Sleep Function
Operation instruction Before going to bed, you can press the SLEEP button, the air conditioner will operate in comfort sleep mode to make you have a sound sleep. Before using this function, you should calibrate the clock first, otherwise, the SLEEP function will be out of order. -
Page 13: Timer On/Off Function
(referring to page 4). When you wake up in the morning, before going back to home after work or after going to bed, you can let your air conditioner automatically turn on or turn off. 1.Turn on the unit After turning on the unit, set the desired working mode. -
Page 14: Timer On-Off Function
Operation instruction **** **/** 3.Set time Press the time adjusting button Each press, the set time increases 10 minutes. If depress the button, the time will increase rapidly. Each press, the set time decreases 10 minutes. If depress the button, the time will decrease rapidly. -
Page 15: Usersí Attention
The air conditioner can only be used in air conditioning. It can not be used in other purpose. Do not use the air conditioner in some specific purpose, such as storage or protect food, animals, plants, precise instrument and... -
Page 16: Maintenance
Instructions: When not for cleaning, do not dismantle the air filter, otherwise it may cause trouble. When the air conditioner is used in a dusty environment, the air filter should be cleaned more often (generally once every two weeks). 1.Open air inlet grille Pull the two handles at the same time, slowly draw them out. - Page 17 Maintenance Clean the air filter Dismantle the air filter Pull the two side handles at the back of the air inlet grille, lift the air filter to dismantle it. Clean Do not use the hot water over 50* to clean to avoid discoloration or deformation.
- Page 18 Maintenance Clean the air inlet grille Open air inlet grille Pull the two handles at the same time, slowly draw them out. (when closing it, the procedure is reversed.) Remove air filter Referring to “Clean the air filter”. Remove the air inlet grille Open the air inlet grille for 45o, the lift it up.
- Page 19 Use soft dry cloth to clean. If cannot remove the dust, use water or neutral detergent. If the louver of the air conditioner is too dirty, it may be dismantled (as the following described) for cleaning. Dismantle and install louver Fix the louver at the lowest position.
- Page 20 Maintenance Maintenance before and after the using season. Check the following items: If the air inlet and outlet of indoor and outdoor unit are blocked. If the earth wire is proper. If the wire connection is proper. If there is abnormal phenomenon, please ask the after-sale service staffs for help.
-
Page 21: Troubleshooting
In DEHUMIDIFYING operation, when the room temperature is 2 higher than the set temperature, despite of the set FAN SPEED the air conditioner will operate in LOW FAN SPEED. In order to remove the remained heat, after automatic stop, the indoor fan will... -
Page 22: When Troubles Occur
The trouble of water pump After checking the above items and treating the air conditioner, it still cannot normally work, or find the following troubles occur, please stop the unit and cut off power, then contact the after-sales service worker. -
Page 23: Installation Instruction
Install the air conditioner to a place where can definitely stand its weight. The air conditioner can not be installed on a nonmetal bracket (such as theft guard net). Places not firm enough will cause drop down of unit resulting in body hurt. - Page 24 Installation instruction This manual can not include all kinds of conditions, if you have new requirements and questions, please contact with local Haier Sales Center. Before installing the unit, please read this manual carefully. Improper installation may cause accidents and make unit damage or death.
-
Page 25: Installation Procedure ****** 23*36
Installation procedure 1. Before installation [Before finishing installation, do not throw the attached parts installation needs] Confirm the way to move the unit to the installation place. Before moving the unit to the installation place, do not remove their packages. When have to remove the package, use a soft material or protection board with rope to lift the unit assembly to avoid unit damage or bumping a scrape. -
Page 26: Preparation Before Installation
Use M8 or M10 hoisting screw (4, prepare on site) (When the height of hoisting screw is more than 0.9m, you must use M10), their gaps refer to the dimension of air conditioner, according to the original structure and the following method to install. - Page 27 Installation procedure Original cement panel Use the in hole hinge, in hole plug or in hole screw. Directly use angle steel or new angle steel for support. Suspending of indoor unit Adjust the position of screw cap (underside) to make the gap between the attached washer (underside) and the ceiling is 135mm.
-
Page 28: Installation Of Drain Hose
Installation procedure 5 . Refrigerant pipe [The proper thermal insulation must be treated to gas pipe and liquid pipe. If not, it may cause water leakage.] The outdoor unit is not charged with refrigerant. When connecting the pipes to unit or dismantling the pipes from the unit, do proceed as the figure shown, use spanner and torque pincers together. -
Page 29: Install Indoor Unit
Installation procedure The indoor side drain hose and the parts connected with indoor unit should be thermal insulated. Improper thermal insulation may cause dew-forming phenomenon. The drain hose should be as short as possible. The droop slant degree at least should be 1/100 to avoid forming of gas bag. - Page 30 Installation procedure Test of drainage system (a)After finishing the electric work, perform the test to the drainage system. (b)During test, confirm the water flow properly passes the hose and there is no leakage at the joint. (c)If the house is new, perform test before installing ceiling. (d)Even if installing in the season needing to make heating, the test also must be performed.
- Page 31 Installation procedure <The wiring method of the connection of the unit> Connect the unit Remove the electric box cover (1), draw the wire in the rubber lining, use wire clamp A to clamp it together with other wires, and connect the wire of the relative polarity to the inner power terminal block.
-
Page 32: Indoor Unit Wire Connection
Installation procedure 1.Remove the upper cover of wire controller The PC board is installed on the back cover of wire controller. When remove the upper cover, pay attention not to damage PC board. 2.Install wire controller Drill 2 wall holes according to the position of the 2 screw holes on the back cover of wire controller, then hit wood in the wall holes. - Page 33 When the corner cover can slide, dismantle the corner cover (referring to Figure Note: When the air conditioner is under use, the fixing adhesive tape can be removed, not use any longer. 2.The installation of the decorative panel on the indoor unit.
- Page 34 Installation procedure (1)Install decorative panel Temporarily hang the hoisting ring opposite to the louver motor of the decorative panel on the hoisting ring fixing piece (2 pieces) of the indoor unit. Temporarily hang the other 2 hoisting rings on the hoisting ring fixing pieces at the side of the indoor unit (be careful not to stick to wire of the louver motor into the sealing material).
- Page 35 Installation procedure (3)The circuit of the decorative panel Connect the wire end of the louver motor installed on the decorative panel (referring to Figure 7). Side of indoor unit 3.Installation of air inlet grille and corner cover (1)Install the air inlet grille The reversed procedure to the “the preparation of decorative panel”...
- Page 36 Installation procedure 1. Connection of pipe For the specific max length and the max fall of connection pipe, please refer to the manual of outdoor unit. In order to guarantee the efficiency, the pipe should be as short as possible. Daub the refrigerant oil on the joint and the flared nut.
-
Page 37: Electric Wiring
*When connecting the wire of indoor and outdoor unit, check the number on the indoor and outdoor terminal blocks, the same number uses one wire to connect. Incorrect wiring easily damage the controller of the air conditioner, or the unit cannot work normally. - Page 38 Installation procedure Other instruction 1.Power supply The air conditioner must use a special power circuit and special air switch (40A). The wiring should be done by a qualified electrician according to the wiring rules specified by national standard An creepage breaker should be installed.