
Related Manuals for Grundig YB550PE


Summary of Contents for Grundig YB550PE
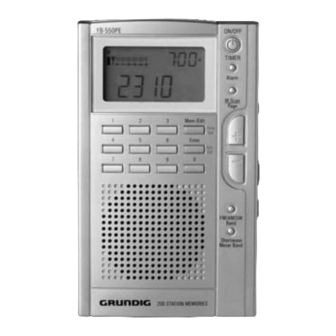
- Page 1 . e t o n c o r p . c o m DESCRIPTIONS AND FUNCTIONS OF FRONT YB550PE O P E R A T I O N M A N U A L A M / F M S H O R T W A V E R A D I O...
- Page 2 YB 550PE OPERATION MANUAL DO YOU NEED HELP? Here’s how to contact us: • From the United States: (800) 872-2228 • From Canada: (800) 637-1648 • From Everywhere Else: (650) 903-3866 • Email: customersvc@etoncorp.com • Internet: www.etoncorp.com...
-
Page 3: Table Of Contents
TABLE OF CONTENTS INTRODUCTION ......7 DIAGRAMS ....... . .8-11 QUICK GUIDE . -
Page 4: Introduction
TABLE OF CONTENTS continued ADDITIONAL INFORMATION ....43 USING THE LIGHT ......43 USING EARPHONES . -
Page 5: Diagrams
DIAGRAMS FRONT Display (1) ON/OFF/ Timer Button (2) Alarm Button (3) Memory Scan/Page Button (4) + Tuning Button (7) Memory/Edit; Time Set (5) Enter; Sys. Set (6) – Tuning Button (8) AM/FM/SW Band Button (9) Shortwave Meter Band Button (10) Numeric Keypad (10A) BACK Stand (20) - Page 6 RADIO OFF DISPLAY Triangle Pointer (23) Antenna Symbol (24) 1-5 Scale (30) Alarm AM/PM Indicator (25) Battery Symbol (31) Clock Digits (28) Time AM/PM Indicator (29) RADIO ON DISPLAY Triangle Pointer (23) Antenna Symbol (24) 1-5 Scale (30) Sleep Timer Symbol (32) Battery Symbol (31)
-
Page 7: Quick Guide
QUICK GUIDE The purpose of this Quick Guide is to enable immediate use of the radio. Please note that it is not a replacement for the Detailed Owner’s Manual, a much more thorough document. Please refer to it for detailed operating instructions, starting on Page 19. - Page 8 QUICK GUIDE continued S E L E C T I N G A S H O RT WAV E M E T E R B A N D The following bands can be selected: 120, 90, 75, 60, 49, 31, 25, 22, 19, 16, 15, 13 and 11 meters.
- Page 9 QUICK GUIDE continued S T O R I N G A F R E Q U E N C Y I N T O M E M O RY 200 frequencies can be stored into 8 pages of memory, each page holding 25 frequencies.
-
Page 10: Detailed Owners Manual
QUICK GUIDE continued D E L E T I N G M E M O R I E S A N D M E M O RY PA G E S To delete a frequency stored in a memory, press/release the M.Scan/Page button, then use the +/- buttons to select the memory preset location of the frequency that you wish to delete. -
Page 11: Selecting And Using An Ac Adaptor
1.3 millimeters. An appropriate adaptor for use in North America is available for purchase from Eton Corporation/Grundig. For details, visit www.etoncorp.com or contact us via phone. Plug it into the DC socket (15), located on the left side of the radio. -
Page 12: Basic Radio Operation
BASIC RADIO OPERATION TURNING ON AND OFF The YB 550PE can be turned on by the two methods shown below. To turn it off, press the ON/OFF-TIMER button 1 . B AT T E RY S AV E R / S L E E P T I M E R M E T H O D : Perform a quick, short press of the ON/OFF-TIMER button (2). -
Page 13: Setting Up Am And Fm Outside Of North America
BASIC RADIO OPERATION continued SETTING UP AM AND FM OUTSIDE OF NORTH AMERICA You can skip this section if you are in North America and just purchased the YB 550PE. It is already set-up in the factory for use in North America. If you travel to other world regions, make the changes below as necessary. -
Page 14: Using Shortwave
USING SHORTWAVE world. If you are completely new to shortwave, or just need a refresher on shortwave basics, please see the SHORTWAVE LISTENING GUIDE that accompanies this product. To get you started, some basics are noted below • Night shortwave reception is almost always better than daytime shortwave. -
Page 15: Autoscan Tuning While In Shortwave
USING SHORTWAVE continued AUTOSCAN TUNING WHILE IN SHORTWAVE In shortwave, autoscan tuning only autoscans in the short- wave frequency ranges noted below in the SHORTWAVE BAND CHART OF AUTOSCANNING RANGES. To tune short- wave frequencies that are in-between these ranges, or out- side of these ranges, use one of the other tuning methods. -
Page 16: Setting The Alarm
CLOCK AND ALARM FEATURES SETTING THE ALARM After setting the alarm time, be sure to read the next section titled ACTIVATING AND DEACTIVATING THE ALARM. The alarm will wake you to the last radio station tuned, unless set for Favorite Station Wake-Up. See Below. The radio will play for 30 minutes, until you turn it off or until you press the SNOOZE/LIGHT button (see USING THE SNOOZE FEATURE, below). -
Page 17: Working With Memory
WORKING WITH MEMORY To store frequencies into memory, it must first be learned how to select memory pages. By factory default, there are 8 pages of memory, each page holding 25 frequencies. This enables storing of 200 frequencies into memory. This default can be changed and tailored to your personal need. -
Page 18: Accessing What Is Stored Into Memory
WORKING WITH MEMORY continued ACCESSING WHAT IS STORED INTO MEMORY Below, the three ways to access what has been stored into memory are described: Direct Memory Access, Memory Search and Memory Autoscan. When the memory page and memory preset numbers appear in the upper right corner of the dis- play, as it will in the sections below, the radio is in MEMORY ACCESS MODE. -
Page 19: Moving A Stored Frequency
WORKING WITH MEMORY continued MOVING A STORED FREQUENCY 1. Turn on the radio. 2. Press/hold the M.Scan/Page button for about 3 seconds and release it. 3. Use the + or – button to select the required memory page. 4. Press/release the M.Scan/Page button twice. 5. -
Page 20: System Set Code Table
SYSTEM SET CODE TABLE Certain functions can be programmed and changed using SYSTEM SET CODES. These functions and their descriptions are noted in the SYSTEM SET CODE TABLE, on Page 41. CHANGING SYSTEM SET CODES To enter a system code of your choice, use the procedure below. -
Page 21: Default Factory System Set Codes
SYSTEM SET CODE TABLE continued DEFAULT FACTORY SYSTEM SET CODES USED FOR NORTH AMERICA When shipped from the factory, the radio is set up as follows. Changes can be made via the SYSTEM SET CODE TABLE and the section titled CHANGING SYSTEM SET CODES, on the pre- vious page •... -
Page 22: Additional Information
SYSTEM SET CODE TABLE continued Check all the segments on LCD display and model no. 28 * Rechargeable battery to be used 1.2 29 * Normal AA battery to be used 1.5 76 * Set the FM frequency range to 76-108MHz (Japan) 88 * Set the FM frequency range to... -
Page 23: Using The Lock Switch
ADDITIONAL INFORMATION USING THE LOCK SWITCH Placing the LOCK switch into the ON position will render all buttons and the FINE TUNING control inoperative. If the radio is turned on while LOCK is on, the volume control is still operative. This is an excellent feature to use when traveling. Before placing the radio into a suitcase, purse or briefcase, turn it off and then lock it. -
Page 24: Reset Procedure
ADDITIONAL INFORMATION O P E R AT E S E R R AT I C A L LY Perform a RESET, as described in the section titled RESET PROCEDURE. S TAT I O N S A R E R E C E I V E D T O O W E A K •... -
Page 25: Major Features Of The Yb 550Pe
ADDITIONAL INFORMATION MAJOR FEATURES OF THE YB 550PE • SHORTWAVE – 1711-29.995 KHz. • FM 87.0 – 108.0MHz; MW 520 – 1710 KHz • Manual and Auto-Scan Tuning • Direct Keypad Frequency Entry • Manual/Auto Scan to scan the preset stations •... -
Page 26: Service Information
SERVICE INFORMATION You may contact the Etón Service Department for additional information: customersvc@etonncorp.com Contact us for a Return Authorization prior to shipping your unit. Should you want to return your unit for service, pack the receiver carefully using the original carton or other suitable container. - Page 27 YB 550PE OPERATION MANUAL SERVICE INFORMATION continued All implied warranties, if any, including warranties of mer- chantability and fitness for a particular purpose, terminate one (1) year from the date of the original purchase. The fore- going constitutes Etón entire obligation with respect to this product, and the original purchaser shall have no other reme- dy and no claim for incidental or consequential damages, losses, or expenses.
- Page 28 w w w . e t o n c o r p . c o m DESCRIPTIONS AND FUNCTIONS OF FRONT From the United States: (800) 872-2228 From Canada: (800) 637-1648 From Everywhere Else: (650) 903-3866 Email: customersvc@etoncorp.com Internet: www.etoncorp.com Etón Corporation 1015 Corporation Way Palo Alto, California 94303...