Table of Contents
Advertisement
Quick Links
Advertisement
Table of Contents

Related Manuals for Grizzly G1010


Summary of Contents for Grizzly G1010
-
Page 1: Instruction Manual
4"x 6" METAL-CUTTING BANDSAW INSTRUCTION MANUAL COPYRIGHT © AUGUST, 2005 BY GRIZZLY INDUSTRIAL, INC. REVISED JULY, 2007 (TR) WARNING: NO PORTION OF THIS MANUAL MAY BE REPRODUCED IN ANY SHAPE OR FORM WITHOUT THE WRITTEN APPROVAL OF GRIZZLY INDUSTRIAL, INC. - Page 2 ���� ������ �������� �������� ������ ������������ �� ��� ������ ������ ���������� ����������� ��� ������� �� ���� ������������������ ������� �� ����� ���������� ��� ������ ��� ������������ ����� �� ���� ������ ��� ������ �� ������� �������� ������� ��������� ����������� ������������� �� ������ ���...
-
Page 3: Table Of Contents
INTRODUCTION ... 3 Foreword ... 3 Contact Info ... 3 Machine Data Sheet ... 4 Identification ... 6 SECTION 1: SAFETY... 7 Safety Instructions for Machinery ... 7 Safety Instructions for Metal-Cutting Bandsaws ... 9 SECTION 2: CIRCUIT REQUIREMENTS ... 10 110/220V Operation ... - Page 4 Blade Guide Bearings ... 34 Maintenance Log ... 35 SECTION 7: SERVICE ... 36 Troubleshooting ... 36 Wiring Diagram G1010 ... 38 Parts Breakdown G1010 ... 39 Parts List G1010 ... 40 Parts Breakdown G1010 ... 41 Parts List G1010 ... 42...
-
Page 5: Introduction
INTRODUCTION Foreword We are proud to offer the Model G1010 4" x 6" Metal-Cutting Bandsaw. This machine is part of a growing Grizzly family of fine metalworking machinery. When used according to the guide- lines set forth in this manual, you can expect years of trouble-free, enjoyable operation and proof of Grizzly’s commitment to customer satis-... -
Page 6: Machine Data Sheet
Customer Service #: (570) 546-9663 · To Order Call: (800) 523-4777 · Fax #: (800) 438-5901 MODEL G1010 4" X 6" METAL CUTTING BANDSAW Product Dimensions: Weight ... 108 lbs. Length/Width/Height ... 38 x 15 x 55 in. Foot Print (Length/Width) ... 29 x 12 in. - Page 7 Serial Number Location ...Machine Label on Body Frame Assembly Time ... 30 minutes Features: Vertical Position Work Table Stop for Stock Wheels for Moving Machine Includes Blade Model G1010 Specifications, while deemed accurate, are not guaranteed. G1010 4" x 6" Metal-Cutting Bandsaw PAGE 2 OF 2...
-
Page 8: Identification
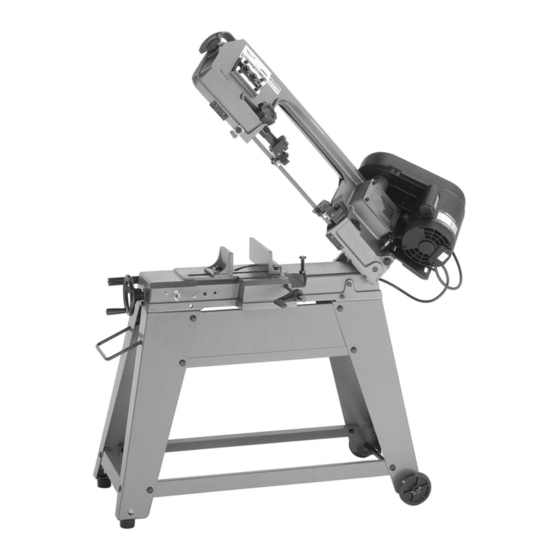
A. Blade Tension Knob B. Guide Post Adjustment Knob C. Blade D. Pulley Cover ⁄ HP Motor Horizontal Stop G. Work Stop H. Wheels Identification Figure 1. Main view of machine features. G1010 4" x 6" Metal-Cutting Bandsaw... -
Page 9: Section 1: Safety
NOT safety glasses. 3. ALWAYS WEAR AN ANSI APPROVED RESPIRATOR WHEN MACHINERY THAT PRODUCES DUST. G1010 4" x 6" Metal-Cutting Bandsaw 4. ALWAYS USE HEARING PROTECTION WHEN MACHINERY. Machinery noise can cause permanent hearing damage. - Page 10 Make sure you know what type of dust you will be exposed to and always wear an approved respirator. ADJUSTING KEYS DAMAGED PARTS LOCK MOBILE BASES USED) BEFORE OPERATING G1010 4" x 6" Metal-Cutting Bandsaw...
-
Page 11: Safety Instructions For Metal-Cutting Bandsaws
Like all machines there is danger associ- ated with the Model G1010. Accidents are frequently caused by lack of familiarity or failure to pay attention. Use this machine with respect and caution to lessen the pos- sibility of operator injury. -
Page 12: Section 2: Circuit Requirements
220V Circuit ... 15 Amp -10- Wiring for 220V The Model G1010 can be rewired to operate on a 220V power source. The motor must be rewired according to the wiring diagram on the motor label. The wiring configuration can also be found on the inside of the motor wire cover, as well as on Page 38. -
Page 13: Grounding
If the plug will not fit the outlet, have the proper outlet installed by a qualified electrician. G1010 4" x 6" Metal-Cutting Bandsaw Extension Cords 110V Operation We do not recommend the use of extension cords. -
Page 14: Section 3: Set Up
• Wrench • Wrench moving The Model G1010 was carefully packed when it left our warehouse. If you discover the machine is damaged after you have signed for delivery, please immediately call Customer Service at (570) 546-9663 for advise. Save the containers and all packing materials for possible inspection by the carrier or its agent. -
Page 15: Inventory
⁄ " ... 2 M. Work Stop ... 1 N. V-Belt ... 1 O. Bracket ... 1 P. Handwheel Handle ... 1 G1010 4" x 6" Metal-Cutting Bandsaw Items not shown: Metal-Cutting Bandsaw ... 1 Blade ⁄ Axle ... 1 Hardware Bag ... -
Page 16: Hardware Recognition Chart
Hardware Recognition Chart -14- G1010 4" x 6" Metal-Cutting Bandsaw... -
Page 17: Machine Data Sheet
Take precautions from this hazard by only using cleaning solvents in a well ventilated area. G1010 4" x 6" Metal-Cutting Bandsaw Site Considerations Floor Load The weight and footprint size for your machine is located in the machine data sheet. Most floors are suitable for your machine. -
Page 18: Stand Assembly
With a pair of pliers, insert a cotter pin through each hole at the end of the axle and bend back one end of the cotter pin to keep the wheel in place. Figure 7. Axle and wheels. G1010 4" x 6" Metal-Cutting Bandsaw ⁄ "... -
Page 19: Mounting
10. With a pair of pliers, insert a cotter pin through each hole at the end of the handle and bend back one end of the cotter pin to secure the handle to the leg. G1010 4" x 6" Metal-Cutting Bandsaw ⁄ " flat washers Components and Hardware Needed: Bandsaw ...1... -
Page 20: Pulley Cover
To install the pulley cover: Slide the pulley cover over the drive-shaft. Align the holes and secure with the two " screws (see Figure 13). 20 x ⁄ Figure 13. Installing pulley cover. G1010 4" x 6" Metal-Cutting Bandsaw ⁄ "-... -
Page 21: V-Belt
⁄ " with moderate pressure when pinched together at the points shown in Figure 16. G1010 4" x 6" Metal-Cutting Bandsaw V-Belt Tension Knob Figure 15. V-belt tension knob. Figure 16. V-belt in place and tensioned. Close the pulley cover. -
Page 22: Vise Handwheel
Position it down and out of the way for longer stock, as shown in Figure 19, or set the work stop to a measured distance from the blade for consistent, repeatable cut lengths. Figure 19. Installing work stop. G1010 4" x 6" Metal-Cutting Bandsaw... -
Page 23: Vertical Assembly
Vertical Assembly The Model G1010 can easily be set up for vertical cutting operations. Components and Hardware Needed: Table ...1 Bracket ...1 Flat Head Screw ⁄ "-20 x ⁄ " ...1 Former Switch Safety Bracket ...1 Hex Nut ⁄ "-20 ...1... - Page 24 "modi- fied" with a hammer or other appropriate implement to fit securely. Safety Bracket Figure 25. Safety bracket. G1010 4" x 6" Metal-Cutting Bandsaw...
-
Page 25: Test Run
—If you need any help with your bandsaw call our Tech Support at (570) 546-9663. Figure 26. ON/OFF switch. G1010 4" x 6" Metal-Cutting Bandsaw Recommended Adjustments The adjustments listed below have been per- formed at the factory. However, because of... -
Page 26: Section 4: Operations
Do not use cutting fluids with this bandsaw. Serious injury could occur. -24- Blade Speed The Model G1010 has these three blade speeds: 80, 120, and 220 FPM. To change blade speeds: UNPLUG THE BANDSAW! Determine the best speed for your cut. The table in Figure 27 is provided as a rough guideline. -
Page 27: Blade Selection
We suggest you do some research for your spe- cific situation so you get the best blade to match your needs. Grizzly is proud to offer a variety of selections that can be found in the current catalog and in ACCESSORIES on Page 28. -
Page 28: Vise
To adjust the blade guides: Loosen the knobs shown in Figure 33 and slide the blade guides as close to the workpiece as possible, then tighten the knobs. Blade Guides Knobs Figure 33. Blade guides. G1010 4" x 6" Metal-Cutting Bandsaw... -
Page 29: Operation Tips
• Adjust the blade guides as close as possible to the workpiece to minimize side-to-side blade movement. G1010 4" x 6" Metal-Cutting Bandsaw Figure 34. Using the work stop. Figure 35. Proper starting position. Figure 36. Using the vertical set-up. -
Page 30: Section 5: Accessories
The Blade Tensioning Gauge ensures long blade life, reduced blade breakage, and straight cutting by indicating correct tension. A precision dial indi- cator provides you with a direct readout in PSI. Figure 39. H5408 Blade Tensioning Gauge. G1010 4" x 6" Metal-Cutting Bandsaw ™... - Page 31 H1300 G7984 H2347 Figure 41. Our most popular safety glasses. G1010 4" x 6" Metal-Cutting Bandsaw H1302—Standard Earmuffs H4979—Deluxe Twin Cup Hearing Protector H4977—Work-Tunes Radio Headset Earmuffs Protect yourself comfortably with a pair of cush- ioned earmuffs. Especially important if you or employees operate for hours at a time.
-
Page 32: Section 6: Maintenance
• Lubricate vise screw. Annual Check: • Lubricate gear box. Cleaning Cleaning the Model G1010 is relatively easy. After using your bandsaw, remove excess chips by sweeping. -30- Lubrication Before applying lubricant to any area, wipe the area clean to avoid contamination. Lubricate the vice screw shown in Figure 44 with general pur- pose grease. -
Page 33: Blade Change
Figure 47, after mounting to the bandsaw. Some blades will have a directional arrow as a guide. G1010 4" x 6" Metal-Cutting Bandsaw Figure 47. Blade cutting direction. When the blade is around both wheels, adjust the position so the back of the blade is against the shoulder of the wheels. -
Page 34: Blade Tracking
(without rubbing), the blade is tracking properly and this adjustment is completed. —If the blade walks away from the shoulder of the wheel or hits the shoulder, repeat Steps 4-7. Replace the blade guard and wheel access cover. G1010 4" x 6" Metal-Cutting Bandsaw... -
Page 35: Blade Tension
Tension Knob Figure 51. Tension knob and blade. G1010 4" x 6" Metal-Cutting Bandsaw Squaring the Blade It is always a good idea during the life of your saw to check and adjust this setting. This adjustment will improve your cutting results and extend the life of your blade. -
Page 36: Blade Guide Bearings
Tighten the nut to lock the bearing in posi- tion. Adjust the other eccentric blade guide bear- ing in the same manner. The backing bear- ing should have a gap between 0.002-0.003" from the back of the blade. Hex Nut G1010 4" x 6" Metal-Cutting Bandsaw... -
Page 37: Maintenance Log
Maintenance Log Maintenance Performed Date Approximate Hours Of Use -35- G1010 4" x 6" Metal-Cutting Bandsaw... -
Page 38: Section 7: Service
SECTION 7: SERVICE This section is provided for your convenience—it is not a substitute for the Grizzly Service Department. If you need help troubleshooting, you need replacement parts, or you are unsure of how to perform the pro- cedures in this section, then feel free to call our Technical Support at (570) 546-9663. - Page 39 3. The blade tension is low. 4. The blade is dull. 5. The blade speed is wrong. G1010 4" x 6" Metal-Cutting Bandsaw CORRECTIVE ACTION 1. Refer to Feed Rate on Page 25, or Changing Blade Speed on Page 24, and adjust as required.
-
Page 40: Wiring Diagram G1010
Switch Wire Figure 55. G1010 Junction box. -38- � � � �� Figure 54. G1010 Wiring diagram. Plug Wire Figure 56. G1010 Capacitor. � ����� ������ � ������ � � �� ���� ���� ������ G1010 4" x 6" Metal-Cutting Bandsaw... -
Page 41: Parts Breakdown G1010
Parts Breakdown G1010 -39- G1010 4" x 6" Metal-Cutting Bandsaw... -
Page 42: Parts List G1010
SWITCH CUT OFF TIP BLADE WHEEL REAR ASSY BLADE WHEEL (REAR) SLIDING PLATE DRAW BLOCK BLADE WHEEL SHAFT PIN 4 X 20 BUSHING HEX BOLT 5/16-18 X 3/4 FLAT WASHER 5/16 BLADE TENSION KNOB SPRING BODY FRAME G1010 4" x 6" Metal-Cutting Bandsaw... -
Page 43: Parts Breakdown G1010
���� ���� ����� ���� ����� ����� ����� �� ���� ���� ���� ���� �� ���� ���� ���� ���� G1010 4" x 6" Metal-Cutting Bandsaw ��� ��� ��� ��� ��� ��� �� ���� �� ���� ���� ���� ���� ���� ���� ���� �����... -
Page 44: Parts List G1010
CARRIAGE BOLT 5/16-18 X 3/4 HEX NUT 5/16-18 HEX BOLT 5/16-18 X 1 FLAT WASHER 5/16 WHEEL ROD RUBBER HD SCR 3/8 X 20 HEX NUT 3/8-16 FLAT WASHER 3/8 MACHINE ID LABEL HEX WRENCH 4MM G1010 4" x 6" Metal-Cutting Bandsaw... -
Page 45: Warranty And Returns
WARRANTY AND RETURNS Grizzly Industrial, Inc. warrants every product it sells for a period of 1 year to the original purchaser from the date of purchase. This warranty does not apply to defects due directly or indirectly to misuse, abuse, negligence, accidents, repairs or alterations or lack of maintenance. -
Page 46: Warranty Card
Do you think your machine represents a good value? Would you recommend Grizzly Industrial to a friend? Would you allow us to use your name as a reference for Grizzly customers in your area? Note: We never use names more than 3 times. - Page 47 FOLD ALONG DOTTED LINE FOLD ALONG DOTTED LINE Send a Grizzly Catalog to a friend: GRIZZLY INDUSTRIAL, INC. P.O. BOX 2069 BELLINGHAM, WA 98227-2069 Name_______________________________ Street_______________________________ City______________State______Zip______ TAPE ALONG EDGES--PLEASE DO NOT STAPLE Place Stamp Here...
- Page 48 Buy Direct and Save with Grizzly Visit Our Website Today And Discover Why • • • – Trusted, Proven and a Great Value! ® Grizzly Is The Industry Leader! ® SECURE ORDERING ORDERS SHIPPED WITHIN 24 HOURS E-MAIL RESPONSE WITHIN ONE HOUR...