Table of Contents
Advertisement
Quick Links
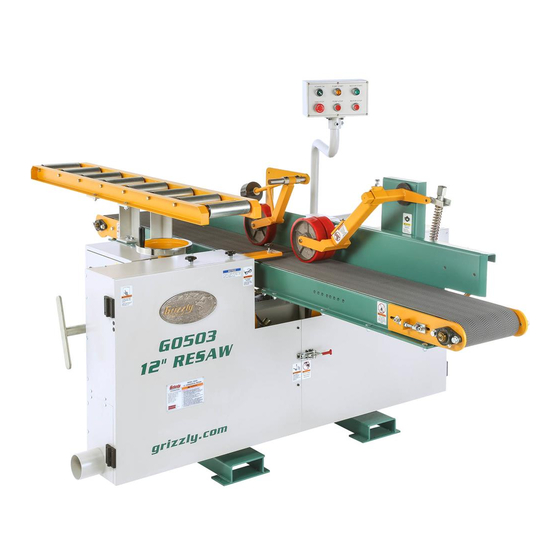
12" HORIZONTAL
RESAW BANDSAW
MODEL G0503
INSTRucTION MANuAL
Copyright © august, 2004 By grizzly industrial, inC., rEVisEd May, 2011 (ts)
WARNING: NO pORTION Of THIS MANuAL MAy BE REpRODucED IN ANy SHApE
OR fORM WITHOuT THE WRITTEN AppROvAL Of GRIZZLy INDuSTRIAL, INc.
(For ModEls ManuFaCturEd sinCE 12/08) #Ew6190 printEd in taiwan
Advertisement
Table of Contents

Related Manuals for Grizzly G0503


Summary of Contents for Grizzly G0503
-
Page 1: Instruction Manual
RESAW BANDSAW MODEL G0503 INSTRucTION MANuAL Copyright © august, 2004 By grizzly industrial, inC., rEVisEd May, 2011 (ts) WARNING: NO pORTION Of THIS MANuAL MAy BE REpRODucED IN ANy SHApE OR fORM WITHOuT THE WRITTEN AppROvAL Of GRIZZLy INDuSTRIAL, INc. - Page 2 This manual provides critical safety instructions on the proper setup, operation, maintenance, and service of this machine/tool. Save this document, refer to it often, and use it to instruct other operators. Failure to read, understand and follow the instructions in this manual may result in fire or serious personal injury—including amputation, electrocution, or death.
-
Page 3: Table Of Contents
Foreword ... 3 Contact info ... 3 identification ... 4 Control panel... 6 g0503 Machine data sheet ... 7 SEcTION 1: SAfETy ... 8 safety instructions for Machinery ... 8 additional safety instructions for resaws ... 10 additional safety instructions for hydraulics ... 11 SEcTION 2: cIRcuIT REQuIREMENTS ... - Page 4 V-Belt tensioning ... 48 replacing V-Belts ... 48 rewiring to 440V ... 49 Maintenance log ... 51 parts Breakdown and list ... 52 troubleshooting ... 68 service log ... 69 warranty and returns ... 70 Model g0503 (Mfg. since 12/08)
-
Page 5: Introduction
Your Machine For your convenience, we post all available man- uals and manual updates for free on our website at www.grizzly.com. Any updates to your model of machine will be reflected in these documents as soon as they are complete. -
Page 6: Identification
D. control panel—Controls power to the main motor and the hydraulic motor. For more details, see page 6. E. 4" Dust port—allows the resaw to be con- nected to a dust collection system. Model g0503 (Mfg. since 12/08) - Page 7 K. Hydraulic conveyor Motor—utilizes the hydraulic fluid flow from the hydraulic pump drive motor to move the conveyor belt. Model g0503 (Mfg. since 12/08) L. Head Elevation Handwheel—Moves the head (the part of the saw that contains the wheels and blade) up or down as needed.
-
Page 8: Control Panel
MOTOR STOp Button—stops the main motor. control panel figure 3. Control panel close-up. D. MOTOR START Button—starts the main motor and the saw blade. E. puMp START Button—starts the hydraulic pump motor. pOWER ON Button—Connects power to both motors. Model g0503 (Mfg. since 12/08) -
Page 9: G0503 Machine Data Sheet
Customer service #: (570) 546-9663 • to order Call: (800) 523-4777 • Fax #: (800) 438-5901 Model G0503 12" Horizontal Resaw Bandsaw design type ... horizontal Floor Model Overall Dimensions: Conveyor table ...12"w x 107"d height From Floor to table ...35 height From Floor to Back roller ...46... -
Page 10: Section 1: Safety
6. NEvER OpERATE MAcHINERy WHEN TIRED, OR uNDER THE INfLuENcE Of OpERATING DRuGS OR ALcOHOL. Be mentally alert at all times when running machinery. OpERATING MAcHINERy. Model g0503 (Mfg. since 12/08) - Page 11 15. MAINTAIN MAcHINERy WITH cARE. Keep blades sharp and clean for best and safest performance. Follow instructions for lubricating and changing accessories. Model g0503 (Mfg. since 12/08) 16. MAKE SuRE GuARDS ARE IN pLAcE AND WORK cORREcTLy BEfORE uSING MAcHINERy.
-
Page 12: Additional Safety Instructions For Resaws
Like all machines there is danger associ- ated with the Model G0503. Accidents are frequently caused by lack of familiarity or failure to pay attention. use this machine with respect and caution to lessen the pos- sibility of operator injury. -
Page 13: Additional Safety Instructions For Hydraulics
Model g0503 (Mfg. since 12/08) cHEcKING fOR LEAKS. use a piece of cardboard to check for suspected hydrau- lic leaks. pressurized hydraulic fluid may cause injection injuries and can be extreme- ly hot. -
Page 14: Section 2: Circuit Requirements
Model g0503 is prewired for 220V 3-phase operation. Amperage Draw the Model g0503 has a 20 hp main motor and a 2 hp hydraulic pump motor that will draw the following amps at 220V 3-phase: Main Motor ...48 amps hydraulic pump Motor ... -
Page 15: Phase Converter
Model g0503 (Mfg. since 12/08) Grounding in the event of an electrical short, grounding reduces the risk of electric shock by providing a path of least resistance to disperse electric cur- rent. -
Page 16: Section 3: Set Up
Model g0503 left our warehouse in a care- fully built crate. if you discover the machine is damaged after you have signed for delivery, please immediately call Customer Service at (570) 546-9663 for advice. -
Page 17: Hardware Recognition Chart
Hardware Recognition chart -15- Model g0503 (Mfg. since 12/08) -
Page 18: Items Needed For Set Up
-16- clean up the wheels and the blade guides of the Model g0503 are coated with a light coat of grease to protect them from corrosion during shipment. remove the blade guard for complete access to the blade guides and clean off the protective coating with a solvent or citrus-based degreaser such as grizzly’s g7895 degreaser shown on... -
Page 19: Site Considerations
Site considerations floor Load the Model g0503 weighs 1870 lbs. and has a base footprint of 40"w x 39 ⁄ "l. the floor where this machine will be installed must be level and structurally sound. Most commercial floors are suitable for your machine. some floors may require additional reinforcement. -
Page 20: Mounting Resaw To The Floor
8. Conveyor belt placement. lift the conveyor belt onto the resaw body as shown in the lower half of figure 8. The conveyor belt is very heavy. Seek assistance or use power equipment to mount the conveyor belt. Model g0503 (Mfg. since 12/08) -
Page 21: Attaching The Hydraulics
10. Conveyor washer/nut placement. re-install the blade guard in the wheel hous- ing. Model g0503 (Mfg. since 12/08) Attaching the Hydraulics Tools Needed wrench/socket 19mm ... 1 wrench/socket 17mm ... 1 the hydraulic hoses and fittings are capped for protection during shipping and labeled with an "a"... -
Page 22: Installing The Blade Cover
19mm wrench. figure 13. head elevation handwheel. Model g0503 (Mfg. since 12/08) -
Page 23: Positioning The Control Panel
15, and tighten the cap screws shown in figure 14. figure 15. Control panel positioning. Model g0503 (Mfg. since 12/08) Mounting the Return Rollers Tools Needed wrench/socket 17mm ... 1 To mount the return rollers: remove all four bolts shown in figure 16. -
Page 24: Connecting To The Dust Collector
19. figure 19. positioning blade for installation. Model g0503 (Mfg. since 12/08) These instructions present a serious injury hazard if done while the machine is connected to power. - Page 25 ⁄ the wheel as illustrated in figure 21. figure 21. illustration of proper blade position. Model g0503 (Mfg. since 12/08) 8. turn the wheels clockwise by hand. " over the edge of hand tighten the handle until the set plate comes in contact with the sleeve shown in figure 22.
-
Page 26: Connecting To Power
Shut off the main power at the power source circuit breaker. Connect the conduit to the shut off lever box and the bottom of the electrical panel. install the power wires to the disconnect switch. Model g0503 (Mfg. since 12/08) -
Page 27: Test Run
EMg stop switch (shown in figure 24) clockwise until it pops up. figure 24. power switches. Model g0503 (Mfg. since 12/08) 4. turn the powEr on switch (shown in figure 24) clockwise. 5. press the Motor start button and imme- diately press the EMg stop button. -
Page 28: Blade Tension
27. Blade tensioning handle. until the fluttering stops, then increase the tension an additional quarter turn. tension until it begins to flutter, then re-ten- sion until it stops fluttering, then increase the tension an additional quarter turn. NOTICE Model g0503 (Mfg. since 12/08) -
Page 29: Section 4: Operations
OMMEND that you read books, trade maga- zines, or get formal training before using this machine. Regardless of the content in this section, Grizzly Industrial will not be held liable for accidents caused by lack of training or knowledge. Model g0503 (Mfg. since 12/08) -
Page 30: Blade Height
Blade Elevation Gauge on page 43 for adjustment instructions. -28- conveyor controls the Model g0503 features a variable speed infeed conveyor to move lumber through the blade. slow the conveyor speed to get a smooth cut on hard wood, and speed it up for softer woods. -
Page 31: Pressure Rollers
31, center the pressure roll- ers on the workpiece, then retighten the bolt and jam nut. Model g0503 (Mfg. since 12/08) figure 31. pressure roller adjustments. rotate the height adjustment nut to raise or lower the infeed pressure roller. -
Page 32: Resawing
Always de-tension blade after use. Bandsaw blades will last longer and stretch less if de- tensioned after each use. NOTICE guide roller through the bandsaw. NOTICE Model g0503 (Mfg. since 12/08) -
Page 33: Blade Information
Blade Information the Model g0503 is a specialized machine that requires specialized blades. grizzly industrial has selected a series of blades for optimum per- formance on this machine. the only variables when selecting a blade are the type of cutting tooth and the number of teeth-per-inch (tooth pitch). -
Page 34: Section 5: Accessories
CFC’s. spray. ® figure 38. g7895 Citrus degreaser. T-9 12 oz Spray ® T-9 4 oz Spray ® figure 37. Boeshield t-9 spray. ® Model g0503 (Mfg. since 12/08) - Page 35 Lenox Blades ® replacement blades for the Model g0503 horizontal resaw Bandsaw. MODEL TypE WIDTH H4874 Carbon 1" H4875 Carbide tip 1" H4876 Carbide tip 1" figure 39. lenox bandsaw blade. ® H5408—Blade Tensioning Gauge the Blade tensioning gauge ensures long blade life, reduced blade breakage, and straight cutting by indicating correct tension.
- Page 36 Kit this kit allows the Model g0503 to run on 440V power. 440V power offers better start capacity, cooler motor operation, and increased motor life. figure 43. 440V overload relay. H2499—Small Half-Mask Respirator H3631—Medium Half-Mask Respirator H3632—Large Half-Mask Respirator H3635—cartridge filter pair p100...
-
Page 37: Section 6: Maintenance
Model g0503 (Mfg. since 12/08) Miscellaneous disconnect always be aware of the condition of your machine. -
Page 38: Greasing
G0503 GREASE SCHEDULE/CHECK-OFF CHART Main Wheels Blade Tension Slide conveyor Elevation Shaft Elevation Gear Tension Handle -36- figure 47. lubrication points. (see fig. 47 for fitting locations) 4,5,6 Model g0503 (Mfg. since 12/08) -
Page 39: Hydraulic Fluid Schedule
Model g0503 (Mfg. since 12/08) Hydraulic System Minor Service the hydraulic system minor service consists of... -
Page 40: Hydraulic System Major Service
3. thoroughly clean the area around the filter to prevent contamination of the hydraulic fluid. 4. remove the filter shown in figure 49. replacement filter kits can be ordered from grizzly industrial using part number p0503B74. hydraulic Fluid Filter Filter pressure gauge figure 49. -
Page 41: Wheel Scrapers
This will take approximately 14 gallons. Model g0503 (Mfg. since 12/08) the wheel scrapers ride directly on the wheels removing dust and shavings. the constant motion of the wheels cause the scrapers to wear down. -
Page 42: Section 7: Service
(570) 546-9663. - Page 43 —if the wheels are not aligned, determine which direction they need to move in order to be correct, then proceed to step 9. Model g0503 (Mfg. since 12/08) Vertical loosen the jam nuts on the tracking adjust- ing bolts and loosen the lock bolts. (see...
-
Page 44: Adjusting The Blade Guides
10. test the alignment as described in step 1. Continue to make adjustments until the guide block no longer touches the blade. 11. repeat the previous steps for the other guide block. rotation adjustment Bolts Model g0503 (Mfg. since 12/08) -
Page 45: Adjusting The Support Wheel
Move the adjustment shaft up or down until the blade contacts the support wheel in a new place. Model g0503 (Mfg. since 12/08) Tools Needed wrench/socket 17mm ... 1 Calipers ... 1... -
Page 46: Adjusting Main Conveyor Table
(see figure 60). Conveyor Mounting Bolts Conveyor adjustment figure 60. Conveyor table mounting and adjustment bolts. Model g0503 (Mfg. since 12/08) Bolts... - Page 47 —if the measurements are close to correct, but need fine tuning, continue to step 6. —if large adjustments are necessary, repeat steps 3 and 4. Model g0503 (Mfg. since 12/08) To adjust the conveyor table front to back: Disconnect the resaw from the power source! place two flat bars of wood or metal under the conveyer belt as shown in figure 62.
-
Page 48: Tracking Conveyor
7. tighten the rear adjustment nuts against the bracket plates, then tighten the front adjust- ment nuts against the bracket plates to make sure that the tracking adjustment will not slowly change during normal operation. Model g0503 (Mfg. since 12/08) -
Page 49: Replacing Conveyor
Remembering this number is an important part of the re-assembly pro- cess. Model g0503 (Mfg. since 12/08) 6. slide the roller brackets toward the body of the resaw to loosen the belt. 7. remove the stiff cable from the center of the seam to separate the conveyor belt. -
Page 50: V-Belt Tensioning
V-belts that connect the motor to the wheel pulley. tension the new V-belts and replace the drive wheel. Each wheel weighs 175 lbs. Seek assistance or use power equipment to remove wheels. Model g0503 (Mfg. since 12/08) -
Page 51: Rewiring To 440V
1) wiring the voltage transformer, 2) rewiring the main motor and the hydraulic pump motor, and 3) replacing the over-load relays with the relays included in the Model g0503 440V Conversion Kit (item #p0503909) that is sold separately. - Page 52 FOR 220V NO NO NC NC 20HP MAIN MOTOR PUMP MOTOR PUMP/START MOTOR/STOP L3 NO NO NC 220V 440V LC1D096 TRANSFORMER 220V 210V NO NC T3 NO 5A FUSE 5A FUSE POWER ON PUMP/STOP Model g0503 (Mfg. since 12/08) EMG STOP...
-
Page 53: Maintenance Log
Maintenance Log Maintenance performed Date Approximate Hours Of use -51- Model g0503 (Mfg. since 12/08) -
Page 54: Parts Breakdown And List
102 103 -52- Model g0503 (Mfg. since 12/08) - Page 55 Model g0503 (Mfg. since 12/08) -53-...
- Page 56 -54- Model g0503 (Mfg. since 12/08)
- Page 57 Model g0503 (Mfg. since 12/08) -55-...
- Page 58 -56- Model g0503 (Mfg. since 12/08)
- Page 59 Motor Components 601A-3 601A-1 601A 601A-2 -57- Model g0503 (Mfg. since 12/08)
- Page 60 -58- Model g0503 (Mfg. since 12/08)
- Page 61 Model g0503 (Mfg. since 12/08) -59-...
- Page 62 -60- Model g0503 (Mfg. since 12/08)
- Page 63 B68-1 B68-3 B71-1 B68-2 B71-2 B68-4 B71-3 B71-4 -61- Model g0503 (Mfg. since 12/08)
- Page 64 I-ON 75 AMP A01-1 -62- L1 L2 21NC 13NO LC1 D50 LC1D096 14NO T1 T2 22NC LR3D 126 5.5-8A LR3 D33 48-65A NO NO NC NC Model g0503 (Mfg. since 12/08)
- Page 65 MOTOR/START PUMP/START POWER ON MOTOR/STOP PUMP/STOP EMG STOP -63- Model g0503 (Mfg. since 12/08)
- Page 66 Bolt 3/4-10 X 3 plw10 loCK washEr 3/4 pw13 Flat washEr 3/4 pCB21M CarriagE Blt M12-1.75 X 40 p0503235 BEaM platE p0503248 platE B p0503301 right door pB08M hEX Bolt M6-1 X 20 pw03M Flat washEr 6MM Model g0503 (Mfg. since 12/08)
- Page 67 Flat washEr 8MM plw04M loCK washEr 8MM pn02M hEX nut M10-1.5 pB32M hEX Bolt M10-1.5 X 25 Model g0503 (Mfg. since 12/08) pART # DEScRIpTION pCB24M CarriagE Bolt M10-1.5 X 30 p0503418 BladE guidE right adJ pw06M Flat washEr 12MM pn09M hEX nut M12-1.75...
- Page 68 BEaring BraCKEt pw04M Flat washEr 10MM plw06M loCK washEr 10MM p0503817 Front rollEr support psB14M Cap sCrEw M8-1.25 X 20 plw04M loCK washEr 8MM pw01M Flat washEr 8MM p0503821 spaCEr psB120M Cap sCrEw M12-1.75 X 120 Model g0503 (Mfg. since 12/08)
- Page 69 220V lr3 d126 a15a p0503a15a rElay 440V lr3 d086 p0503a16 tErMinal BloCK a17a p0503a17a 440V ConVErsion Kit Model g0503 (Mfg. since 12/08) pART # DEScRIpTION p0503B47 hydrauliC tanK p0503B48 oil diVErtEr p0503B49 hydrauliC prEssurE gaugE p0503B50 hydrauliC hosE 3/8 X 67”...
-
Page 70: Troubleshooting
38. above and then perform a hydraulic system major service as described on page 38. described on page 38 minor service as described on page 37. if necessary. Model g0503 (Mfg. since 12/08) -
Page 71: Service Log
Service Log Maintenance performed Date Approximate Hours Of use -69- Model g0503 (Mfg. since 12/08) -
Page 72: Warranty And Returns
Warranty and Returns grizzly industrial, inc. warrants every product it sells for a period of 1 year to the original purchaser from the date of purchase. this warranty does not apply to defects due directly or indirectly to misuse, abuse, negligence, accidents, repairs, alterations or lack of maintenance. - Page 73 ___yes would you recommend grizzly industrial to a friend? ___yes would you allow us to use your name as a reference for grizzly custom- ers in your area? Note: We never use names more than three times. ___yes Comments:____________________________________________...
- Page 74 Fold along dottEd linE Fold along dottEd linE send a grizzly Catalog to a friend: GRIZZLy INDuSTRIAL, INc. p.O. BOX 2069 BELLINGHAM, WA 98227-2069 name_______________________________ street_______________________________ City______________state______zip______ tapE along EdgEs--plEasE do not staplE place stamp here...
- Page 76 Buy Direct and Save with Grizzly – Trusted, Proven and a Great Value! ® ~Since 1983~ Visit Our Website Today For Current Specials! ORDER 24 HOURS A DAY! 1-800-523-4777...