Table of Contents
Advertisement
Quick Links
Advertisement
Table of Contents

Related Manuals for Grizzly G0504


Summary of Contents for Grizzly G0504
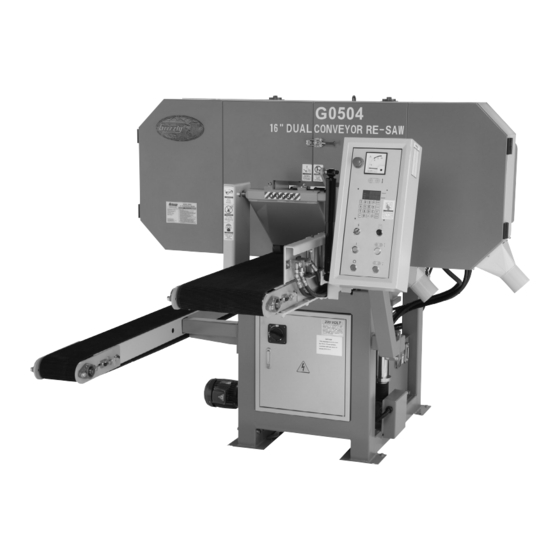
- Page 1 16" HORIZONTAL RESAW BANDSAW Owner's Manual COPYRIGHT © MAY, 2003 BY GRIZZLY INDUSTRIAL, INC. REVISED MARCH, 2007. WARNING: NO PORTION OF THIS MANUAL MAY BE REPRODUCED IN ANY SHAPE OR FORM WITHOUT THE WRITTEN APPROVAL OF GRIZZLY INDUSTRIAL, INC. #TR5063 PRINTED IN TAIWAN...
- Page 2 ���� ������ �������� �������� ������ ������������ �� ��� ������ ������ ���������� ����������� ��� ������� �� ���� ������������������ ������� �� ����� ���������� ��� ������ ��� ������������ ����� �� ���� ������ ��� ������ �� ������� �������� ������� ��������� ����������� ������������� �� ������ ���...
-
Page 3: Table Of Contents
Table of Contents SECTION 1: GENERAL INFORMATION ... 3 Commentary ... 3 Machine Data Sheet ... 4 SECTION 2: SAFETY... 5 Additional Safety Instructions for Bandsaws ... 7 Additional Safety Instructions for Hydraulics ... 8 SECTION 3: CIRCUIT REQUIREMENTS ... 9 3-Phase Power ... - Page 4 About Service ... 35 Adjusting Lower Blade Guides ... 35 Adjusting V-Belt Tension ... 36 Replacing V-Belts ... 37 Adjusting Main Conveyor Table ... 37 Tracking Conveyors ... 38 Replacing Conveyors ... 39 Blade Tracking and Wheel Alignment ... 41 Troubleshooting ...
-
Page 5: Section 1: General Information
Grizzly’s commitment to customer satisfaction. We are also pleased to provide this manual for the Model G0504. It was written to guide you through assembly, review safety considerations, and cover general operating procedures. It repre- sents our latest effort to produce the best docu- mentation possible. -
Page 6: Machine Data Sheet
Minimum Workpiece Length ...16" L Distance From Blade to Conveyor Table ... Saw Wheel Diameter ... Ø28" x Saw Blade Size ...180" L x 1" W x .035" T (.063 kerf) Saw Blade Speed ... 7300 FPM Feed Conveyor Belt Size ... 15 Return Conveyor Belt Size ... -
Page 7: Section 2: Safety
��������� ���� �������� ������ ����� ����� ���� ������ ������� ������������ ���������� G0504 16" Horizontal Resaw Bandsaw ��������� �� ���������� ��������� ��������� ������ �� ��� �������� ���� ������ �� ����� �� ������� ������� ��������� � ����������� ��������� ��������� ������ �� ��� ��������... - Page 8 ��� ������� ���� ��� �� ���������� ��� ���� ������������ �������� ��� ������� ���� ������������������������������������������� ���� ����� ��� ����� ���� ���� �������� ��� ���� �������������������������������������������� ������������������ ��������� ���� ��� ������� ����� �������� ��� ����� ���� ������ ����� ����� ������ ��������� G0504 16" Horizontal Resaw Bandsaw ���...
-
Page 9: Additional Safety Instructions For Bandsaws
SMOOTHLY. DO NOT change conveyor speeds during a cut. Like all machines there is danger associ- ated with the Model G0504. Accidents are frequently caused by lack of familiarity or failure to pay attention. Use this machine with respect and caution to lessen the pos- sibility of operator injury. -
Page 10: Additional Safety Instructions For Hydraulics
AROUND ONLY USE HIGH PRESSURE HYDRAU- LIC HOSE AND STEEL HYDRAULIC FITTINGS WHEN REPLACING COM- PONENTS IN THE HYDRAULIC SYS- TEM. DO NOT use brass or aluminum. G0504 16" Horizontal Resaw Bandsaw HYDRAULIC HYDRAULIC... -
Page 11: Section 3: Circuit Requirements
DO NOT allow power to the machine until instructed to do so. Amperage Draw The Model G0504 features a 220/440V motor that is prewired for 220V and draws the following amps under maximum load: Motor Draw at 220V ... 62.2 Amps Motor Draw at 440V ...31.1 Amps... -
Page 12: Grounding
1) wiring the voltage transformer, 2) replacing the overload relays with those provided in the G0504 440V conversion kit, and 3) rewiring the main motor and the elevation motor. A quali- fied electrician must inspect all electrical modifi- cations before connecting to power. - Page 13 �� �� �� Figure 6. Elevation motor 440V wiring. G0504 16" Horizontal Resaw Bandsaw Replace the main motor relay (LR3D-3359 48/65A) with the relay from kit (LR3D-3355 30/40A) and set the dial to “33.” Replace any wire duct covers and motor wir-...
-
Page 14: Section 4: Machine Features
The control panel also houses a load meter that allows the operator to monitor the load being placed on the resaw during operation. For more details, see Page 14. G0504 16" Horizontal Resaw Bandsaw... - Page 15 10. Hydraulic Tank—Holds and cools the hydraulic fluid for the hydraulic system. G0504 16" Horizontal Resaw Bandsaw 11. Return Conveyor—Allows the person receiving the newly cut board to return it to the operator without walking around the saw.
-
Page 16: Control Panel
2" in the A memory key. After cutting down each piece, press A to return to the starting height. G0504 16" Horizontal Resaw Bandsaw ⁄ " boards from a 5" board, ⁄... -
Page 17: Section 5: Set Up
Wear during the entire set up process! Unpacking The Model G0504 is shipped from the manu- facturer in a carefully built crate. If you discover the machine is damaged after you have signed for delivery, please immediately call Customer Service at (570) 546-9663 for advice. -
Page 18: Hardware Recognition Chart
Hardware Recognition Chart -16- G0504 16" Horizontal Resaw Bandsaw... -
Page 19: Clean Up
G0504 16" Horizontal Resaw Bandsaw Site Considerations DO NOT smoke Floor Load: The Model G0504 represents a large weight load. Most commercial floors are suitable for your machine. Some resi- dential floors may require additional build up to support both the machine and operator. -
Page 20: Removing Resaw From Crate Pallet
Removing Resaw from Crate Pallet The Model G0504 is a heavy weighs 3300 lbs. Serious per- sonal injury may occur if safe moving methods are not followed. To be safe, you will need assistance and power equipment when moving the ship-... -
Page 21: Installing & Tensioning Blade
Figure 13. Blade positioned between blade guides. G0504 16" Horizontal Resaw Bandsaw 5. Position the blade on the wheels so that the tooth gullet is approximately edge of the wheel, as shown in Figure 14. -
Page 22: Adjusting Blade Guides
Adjusting Blade Guides These instructions are hazardous if done while the machine is connect- ed to power. Disconnect power during this entire procedure! G0504 16" Horizontal Resaw Bandsaw... - Page 23 Remove the dollar bill. Repeat Steps 1-4 with the blade guide on the other side of the conveyor. G0504 16" Horizontal Resaw Bandsaw Support Bearing The support bearing is positioned behind the blade to brace it from pushing backwards during a cut.
-
Page 24: Connecting To Dust Collector
Figure 20. Dust hose connected to dust port. -22- Connecting to Power Source If you have performed all of the previous set up instructions, the resaw can now be connected to the power source by a qualified electrician. G0504 16" Horizontal Resaw Bandsaw... -
Page 25: Test Run
Turn the POWER ON switch (shown in Figure 21) clockwise. Figure 21. POWER ON switch. G0504 16" Horizontal Resaw Bandsaw 6. Press the UP and DOWN buttons to make sure the resaw head moves in the proper direction. -
Page 26: Section 6: Operations
-24- Conveyor Controls The Model G0504 features an infeed conveyor and a return conveyor. The speed and engage- ment controls of the conveyors are controlled by the conveyor control lever. The farther the control lever is pushed forward, the faster the conveyors will move. -
Page 27: Setting Blade Height
⁄ ", press 7, 5. After the blade height has been entered, press the START key. G0504 16" Horizontal Resaw Bandsaw Calibrating Digital Display The digital display indicates the distance between the conveyor table and the bottom face of the bandsaw blade. -
Page 28: Setting Memory Button
Note—To stop a stored memory preset from moving to its stored height, press the STOP key on the key pad AFTER you have pressed the memory preset key (A in this example). G0504 16" Horizontal Resaw Bandsaw... -
Page 29: Resawing
Begin feeding the workpiece under the front pressure rollers with the jointed edge against the guide rollers, as shown in Figure 23. G0504 16" Horizontal Resaw Bandsaw Figure 23. Feeding the workpiece through the bandsaw. 10. Watch the load meter (Figure 24) at the top of the control panel. -
Page 30: Blade Information
Blade Information Blade choices are limited due to the specialized nature of the Model G0504. The only variables when selecting a blade are the type of cutting tooth and the number of teeth-per-inch (Tooth Pitch). Blade Tooth Type Carbon Steel—The least expensive type, car- bon steel blades are adequate for most cutting applications;... -
Page 31: Accessories
You can't be too careful when it comes to shop safety! H1300 H2347 Figure 27. Our most popular safety glasses. G0504 16" Horizontal Resaw Bandsaw H6175—Power Respirator H6892—3M Pre-Filter, 10-Pack H6893—Filter Cartridge, 10-Pack Say goodbye to foggy safety glasses and labored breathing, this battery powered respirator sup- plies a constant breeze of fresh air all day long. -
Page 32: Section 7: Maintenance
All bearings are standard sizes, and replacements can be purchased from our parts department or a bearing supply store. V-Belts Bearings G0504 16" Horizontal Resaw Bandsaw... -
Page 33: Grease Fittings
Wipe clean and lubricate the grease fittings with two pumps of high-temp bearing grease. The proper greasing intervals are indicated by the boxes on the chart below. Note—This page was designed to be copied and used as a check-off chart to help maintain a regular lubrication schedule. G0504 16" Horizontal Resaw Bandsaw -31-... -
Page 34: Hydraulic Fluid Schedule
-32- G0504 16" Horizontal Resaw Bandsaw... -
Page 35: Hydraulic System Major Service
Correct the component that is causing thermal breakdown and perform a major service. G0504 16" Horizontal Resaw Bandsaw Hydraulic System Major Service The hydraulic system major service consists of performing a complete “Minor Service,” draining the old hydraulic fluid, cleaning the tank screen, cleaning the tank, and adding new fluid. - Page 36 Figure 33. Access plate removed from tank. Remove the tank screen, clean it with solvent and compressed air, and allow it to dry. (Re- install the tank screen AFTER you clean the bottom of the tank.) -34- G0504 16" Horizontal Resaw Bandsaw...
-
Page 37: Section 8: Service Adjustments
This section is provided for your convenience— it is not a substitute for the Grizzly Service Department. If any adjustments arise that are not described in this manual, then feel free to call the Grizzly Technical Support at (570) 546-9663. -
Page 38: Adjusting V-Belt Tension
On the Model G0504 there is a triple-drive V-belt system that connects the motor to the wheel pulley and a single-drive V-belt system that con- nects the wheel pulley to the hydraulic pump (Figure 35). -
Page 39: Replacing V-Belts
Matching sets can be identified by the batch number on the belt—NOT to be confused with the size markings of the belt. 7. Tension the newly installed V-belts. G0504 16" Horizontal Resaw Bandsaw Adjusting Main Conveyor Table The main conveyor table height can be adjusted left-to-right and front-to-back to make the table parallel to the blade in both directions. -
Page 40: Tracking Conveyors
— If the tracking was not corrected by this adjustment, proceed to Step 5. If the tracking was corrected, skip to Step 6. G0504 16" Horizontal Resaw Bandsaw ⁄ of a turn. Do... -
Page 41: Replacing Conveyors
G0504 16" Horizontal Resaw Bandsaw Replacing Conveyors Although the conveyor belts have slight differenc- es in size and access, the replacement instruc- tions are the same. - Page 42 Disconnect the resaw from the power source! Loosen the roller bracket (see Figure 42) by turning the roller bracket cap screws turn. Roller Bracket Cap Screws Figure 42. Roller bracket cap screws and adjustment nuts. -40- ⁄ of a G0504 16" Horizontal Resaw Bandsaw...
-
Page 43: Blade Tracking And Wheel Alignment
Blade Tracking and Wheel Alignment Blade tracking on the Model G0504 consists of adjusting the wheels to be nearly coplanar (coplanar=both wheels even and parallel), but having the outside edge of the wheel approxi- mately 0.020"-0.040" behind the inside edge of the wheel to compensate for wheel toe-in when the blade is fully tensioned. - Page 44 Look at the backside of the wheel guard and learn the controls shown in Figures 47 & 48 by reading the text that follows. Figure 47. Tension wheel adjustment bolts. -42- Figure 48. Drive wheel adjustment controls (fourth bolt hidden in this picture). G0504 16" Horizontal Resaw Bandsaw...
- Page 45 Figure 50. Overhead view of wheel position when checking with a straightedge and the blade is installed and tensioned. G0504 16" Horizontal Resaw Bandsaw — If the gauge blocks are aligned within 0.040" of each other, continue to Step — If the gauge blocks are positioned more than 0.040"...
-
Page 46: Troubleshooting
7. Use sharp blade with lower TPI; reduce the feed rate/depth of cut; use cutting fluid if possible. 8. Clean off motor, let cool, and reduce workload. 9. Fix contacts or replace contactor. 10. Test/repair/replace. 11. Adjust to correct delay; replace module. G0504 16" Horizontal Resaw Bandsaw... - Page 47 1. Adjust blade support bearings (Page 21). 2. Clean wheels of all pitch and dust. 3. Call the Grizzly Service Department at (570) 546-9663 for help determining if your wheels really are NOT coplanar; adjust wheels to be coplanar as described on Page 41.
-
Page 48: Section 9: Parts
���� ���� ���� ���� ���� ���� ���� ���� ���� ���� ���� ���� ���� ���� ���� ���� ���� ���� ���� � ���� ���� ���� ���� � ���� ���� ���� ���� ���� ���� ���� ���� ���� G0504 16" Horizontal Resaw Bandsaw ����... - Page 49 1127 1128 1129 1130 1131 1132 1133 1134 1135 1136 1137 1138 G0504 16" Horizontal Resaw Bandsaw Housing Parts List PART # DESCRIPTION PB27M HEX BOLT M12-1.75 X 30 PLW05M LOCK WASHER 12MM PW06M FLAT WASHER 12MM P05041104 MOTOR 25HP PB24M HEX BOLT M12-1.75 X 45...
-
Page 50: Frame Parts
Frame Parts ���� ���� ���� ���� ���� ���� ���� ���� ���� ���� ���� ���� ���� ���� ���� ���� ���� ���� ���� -48- G0504 16" Horizontal Resaw Bandsaw... - Page 51 1203 1204 1205 1206 1207 1208 1209 1210 1211 1212 1213 1214 1215 G0504 16" Horizontal Resaw Bandsaw Frame Parts List PART # DESCRIPTION P05041201 FRAME P05041202 ELECTRIC BOX P05041203 DOOR HINGE PW01M FLAT WASHER 8MM PLW04M LOCK WASHER 8MM PB09M HEX BOLT M8-1.25 X 20...
-
Page 52: Elevation Parts
���� ���� ���� ���� ���� ���� ���� ���� ���� ���� ���� ���� ���� ���� ���� ���� ���� ���� ���� ���� G0504 16" Horizontal Resaw Bandsaw ���� ���� ���� ���� ���� ���� ���� ���� ���� ���� ���� ���� ���� ���� ����... - Page 53 1335 1336 1337 1338 1339 1340 1341 1342 1343 1344 1345 1346 G0504 16" Horizontal Resaw Bandsaw Elevation Parts List PART # DESCRIPTION PB110M HEX BOLT M16-2 X 25 PLW10M LOCK WASHER 16MM PW08M FLAT WASHER 16MM P0504204 COLUMN P0504205...
-
Page 54: Blade Guide Parts
���� ���� ���� ���� ���� ���� ���� ���� ���� -52- Blade Guide Parts ���� ���� ���� ���� ���� ���� ���� ���� ���� ���� ���� ���� ���� ���� ���� ���� ���� ���� ���� ���� ���� ���� G0504 16" Horizontal Resaw Bandsaw... - Page 55 1414 1415 1416 1417 1418 1419 1420 1421 1422 1423 1424 G0504 16" Horizontal Resaw Bandsaw Blade Guide Parts PART # DESCRIPTION P0504309 ADJUSTMENT ROD BRACKET PW04M FLAT WASHER 10MM PLW06M LOCK WASHER 10MM PB74M HEX BOLT M10-1.5 X 20...
-
Page 56: Tensioning Wheel Parts
���� ���� -54- ���� ���� ���� ���� ���� ���� ���� ���� ���� ���� ���� ���� ���� ���� ���� ���� ���� ���� ���� ���� ���� ���� ���� ���� ���� ���� ���� ���� ���� ���� ���� G0504 16" Horizontal Resaw Bandsaw ����... - Page 57 1521 1522 1523 1524 1525 1526 1527 1528 1529 1530 1531 1532 G0504 16" Horizontal Resaw Bandsaw PART # DESCRIPTION P0504428A LOCK NUT AN11 PTLW08M EXT TOOTH WASHER 10MM P0504429A LOCK RING P0504455 INT RETAINING RING 90MM P0504456 OIL SEAL TC-70 X 90 X 8...
-
Page 58: Drive Wheel Parts
OIL SEAL TC-75 X 95 X 10 P05041614 INT RETAINING RING 95MM PZERK2 GREASE FITTING PT 1/8 P05041616 RIGHT WHEEL SHAFT PB25M HEX BOLT M12-1.75 X 25 PN09M HEX NUT M12-1.75 P05041619 WHEEL ADJUSTMENT PLATE G0504 16" Horizontal Resaw Bandsaw ���� ���� ���� ����... -
Page 59: Hydraulic Pump Parts
HEX BOLT M8-1.25 X 20 1702 PLW04M LOCK WASHER 8MM 1703 P05041703 PULLEY SLEEVE 1704 P05041704 PULLEY 1705 P05041705 V-BELT B X 53 G0504 16" Horizontal Resaw Bandsaw ���� ���� ���� ���� ���� ���� PART # 1706 P05041706 1707 PLW06M 1708... -
Page 60: Main Conveyor Table Parts
���� ���� ���� ���� ���� ���� ���� ���� ���� ���� ���� ���� ���� ���� ���� ���� ���� ���� ���� ���� ���� ���� ���� ���� ���� ���� ���� ���� ���� ���� ���� G0504 16" Horizontal Resaw Bandsaw ���� ���� ���� ����... - Page 61 1820 1821 1822 1823 1824 1825 1826 1827 1828 1829 1830 1831 1832 G0504 16" Horizontal Resaw Bandsaw PART # DESCRIPTION PLN05M LOCK NUT M10-1.5 PW04M FLAT WASHER 10MM P0504603 CONVEYOR LOWER PLATE PN33M HEX NUT M24-2 P0504605 ADJUSTMENT BOLT PB01M HEX BOLT M10-1.5 X 30...
-
Page 62: Return Conveyor Table Parts
OIL PUMP FLANGE P05041923 HYDRAULIC MOTOR OMP160 PK42M KEY 6 X 6 X 30 PB33M HEX BOLT M12-1.75 X 50 P0504621A REAR ROLLER BRACKET R P05041927 CONVEYOR SUPPORT PB143M HEX BOLT M12-1.75 X 120 G0504 16" Horizontal Resaw Bandsaw ���� ����... -
Page 63: Rear Hold Down Parts
REAR ROLLER SHAFT 2009 PSB129M CAP SCREW M12-1.75 X 20 2010 P0504757 REAR PRESSURE PLATE 2011 P0504758 COLLAR 2012 PSS30M SET SCREW M10-1.5 X 10 G0504 16" Horizontal Resaw Bandsaw ���� ���� ���� ���� ���� ���� ���� ���� ���� ���� ���� ����... -
Page 64: Front Hold Down Parts
���� ���� ���� ���� ���� ���� ���� ���� ���� ���� ���� ���� ���� ���� ���� ���� ���� ���� ���� ���� ���� ���� ���� ���� ���� ���� ���� ���� ���� ���� ���� ���� ���� ���� -62- G0504 16" Horizontal Resaw Bandsaw... - Page 65 2111 2112 2113 2114 2115 2116 2117 2118 2119 2120 2121 2122 G0504 16" Horizontal Resaw Bandsaw PART # DESCRIPTION PN09M HEX NUT M12-1.75 PLW05M LOCK WASHER 12MM PW06M FLAT WASHER 12MM P0504625 FLANGE BEARING UCFL205 P0504721 PRESSURE ROLLER SUPPORT (L)
-
Page 66: Hydraulic System Parts
���� ���� ���� ���� ���� ���� ���� ���� ���� ���� ���� ���� ���� ���� ���� ���� ���� ���� ���� ���� ���� ���� ���� ���� ���� ���� ���� ���� ���� ���� ���� ���� ���� ���� ���� G0504 16" Horizontal Resaw Bandsaw... - Page 67 2232 2233 2234 2235 2236 2237 2238 2239 2240 2241 2242 2243 2244 2245 G0504 16" Horizontal Resaw Bandsaw PART # DESCRIPTION P05042201 FUEL TANK P05042202 MANOMETER P05042203 OIL FILLER P05042204 CONNECTOR 3/4T X 3/4T P05042205 REVERSE VALVE 3/4" P05042206 CONNECTOR 3/4T X 3/4H X 45°...
-
Page 68: Electrical System Parts 1
� � ���� � � ����������� � � � ���� � ��������� � � � ���� � ���� ���� ��������������� ��� � �� � ���� ����������������� ��� �� �� �� ���� G0504 16" Horizontal Resaw Bandsaw ��� � ���� �... -
Page 69: Electrical System Parts 2
�� �� �� �� �� �� �� �� �� �� �� �� �� �� �� �� ���� ����� G0504 16" Horizontal Resaw Bandsaw � � � � � � ���� �� �� �� � �� �� �� �� ���� ��������... - Page 70 TRANSFORMER 200VA P05042316 FUSE 5A FUSE P05042317 ELECTRIC SET 10A/1P P05042318 POWER SAFETY SWITCH P05042319 440V CONVERSION KIT (TE) P05042320 O-L RELAY 220V LR3D-3359 48/65A P05042321 UP O-L RELAY LR3D-066 1A P05042322 PHASE REVERSAL RELAY G0504 16" Horizontal Resaw Bandsaw...
-
Page 71: Warranty And Returns
WARRANTY AND RETURNS Grizzly Industrial, Inc. warrants every product it sells for a period of 1 year to the original purchaser from the date of purchase. This warranty does not apply to defects due directly or indirectly to misuse, abuse, negligence, accidents, repairs or alterations or lack of maintenance. - Page 73 ���������������������������������������������������������������������������������� � ������������������������������������������������������������������������������������ ����� ����������������������� ������ � ������������������������ ���� ��������������������� ���������������������������� ������ ������������������������ ���������� � ���������������� ���������������������������� ������������������������������� ��������������������������� ��� ��������� ����������� �� ����� �� � ��������� ������ �� ���� �� ���� ��� ��������� �������� �� ���� �� ������� ������ �������� ��� ��������� �� ������� ��� ����������� �� �������� ������������� ���...
- Page 74 ���������������������� ���������������������� ����������������������������������� ������� ����������� ���� ���� ��� ���� ����������� �� ���������� ����������������������������������� ������������������������������������� �������������������������������������� �������������������������������������� ����� ����� ����...
- Page 76 ��� ������ ��� ���� ���� ������� ����� ��� ������� ����� ��� �������� ��� ������� � � � ���� ����� ��� � � �������� ������ ��� � ����� ������ � �� ��� �������� ������� � ������ �������� ������ ������� ������ �� ����� ������...