Table of Contents
Advertisement
Quick Links
o o o o o o o o o o o o o o o o o o o o o o o o o o o o o o o o o o o o o o o o o o o o o o o o o o o o o o o o o o o o o o o o o o o o o o o o o o o o o o o o o o o o
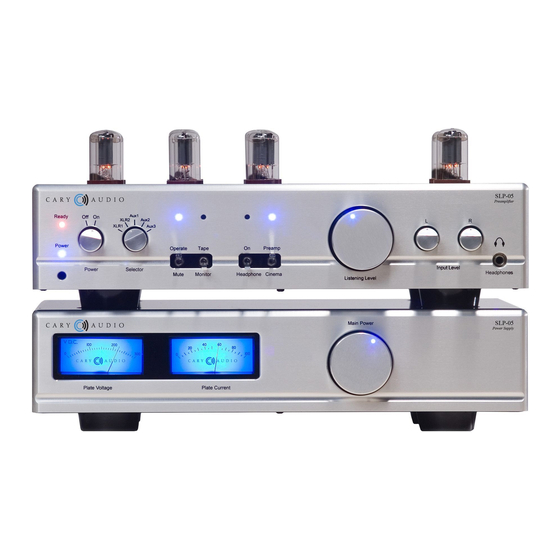
SLP 05
Pure Balanced Vacuum Tube
Preamplifier
NOTE: Before installing your new component, please read this manual
carefully as it will inform you of the product specifications, proper
installation and correct operating procedures for your unit. Also included
in this manual are guidelines on how to service and care for your new
Cary Audio Design product.
Advertisement
Table of Contents

Related Manuals for Cary Audio Design SLP 05


Summary of Contents for Cary Audio Design SLP 05
- Page 1 NOTE: Before installing your new component, please read this manual carefully as it will inform you of the product specifications, proper installation and correct operating procedures for your unit. Also included in this manual are guidelines on how to service and care for your new Cary Audio Design product.
-
Page 2: Table Of Contents
TABLE OF CONTENTS Important Safety Instructions ......................2 Welcome Product Overview ..........................4 Circuitry .............................5 Unpacking and Installation ........................6 Specifications General Specifications ..........................7 Features .............................8 Controls Front Panel Preamplifier ........................9 Rear Panel Preamplifier ........................11 Front Panel Power Supply ........................12 Front Panel Power Supply ........................13 Remote Control .......................... -
Page 3: Important Safety Instructions
If water or any metal object (such as a paper clip, coin, or staple) accidentally falls inside the unit, disconnect it from the AC power source immediately and contact Cary Audio Design for further instructions. HEAT: Position the unit away from heat sources such as radiators, heat registers, stoves, or other units (including amplifiers) that produce heat. - Page 4 (preferably unplugging them from the AC power source). Many audio components feature automatic turn-on circuits that may activate during an installation, potentially causing damage to electronic components and/or speakers. This type of damage is not covered by product warranties, and Cary Audio specifically disclaims responsibility for any such damage.
-
Page 5: Welcome
The cinema bypass circuitry may be engaged by toggling the Cinema bypass switch on the front panel of the preamplifier. If the SLP 05 power switch is turned to the off position, the SLP 05 automatically defaults to the cinema bypass mode. -
Page 6: Circuitry
WELCOME CIRCUITRY The SLP 05 is a no compromise line stage and headphone amp. The power supply is vacuum tube rectified and has a 5AR4 vacuum tube rectifier lying on its side inside the unit. The 5AR4 tube has a separate cathode from the filament so any position of mounting is proper. It was horizontally mounted to keep the power supply the same height as the preamplifier. -
Page 7: Unpacking And Installation
Cary Audio Design within 15 days of your purchase. Warranty restrictions apply. Consult the warranty section of this manual for details. Please keep a copy of the original sales receipt from your Authorized Cary Audio Design dealer to validate the warranty if necessary. -
Page 8: Specifications
SPECIFICATIONS Operating the SLP 05 Preamplifier is a simple procedure since each unit is designed for long- term stability in virtually any home operating situation. However, if the unit is operated outside the parameters outlined in this owner’s manual, damage may occur. Please read this manual carefully before operating your new SLP 05 Preamplifier. -
Page 9: Specifications General Specifications
The SLP 05 has a timer warm up circuit that allows safe use with “rapid turn on” solid state power amplifiers. The headphone power amplifier, using two 6SN7 octal vacuum tubes, is coupled through audio transformers to produce 1/2 watt per channel to drive your favorite high quality headphones. -
Page 10: Controls
5. OPERATE/MUTE This bat handle switch will either mute the output of the SLP 05 or allow the signal to flow to the basic power amplifier in the system. In the MUTE position the external hand held remote unit will take over the mute/operate function. - Page 11 3:00 o’clock or even all the way up. This does not stress the SLP 05 in any fashion. The SLP 05 is a Class A operating circuit and in reality is running at full potential at all times. The listening level control simply controls the input voltage level flow.
-
Page 12: Rear Panel Preamplifier
CONTROLS REAR PANEL PREAMPLIFIER Special Note: The balanced input and output XLR connectors follow the ITT Cannon pin out configuration. This pin-out calls for the shield to be wired to pin #1. The normal- phase (hot) is wired to pin #2. Pin #3 is the inverted phase. CINEMA INPUT FROM PROCESSOR –... -
Page 13: Front Panel Power Supply
CONTROLS AUX2 INPUT – RIGHT CHANNEL RCA AUX3 INPUT – RIGHT CHANNEL RCA XLR OUTPUT– RIGHT CHANNEL RCA OUTPUT– RIGHT CHANNEL POWER SUPPLY– 6 FOOT CABLE CONNECTOR RCA OUTPUT– LEFT CHANNEL XLR OUTPUT– LEFT CHANNEL AUX3 INPUT – LEFT CHANNEL RCA AUX2 INPUT –... -
Page 14: Front Panel Power Supply
CONTROLS REAR PANEL POWER SUPPLY 1. REMOTE TRIGGER +14 VOLTS FOR POWER AMPLIFIERS 2. REMOTE TRIGGER +14 VOLTS FOR POWER AMPLIFIERS 3. 1A SLOW BLOW FUSE 4. AC POWER JACK 5. 1A SLOW BLOW FUSE 6. CONNECTION TO PREAMPLIFIER 7. 120v/50Hz-60Hz 8. -
Page 15: Remote Control
CONTROLS REMOTE CONTROL The SLP 05 remote control included with the SLP 05 is designed to function with several of our products. For use with the SLP 05, only the “Volume” and “Mute” buttons on the bottom of the remote will be used. If you have a CD-500 disc player, many of the other remote functions will be used to control its operation. -
Page 16: Operation
When you activate the preamplifier power on switch you will notice a blue LED showing at the left lower side of the front panel. This indicates the SLP 05 is receiving the necessary power from the matching supply. After approximately 60 to 90 seconds please observe the red LED labeled ready. -
Page 17: Service And Care
Unplug the unit from the wall outlet before cleaning. Clean the cabinet housing and front panel of the SLP 05 with a soft cloth and a glass cleaner (such as Windex). The frequency of cleaning will vary based on the cleanliness of the environment and the number of hours the SLP 05 is operated. -
Page 18: Tube Placement Chart
SERVICE AND CARE TUBE PLACEMENT CHART Refer to the diagram below for the location of the tubes and their functions. 1. 6SN7 tube – left channel positive phase gain – buffer 2. 6SN7 tube – right channel positive phase gain – buffer 3. -
Page 19: Limited Warranty
5. Accessories, including but not limited to, batteries, cables, mounting hardware and brackets, cleaning accessories, antenna and detachable power cords. 6. Warranty is void if purchase was made from anyone other than an authorized Cary Audio dealer. Who May Enforce the Warranty? This warranty extends to products purchased directly from Cary Audio or an authorized Cary Audio dealer. - Page 20 How You Can Get Service? In the event that the owner needs to return the unit to Cary Audio for service or repair of a possible defect, he must follow the following steps: 1.
- Page 21 International Purchasers (Export Markets) Cary Audio warrants its merchandise to purchasers within the United States exclusively for use within the United States. It provides no other warranties, expressed or implied. If you are living outside of the United States, please consult your local dealer or distributor to determine the details...
- Page 22 CARY AUDIO DESIGN 1020 Goodworth Drive, Apex, NC 27539 phone 919-355-0010 fax 919-355-0013 www.caryaudio.com o o o o o o o o o o o o o o o o o o o o o o o o o o o o o o o o o o o o o o o o o o o o o o o o o o o o o o o o o o o o o o o o o o o o o o o o o o o o o o o o o o o o o...