Table of Contents
Advertisement
Quick Links
Download this manual
See also:
User Manual
Advertisement
Table of Contents

Related Manuals for Sonim XP1


Summary of Contents for Sonim XP1
- Page 1 Sonim Xperience (XP1) User’s Guide Version 2.5 SON 007-020500-001-100084-03-20-01-01...
- Page 2 The battery should never be placed in munici- pal waste. Use a battery disposal facility if available. Declaration of Conformity Sonim Technologies Inc, declares that the mobile phone Sonim Xperience™ One – XP1 is in compliance with the essential requirements and other relevant provisions of Directive 1999/5/EC.
-
Page 3: Table Of Contents
Remove the SIM card ........9 Settings............26 Key operations without your SIM card ..9 Ringer settings..........26 Parts of the XP1 phone ........9 Phone settings ..........26 XP1 keypad ..........10 Network settings ......... 27 Standby mode ..........10... - Page 4 Add a new number........29 Reject list ............41 Send a namecard .........30 Display name..........41 Edit or delete phone records ......30 Report reminder ..........41 Copy or move numbers to other lists .....31 Manage your PTT contacts .........41 Manage personal information ......31 Create contacts..........41 Phone book memory ........31 Copy contacts from phone book ....41 Store the IP service number......32...
- Page 5 Make PTT calls..........48 Delete entries ..........58 Make calls from the PTT contacts list .... 48 Alarm clock............58 Make calls from the PTT calls list ....48 Calculator ............58 Make calls from the calls list......48 Audio recorder ..........59 Make calls from the group list ......
-
Page 6: General Information
Congratulations on the purchase of a Sonim Xperience™ the guide to help you use your phone effectively. One – XP1 mobile phone. The Sonim XP1 phone is fully compliant with the recently ratified Open Mobile Alliance (OMA) PoC standard specification. It has an intuitive, fea-... -
Page 7: Options Commonly Used Across Menu Items
Press and hold Means to press and hold a key for Signifies a Tip. 2–3 seconds before releasing the key. This action is typically used when trying to switch on/off the phone or when using shortkeys to access specific functions. For Options commonly used example. -
Page 8: Your Safety Guidelines
Do not expose the battery to high temperatures Use only Sonim XP1 approved charging equip- (in excess of 60°C). ment to charge your phone and avoid damage to your phone. -
Page 9: Battery Care
Battery care causes direct connection of the positive (+) and negative (- ) terminals of the battery. (These look like metal strips on the battery.) This might happen, for example, when you A rechargeable battery powers your device. Use the battery carry a spare battery in your pocket or purse. -
Page 10: More Safety Information
More safety information Child safety Do not allow children to play with your mobile phone or its Personal medical devices accessories. Keep it out of their reach. They could hurt themselves or others, or could accidentally damage the Mobile phones may affect the operation of cardiac pace- mobile phone or accessories. - Page 11 The localized (SAR) of the portable XP1 device has been measured in all cases as requested by the relevant interna- tional standards. The maximum localized SAR value for which the device has been tested and certified for specific exposure limits and different network bands is given below: 900 MHz Band Min.
-
Page 12: Getting Started
Battery usage top of the battery are aligned with the metallic contacts Use only an XP1 certified battery, charger or any other within the battery compart- Lift the battery cover accessories that are designed for this phone model. -
Page 13: Set Battery Alert
If the battery is being charged To set the battery alert select Menu > Quick set- when the phone is switched off, tings > Normal > Personalize > Battery alert > only the battery icon with the mes- or, press Menu key to select the checkbox beside sage... -
Page 14: Remove The Sim Card
Slide the silver clip over the SIM card to hold it securely (as shown in the figure B). The XP1 keypad has six function keys and 12 alphanumeric keys. The right side of the phone has the three PTT related... -
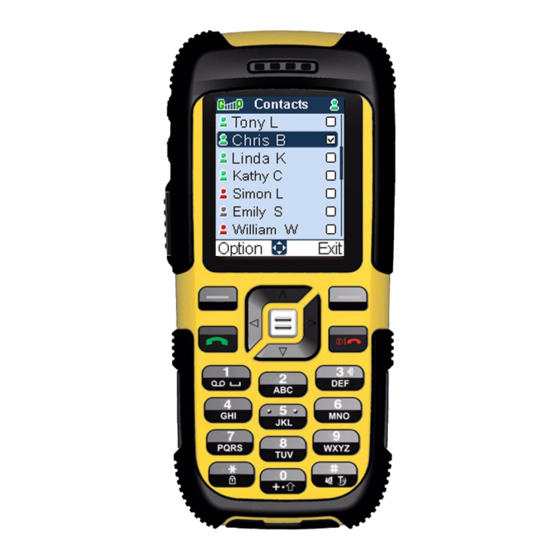
Page 15: Xp1 Keypad
XP1 keypad use these keys efficiently. For more information on text input modes refer section “Text input mode” on page 52. The various keypad keys and their corresponding functions Standby mode are described in the following figure. Function keys Certain information is displayed when the phone is in 1.Navigation arrow keys... -
Page 16: Operations In Standby Mode
Basic settings Operations in standby mode The following can be accessed from the home screen when When you have switched on your phone the name of the the phone is in standby mode or when the phone is not in service provider is displayed. -
Page 17: Keypad Functions
Keypad functions The following table displays the various keys and the corresponding functions they perform: Keypad key Operation Press hold to switch on or switch off the mobile phone. Press when in Menu or Edit modes to return to Standby mode. Press to end a call. - Page 18 Keypad key Operation The Left and Right Selection keys, Power On/Off and Pickup keys surround this key group. There are arrows on the key that denote the direction for scrolling through information, displayed on the screen. Up/Down Press to view the target characters by pages in the text editor. Press to browse menus/lists at the same level.
- Page 19 Keypad key Operation Press hold to set the ringtones for incoming calls. Press hold to switch on and switch off the loudspeaker during a PTT or a GSM call. Press hold to set the Alarm. Press hold to display the calculator. Press hold to display the languages screen.
-
Page 20: Ptt Quick Start
The following table explains the use of the various PTT - End a PTT call. related keys present on your XP1 mobile phone. Right arrow key - Increase or decrease the volume during a PTT call. -
Page 21: Registering With The Ptt Service
Registering with the PTT ser- vice. Type Preference Function Select Menu > to register with the service. General Answer Individual Allows you to specify When registration with the PTT service settings answer settings for is successful, P and G are displayed in each contact sepa- green at the top left corner of the rately. - Page 22 Type Preference Function Type Preference Function Hide my Never Displays your ID to Always on allows to set back- other online contacts light always on during when you are in a a PTT session. PTT session. Reject list Always Displays your ID as Reject list Add to reject Disallows persons on...
-
Page 23: Ptt Display Icons
Type Preference Function Icon Description Turn on Press the A global setting that Indicates that you are key and disallows PTT con- attempting to speak while select tacts from calling the other person is speak- Option > you. When this option ing. -
Page 24: Create A Ptt Contact
Create a group Icon Description Select Menu > > Group > Option > Create The letters P and G in group > OK. green indicate that the Enter a Group name and select Save. Make a note of GPRS network is present the Group Id displayed and select OK. -
Page 25: Make A One-To-One Call
Move a call to the background On the Phone book list select the contact whose details you want to copy to the PTT contact list and select OK. You can work on other functions on your device, for exam- You can choose to retain or change the existing con- ple, send an SMS or use the Phone book while you are on a tact details. -
Page 26: Make An Unplanned Group Call
Make an unplanned group call When any participant from the group accepts your call the top of the screen displays Group session, Start sending, Speaking. Continue to hold the key while An unplanned or and ad hoc group call is made to contacts you are speaking. -
Page 27: Block Incoming Ptt Calls
When you accept the call, the top of the screen now When the DnD option is turned on, any PTT contact trying displays Start receiving, Listen. When there is a pause your number gets the message ‘User busy’. and no one is speaking Push to talk, Idle is displayed. -
Page 28: Copy Phone Book Contacts To Ptt List
To refresh the PTT contact list select Menu > > Contact > Option > Scroll to Refresh List select The new contacts gets added in to the list. Refresh list is normally used when contacts are added via web application for example sonim’s XPA. -
Page 29: Your Xp1 Phone
To access the main menu press the Menu key or press the The following table describes the display indicators available Left selection key to display the main menu which com- in the XP1 phone: prises the following nine items: Display Name Description indicators... - Page 30 Display Display Name Description Name Description indicators indicators GPRS P displayed in red indi- Silent Indicates that the phone cates that the GPRS net- is on Silent mode. work is present but you have not logged on to the PTT service. Report Indicates that a recurring reminder...
-
Page 31: Settings
Settings Auto power: switches off and switches on the phone automatically, at the specified time set by you. You can create and modify various settings on your XP1 Welcome text: allows you to create the welcome text phone. that is displayed when the phone is switched on. -
Page 32: Network Settings
Idle screen type: allows you to set the Standby OK. The list of options is displayed. Choose an option, screen display to Digital, Analog, Month view (calendar for example, > OK. The shortcut is set. view) or Universal time modes. To cancel a shortcut select Menu >... - Page 33 Network account: is used to connect to the GSM or Available networks Locates and displays the GPRS network. Contact your service provider to network providers avail- change the existing factory profiles and to acquire the able to you. correct parameter updates. Connection errors are caused due to wrong parameters.
-
Page 34: Manage The Phone Book
Data call type: choose between ISDN and Analogue. Alternatively to directly access the phone book list and its allied options, press the Down navigation key to display Phone number: enter the number you need to dial. the Phone book list. When your phone connects to the Internet, it will dial Add a new number this number automatically. -
Page 35: Send A Namecard
Select to save a copy of the new contact to your Save as user defined: allows you to save the name- PTT contact list. Select to revert to the Phone card information for reuse. book. Add icon: allows you to insert an image from the Alternatively, you can directly enter a number and select existing emoticon folder. -
Page 36: Copy Or Move Numbers To Other Lists
To delete all records in the Phone memory To move all record from Phone memory to SIM card On the home screen select Phonebk > Advanced > > Delete all phone records > OK. Select Phonebk > Advanced > > Move all from phone to SIM >... -
Page 37: Store The Ip Service Number
Store the IP service number You can store your IP service number and relieve yourself of the trouble of entering it each time you make an IP call. To store the IP number select Phonebk > IP number > OK. Enter the IP number and select Save. You can make IP calls only if your network operator supports IP service numbers. -
Page 38: Make Calls
Make calls To locate a phone number: On the home screen select Phonebk > Search > OK. Enter the name or the number (Press to switch Before making a call you must ensure the following: between numeric and text input modes) and select Keypad is not locked. -
Page 39: Speed Dial
Choose a list and select to view the list of calls IP Handsfree When you dial a number within a list, for example, Outgoing calls list. through the IP network, Choose a contact and select to view the date and you can talk using the time of the call. -
Page 40: Receive A Call
To dial the number, just press and hold the designated Menu key to select the checkbox and activate the fea- shortcut key. ture. Forward a call If you use IP Dialing and have already entered If you are not available or choose not to answer a call, you an IP number in the Phone book, the phone can use this function to forward your incoming calls to a will automatically add the service number... -
Page 41: Call Barring
To enable call waiting facility, select Menu > Settings When Call forward is enabled, the icon is dis- > Call settings > Call waiting > GSM call > > played at the top of the screen when the phone is in standby mode. -
Page 42: Auto Answer
Black list calls Use the Menu key as a toggle key to select and clear the checkbox beside the Auto redial option to enable In this menu you can add, search for, change and delete and disable the function. numbers that you do not want to answer. This menu has When you redial a number, you are prompted with the two submenus: Add and Search. -
Page 43: White List Calls
White list calls To view whether the option is enabled or not, select Status > OK. This list contains phone numbers of persons you want to Review call information call. The options are similar to that of Black list calls. Refer “Black list calls”... - Page 44 Reset charge count Resets the counter to zero (protected by PIN2 code). Show balance Displays available bal- ance. Show limit Displays maximum limit available. Cancel limit Cancels maximum limit available on charges (protected by PIN2 code). Set limit Sets maximum limit for charges (protected by PIN2 code).
-
Page 45: Push-To-Talk
Never to remove your online presence. Sorting: Sorts your list of contacts, scroll to Sorting The Sonim Xperience™ One (XP1) brings to you the Push- and choose either Alphabetically to display the list of to-Talk over cellular (PoC) experience. Now you can turn... -
Page 46: Reject List
Select Exit to return to the previous screen or press Always on: allows you keep the backlight on always during a PTT session. to return to the home screen. Reject list Manage your PTT contacts All calls from contacts on your reject list are blocked from Your PTT contact list is a list of mem- calling your number. -
Page 47: Set As Default
OK. The list of contacts in your Phone book is dis- Similarly to turn off the option, select Menu > > played. Contact > > Option > Turn off DnD > OK. The Select Contact name > OK> Save > OK. The cop- icon color reverts to green. -
Page 48: Delete A Contact
After the checkbox is selected, select Option > Edit mended that a maximum of 20 members can be added contact > OK. to a group. Edit the contact details, like Contact name, Contact Select to view the new group in the Groups list. number and Answer settings, before you add the con- Import a group tact to your PTT contact list. -
Page 49: Delete Members From A Group
Send group ID Add members via the PTT contact list To add members via the PTT contacts list, on the To send group ID to the members of the group, select Groups screen scroll to the group and select Option >... -
Page 50: Rename A Chat Group
Rename a chat group Option > Edit/View members > Option > Delete members > OK. Use the Menu key as a toggle key To assign a different name to an existing chat group, to select or clear the checkbox against the member to on the Chat groups screen, scroll to the chat group you be deleted from the chat group. -
Page 51: Delete A Chat Group
Delete a chat group To view the list of outgoing calls, on the Call list screen select Outgoing calls list > OK. To remove a chat group, on the Chat groups screen To view call details scroll to the call record and select scroll to the chat group you want to delete and select Option >... -
Page 52: Answered Calls List
select > Option > Add to reject list > OK. To that you receive is also displayed in the Missed calls list. You confirm the operation select Yes. In case of a group, can add the contact to your PTT Contacts list, delete a con- the members of the rejected group are added to the tact, move a contact to the reject list and send a PTT invita- Reject list.The following additional options are avail-... -
Page 53: Make Ptt Calls
Make PTT calls Choose a list and select OK, for example, Outgoing calls list. Scroll to the contact you want to call and press the A user can make a one-to-one or one-to-many call from the key to initiate the call. list of contacts, make a group call, join a chat list, call from If you select a group contact, select >... -
Page 54: Make Calls From The Group List
Make calls from the group list During the session the status of all the members in the group is A group has a set of pre-arranged members and a unique displayed on the screen. The group ID. A group PTT call is similar to a one-to-many PTT name of the person speaking is call. -
Page 55: Respond To An Invitation
If you want to add more contacts to the session select Select Option > > Contacts > select the con- and choose the contacts you want to call. tact > Add. The contact will be invited for the PTT ses- user to session is displayed at the top of the screen. -
Page 56: Place A Call In The Background
View IPA details To end a PTT call press and hold the headset button. Press and hold the headset button to reject the call. An IPA is an Instant Personal Alert. When you received an Place a call in the background IPA, a log is updated in your Missed calls list and a missed call pop-up is displayed on the home screen. -
Page 57: Messages
Messages Reply path: if this option is enabled, messages that are sent to your inbox will be sent via your service cen- ter rather than the sender’s service center. Use the SMS is a convenient and inexpensive means of communica- Menu key to select the option and select OK. -
Page 58: Predictive Text Input
To choose the input text for a character (abc / en T9 / To choose the Predictive text input mode, press and 123), press and release the key. release the key till enT9 is displayed. To switch between upper case, lower case and sen- To enter a word, press the numeric key with the tence case use key as a toggle key. -
Page 59: Send An Sms Via Phone Book
Select Exit to return to the text pane. The contact If the Search option is selected, enter the phone num- address is displayed in the To field. ber or the contact name and select Press switch between numeric and text input modes. Enter the message in the text pane. -
Page 60: Unsent Messages
You can also Forward a Sent message. Save number: extracts the number from the mail and saves it after you have entered the sender’s name in Predefined SMS messages the Phone book list. Select if you also want to copy the contact number to your PTT contacts list. You can customize and store up to a maximum of 10 SMS messages in the SIM card memory. -
Page 61: Voice Mail
New cell broadcast messages are directly shown on feature requires you to enter a voice mail number which is your standby display, until you press any key. Broad- provided by your service provider. cast SMS messages cannot be stored in your phone or To set voice mail number select Menu >... -
Page 62: Tools
Tools Create new event entries You can create two types of event entries. Tools are used to organize and manage your daily tasks sys- Meeting: set the date and time for a meeting. tematically. Choose a date on the calendar and select Option Organizer >... -
Page 63: Edit Organizer Entries
Calculator Edit organizer entries Select Menu > Tools > Organizer. The calculator in this phone is designed to perform simple Scroll to a date and press the Menu key to display the mathematical calculations. list of entries. Select Menu > Tools >... -
Page 64: Audio Recorder
To stop the counter select Pause. To continue select Options Explanation Exit Quit the menu. To reset the counter select Clear. To record a reading, press the Menu key while the This phone accepts numbers up to a maxi- counter is running. A maximum of six readings are dis- mum of 10 digits per entry. - Page 65 To view the universal time, select Menu > Tools > Universal time > OK. To set your local time, navigate to a specific Universal time and select Option > Set as local > OK. For example, navigate to San Francisco and set it as the local time.
-
Page 66: Personalizing Your Phone
Personalizing your phone For other settings such as Key tone, Connect alert and Battery alert, select the appropriate checkbox using Menu key and activate the function. You can customize ring tones, alerts and alarms on your phone for different environments. Silent: mutes all sounds in the phone. -
Page 67: Managing Your Files
Managing your files Using the My files menu, you can store and manage audio files and pictures. You can Preview the files, view their details and Delete files. The maximum storage capacity is 9000kb. To view your files select Menu >... -
Page 68: Wap
address. You can also edit or delete bookmarks via this menu Resume: You can view web pages from where you This mobile phone has an internal WAP browser that allows last left off. Access the web pages you visited last via you to browse contents of various WAP websites on the this menu. - Page 69 Cache: This is a storage mechanism provided in the phone. You can choose to enable the cache mode or clear the cache memory. Cookies: Cookies are used when the web browser requests for a page from the web server. You can Enable or Clear cookies via this menu.
-
Page 70: End User Licence Agreement
Product in accordance with the terms and condi- est in and to the Software. Sonim, and, to the extent that tions stipulated herein. Sonim and its service partners... - Page 71 Please note that some of your personal settings, downloads due to accident, software or hardware modification or or other information may be lost when your Sonim Product adjustment, acts of God or damage resulting from liq- is repaired or replaced. Sonim does not take any responsi-...
- Page 72 WARRANTIES OF MERCHANTABILITY OR FITNESS FOR A PARTICULAR PURPOSE, ARE LIMITED TO THE DURATION OF THIS LIMITED WARRANTY. IN NO EVENT SHALL SONIM OR ITS LICENSORS BE LIABLE FOR INCIDENTAL OR CONSEQUENTIAL DAMAGES OF ANY NATURE WHATSOEVER, INCLUDING BUT NOT LIMITED TO LOST PROFITS OR COMMERCIAL LOSS;...
-
Page 73: Index
12 create 19 function keys 10 delete 43 LSK/RSK 12 modify 42 navigation keys 13 call accept/send key 10 sorting 16 numeric keys 10 call barring turn on DnD 46 power on/off 12 cancel 36 XP1 10 status 36... - Page 74 delete 54 organizer forward 54 capacity 57 left selection key 10 inbox 54 check 57 predictive text 53 create new event 57 reply 54 delete 57 managing your files 62 save as user defined 54 edit 58 meeting mode 61 send &...
- Page 75 phone book press 1 edit group information 43 add 29 press and hold 2 import 43 copy 31 rename 43 delete 30 call log 22 PTT settings dial 33 Close PTT 16 answer 16 edit 30 contacts 34 audio 17 memory 31 copy 23 connection settings 40...
- Page 76 date and time 11 operation 12 network 27 phone 1 universal time phone 26 shortcuts 27 daylight saving time 59 ringer 26 speaker setting 17 local 60 security 11 standby mode 10 use in car mode 61 silent mode 11 SIM card insert 8 voice mail 56...