Table of Contents
Advertisement
Quick Links
Advertisement
Table of Contents

Related Manuals for Sonim XP1


Summary of Contents for Sonim XP1
- Page 2 The battery should never be placed in munici- pal waste. Use a battery disposal facility if available. Declaration of Conformity Sonim Technologies Inc, declares that the mobile phone Sonim XP1™(bt) is in compliance with the essential require- ments and other relevant provisions of Directive 1999/5/EC.
-
Page 3: Table Of Contents
Insert the SIM card ... 9 Remove the SIM card ... 9 Key operations without your SIM card ... 9 Parts of the XP1(bt) phone ... 9 XP1(bt) keypad ... 11 Standby mode ... 11 Operations in standby mode ... 12 Keypad functions ... - Page 4 Auto redial ...30 Auto answer ...31 Filter calls...31 Black list calls ...31 White list calls ...32 Call filter settings ...32 Other call settings ...32 Review call information ...32 Messages ... 34 Message settings ...34 Text input mode ...35 Conventional text input ...35 Predictive text input ...35 Write messages ...36 Send an SMS via phone book...36...
- Page 5 Modify contact information... 56 Delete a contact... 56 Delete contacts from call log ... 57 Manage PTT groups ... 57 Create a new group... 57 Import a group ... 57 Rename a group ... 57 Edit group information... 57 Delete members from a group ... 58 Delete a group ...
- Page 6 Outgoing Calls ...75 Use Handsfree mode for calls... 76 When connected to a wired headset...76 GSM calls ...76 PTT calls ...76 When placed in a Car Kit dashboard holder...76 GSM Calls ...76 PTT Calls ...76 When using a Bluetooth headset ...77 GSM calls ...77 PTT calls ...77 Personalize your phone...
-
Page 7: General Information
General information Congratulations on the purchase of a Sonim XP1™ (bt) mobile phone. The Sonim XP1(bt) phone is fully compliant with the recently ratified Open Mobile Alliance (OMA) GSM standard specification. It has an intuitive, feature-rich user interface that allows you to make the best use of the func- tions offered on your XP1(bt) device. -
Page 8: Options Commonly Used Across Menu Items
Press and hold Means to press and hold a key for 2–3 seconds before releasing the key. This action is typically used when trying to switch on/off the phone or when using shortkeys to access specific functions. For example. press and hold access Voicemail. -
Page 9: Your Safety Guidelines
Avoid using the phone in close proximity to per- sonal medical devices, such as pacemakers and hearing aids. Use only Sonim XP1(bt) approved charging equip- ment to charge your phone and avoid damage to your phone. The Sonim XP1(bt) is water-resistant, dust-resist- ant and rugged. -
Page 10: Battery Care
Battery replacement When the talk and standby times are noticeably shorter than normal, replace the battery with an original Sonim bat- tery. If a replacement battery is being used for the first time or if the battery has not been used for a prolonged period, it may be necessary to connect the charger and then discon- nect and reconnect it to begin charging the battery. -
Page 11: More Safety Information
More safety information Personal medical devices Mobile phones may affect the operation of cardiac pace- makers and other implanted equipment. Please avoid plac- ing the mobile phone over the pacemaker, for example. in your breast pocket. When using the mobile phone, place it at the ear opposite the pacemaker. - Page 12 The localised (SAR) of the portable XP1(bt) device has been measured in all cases as requested by the relevant interna- tional standards. The maximum localised SAR value for which the device has been tested and certified for specific exposure limits and different network bands is given below:...
-
Page 13: Getting Started
Getting started Battery information Battery usage Use only an XP1(bt) certified battery, charger or any other accessories that are designed for this phone model. The use of other batteries, chargers and accessories may void the warranty terms of your phone and cause damage. -
Page 14: Charge The Battery
Charge the battery The battery delivered with your mobile phone is not fully charged. We recommend that you charge your mobile for three hours before you use your mobile phone for the first time. Insert the charger plug into a 220V AC power outlet. -
Page 15: Insert The Sim Card
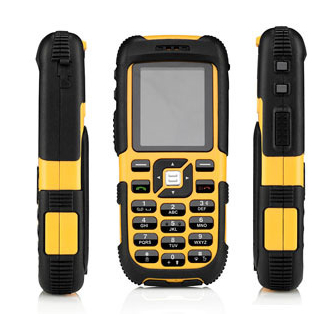
Emergency service. Parts of the XP1(bt) phone The XP1(bt) keypad has seven function keys and 12 alpha- numeric keys. The right side of the phone has three keys the largest of which is known as the PTT key:... - Page 16 XP1(bt) at a glance 1.Ear piece 8.Charger port 2.Display screen 9.Microphone 3.Menu key 10.Headset port 4.Volume keys 11.Loud speakers 5.PTT key 12.Battery cover 6.Function keys 13.Battery cover knob 7.Alpha-numeric keys...
-
Page 17: Xp1(Bt) Keypad
XP1(bt) keypad The various keypad keys and their corresponding functions are described in the following figure. Function keys 1.Navigation arrow keys (Up/Down/Left/Right) 2.Right Selection Key (RSK) 3.Menu key 4.Power On/Off/End call 5.Call accept/Send 6.Left Selection Key (LSK) Numeric keys 7.Press and hold for voice- mail 8.Press and hold to switch... -
Page 18: Operations In Standby Mode
The device with a fully-charged battery can remain in the standby mode for a duration of 200 hours. 1.GPRS connectivity 2.Signal strength indica- 3.Display icons 4.Battery charge indica- 5.Service provider 6.Local time 7.RSK command 8.LSK command Standby screen Operations in standby mode The following can be accessed from the home screen when the phone is in standby mode or when the phone is not in use. - Page 19 To change the PIN code select Menu > Security settings > Change code > OK. You can change codes for PIN, PIN2 and Call barring. Date and time To set the Date and Time, select Menu Date and time > Auto keypad lock To lock the keypad, select Menu...
-
Page 20: Keypad Functions
Keypad functions The following table displays the various keys and the corresponding functions they perform: Keypad key Operation Press hold Press when in Menu or Edit modes to return to Standby mode. Press to end a call. ... - Page 21 Keypad key Operation The Left and Right Selection keys, Power On/Off and Pickup keys surround this key group. There are arrows on the key that denote the direction to scroll for information displayed on the screen. Up/Down Press to view the target characters by pages in the text editor. ...
- Page 22 Keypad key Operation Press hold in standby mode to display Press hold Press hold Press hold Press hold Press hold Press to switch between lower case, upper case or auto case, when entering text. ...
-
Page 23: Your Xp1(Bt) Phone
Your XP1(bt) phone This model is a bar type phone with a single LCD screen. The graphic field of the screen is 128 (w) and 160 (h) pix- els. The CSTN technology used displays 65K colours. Main menu To access the main menu press the... -
Page 24: Home Screen Indicators
Some icons are displayed only if the specific service is activated. The following table describes the display indicators available in the XP1(bt) phone: Display Name Description indicators... - Page 25 Display Name Description indicators Vibrate Indicates that the Vibrate mode is turned Call For- Indicates that the ward Unconditional Call for- ward function is ena- bled. Silent Indicates that the phone is on Silent mode. Missed Indicates that there are calls missed or rejected GSM, or PTT calls.
-
Page 26: Settings
Unmute Indicates that the speaker is turned on and incoming talk burst is received. Settings You can create and modify various settings on your XP1(bt) phone. On the Standby screen select Menu > display the options. Ringer settings You can set different tunes for your incoming calls, SMS alerts, alarms and PTT (if PTT is enabled in your phone). -
Page 27: Network Settings
Wallpaper: allows you to set the background screen display using the embedded pictures available in your phone or from your own pictures that you have down- loaded on to your phone. The selected wallpaper is displayed on the standby screen only if you select ital as the idle screen type. - Page 28 Delete list Removes a network provider from the existing list. Available networks Locates and displays the network providers available to you. Add existing Displays a list of existing network providers. Allows you to add a network provider list. Select to add a network provider to the preferred networks list.
-
Page 29: Manage The Phone Book
name and User password required to log in to the WAP/data server. Search Mode: select Automatic to set the phone to automatically select a cellular network available in your area, or select Manual to set the network manually. Manage the phone book You can use the phone book to maintain phone numbers of your contacts. -
Page 30: Send A Namecard
Send a namecard A namecard contains contact details of an individual. You can send a namecard either from the Search View list option in the Phone book. You can opt to send the namecard by SMS or by Bluetooth. To send a namecard by SMS: Select Phonebk >... -
Page 31: Copy Or Move Numbers To Other Lists
To delete all records in the SIM memory On the home screen select Phonebk > > Delete all SIM records > OK. To delete all records in the Phone memory On the home screen select Phonebk > > Delete all phone records >... -
Page 32: Phone Book Memory
Phone book memory You can store records in both phone memory and SIM card. Phone memory has the capacity to store upto 500 records and the SIM memory depends on the SIM provider. To verify the memory status, select Phonebk status >... -
Page 33: Make Calls
Make calls Before making a call you must ensure the following: Keypad is not locked. A valid SIM card is installed. Phone battery is charged. Phone is switched on and the network operator’s name is displayed. Dial a number Use the numeric keys to enter the number and press Send... -
Page 34: Speed Dial
Choose a contact and select to view the date and time of the call. Contacts within the call list have the following options: Dial: displays dial options from which to choose. IP dial Dials a number through the IP network. Dial Dials a GSM number. -
Page 35: Any Key Answer
Any key answer When enabled, you can press any key except answer a call. To activate this feature, select Menu > Call settings > Anykey answer > Menu key to select the checkbox and activate the fea- ture. Forward a call If you are not available or choose not to answer a call, you can use this function to forward your incoming calls to a new number or an existing number in the Phone book list,... -
Page 36: Call Waiting
Barring status: when you check the status, your phone will send a request to the network and the feed- back will be displayed on your screen. Call waiting This facility can be used for GSM calls. GSM calls When Call waiting is enabled or turned on and your phone is in conversation, the message Call waiting from... -
Page 37: Auto Answer
Auto answer When enabled your incoming calls will automatically be answered. Select Menu > Settings > Call settings answer > On. Use the Menu key as a toggle key to select and clear the checkbox beside the Auto answer option to enable and disable the function. -
Page 38: White List Calls
White list calls This list contains phone numbers of persons you want to call. The options are similar to that of Black list calls. Refer “Black list calls” on page 31. Call filter settings You can enable or disable the call filter settings. On the Call filter screen, select Call filter settings ... - Page 39 Reset charge count Resets the counter to zero (protected by PIN2 code). Show balance Displays available bal- ance. Show limit Displays maximum limit available. Cancel limit Cancels maximum limit available on charges (protected by PIN2 code). Set limit Sets maximum limit for charges (protected by PIN2 code).
-
Page 40: Messages
Messages SMS is a convenient and inexpensive means of communica- tion. You can send a text message to other people via this service. You can use the SMS menu in your phone to send an SMS message to other mobile phones or any other equipment that can receive SMS. -
Page 41: Text Input Mode
Text input mode When you enter text, the input mode is displayed at the top right of the screen. Press and release the key to view the different text input modes, such as, Conventional (Abc), Predictive (T9) and numeric (123). In Conventional mode, you enter a letter by repeatedly pressing a key until the letter you want appears. -
Page 42: Write Messages
For more information, refer point 6 of “Conventional text input” on page 35. Write messages To create a message select Menu > Messages > Write message > OK. Enter the number and press the Down navigation key to move to the text pane Select a number from the Phone book list by pressing Menu key or selecting... -
Page 43: Manage Your Messages
Select Option > Dial. Manage your messages Inbox The Inbox stores and displays all the incoming messages. To access the Inbox, select Menu > Messages > Inbox > OK. The Inbox displays a list of mes- sages. To straight away delete a message or all the messages, select Option >... -
Page 44: View Sms Memory
Enter a message and select Save. View SMS memory To view the memory capacity for SMS messages select Menu > Messages > > Capacity SMS broadcasts You can receive a variety of text messages, such as news and traffic information, broadcast by your network. These messages are provided to all users in a certain cell. - Page 45 and select Call. You are connected to your mailbox where you can hear the stored voice mails messages. For quick access to Voice mail press and hold 1.
-
Page 46: Hardcoded Shortcuts
Hardcoded Shortcuts The following is the list of hardcoded shortcuts. Long press center button - Silences the incoming call ringtone. Long press 3 or the right arrow key - Switches the speaker mode during a GSM call. Press the green dial button From idle screen - Get the outgoing call list. -
Page 47: Push-To-Talk Quick Start
This section helps you to quickly get started and use the PTT function on your phone. The PTT functionalities shall be available in your XP1 Phone only if the PTT service is enabled. Follow the instructions to create contacts, make calls to individuals, predefined groups and ad hoc (informal) groups. -
Page 48: Registering With The Ptt Service
PTT key - Display the contacts list. - Initiate a PTT call. - Bring back to focus a PTT call that is in the back- ground. Volume keys - Adjust the volume during a PTT conversation. - Navigate up and down the PTT Contacts list. -
Page 49: Ptt Settings
PTT settings On the home screen, select Menu > Settings. The following settings are available on the PTT application: Type Preference Function General Answer Individual Allows you to specify settings answer settings for each contact sepa- rately. Manual Renders individual set- tings ineffective. - Page 50 Type Preference Function Backlight Timer on Turns off the backlight after the set backlight time in the phone set- tings is over during a PTT session. Always on allows to set backlight always on during a PTT session. Reject list Reject list Add to reject Disallows persons on...
-
Page 51: Ptt Display Icons
PTT display icons The common display icons within the PTT application are explained in the following table: Icon Description Appears when you start speaking. Appears when the other person takes the floor. Indicates that you are attempting to speak while the other person is speak- ing. -
Page 52: Create A Ptt Contact
Create a PTT contact Press and release the key to display the Contacts screen. Select Option > Create contact Select Menu > > Contact > Option contact > OK. Enter the Contact number and Contact name. Choose the Answer settings, either as Manual answer. -
Page 53: Move A Call To The Background
Scroll to the contact you want to call. Press and hold key until the top of the screen displays sending, Speaking. Continue to hold the you are speaking. Release the key when you finish speaking. When the other person begins speaking, the top of the screen displays Start receiving, Listen. -
Page 54: Make A Ptt Group Call
Release the key when you finish speaking. When another participant takes the floor, the top of the screen displays Start receiving, Listen. The screen displays the list of contacts in the session. If you attempt to take the floor while another person is speaking, Remote speaking is briefly displayed at the... -
Page 55: Block Incoming Ptt Calls
to rejoin a session refer section “Rejoin a group ses- sion” on page 62. Block incoming PTT calls Turn on the Do not Disturb (DnD) option to block incoming calls from other PTT members. Press the key, the Contacts list appears. To block callers from calling you, select Turn on DnD >... -
Page 56: Refresh The Ptt Contact List
To refresh the PTT contact list select Menu Contact > Option > Scroll to Refresh List select The new contacts gets added in to the list. Refresh list is normally used when contacts are added via web application for example sonim’s XPA. > >... -
Page 57: Push-To-Talk
Push-To-Talk The Sonim Xperience™ One (XP1) brings to you the Push- to-Talk over cellular (PoC) experience. Now you can turn your mobile phone into a walkie-talkie and have a one-to- one or one-to-many communication at the push of a key and the call communication is almost instantaneous. -
Page 58: Reject List
Timer on: allows you to use the same time settings as in phone settings to display backlight in a PTT session. Always on: allows you keep the backlight on always during a PTT session. Reject list All calls from contacts on your reject list are blocked from calling your number. -
Page 59: Manage Your Ptt Contacts
In addition to the Standard menu options, the Advanced menu displays General and Reject list menu options. Manage your PTT contacts Your PTT contact list is a list of mem- bers whom you want to either call or chat with, outside of the GSM net- work. -
Page 60: Turn On Dnd
To bring the contact to the top of the Contacts screen use the Set as default option. On the Contacts screen, select the contacts of your choice > Option > Set as default > OK. The contact is displayed as the first contact in the Contacts screen. Turn on DnD To block contacts from calling you, use Turn on DnD (Do- not-Disturb) option. -
Page 61: Delete Contacts From Call Log
Delete contacts from call log To delete a contact from call log Select > Call log > Outgoing calls list Select the contact to be deleted. Select > Option > Delete > Select to confirm. Manage PTT groups A group includes names of contacts that form part of a spe- cific pre-arranged group, for example, family, friends and the like. -
Page 62: Delete Members From A Group
To add new contacts to the group using a telephone number, on the Groups screen scroll to the group and select Option > Edit/View members Add via number > OK. Enter the Contact name and Number and select Save. The new member is added to the group. -
Page 63: Edit/View Chat Group Information
want to rename and select Option > Rename chat group > OK. Select Clear to erase the existing Group name. Edit the chat group name and select Save changed name is reflected in the Chat groups list. Edit/view chat group information This option allows you to view, add, edit and delete mem- bers within a Chat group. -
Page 64: Import A Group
To remove a chat group, on the Chat groups screen scroll to the chat group you want to delete and select Option > Delete group > OK. Select to confirm the deletion. Select to the Chat groups list. The selected chat group is deleted from the Chat groups list. -
Page 65: Answered Calls List
Add to contacts: adds the outgoing contact to your contacts list, on the Outgoing calls list screen scroll to the contact and select > Option > tacts > Save > to add the name to your contacts. The updated Contacts list appears. Select revert to the Call list. -
Page 66: Rejoin A Group Session
Rejoin a group session This option is used when you want to join in or return to a PTT group session, which you have been part of and have opted out for some reason. On the Call list scroll to Rejoin group session When the Group ID is called, Ringing... -
Page 67: Make Calls From The Standby Screen
Select a PTT contact, press the key to initiate the call. If you select a group contact, select PTT invitation > to initiate the call. To proceed with the call After you have chosen any one of the invitation modes and have initiated the call, the screen displays Ringing. -
Page 68: Make Unplanned Group Calls
If any member takes floor control, Start receiving, Lis- is displayed at the top of the screen. During the session the status of all the members in the group is displayed on the screen. The name of the person speaking is highlighted in the displayed list of participants. -
Page 69: Mute Or Unmute The Session
Select Option > > Contacts > select the con- tact > Add. The contact will be invited for the PTT ses- sion. Mute or unmute the session Select Option > Mute. The speaker is turned off and all the incoming talk burst gets muted. If you want to unmute, Select >... -
Page 70: Configurable Default Ptt List
Configurable default PTT list Any one of Contact, Group or Chat group can be set as the default PTT list. Press Menu Key > Contact Group > from the PTT contacts. Select Set as default > from Options. Press the PTT button from the idle screen to bring up the default PTT list. -
Page 71: Wap
This mobile phone has an internal WAP browser (version 2.0) that allows you to browse contents of various WAP websites on the Internet. This facility is made available only if you subscribe to a data service from your network operator for Internet access. You need to consult your local operator for more details. - Page 72 Rename profile: Specify a name for the selected pro- file in this menu. The maximum length of the name is 40 characters. Cache: This is a storage mechanism provided in the phone. You can choose to enable the cache mode or clear the cache memory.
-
Page 73: Tools
Tools Tools are used to organize and manage your daily tasks sys- tematically. Organizer The Organizer has a calendar to enable you to set appoint- ments, create appropriate notes, schedule reminders when required, set alerts and repeat specific settings. Tasks can be viewed on a daily, weekly and monthly basis. To access the Organizer and its associated functions, select Menu... -
Page 74: Edit Organizer Entries
Edit organizer entries Select Menu > Tools > Organizer. Scroll to a date and press the Menu key to display the list of entries. Choose an entry (either meeting or memo) and select Option > Change. Delete entries You can delete one entry at a time or all entries simultane- ously. -
Page 75: Audio Recorder
Devices within a range of 10 meters can be connected wirelessly using Bluetooth technology. Sonim XP1(bt) is compliant with Bluetooth specification 1.2 supporting the following profiles: Headset profile, Hands free profile, Object push profile, Dial up networking profile, Serial port profile. -
Page 76: Bluetooth Settings
Bluetooth Settings The following table describes the settings available for Blue- tooth. Type Function Change name Select this option to change the name of your device. Hide/Visible Use this as a toggle option to select Hide or Visible. Select show your presence to other devices. Select Hide to hide your presence... -
Page 77: Delete Pairing
Object sent is displayed on the screen. When the other device rejects the file, the message connection failed XP1(bt) supports audio formats such as Own Melo- .mid/.amr/.wav/.mp3/.aac and image for- mats such as .jgp/.bmp/.wbmp. Receive data To receive data using Bluetooth, your device should be Bluetooth activated and must be visible to other devices. -
Page 78: Stopwatch
When you receive a data, you are asked if you want to accept it. Select Accept to receive data. Select Reject to refuse the data. If you accept, the picture data is placed in Pictures > Own Pictures folder. ... -
Page 79: Car Kit
Outgoing Calls Making calls: When using the Nokia CK-7W car kit with Sonim XP1, it is not possible to make outgoing GSM calls. The user needs to dial from the phone keypad only. Ending calls: During a call, press and hold the Remote control Button for couple of seconds. -
Page 80: Use Handsfree Mode For Calls
To end the call, click and hold the remote control but- ton.. Outgoing calls: When using the Nokia CK- 7W car kit with the Sonim XP1(bt) it is not possible to make outgoing GSM calls. The user needs to dial from the phone keypad for mak- key; this ing out going calls. -
Page 81: When Using A Bluetooth Headset
This feature is only available with Sonim XP1 R4.0 Software Release. Once the XP1(bt) handset is paired with a car kit, irrespective of wherever the GSM call is accepted (either in handset or in the car kit) audio is routed to the car kit only. - Page 82 For the list of certified bluetooth headsets for use with XP1(BT), please download the Car Kit Installation Guide from the Sonim website www.sonimtech.com.
-
Page 83: Personalize Your Phone
Personalize your phone You can customise ring tones, alerts and alarms on your phone for different environments. Select Menu > Quick settings. There are four environment profiles present in this phone. Normal is the default profile, while the other profiles are Silent, Meeting, Outdoors and Use in car. -
Page 84: Themes
Themes You can choose from the existing colour themes available on your phone. For more information refer “Phone settings” on page 20. Manage your files Using the My files menu, you can store and manage audio files and pictures. You can Preview the files, view their details and Delete files. -
Page 85: End User Licence Agreement
Sonim and its third party suppliers and licensors are the sole and exclusive owner of and retain all rights, title and inter- est in and to the Software. Sonim, and, to the extent that the Software contains material or code of a third party, such third party, shall be entitled third party beneficiaries of these terms. -
Page 86: Phone Care
Subjecting the phone to water jetting or immer- sion in water can damage it and must be avoided. The Sonim XP1(bt) is solid and built for heavy duty use. Its design protects against disassembly or mechanical damage when subjected to forces equal to free fall from the high of an average adult. - Page 87 Sonim recommends that you use only batteries and chargers approved by Sonim. Minor vari- ations in display brightness and colour may occur between phones. There may be tiny bright or dark dots on the display. These are called defective pixels and occur when individual dots have malfunctioned and can not be adjusted.
-
Page 88: Index
GPRS 30 dial 28 IP dial 28 send phone number 28 IPA 65 keypad accept/send 14 end call 14 function keys 11 LSK/RSK 14 navigation keys 15 power on/off 14 XP1(bt) 11 left selection key 11 managing your files 80... - Page 89 meeting mode 79 menu call list 27 key 9 main 17 options 2 Phonebk 27 quick settings 79 selection keys 43 tools 41 WAP 67 menu key 11 message settings memory 34 reply path 34 service number 34 validity period 34 messages auto case 16 conventional text 35...
- Page 90 call timer 32 minute reminder 32 send ID 32 PoC 53 power on/off/end call 11 presence 46 press 1 press and hold 2 call log 50 Close PTT 43 copy 50 display icons 46 function keys 42 groups 47 Push-to-Talk 53 PTT calls ad hoc 48 block 50...
- Page 91 38 address 67 bookmarks 67 cache 68 homepage 67 profile 67 resume 67 settings 67 speaker setting 44 XP1(bt) auto keypad lock 13 keypad 9 operation 14 phone 1 shortcuts 21...