
Related Manuals for Aviom A-16II


Summary of Contents for Aviom A-16II
-
Page 1: User Guide
P e r s o n a l M i x e r C o n s o l e P e r s o n n e l l e User Guide 9301 1006 0001F rev 2.00 © 2009 Aviom, Inc. - Page 2 Aviom, Inc. Trademarks Aviom, A‑Net, the A‑Net icon, Pro16, Pro64, and Virtual Data Cable are trademarks of Aviom, Inc. All other trademarks are the property of their respective owners.
-
Page 3: Important Safety Instructions
No on/off power switches are included in the system. The external power supply should be used to control power to an Aviom device. This power supply should remain readily operable. The solid line over dashed line symbol ( ) indicates that the input voltage must be a DC voltage. - Page 4 • Consult the dealer or an experienced radio/TV technician for help. Changes or modifications to the product not expressly approved by Aviom, Inc. could void the user’s FCC authority to operate the equipment.
- Page 5 If a defect is discovered, first write or call Aviom, Inc. to obtain a Return Authorization number. No service will be performed on any product returned without prior authorization.
-
Page 6: Warranty Information
To fulfill warranty requirements, your Aviom product should be serviced only at an authorized Aviom service center. The Aviom serial number label must appear on the outside of the unit, or the Aviom warranty is void. This manual and its contents are copyrighted by Aviom, Inc. All rights are reserved by Aviom, Inc. -
Page 7: Table Of Contents
Powering Up ......13 A-16II Features ......14 Operational Modes . - Page 8 Troubleshooting ......39 A-16II Personal Mixer Specifications....42 Personal Mixer Mounting Options .
-
Page 9: Welcome
The A‑16II Personal Mixer can be used with all of Aviom’s Pro16 A‑Net devices and can be connected to third‑party products such as console cards that support the Pro16 A‑Net protocol. -
Page 10: Conventions Used In This Document
When referring to the use of the personal mixers in a system in general, the terms A-16II Mixer or Personal Mixer are used to describe a case where a standard A‑16II Personal Mixer or a rack mounted A‑16R Personal Mixer (with/ without the optional A‑16CS Control Surface) can be used. -
Page 11: Package Contents
• User documentation Also included within this document is a Warranty registration page. Be sure to fill out the form and return it to Aviom, Inc. via mail or fax as soon as possible. About A-Net The Pro16® version of A‑Net® is a high‑speed data transmission protocol capable of sending and receiving high‑quality digital audio using readily... -
Page 12: Compatibility With Pro64
The twisting of the wire pairs helps to shield the cable from unwanted interference from electrical fields or radio interference (sometimes referred to as “RF”). Cat‑5 cabling supports frequencies up to 100 MHz and speeds up to 1000 Mbps. A-16ii P ersonAl ixer Uide... -
Page 13: Cat-5 Cables
Aviom equipment. Cable Lengths Cat‑5e cables used with your Aviom products can be up to 500 feet (150 meters) in length between devices. The maximum cable length specification applies to the cable connected between the A‑Net input module and the first Pro16 output device (such as an A‑16II Personal Mixer) in your system... - Page 14 Pro16 Output Bridge Bridge A-Net Out A-Net In Total cable length calculations include cables used top connect I/O modules to System Bridges. Pre‑made cables in a variety of lengths and colors are available at most A-16ii P ersonAl ixer Uide...
-
Page 15: Ac Line Conditioning
AC Line Conditioning Aviom products are digital devices and as such are sensitive to sudden spikes and drops in the AC line voltage. Changes in the line voltage from lightning, power outages, etc. can sometimes damage electronic equipment. -
Page 16: Cleaning And Maintenance Information
(See the diagram above.) Cleaning and Maintenance Information The exterior of your Aviom products should be cleaned with a dry, soft, lint‑ free cloth. For tougher dirt, you can use a cloth slightly dampened with water or with a mild detergent. -
Page 17: A-16Ii Personal Mixer Components
A-16II Personal Mixer Components A-16ii P ersonAl ixer Uide... -
Page 18: Solo Button
Label strip Recall button (for Save, hold R and G ecall Roup Group button Trim function (hold G and press M Roup Phones/Lines Out DC Power A-Net 18-24 VDC Regulated 500 mA T-Left R-Right S-Ground A-16ii P ersonAl ixer Uide... -
Page 19: Monitor System Setup
Connecting the Personal Mixers in this manner is referred to as a series connection, also known as a daisy chain. Any combination of A‑16II and A‑16R Personal Mixers as well as other Pro16 output devices can be used to create a system. A-16ii P ersonAl ixer Uide... -
Page 20: Audio Connections
Optionally, apply removable artist’s tape to the label strip prior to labeling each Personal Mixer. A convenient MS Excel format label strip template, available on the Aviom website, can be used to print out text labels for the A‑16II from a computer. -
Page 21: Powering Up
Follow this by powering up your A‑Net input module and then all connected A‑16II Personal Mixers. Lastly, turn on any power amps, powered monitor speakers, in‑ear monitors, etc. that are part of the monitor system. A-16ii P ersonAl ixer Uide... -
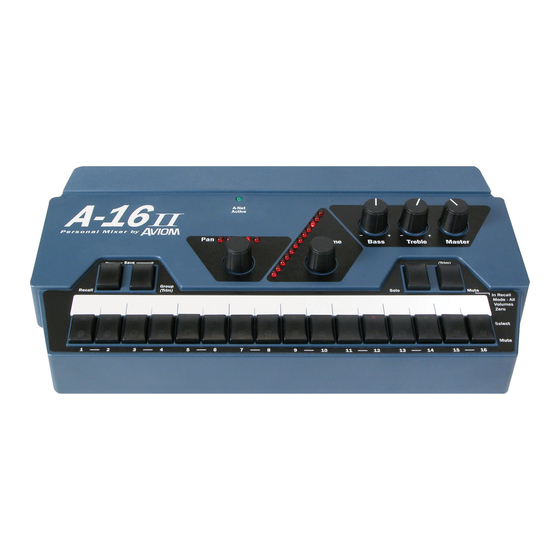
Page 22: A-16Ii Features
• Bass and Treble tone controls • Master Volume control • A‑Net Active LED indicator The A-16II front panel Operational Modes When using the A‑16II Personal Mixer, you will be in one of the following modes: • Mix Mode — Here you can change channel and mix settings such as volume, mute, and panning;... -
Page 23: Global Controls
These controls affect the entire mix, not the individual channels. The global Bass, Treble, and Master volume controls The default position for the B and t knobs is at 12 o’clock. To add more ReBle A-16ii P ersonAl ixer Uide... -
Page 24: Master Volume
Group. • and G buttons will both flash when held ecall Roup down simultaneously. This is the Save Mode, as indicated by the connecting graphic above the two buttons on the A-16ii P ersonAl ixer Uide... -
Page 25: Basic Navigation
Groups. (More info on Groups appears later in this document.) The lower yellow LED in each channel button indicates the channel’s mute status. A lit LED indicates that the channel is muted. Any number of channels can be muted. A-16ii P ersonAl ixer Uide... -
Page 26: Personal Mixer Rear Panel
DC Power Input Connect the DC power supply to the jack on the rear of the Personal Mixer. Use only power supplies designed for your Aviom products. Audio Outputs The audio outputs on the rear of the A‑16II Personal Mixer can be used with headphones, in‑ear monitors, powered speakers, or any other device that... -
Page 27: Automatic Mono/Stereo Plug Detection
500 mA T-Left R-Right S-Ground The headphone/line output of the A-16II has a TRS stereo output. Stereo The TRS outputs on the Personal Mixer are stereo. Any pair of stereo headphones or earphones can simply be plugged into the jack. -
Page 28: Making A Mix
Volume LED indicators. There are twenty‑four visible volume steps available in the Volume LEDs. Each LED lights at two levels, first at half brightness, then at full brightness. More LEDs lit indicates higher volume. A-16ii P ersonAl ixer Uide... -
Page 29: Setting Channel Volume
When using stereo linked channels, the LEDs light in different patterns, using a pair of LEDs on either side of the display to indicate the width of the stereo A-16ii P ersonAl ixer... -
Page 30: Linking Channels
This allows you to position stereo sources in your mix by controlling the width of the stereo image. Spread changes the panning of the left and right channels simultaneously. Instead of having two channels panned 100% left and right, Spread allows A-16ii P ersonAl ixer Uide... -
Page 31: The Effect Of The Spread Control
S button again to exit. To select a different channel for auditioning in Solo mode, remember that you must first select a channel and then press the S button to enter Solo mode. A-16ii P ersonAl ixer Uide... -
Page 32: Held Solo Mode
Mix Mode. If you currently have a channel temporarily soloed (the Solo LED is lit solid), you must exit the single channel Solo Mode (by hitting another channel button or the S button) before you can enter Held Solo Mode. A-16ii P ersonAl ixer Uide... -
Page 33: Mute A Channel
• The yellow LED will go out. • To clear mutes on other channels, continue selecting chan‑ nels, pressing the M button to clear each mute. Save the Preset with the mutes, if desired. A-16ii P ersonAl ixer Uide... -
Page 34: Creating Groups
• Horns and woodwinds can be controlled together. • Rhythm section instruments can be combined into one source. Creating and editing Groups is done in the Group Mode. A-16ii P ersonAl ixer Uide... -
Page 35: Creating Additional Groups
The instructions in the previous section describe how to create and save the first Group in a mix. Creating additional Groups follows the same procedure. Use these steps to create a second and/or third Group. • Select a channel that is not currently part of an existing A-16ii P ersonAl ixer Uide... -
Page 36: Making Changes To A Group
Group. The changes you make to volume and pan affect only the selected channel, allowing you to change the relative balance of the individual components of your Group. Changes can be made in real time. A-16ii P ersonAl ixer Uide... -
Page 37: Removing Channels From A Group
Personal Mixers being used in a system. Remember that although you have edited and saved changes to a Group, you must still save the Preset if you want to recall the Preset with the new Group configuration intact. A-16ii P ersonAl ixer Uide... -
Page 38: Muting Groups
To Use the Global Trim function: • Hold the button down. Roup • While still holding the button, press the M button Roup once. • The mix is trimmed by 6dB on all channels • Perform additional trims as needed. A-16ii P ersonAl ixer Uide... -
Page 39: Save A Preset
Preset location #1. Any temporary edits that are not saved to a memory location are cleared when the A‑16II is turned off. A-16ii P ersonAl ixer... -
Page 40: Verify A Mix Memory Location
The red LED in the channel button that corresponds to the last recalled Preset will light as long as these two buttons are held. : Remember to save your new mix to a memory location before turning the monitoring system off. A-16ii P ersonAl ixer Uide... -
Page 41: Applications
This section describes how to set up and use the Pro16 Monitor Mixing System in a variety of contexts. Pro16 mic‑ or line‑level input modules such as the AN‑16/i and AN‑16/i‑M can be used as well as console cards from Aviom and third‑party manufacturers. -
Page 42: Using Aux Sends
What if you need to add an effect such as a compressor to the same channel feeding the monitor system via the input module? There are a couple of options. For both examples, start with the cables set up as just described for A-16ii P ersonAl ixer... -
Page 43: Studio Cue System
In the studio, performers also need to listen back to tracks they have just recorded. If each performer is using a different mix while recording, playback of the track will be different in each set of headphones. A-16ii P ersonAl ixer... -
Page 44: Adding Effects To A Monitor Mix
There are two ways of accomplishing this: • Patch the effects returns from the mixing console into the Pro16 input module via insert points if available. • Connect the effects device’s audio outputs to the Pro16 A-16ii P ersonAl ixer Uide... -
Page 45: Adding Live Ambience To A Monitor Mix
Set the stereo link switches on the input module for any stereo channel pairs. Other Uses for the Personal Mixer Outputs The stereo audio outputs on the Personal Mixer can be used with stereo headphones, in‑ear monitors, or powered speakers. But, since the outputs A-16ii P ersonAl ixer Uide... -
Page 46: Record A Mix
• Choose an appropriate audio level for recording on the device by setting the Master volume control on the A‑16II to a level that does not distort the inputs of the recorder. A-16ii P ersonAl ixer Uide... -
Page 47: Troubleshooting
The Preset is saved when you release your finger from the memory location button. When a Preset has been saved correctly, you will see all sixteen channel LEDs flash momentarily to confirm the save operation. A-16ii P ersonAl ixer Uide... - Page 48 Preset will be adjusted to agree with the current settings on the input module’s front panel. If this happens, simply change the position of the Link switch on the input module. Your current mix will be updated immediately. A-16ii P ersonAl ixer Uide...
- Page 49 If you already have three Groups defined and attempt to create a new Group, the button press is ignored. Creating a new Group would exceed the limit of three Groups per Preset. Edit or delete an existing Group to continue. A-16ii P ersonAl ixer Uide...
-
Page 50: A-16Ii Personal Mixer Specifications
10.75” (273 mm) wide x 5.6” (142.2 mm) deep; 2.25” (57.5 mm) high Weight 3.4 lb. (1.54 kg) Options MT‑1 Mic Stand Bracket (uses 6‑32, 1/4‑inch machine screws) EB‑1 Extension Bracket All Aviom products are designed and manufactured in the USA. A-16ii P ersonAl ixer Uide... -
Page 51: Personal Mixer Mounting Options
The A‑16II can be mounted to standard mic stands with the MT‑1, which attaches to the bottom of the Personal Mixer. MT-1 Mic Stand Mount The MT‑1 attaches to the Personal Mixers using three machine screws, size 6‑32, 1/4‑inch long. A-16ii P ersonAl ixer Uide... -
Page 52: Block Diagram
Block Diagram A-16ii P ersonAl ixer Uide... - Page 53 Dimensions A-16ii P ersonAl ixer Uide...
- Page 54 UTP 4 Group ‑ Making Changes 28 Cat‑6 2, 5 Group Mode 15 Category 5 4 Category 5e Certifications ii headphones 19 Channel Headphones/Line output 12 selecting 20 Held Solo Mode 23, 24 Channel buttons 17 A-16ii P ersonAl ixer Uide...
- Page 55 Save 10 Mute button 17 Save a Preset 31 mute status 17 Save Mode 15, 16 Muting Groups 29 save Preset scribble strip 12 series connection 11 N‑16/i‑M 33 Solo 10, 17, 23 network 3 A-16ii P ersonAl ixer Uide...
- Page 56 Unshielded Twisted Pair 4 UPS 7 UTP 4, 42 Verify a Mix Location 32 Volume knob 20 Volume LEDs 20, 32 width stereo pan 23 XLR input 19 Y Cable Insert 34 Y‑cord 19 yellow LED 17 A-16ii P ersonAl ixer Uide...
-
Page 57: Warranty Registration
Warranty Registration Please take a moment to fill in this warranty registration form. Return it to Aviom via mail or fax. All information will be kept confidential. Model Number Product Serial Number Model Number Product Serial Number Model Number Product Serial Number... - Page 58 1157 Phoenixville Pike, Suite 201 • West Chester, PA 19380 Voice: +1 610.738.9005 • Fax: +1 610.738.9950 • www.Aviom.com...