Table of Contents
Advertisement
Quick Links
Download this manual
See also:
User Manual
Advertisement
Table of Contents

Related Manuals for Aviom A360


Summary of Contents for Aviom A360
- Page 1 User Guide 9310 1027 0001F rev 1.1 © 2013 Aviom, Inc.
-
Page 2: Important Safety Instructions
No on/off power switches are included in the system. The external power supply should be used to control power to an Aviom device. This power supply should remain readily operable. The solid line over dashed line symbol ( ) indicates that the input voltage must be a DC voltage. - Page 3 Connect the equipment into an outlet on a circuit different from that to which the receiver is connected. • Consult the dealer or an experienced radio/TV technician for help. Changes or modifications to the product not expressly approved by Aviom, Inc. could void the user’s FCC authority to operate the equipment. CAUTION: •...
-
Page 4: Certifications
Trademarks Aviom, A-Net, the A-Net icon, Pro16, Pro16e, Pro64, Virtual Data Cables, m-control, One-Touch Ambience, Dual Profile Channel, Network MixBack, and AllFrame are trademarks of Aviom, Inc. All other trademarks are the property of their respective owners. ©2013 Aviom, Inc. All rights reserved. -
Page 5: Aviom, Inc. Limited Warranty
Quality Assurance label has been damaged, modified, or removed. If a defect is discovered, first write or call Aviom, Inc. to obtain a Return Authorization number. No service will be performed on any product returned without prior authorization. Aviom, Inc. will, at its option, repair or replace the product at no charge to you. -
Page 6: Warranty Information
Authorized Aviom Repair Station, check the Aviom web site at www.aviom.com. To fulfill warranty requirements, your Aviom product should be serviced only at an authorized Aviom service center. The Aviom serial number label must appear on the outside of the unit, or the Aviom warranty is void. -
Page 7: Table Of Contents
Certifications ....... iv Aviom, Inc. Limited Warranty ..... . . v Warranty Information . - Page 8 Mono Mix Out ......44 A360 Modes ....... 45 Mode Switch .
- Page 9 Personal Mixing System Setup ....56 Adding the A360 to an Existing System ....56 Daisy Chain Connections .
-
Page 10: A360 Personal Mixer
Feature Overview The A360 Personal Mixer is part of Aviom’s Pro16® Series of products; it can be combined with Pro16® and Pro16e™ analog input devices, console cards, and/or the Pro64® ASI A-Net® Systems Interface to create personal mixing systems for applications in live performance, recording, and broadcast. -
Page 11: Conventions Used In This Document
When referring to the use of the Personal Mixers in a personal mixing system in general, the term Personal Mixer is used to describe a case where an A360 Personal Mixer, A-16II Personal Mixer, or an A-16R Rack-mount Personal Mixer (with or without the optional A-16CS Control Surface) can be used. -
Page 12: Package Contents
Pro16e® version of A-Net is capable of carrying up to 64 channels of digital audio data. Like standard Pro16 A-Net, Pro16e is a point-to-point digital audio protocol. Pro16e A-Net data is intended for use with the A360 Personal Mixer which can take advantage of the higher network channel count that Pro16e provides. -
Page 13: Compatibility
Pro16 outputs, depending on the Pro64 sample rate being used. Any of the four Pro16 A-Net outputs from the ASI may be connected to the A-Net In on the A360 Personal Mixer either directly or by adding an A-Net distributor to the signal path between the ASI and A360. -
Page 14: About Category 5
Aviom products. Cat-5e Cables Any standard Cat-5e UTP cable may be used with your Aviom products. If you need a longer cable for a particular application, any computer store should be able to supply you with an appropriate cable. A qualified technician should be able to build custom cables to any length. -
Page 15: Cable Lengths
Cable Lengths For Pro16 applications—connecting one Pro16 device to another—the Cat-5e cables used with your Aviom products may be up to 500 feet (approximately 150 meters) in length between devices. For example, connecting an AN-16/i-M Mic Input Module to an AN-16/o Output Module is a Pro16-to-Pro16 connection. -
Page 16: Ac Line Conditioning
(sometimes referred to as an uninterruptible power supply, or UPS). Power Supplies The A360 Personal Mixer is intended to be connected to an A-Net Distributor such as the D800 or A-16D Pro when creating a personal mixing system. A-Net Distributors provide both parallel A-Net connections for up to eight devices as well as the DC power required to run them. -
Page 17: Cleaning And Maintenance Information
Cleaning and Maintenance Information The exterior of your Aviom products should be cleaned with a dry, soft, lint-free cloth. For tougher dirt, you can use a cloth slightly dampened with water or with a mild detergent. When cleaning your Aviom products, never spray cleaners directly onto the product surfaces. Instead, spray a small amount of the cleaning solution onto a clean cloth first. -
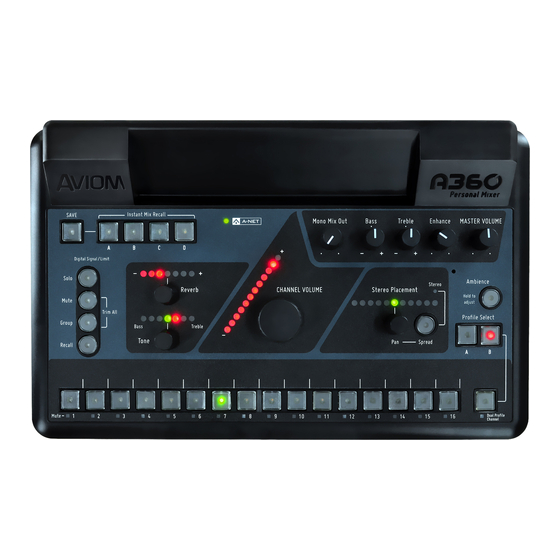
Page 18: A360 Front Panel
A360 Front Panel Mix Channels Function Channel Label Strip Channel Buttons with LED – green Channel Mute LEDs – yellow Dual Profile Channel™ Button Profile Select Buttons for the Dual Profile Channel One-Touch Ambience™ Button and Built-in Ambience Mic... -
Page 19: Channel Label Strip
PreAD Channel 2 is selected. When used with a single 16-channel Pro16 A-Net input device or when the A360 rear-panel mode switch is set to P 16, a stereo source will be mapped to two adjacent channel buttons (in odd-even pairs). Pressing either channel button will light both buttons, and the stereo channel pair may be edited using the Reverb, Tone, Channel Volume and Pan/Spread controls. -
Page 20: Channel Mute Leds
While muted, a channel’s Reverb, Tone, Volume, Pan, and Spread (if stereo) can still be edited. Channels 4 and 6 are already muted. Channel 3 is selected; press the round Mute button to mute it. A360 P ersonAl ixer... -
Page 21: Dual Profile Channel
Profile Channel can mirror one of the 16 mix channel buttons, allowing a performer to place a favorite or important channel in an easy-to-reach position on the A360 Personal Mixer. Second, when the A360 mode switch is set to C... -
Page 22: What Gets Stored In A Profile
Setting Up a Channel Mirror The A360 allows any one of the 16 standard mix channels to be assigned to the Dual Profile Channel with a single button press, using the Dual Profile Channel as a shortcut to that mix channel. This is the behavior... -
Page 23: Using The Dual Profile Channel As A Mix Channel
A custom channel configuration created using the A360 Channel Manager software can include the mapping of a network slot to the Dual Profile Channel. Once this configuration is loaded into the A360 and the A360 rear-panel mode switch is set to C... -
Page 24: One-Touch Ambience
Adding an ambient mic to bring outside sounds into the monitor mix can be a solution to these problems. The A360 offers two ways to do this: first, with its onboard mic and second, with the ability to assign room mics to the Ambience channel that have been set up by an engineer and made part of the network. -
Page 25: Setting The Ambience Level
While setting the mic level, the Tone, Reverb, and Pan LEDs will not be lit, and the active mix channel LED will also go out. The One-Touch Ambience level and its on/off state are saved as part of each Mix Preset. Hold Ambience and then turn the Channel Volume knob to set the level. A360 P ersonAl ixer Uide... -
Page 26: Using Network Audio For One-Touch Ambience
Using Network Audio For One-Touch Ambience As with the Dual Profile Channel, the A360’s Custom mode allows the user to go beyond the sequential channel mapping of the Default mode, customizing each Personal Mixer’s channel assignments to suit the needs of the performers. With the A360 rear-panel mode switch set to C... - Page 27 While the onboard mic in the A360 can be used to bring audience sound into the local monitor mix, remember that the onboard mic is not always going to be in an ideal location to pick up ambience and imaging from the performance space as a stereo pair of room mics can.
-
Page 28: Channel Controls Section
Function Reverb Knob and Reverb Level LEDs Bass/Treble Tone Knob and Tone LEDs Channel Volume Knob and Level LEDs Stereo Placement Pan Knob and Pan/Spread LEDs Stereo LED Spread Button A360 P ersonAl ixer Uide... -
Page 29: Channel Controls
—low and high. Each LED turns on first at its low level and then at its high level; only one LED will be at its full level while editing. The A360 Personal Mixer’s reverb algorithm is preset and is designed as an easy-to-use live monitoring tool. As such, no editable reverb parameters are available to the user. -
Page 30: Channel Volume
Set each channel’s level with the Channel Volume control. The Channel Volume setting for each of the 16 standard mix channels as well as for the Dual Profile Channel and Ambience is saved with each Mix Preset. A360 P ersonAl ixer... -
Page 31: Stereo Placement
Stereo sources are set up at the Pro16 or Pro16e input device feeding the A360 Personal Mixers by simply setting the stereo/mono Link switch for a pair of channels. On the A360, the stereo channel behavior is slightly different for the two variations of A-Net it can receive. -
Page 32: Using A Pro16 Input Device
If a single AN-16/i v.2 Input Module is used to create a personal mixing system of 16 inputs or less, the A360 rear-panel mode switch should be set to P 16 so that even-numbered mono channels are not ignored. -
Page 33: Understanding Pan And Spread
Understanding Pan and Spread On the A360, Spread is used to indicate the distance between the left and right sides of a stereo channel. The default spread for a stereo source is full left and full right. The default spread for a stereo source To change the Spread for a stereo channel, press the S button;... - Page 34 If another mix channel is selected while that channel is collapsed to mono, the previous channel’s spread is set to mono. Its stereo spread can be restored by reselecting the channel and reactivating the S PreAD button and setting a new Spread amount. A360 P ersonAl ixer Uide...
-
Page 35: Editing Controls Section
The Mute, Solo, Group, and the Trim All functions are available in this section, along with the Digital Signal/Limit LED indicator. Function Digital Signal/Limit LED, bi-color green/red Solo Button Mute Button Group Button Trim All Function (Mute + Group buttons) A360 P ersonAl ixer Uide... -
Page 36: Digital Signal/Limit
Groups to add them to the existing solo channels. Exit the Solo state by again pressing the S button; the Solo LED stops blinking and goes out; the A360 returns to the normal mixing state. Solo, Group and Mute buttons with their LEDs The following rules apply when the Solo button is engaged: •... -
Page 37: Mute Button
Four user-defined Groups are available within each Mix Preset stored in the A360 Personal Mixer. By default, no Groups exist. A Group may contain any combination of the 16 mono or stereo channel buttons, but note that a channel button cannot be a member of more than one Group. - Page 38 When using Pro16 Mode on the A360, stereo links are treated as pairs of adjacent odd-even channels. Double-clicking either the left or right side of the stereo pair will add or remove it from a Group. It is not possible to add only one side of a stereo pair to a Group.
-
Page 39: Mixing With Groups
Mix Preset. When a Group is selected while mixing on the A360, the Reverb, Tone, and Stereo Placement controls are disabled. These settings can only be changed when in the Group edit mode. See the explanation that follows. -
Page 40: Stereo Links And Groups
A360; the Group is cleared. • If a stereo link is activated causing a channel to be removed from a Group so that it leaves a single channel in the old Group, that Group will be cleared since a Group requires two or more channels. - Page 41 After using the Trim All function to eliminate clipping as described above, you may need to raise the Master Volume level to compensate for the lower overall mix level. The effect of using the Trim All function is seen for channel 6. All other mix channel levels are reduced by the same amount. A360 P ersonAl ixer...
-
Page 42: Master Section
Master Section The master section of the A360 Personal Mixer’s interface includes the A-Net LED and the global master volume and tone controls. Function A-Net LED, bi-color green/red Mono Mix Out Volume Control Bass Tone Control... -
Page 43: Master Section Functions
The Master Volume level is not saved as part of a Mix Preset. Mono Mix Out The A360 generates a balanced line-level mono mix that makes connecting a subwoofer, bass shaker, or powered speaker easy. The m knob controls the level of the mono mix being sent to the XLR jack on the rear panel. -
Page 44: Bass Tone Control
Master Volume determines the mix level available to the Mono Mix Out. The A360 automatically generates a mono mix regardless of any stereo placement and/or panning used in the stereo mix heard at the S jacks. The Mono Mix Out level is not saved as part of a Mix tereo Preset. -
Page 45: A-Net Led
The amount of the Enhance tone control is a global setting and is not saved in a Mix Preset. A-Net LED The A-Net LED lights whenever a valid Pro16 or Pro16e A-Net signal is connected to the A360. When the 16-channel Pro16 version of A-Net is connected, the LED lights green; when the enhanced (up to) 64-channel Pro16e version of A-Net is connected, the LED lights red. -
Page 46: Mix Presets
Mix Presets Mixes created on the A360 can be saved to the four Instant Mix Recall locations or to the sixteen mix channel button locations— for a total of 20 mixes. Function Save Button Instant Mix Recall™ Buttons A, B, C, and D... -
Page 47: Saving Mix Presets
All 20 Mix Presets in the A360 can be backed up to a PC or copied to another A360 by saving the A360’s configuration to a USB memory stick in Program mode. See page 51 for information on saving to USB. -
Page 48: Instant Mix Recall Buttons
Recall button where the mix was just stored will light green. After saving a mix to an Instant Mix Recall location, its LED will remain lit as a reminder until another Mix Preset is stored. A360 P ersonAl ixer Uide... -
Page 49: To Recall An Instant Mix Preset
Instant Mix Recall presets. To Recall a Standard Mix Preset To recall a mix that has been stored in one of the A360 Personal Mixer’s standard mix locations (the channel buttons 1-16): Press and then release the button;... -
Page 50: Clear A Mix
The Dual Profile Channel’s mix values are reset for Profiles A and B • Profile A is selected • Channel Button 1 is selected • Ambience is reset to its default level Channel mapping assignments, the Mode switch position, and all saved Mix Presets are unaffected. A360 P ersonAl ixer Uide... -
Page 51: What Gets Saved In A Mix Preset
Remember that a Mix Preset does not store custom channel mappings created with the A360 Channel Manager software. Mix presets are designed to work with the specific channel mapping configuration that was in use at the time the Mix Preset was saved. Therefore, if a different mixer configuration is loaded, there is no guarantee that the new channel map will work with the channel-level settings saved in the Mix Presets. -
Page 52: A360 Personal Mixer Rear Panel
A360 Personal Mixer Rear Panel A-Net In Mono Mix Out 24VDC Regulated 500 mA Stereo Mix Out Data PROGRAM CUSTOM DEFAULT Pro16 Function Stereo Mix Out – 1/8-inch and 1/4-inch TRS Mono Mix Out – XLR male USB Data Port Mode Switch –... -
Page 53: Rear Panel Features
Rear Panel Features This section details the function of each of the rear panel features on the A360 Personal Mixer. Stereo Mix Out Both 1/8-inch and 1/4-inch TRS Stereo Mix Out jacks are provided for simplified connections to earbuds and headphones. Both outputs can be used at the same time if needed, but note that the impedance of both devices should be similar to avoid a volume imbalance. -
Page 54: A360 Modes
Pro16e A-Net offers. In order to maintain the unit’s flexibility in a variety of contexts, the four-position mode switch is used. The position of the mode switch will have an impact on Mix Presets created on the A360. See page 38 for more information about creating Mix Presets. -
Page 55: Pro16 Mode
16 for systems with 16 or fewer channels when a single Pro16 input device is used. Channels are laid out on the A360 as they are on the A-16II and A-16R Personal Mixers. There is a one- to-one correspondence between the input device’s channel patching assignment and the Personal Mixer’s channels, and this channel order cannot be changed. - Page 56 Power Each channel pair of an input module provides either a mono or stereo source for an A360 mix button, as determined by the Mono/Stereo link switch on the AN16/i v.2. When set to mono, the right side input is ignored by Pro16e devices unless custom mapping is used.
-
Page 57: How Stereo Links Work
(right) If the channels are not stereo linked, then only the odd (left) input module channel is utilized by the A360, and the even (right) input module channel is ignored (but may be used by A-16II mixers in the system or by A360 Personal Mixers that are running in Pro16 or Custom mode). -
Page 58: Program Mode
Saving a configuration from the A360 Personal Mixer to the USB memory device copies the current channel configuration plus all Mix Presets. The 20 Mix Preset files in an A360 can be copied to a PC for backup, but cannot be edited. - Page 59 A custom channel configuration is shown in the A360 Channel Manager software. A360 P ersonAl ixer Uide...
-
Page 60: Usb Data Port
Saving a Mixer Configuration to a USB Device Mix Presets created in an A360 may be saved to a USB memory device for backup or loading into another A360 Personal Mixer in the form of a mixer configuration. This allows a user’s Mix Presets to be backed up to a computer or transferred to another A360 Personal Mixer. -
Page 61: Loading A Mixer Configuration
Mixer configurations make it easy to copy Mix Presets from one A360 to another. They are also used to assign a unique set of network slots for each performer and then quickly load those custom channel maps into each A360 Personal Mixer in a personal mixing system. -
Page 62: Updating Firmware
The audio outputs are available again. USB device can be safely removed. arNiNg Do not press any of the user interface buttons, remove the USB stick, or turn off the A360 Personal Mixer while its firmware is being updated. A360 P... -
Page 63: Firmware Update Error Warnings
Firmware Update Error Warnings Warning Description After pressing the S and S The A360’s firmware is up to date; the buttons, the channel select button LEDs light briefly, current version of the firmware is already installed. and the Personal Mixer returns to the pre-update (normal mixing) state. -
Page 64: A-Net In
Neutrik EtherCon plug. When connected to an A-Net distributor such as the D800 or A-16D Pro, the A360 also receives DC power over the same Cat-5e data cable. In this case an external DC power supply is not required. -
Page 65: Personal Mixing System Setup
Adding the A360 to an Existing System The A360 Personal Mixer can be added to existing 16-channel personal mixing systems that use the A-16II Personal Mixer (and/or the rack-mount version, the A-16R). Most of these systems use the same basic layout—an input device (analog or a digital console card) is used to generate an A-Net digital signal which... - Page 66 A typical daisy chained Pro16 personal mixing system with six A-16II mixers is shown. One A360 Personal Mixer may be added to a daisy chain personal mixing system, but only at the end of the daisy chain—the A360 has only an A-N port and must be the last device in a daisy chain.
-
Page 67: Parallel Connections
16-channel A-Net signal that is distributed to the Personal Mixers. Using one or more A-Net distributors allows any number of A360 Personal Mixers to be integrated into a personal mixing system along with A-16II and A-16R Personal Mixers. As with the daisy chain system, the... - Page 68 The A360 Personal Mixer can make use of the enhanced version of A-Net, Pro16e, which allows up to 64 audio slots to be included in the network pool by using up to four input devices. Each A360 in a personal mixing system may be programmed to use any combination of these network slots.
-
Page 69: Slot Range Setup
A-N of the A-Net distributor. The A360 Personal Mixers are then connected to the distributor’s A-N ports. A legacy Pro16 device may be substituted for the first bank of 16 channels in a daisy chain of input devices. - Page 70 Personal M to all Personal M Channels 33-48 Channels 33-48 AN-16/i AN-16/i Channels 49-64 Channels 49-64 Select A360 mix channels from all Select A360 mix channels from all 64 network channels ( 64 network channels ( mode) mode) USTOM USTOM...
-
Page 71: Using Legacy Input Devices
Pro16e stream Pro16e stream Four AN-16/i v.2 Input Modules can provide up to 64 audio sources for A360 Personal Mixers to select from. * A Pro16 device—original AN-16/i, AN-16/i-M, Y1 A-Net card, ASI, or a third-party console card—may be substituted for the first AN-16/i v.2 in a daisy chain of input devices; a legacy device automatically defaults to Slot Range 1-16. -
Page 72: Connecting Monitoring Devices
The A360 has 1/4-inch and 1/8-inch stereo and XLR mono mix outputs available. Connecting to the Stereo Mix Output The A360 has a pair of jacks—1/4-inch and 1/8-inch TRS—dedicated to the stereo mix coming from the Personal Mixer. Both jacks are always active. -
Page 73: Stereo Wireless In-Ear Systems
Stereo Wireless In-Ear Systems The A360’s Stereo Mix Out may be connected to the left/right inputs of a wireless transmitter used for in-ear monitoring. A Y-cable that splits the TRS stereo output to a pair of TS mono left and right outputs is required. -
Page 74: Stereo Speakers
DEFAULT Pro16 A Y-cable is required to connect the A360 to stereo powered speakers. If the powered speakers have XLR inputs, a custom cable may be required. Check the speaker’s documentation for information about properly connecting the unbalanced left and right signals from the A360 Stereo Mix Out to the balanced inputs of the powered speakers. -
Page 75: Connecting To The Mono Mix Out
Connecting to the Mono Mix Out In addition to the 1/4-inch and 1/8-inch Stereo Mix Outs, the A360 has a dedicated Mono Mix Out that is always available. The Mono Mix Out can be used alone—connected to a powered wedge, for example—or in conjunction with a stereo monitoring device such as headphones where the mono out is connected to a subwoofer or tactile bass shaker device. -
Page 76: Subwoofers
No editing is required to create the mono output. The A360 automatically sums stereo channel and pan information to mono, even if the inputs have been stereo linked at the input modules. Subwoofers When a subwoofer is used to supplement a performer’s monitor mix, the Stereo Mix Out and Mono Mix Out are used simultaneously. -
Page 77: Tactile Shaker Devices
Connect earbuds or headphones to the S ; connect an XLR cable from the m tereo the A360 to the input of the bass shaker device. An adapter cable may be required if the shaker device cannot accept a line-level balanced XLR signal. A-Net In... -
Page 78: Specifications
2 mm 11” (279.4 mm) wide x 6.9” (175.26 mm) deep; Dimensions 1.835” (46.61 mm) high Weight 3.4 lb. (1.54 kg) MT-1a Mic Stand Mount (uses 6-32 1/4-inch screws); Options EB-1 Extension Bracket; PS-120 Power Supply A360 P ersonAl ixer Uide... -
Page 79: Dimensions
175.26 mm 11.000 in. 279.4 mm 1.835 in. 46.609 mm 1.155 in. 29.337 mm A-Net In Mono Mix Out 24VDC 2.049 in. Regulated 52.0446 mm 500 mA Stereo Mix Out Data PROGRAM CUSTOM DEFAULT Pro16 A360 P ersonAl ixer Uide... -
Page 80: Mixer Label
Mixer Label Use this template as a starting point for creating custom Personal Mixer labels for the A360. It is shown actual size. A360 P ersonAl ixer Uide... -
Page 81: Cat-5 Cable Pinout
T568A RJ45 Pin Wire Color White/Green Green White/Orange Blue White/Blue Orange White/Brown Brown T568B RJ45 Pin Wire Color White/Orange Orange White/Green Blue White/Blue Green White/Brown Brown A360 P ersonAl ixer Uide... - Page 82 A-16II Personal Mixer 2, 4, 45, 46, 48, 56, 58, 61 AV-P2 Output Module 4 A-16R Personal Mixer 46, 56, 61 A-16R Rack-mount Personal Mixer 2, 4 A360 Channel Manager 3, 12, 14, 17, 42, 49, 59 A360 Master Volume Mono Mix Out 45 backup...
- Page 83 17, 47 Default Channel Button 9, 10 mode switch 10 Memory Locations 37 Default A360 Channel 48 channel button LED Default Mode 10, 14, 17, 23, 29, 40, 45, 46, 47, 52 in a Group 30 default setting...
- Page 84 6 Memory Location 37 certified 6 Memory Locations 37 input device 22 memory stick 53 Input Module 4 Mic 12, 15, 28 Input Voltage 7, 69 Mic Level 16 insert cable 44 Mic on/off 15 A360 P ersonAl ixer Uide...
- Page 85 44 TRS 64 Mono Mix Out 22, 33, 34, 44, 66, 67, 68 Pinout 72 A360 Master Volume 45 Plug Size Mono Mix Out knob 34 DC Power 7, 69 Mono Mix Out level 42, 66 Polarity...
- Page 86 T568B 72 Saving Mix Presets 38, 51 tactile shaker 44 SB4 System Bridge 6 Tactile Shaker 68 Setup 56 template shaker 44 Mixer Label 71 Shaker 63, 66, 68 throne shaker Signal/Clip LED 21, 31 A360 P ersonAl ixer Uide...
- Page 87 USB memory stick 49, 53, 59 USB port 51, 52 Using a Pro16 Input Device 23 UTP 2, 5, 55 Cat-5e 69 Voltage 7 Volume 33 Master vs. Mono 45 Volume LEDs 53 Warranty Registration 3 wedge 66 A360 P ersonAl ixer Uide...
-
Page 88: Warranty Registration
Warranty Registration Please take a moment to fill in this warranty registration form. Return it to Aviom via mail or fax. All information will be kept confidential. Model Product Serial Number Model Product Serial Number Model Product Serial Number Model... - Page 89 1157 Phoenixville Pike, Suite 201 • West Chester, PA 19380 USA Voice: +1 610.738.9005 • Fax: +1 610.738.9950 • www.Aviom.com...