Table of Contents
Advertisement
Advertisement
Table of Contents

Related Manuals for Smeg SFA304X


Summary of Contents for Smeg SFA304X
- Page 1 INSTRUCTION MANUAL BUILT-IN OVEN SFA304X SA562X...
- Page 2 ENGLISH Dear customer, we would like to thank you for your confidence in us. By choosing a Smeg product, you have opted for solutions where research for beauty meets innovative technical design to provide unique pieces of furniture. We hope you get the most out of your household appliance.
-
Page 3: Table Of Contents
4.10 Extraordinary maintenance 5 Installation 5.1 Electrical connection 5.2 Cable replacement 5.3 Positioning We advise you to read this manual carefully, which contains all the instructions for maintaining the appliance's aesthetic and functional qualities. For further information on the product: www.smeg.com... -
Page 4: Instructions
Instructions 1 Instructions • Do not insert pointed metal objects (cutlery or utensils) into the slots in the 1.1 General safety instructions appliance. Risk of personal injury • Do not try to repair the appliance yourself or without the intervention of •... -
Page 5: Manufacturer Liability
Instructions For this appliance 1.4 Disposal This appliance must be disposed of • Ensure that the appliance is switched off separately from other waste before replacing the bulb. (Directives 2002/95/EC, 2002/ • Do not rest any weight or sit on the open 96/EC, 2003/108/EC). -
Page 6: Identification Plate
Instructions 1.7 How to read the user manual Our appliances are packed in non- polluting and recyclable materials. This user manual uses the following reading • Consign the packing materials to the conventions: appropriate selective collection centres. Instructions Plastic packaging General information on this user Danger of suffocation manual, on safety and final... -
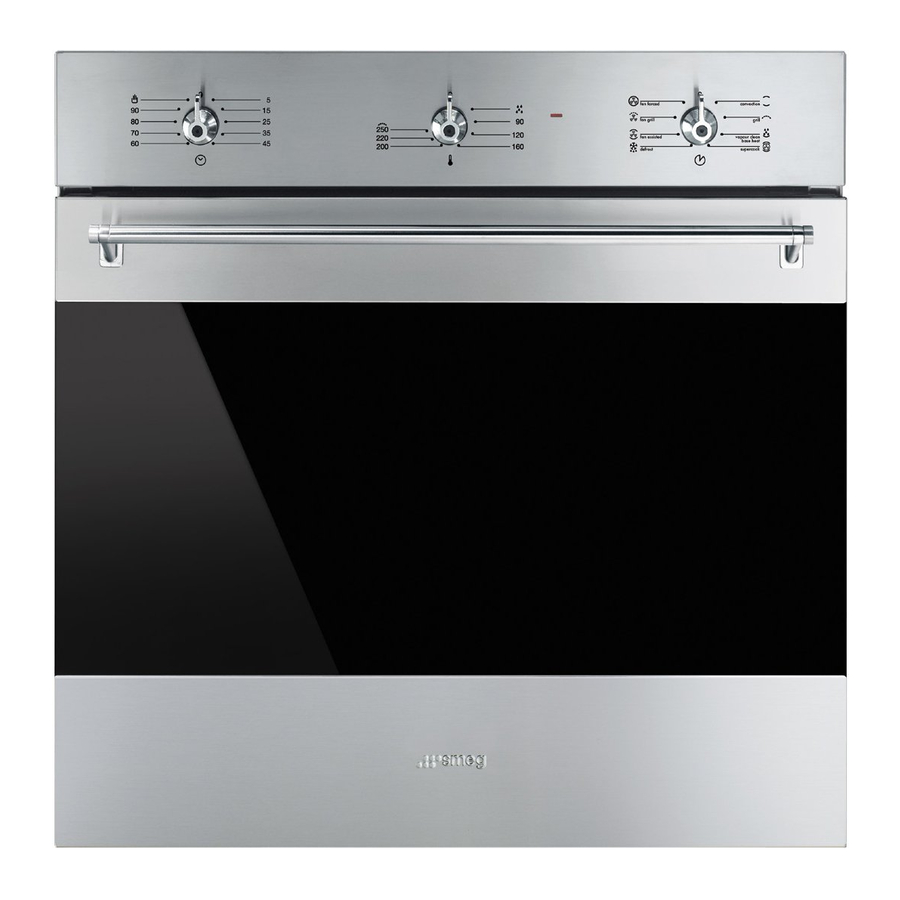
Page 7: Description
Description 2 Description 2.1 General Description 1 Control panel 5 Fan 2 Oven light 6 Rack/tray support frames 3 Seal Frame shelf 4 Door 2.2 Control panel Timer knob (1) Temperature knob (2) This knob allows you to select the cooking It allows you to use the timer or to perform temperature and the Vapour Clean manual cooking. -
Page 8: Other Parts
Description Thermostat indicator light (3) 2.3 Other parts When the indicator light is flashing, it Oven shelves indicates that the oven is heating up to The oven features shelves for positioning reach the set temperature. Once the trays and racks at different heights. The temperature has been reached, the light insertion heights are indicated from the remains lit until the oven is switched off. -
Page 9: Available Accessories
Description 2.4 Available accessories Deep tray Rack useful for collecting fat from foods placed on the rack above and for cooking pies, useful for holding cooking containers. pizzas and baked desserts. Tray rack Handle for racks and trays Useful for handling hot racks and trays. Some models are not provided with all accessories. -
Page 10: Use
3 Use High temperature inside the oven during use 3.1 Instructions Danger of fire or explosion High temperature inside the oven • Do not spray any spray products near during use the oven. Danger of burns • Do not use or leave flammable materials near the oven. -
Page 11: Using The Accessories
3. Remove and wash all the appliance Clean the trays before using them accessories (see 4 Cleaning and for the first time to remove any maintenance). residues left by the manufacturing process. 4. Heat the empty oven at the maximum temperature to burn off any residues left Tray rack by the manufacturing process. - Page 12 Grill Fan-assisted static (fan assisted) The heat coming from the grill The operation of the fan, combined element gives perfect grilling results with traditional cooking, ensures above all for thin and medium uniform cooking even with complex thickness meat and in combination recipes.
-
Page 13: Cooking Advice
3.4 Cooking advice of the dough. • To check whether the dessert is cooked General advice right through: at the end of the cooking • Use a fan-assisted function to achieve time, put a toothpick into the highest point uniform cooking at several levels. of the dessert. -
Page 14: Cooking Information Table
Cooking information table Runner Temperature position Types of food Weight (Kg) Function Time (minutes) (°C) from the Lasagne Static 1 or 2 220 - 230 40 - 50 Oven-baked pasta Static 1 or 2 220 - 230 Roast veal Fan-assisted static 180 - 190 70 - 80 Pork loin... -
Page 15: Cleaning And Maintenance
Cleaning and maintenance 4 Cleaning and maintenance 4.4 Food stains or residues Do not use metallic sponges or sharp 4.1 Instructions scrapers as they will damage the surfaces. Use ordinary non-abrasive products with Improper use the aid of wooden or plastic utensils if Risk of damage to surfaces necessary. -
Page 16: Cleaning The Door Glazing
Cleaning and maintenance 4.7 Removing the internal glass panels For easier cleaning the door internal glass panels can be disassembled. 1. Remove the internal glass panel by pulling the rear part gently upwards, following the movement indicated by the arrows (1). 2. -
Page 17: Cleaning The Inside Of The Oven
Cleaning and maintenance Removing racks/trays support frames 5. Reposition the internal glass panel. Take care to centre and insert the 4 pins into Removing the guide frames enables the their housings in the oven door by sides to be cleaned more easily. This applying slight pressure. -
Page 18: Vapour Clean: Assisted Oven Cleaning (On Some Models Only)
Cleaning and maintenance 4.9 Vapour Clean: assisted oven • Spray a water and washing up liquid cleaning (on some models only) solution inside the oven using a spray nozzle. Direct the spray against the side Vapour Clean is an assisted walls, upwards, downwards and cleaning procedure which towards the deflector. -
Page 19: Extraordinary Maintenance
Cleaning and maintenance 8. For improved hygiene and to avoid food 4. Slide out and remove the lamp. being affected by any unpleasant odours, we recommend that the oven is dried using a fan-assisted function at 160°C for approximately 10 minutes. We recommend that you use rubber gloves for these operations. -
Page 20: Installation
Installation 5 Installation Fixed connection Fit the power line with an omnipolar circuit 5.1 Electrical connection breaker in compliance with installation regulations. Power voltage The circuit breaker should be located near Danger of electrocution the appliance and in an easily reachable position. -
Page 21: Positioning
Installation 5.3 Positioning Secure the appliance to the piece of furniture using screws. Heavy appliance Danger of crush injuries • Place the appliance into the piece of furniture with the aid of a second person. Pressure on the open door Risk of damages to the appliance Cover the bushings with the covers •... - Page 22 Installation Mounting under worktops (mm) Mounting into a column (mm) Make sure that the piece of furniture rear/bottom part has an opening of approx. 60 mm. Make sure that the piece of furniture top/rear part has an opening approx. 35-40 mm deep.
- Page 23 The manufacturer reserves the right to make any changes deemed useful for improvement of his products without prior notice. The illustrations and descriptions contained in this manual are therefore not binding and are merely indicative.