Table of Contents
Advertisement
Quick Links
Advertisement
Table of Contents

Related Manuals for Planet IPX-1500


Summary of Contents for Planet IPX-1500
- Page 1 Internet Telephony /PBX System IPX-1500 User’s manual...
- Page 2 Copyright Copyright (C) 2005 PLANET Technology Corp. All rights reserved. The products and programs described in this User’s Manual are licensed products of PLANET Technology, This User’s Manual contains proprietary information protected by copyright, and this User’s Manual and all accompanying hardware, software, and documentation are copyrighted.
-
Page 3: Table Of Contents
WAN IP address configuration via web configuration interface ........... 21 Internet Access Setup ......................22 Chapter 3 Network Service Configurations ..................24 Configuring and monitoring your IPX-1500 from web browser ..........24 Overview on the web interface of IPX-1500 ................ 24 Manipulation of IPX-1500 via web browser ................. 24 LAN/WAN Configuration ...................... - Page 4 VoIP user..........................65 Chapter 5 Voice communication samples................66 Default Configuration ......................66 IPX-1500 to IPX-1500 ......................67 IPX-1500 to VIP-FXS ......................69 IPX-1500 to VIP-FXO......................71 VIP-FXO to IPX-1500......................74 Keypad operations in IPX-1500 ....................76 Appendix A IPX-1500 Specifications..................85...
-
Page 5: Chapter 1 Introduction
CO line usage logging, and toll restriction are now able to be applied to the IP extensions in IPX-1500, you may integrate IP phones as the extension in your office. The IPX-1500 not only maintains the existing telephony system, but also introduces the new infrastructure into the communication field. -
Page 6: Package Content
IPX-1500 design, and a uniform user interface is provided for both conventional and VoIP functions. Advanced Internet Functions IPX-1500 provides advanced Internet service: • DHCP server. Dynamic Host Configuration Protocol provides a dynamic IP address to PCs and other devices upon request. -
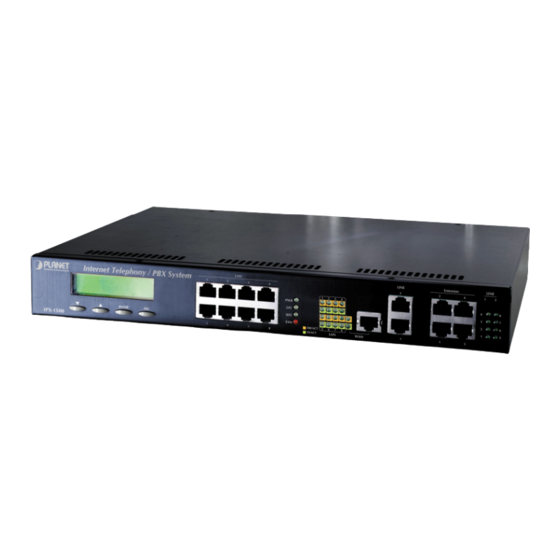
Page 7: Led Display & Button
Note Physical Interfaces IPX-1500 is equipped with a WAN interface with 10/100 Mbps auto-negotiation capability, 8 LAN Ethernet ports with 10/100 Mbps auto-negotiation, auto-MDI/MDI-X capability. In addition to the LAN/WAN Ethernet interface ports, there is a 9-pin RS-232 interface port, four RJ-11 telephony... - Page 8 Port Label Function RJ-45 Connecting IPX to a 10/100 Mbps Ethernet network RJ-45 Connecting IPX to a 10/100 Mbps Ethernet network / xDSL /Cable modem for Internet access 9-pin RS-232 Factory use. Console RJ-45 (Line1~8) LINE Please use the splitter to connect to the LINE1 / 2 on the front panel, then connect the PSTN analog line/CO line.
-
Page 9: Chapter 2 Preparations & Installation
Using UTP cables, connect all your LAN devices (PC, NB, HUB, switch…) to the LAN ports on the IPX-1500. The corresponding “LAN” light(s) on the front panel will turn on. Wait a minute or two for all LAN devices to establish links with the IPX-1500. The network related installation is now complete and you should be able to access the Internet. - Page 10 Please find the splitter in the IPX-1500 package. Each splitter can divide/join 4 RJ-11 lines. Connect CO line(s) to the splitter first, and then use the splitter cable to connect the IPX-1500’s line 1 and/or line 2 interface. The Line 1 to 8 LED shoul light(s) to reflect the actual connected CO/PSTN lines •...
-
Page 11: Administration Interface
IPX-1500 web configuration page. IPX-1500 will prompt for sign in User Name / Password, please enter: admin / 123 to continue machine Web Management. Default WAN interface IP address of IPX-1500 is 172.16.0.1. You may now open your web browser, and insert http://172.16.0.1 in the address bar of your web browser to logon IPX-1500 web configuration... -
Page 12: Preparation Before Beginning Web Administration On Ipx-1500
Preparation before beginning web administration on IPX-1500 In this section, we’ll introduce steps of how to setup a PC to communicate with IPX-1500 and Internet access related parameters through TCP/IP protocol configuration. Before starting web browser to connect to IPX-1500, please check TCP/IP configurations on PC: the PC must be configured either as a DHCP client and or fixed IP allocation on the intranet or Internet. - Page 13 Step 3.1 Change the TCP/IP settings to use DHCP as follows (DHCP environment): a. Double-clicking the first TCP/IP cable icon. The TCP/IP Properties window appears. b. Verify that the IP Address tab has Obtain an IP address automatically selected and that the IP Address and Subnet Mask fields are grayed out.
-
Page 14: Checking Tcp/Ip Settings On Windows Nt
e. Enter the IP address of the DNS server in the DNS Server Search Order field. f. Clicking Add. The IP address displays in the window below the field. Step 5 Clicking OK, and reboot machine to make the modifications effective in your PC. Checking TCP/IP settings on Windows NT Obtain an IP address from a DHCP Server Select Control Panel - Network, and, on the Protocols tab, select the TCP/IP protocol, as shown... - Page 15 Windows NT4.0 - IP Address b) Select the network card for your LAN. c) Select the appropriate radio button - Obtain an IP address from a DHCP Server or Specify an IP Address, as explained. Specify an IP Address If your PC is already configured with an IP address, check with your network administrator before making the following changes.
- Page 16 Windows NT4.0 - Add Gateway b) The DNS should be set to the address provided by your ISP, as follows: • Clicking the DNS tab. • On the DNS screen, shown below, clicking the Add button (under DNS Service Search Order), and enter the DNS provided by your ISP.
-
Page 17: Checking Tcp/Ip Settings - Windows 2000
Checking TCP/IP Settings - Windows 2000: Select Control Panel - Network and Dial-up Connection. Right - clicking the Local Area Connection icon and select Properties. You should see a screen like the following: Network Configuration (Win 2000) b) Select the TCP/IP protocol for your network card. c) Clicking on the Properties button. - Page 18 TCP/IP Properties (Win 2000) Ensure your TCP/IP settings are correct with one of the following description. Using DHCP To use DHCP, select the radio button Obtain an IP Address automatically. This is the default Windows setting. If your networking environment is a DHCP environment, Using this option is recommended. Restart your PC to ensure it obtains an IP Address from DHCP server.
-
Page 19: Checking Tcp/Ip Settings - Windows Xp
Checking TCP/IP Settings - Windows XP Select Control Panel - Network Connection. a) Right - clicking the Local Area Connection icon and select Properties. You should see a screen like the following: Network Configuration (Windows XP) b) Select the TCP/IP protocol for your network card. c) Clicking on the Properties button. - Page 20 TCP/IP Properties (Windows XP) Ensure your TCP/IP settings are correct with one of the following description. Using DHCP To use DHCP, select the radio button Obtain an IP Address automatically. This is the default Windows setting. If your networking environment is a DHCP environment, Using this option is recommended. Restart your PC to ensure it obtains an IP Address from DHCP server.
-
Page 21: Lan Ip Address Configuration Via Web Configuration Interface
Execute your web browser, and insert the IP address (default: 192.168.0.1) of IPX in the adddress bar. After logging on machine with username/password (default: admin / 123), browse to “LAN/WAN Configuration” --> “LAN configuration” menu: The LAN information Parameter Description of IPX-1500 LAN IP address of IPX-1500 Default: 192.168.0.1... -
Page 22: Internet Access Setup
Internet Access Setup • When WAN interface of IPX-1500 is properly configured, with default Windows TCP/IP settings, no changes need to be made on LAN side PC for Internet access. • If using a specified (fixed) IP address on your PC, refer to the user manual for details of the required changes: •... - Page 23 If you’re unable to get response from the remote site, please check the following: IPX-1500 is properly installed, LAN connection is OK, and Hint it is powered ON. You can test the connection by using the "ping" command: ping 192.168.0.1...
-
Page 24: Chapter 3 Network Service Configurations
Provides user input data fields, check boxes, and for changing machine configuration settings Displays machine running configuration To start IPX-1500 web configuration, you must have one of these web browsers installed on computer for management Netscape Communicator 4.03 or higher Microsoft Internet Explorer 4.01 or higher with Java support... - Page 25 IPX-1500 main page...
-
Page 26: Lan/Wan Configuration
LAN mask of IPX-1500 Default: 255.255.255.0 AN info rmation Please clicking WAN configuraion button, the configuration screen is shown below. WAN connection type in IPX-1500 The Internet conn ection type supported in IPX-1500 are PPPoE, DHCP client and the fixed IP... - Page 27 IP address assigned by ISP. Your ISP should provide all the information requied for Internet access. The WAN information Parameter Description of IPX-1500 WAN IP address of IPX-1500 Default: 172.16.0.1 Subnet mask AN mask of IPX-150 Default: 255.255.0.0...
- Page 28 If the ISP demands P PPoE connection for Internet access, please select PPPoE as connection type, and insert the username/password by your ISP to connect you to the Internet. The PPPoE configuration Parameter Description of IPX-1500 sername User name for PPPoE connection...
- Page 29 MAC (physical) address. Please consult your ISP personnel to obtain proper PPPoE/IP address related information, and input carefully. Hint If Internet connection cannot be established, please double-check the parameters configured in IPX-1500 or contact the ISP service staff for support information.
-
Page 30: Dhcp Server Configuration
DHCP Server Configuration IPX-1500 has a built-in DHCP server that can automatically assign dynamic IP addresses to client PCs connected to its LAN ports, simplifying the task of IP address management. You can set up two IP address ranges for the DHCP server to use – the second range will be used only after the first range is all used up. -
Page 31: Internet Sharing
Please insert the first (or the only) DNS server’s IP address. If this IP address DNS server 1st is set incorrectly, your PC will not be able to access web sites via domain names. Please insert the second DNS server’s IP address. This IP address is optional. DNS Server 2st If you don’t need to use the 2nd DNS server, please insert zero for the 2nd DNS server. - Page 32 Address mapping This feature allows public IP address to be associated with one computer on your LAN. All outgoing traffic from that PC will be associated with that public IP address. Any traffic sent to that IP address will be forwarded to the specified PC uses the private IP you set here. Please click Setting button to enter into Address mapping configuration: Add:Clicking Add button to step up the machine the packet want to be transferred.
- Page 33 not returning traffic. Please click Setting button to enter into Port mapping configuration: Add:Clicking Add button to step up the machine the packet want to be transferred. Service type: Please make sure the protocol type service use. TCP(Transmission Control Protocol),UDP(User Datagram Protocol) or BOTH Source port: Please fill the port service using Target port: Please fill the port service will be transferred to Target IP: Please fill the IP Address of the responsible machine...
- Page 34 Add:Clicking Add button to step up the machine you want to transparent. The configuration will show the place to let you fill the IP Address. Note: The ping command can’t be used to call the machine set to transparent mode. Edit:select the IP transparent,clicking Edit to modify the IP Address.
- Page 35 Another important point is the protecting by Firewall. All accessing can be defended and filtered by IPX-1500. But one thing have to be pay attention, the factory setting about allows all service to pass through Firewall. So you need to configure your Firewall before contract the Virtual DMZ framework.
- Page 36 Internet. The reason is the Virtual DMZ framework will occupy more bandwidth and cause the System loading bigger. See the figure, all traffic will through IPX-1500 when PC in intranet want to access server, but Address Mapping won’t.
-
Page 38: Firewall Configuration
A firewall is designed to prevent unauthorized access to and/or from a private network. It can stop inappropriate communications into and out of the LAN, preventing hacker attacks. IPX-1500’s built-in firewall provides hardware based network security via the following two mechanisms. Please select the... -
Page 39: Qos Configuration
QoS Configuration QoS (Quality of Service) regulates the bandwidth used by each network services. QoS can prevent this from happening and make more efficient use of the available bandwidth. QoS is also needed for certain network services (such as IP phone) where it is essential to guarantee a minimum level of bandwidth in order for the service to be usable. - Page 40 Actual BW > Upload and Download Guaranteed BW Advanced QoS config IPX-1500 provides two standard rules: one for H323 (IP phone) and the other for FTP. Usually you want to guarantee a minimum bandwidth for H323 in order to have an acceptable IP phone quality. And you may want to limit the bandwidth for FTP so the network will not perform poorly when someone is uploading or downloading a large file.
- Page 41 DONE Clicking on the DONE button to apply the changes. Return Go back to the last page. Parameter Description Up to ten user rules can be defined. Note that if “-1” is entered into any BW (bandwidth) field, it means that no QoS is applied to that particular bandwidth. QoS rules For example, if all four BW fields are entered “-1”...
-
Page 42: Ddns
DDNS This device supports many popular Dynamic DNS service providers. Select the company that you want to join then clicks Add button. There are seven DDNS service provides of your choices. Note1: This Device only allows register to one DDNS service provider. Note2: Before using this DDNS service, you should apply an account first. -
Page 43: Vpn Configuration
VPN Configuration The IPX Series VPN Client creates a Virtual Private Network (VPN) connection between one IPX machine and the other corporate IPX machine’s network to maintain the confidentiality of private data. The IPX Series VPN Client provides an easy-to-use solution for secure, encrypted access through the Internet for remote users. - Page 44 Parameter Description IPX Series’ VPN service supports max 4 connections. Tunnel num can be tell VPN tunnel by the other side to which num of the tunnel can be connected. This option has relative to “Remote VPN tunnel number”. Tunnel name Type a human-friendly name for your new connection.
- Page 45 Example: Site A wants to establish VPN connection to site B & C. Site B wants to establish VPN connection to site C. First, site A select tunnel 1 as the channel to site B then site B select tunnel 1 to complete this connection.
-
Page 46: Chapter 4 Telephone Service Configurations
Telephone Service Configurations IPX-1500 Telephony Functions IPX-1500 comes standard with 8 CO ports, 16 analog extension and 16 IP extension capability. Basically any analog telephones can be used, but it is better to use telephones with a “Flash” key which generates hook flashes within the range of 100 ~ 700 milliseconds. - Page 47 “Back_yyyy_mm_dd.img” to download the IPX-1500 setttngs, and save in a safe place. To restore the backup settings, please allocate the IPX-1500 config file, and use the file browser to load the IPX-1500 config file into machine. After loading the config file, reboot machine, and the...
-
Page 48: Pbx Configuration
Reboot: system reboot PBX Configuration IPX-1500 comes standard with 8 CO lines, 16 extension lines, and 16 IP extensions capability. Basically any analog telephones can be used, but it is better to use telephones with a “Flash” key which generates hook flashes within the range of 100 ~ 700 milliseconds. The Flash key is used in many operations such as transferring a call. - Page 49 Parameter Description Password This is the password used to login the system. Please clicking on the box to enable Caller ID Pass Through - a check mark will appear in the box. If Caller ID Pass Through is enabled, the system will Call ID (Caller ID Pass pass caller ID information through to the extensions.
- Page 50 PSTN caller party is hung up. A caller makes a telephone call to IPX-1500 from PBX/PSTN side and calls to other VoIP device through the IPX-1500. If the IP side of other VoIP devices do not answer the call and the caller hang up,...
- Page 51 PBX/PSTN will give IPX-1500 a busy tone automatically. If the other VoIP device of IP side answers and hangs up the phone, the IPX-1500 will release the line port automatically without analyzing busy tone from PBX/PSTN. PBX system advance There are three parameters received from PBX/PSTN.
-
Page 52: Co/Extension Line Configuration
DSP false recognize as busy tone. If so, lower sensitivity will reduce such problem. But in any case, if the line port of IPX-1500 was locked, please use “disconnect” in CO & EXT selection to release the line locked Co/Extension line Configuration CO &... - Page 53 Parameter Description CO Line in IPX-1500 can be divided up to 10 different groups for different Group telephony service Each CO line can operate in one of the following modes. Shutdown: This line is totally disabled – usually used for unconnected CO ports.
- Page 54 Parameter Description The range is 100~899 and you are free to assign any number in this range to an extension. If two or more extensions are assigned the same number, the Extension No. system will try to transfer the call to the one with the lowest physical port number first.
- Page 55 You can restrict the outward dialing capability with this function if you also set up the Toll Table. The Toll Table tells the system whether the dialed number is local, domestic long distance or international. Unlimited: No restriction at all. Out Call Priority (Toll No City Call: Restriction)
- Page 56 Add: adding an IP extension into IPX-1500...
- Page 57 Parameter Description The range is 100~899 and you are free to assign any number in this range to an extension. If two or more extensions are assigned the same number, the Extension No. system will try to transfer the call to the one with the lowest physical port number first.
-
Page 58: Toll Table
If this function is enabled, you can pick up the phone and make an outside call EXT. Direct To CO directly without pressing the CO Access Code first. In this case, you will need (Direct CO Access) to press the “#” key first in order to access other system features or calling other extensions. -
Page 59: H.323 Configuration
Select the prefix from the drop down list and clicking on the DELETE button. H.323 Configuration IPX-1500 supports the “H.323” VoIP standard. There are two modes of operation: P2P mode and GK mode. The IP mode allows for direct communication and is used when both parties have static IP address. - Page 60 H.323 ID can be used for identification in the VoIP network, please insert a H323 ID proper H.323 ID in this column When the IPX-1500 is operating in GK mode, and the GK requires password GK password for authentication. Please consult the GK operator and insert the proper...
-
Page 61: Calling Party Configuration
This is where you enter the details of all the VoIP servers that you want to communicate with. An IP phone call involves two VoIP servers: your IPX-1500 and the VoIP server at the other end. Both VoIP servers must be in the same mode when communicating with each other. Therefore, in addition to... - Page 62 IPX Mode: This mode is unique to IPX-1500 and requires both parties to have static IP address. If the other party also uses IPX-1500, using this mode is highly recommended but not mandatory. When two parties communicate in the IPX mode, their systems know more about each other’s capabilities.
-
Page 63: Voip & Pstn
Parameter Description From the drop down list, please select a type to use when communicating with Type of destination this destination. IP/Domain Please insert the IP address or Domain name Please click the Seq.No or Name link to enter into VoIP Tel data Parameter Description Please insert the username of the remote extension Name... - Page 64 Parameter Description The Off-Net Security Level controls all incoming Off-Net calls with unknown privilege. An incoming Off-Net call’s privilege is known if and only if the call is in IPX mode and originated from a remote extension. All other types of incoming Off-Net calls have unknown privilege, therefore are regulated by this setting.
-
Page 65: Voip User
VoIP user VoIP user date VoIP user date is users who want to make Off-Net calls through this office. If the Off-Net Security Level is set to high, a non-IPX Off-Net call will be allowed only if the caller is a VoIP User of this office. Up to 50 VoIP Users can be set up here. -
Page 66: Chapter 5 Voice Communication Samples
Chapter 5 Voice communications Overview There are several ways to make calls to desired destination in IPX-1500. In this chapter, we’ll lead you step by step to establish your first voice communication via web browsers operations. Default Configuration Without any configuration, your IPX-1500 is come with following basic information. -
Page 67: Ipx-1500 To Ipx-1500
IPX-1500 to IPX-1500 IPX-A: IPX-B: IPX-A IPX-B WAN IP Address WAN IP Address (210.66.155.80) (210.66.155.90) Ext: 124 Ext: 444 Assume both PBXs used port is port#4 connect to a phone. To call each other. SETP 1: Please select Calling party configuration item on the Telephone Service configuration menu, after enter Calling party config server page, please added the Seq.No. - Page 68 SETP 2: Please fill other IPX-B WAN IP Address of your IPX-A "IP" field. SETP 3: After clicking DONE button, and then the configuration screen appears below. SETP 4: Please select IPX-B item on the Calling party info menu. You will see the configuration screen below, please added the Name / Abbrev code/ PostFix code and select VoIP server on the Add VoIP TEL.
-
Page 69: Ipx-1500 To Vip-Fxs
GW mode on the Add Calling Party, and then the configuration screen appears below. SETP 2: Please fill other VIP-series IP Address of your IPX-1500 "IP" field. SETP 3: After clicking DONE button, and then the configuration screen appears below. - Page 70 After these configurations, please refer to following usage steps: VIP-400 Usage: Please pick up the VIP-400 telephone and dial 121 to connect to IPX-1500. IPX-1500 Usage: Case 1: IPX-1500 phone 121 calls to VIP-400 phone 5678 Human operation at IPX...
-
Page 71: Ipx-1500 To Vip-Fxo
Calling party config server page, please added the Seq.No. / Name and select GW mode on the Add Calling Party, and then the configuration screen appears below. SETP 2: Please full other VIP-400 IP Address of your IPX-1500 "IP" field. - Page 72 After these configurations, please refer to following steps: VIP-400 Usage: Please pick up the VIP-400 telephone and dial 121 to connect to IPX-1500. IPX-100 Usage: Case 1: IPX-1500 phone 121 calls to Ext. 801 via VIP-400...
- Page 73 Ring back tone is heard Ext.801 is ringing Case 2: IPX-1500 Phone 121 calls to PSTN number (02) 12345678 via VIP-400. Human operation at IPX Equipment operation Human operation at Caller side VIP Receiver Side Pick up phone 121 1.IPX dial tone is heard.
-
Page 74: Vip-Fxo To Ipx-1500
10 h323 210.66.155.80 atpm done atpm store After these configurations, please refer to following usage steps: IPX-1500 Usage: Case 1: Ext. 801 calls to IPX-1500 Ext.121 Human operation at Equipment operation Human operation at Caller side Receiver Side... - Page 75 Phone 121 is ringing 1.The second LED is lighting in phone 4 Pick up phone 121 of IPX-1500 front panel. Case 2: Ext. 801 calls to IPX-1500 Ext.121 and transfer to Ext. 124 Human operation at Equipment operation Human operation at...
-
Page 76: Keypad Operations In Ipx-1500
Dial 121 1.Du Du is heard 2.IPX-1500 Communication is going Ring back tone is heard Phone 121 is ringing 1.The first LED is lighting in Phone 4 of Pick up phone 121 IPX-1500 front panel. Keypad operations in IPX-1500... - Page 77 Dial 9: the CO Access Code is set to be Hint User must dial “9” to request a CO line first. The request is permitted after hearing the CO dial tone and you can start making the call. On the contrary, the request will be denied because all lines are busy or the extension is not allowed to make outside calls, you will hear a message to that effect.
- Page 78 #01~#30: the personal command setting Dial Hint If you use Planet IP-PBX system, there may have some of the useful personal phone commands described below. Please refer to “Personal phone command” session. Dial #31XXXX~#60XXXX: The system command setting (where “XXXX” represents PCBX system’s password and the Hint default value is “1234”), please refer to “System phone commands manual”...
- Page 79 The function is reserved Introduction of the Personal Command #01: Personal Voice Announce Dial Hint Incoming calls that meet specific predefined criteria be answered automatically by your extension. Enabling/Disabling according to the extension is set on the mode of “cancel the forwarding”...
- Page 80 during this time, the IPX system will save the prerecorded message in the voicemail and enable the light of the phone at the same time. #11: Automatic Callback Busy(only for extension) Dial Hint You can dial “#11” to set the other extension to receive callback ringing when the extension becomes idle.
- Page 81 The function is reserved The function is reserved Off Duty Greeting Record The function is reserved The function is reserved The function is reserved The function is reserved The function is reserved On Duty Greeting Record The function is reserved The function is reserved The function is reserved The function is reserved...
- Page 82 seconds. Dial #49:Record/Review On-Duty System Greeting Message Hint Maximum recording time is 50 seconds. When you are finished, carefully hang up the phone in order to minimize the noise at the end. To review the off-duty system-greeting message, enter “#49” alone without the system password. The message will be played after about 2 seconds.
- Page 83 (3) Talk dial “Flash” or “Recall” dial the extension number you want to transfer to hook transfer the call to the destination (the call will be transfer to voice mail or operator if the extension is busy) How to record you’re personal voice announce? Hint Off hook dial “#01”...
- Page 84 *3 + system’s password Record personal voice *3 announce from outside party Reserved *4 H323 ID mode dialing Dial *5 *5 + “another machine’s port ID registered on the same GateKeeper” + “# key” To ring the remote GW; IP-Phone or the operator of IPX machine. Example: you can dial *5 13023886798 # to ring the remote GW;...
-
Page 85: Appendix A Ipx-1500 Specifications
Appendix A IPX-1500 Specifications Product Internet Telephony PBX system Model IPX-1500 Hardware 8 (10Base-T/100Base-TX, Auto-Negotiation) 1 (10Base-T/100Base-TX, Auto-Negotiation) Telephony ports 6 RJ-45, each RJ-45 can be split into 4 RJ-11 lines (4 RJ-45 for extension, 2 RJ-45 for CO/PSTN line connection)