Epson PictureMate PM 240 Manual
Hide thumbs
Also See for PictureMate PM 240:
- Basics manual (91 pages) ,
- Start here manual (6 pages) ,
- Quick manual (6 pages)
Table of Contents
Advertisement
Control Panel Functions
1
12
11
10
9
8
2
3
7
6
5
4
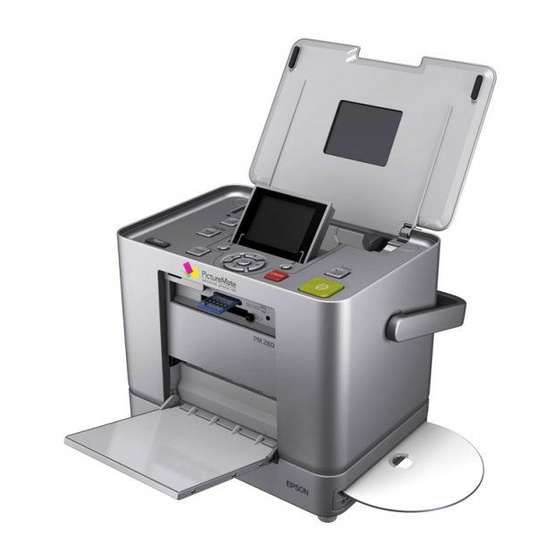
Parts
1
Left soft key
2
Right soft key
3
LCD screen
4
z Print button
13
Cancel button
5
OK button
6
7
u d l r 4-way
scroll button
8
Menu button
9
Open button
10
Display
button
11
d On button
12
Power light
13
Save button
Function
Functions as shown in the bottom left of the
LCD screen.
Functions as shown in the bottom right of the
LCD screen.
Displays the printer status messages, and the
panel settings.
Press to start printing.
Press to cancel the printing or settings.
Functions as shown in the LCD screen.
Press to move the cursor on the LCD screen.
Press to enter the Menu mode for the print
settings or maintenance options.
Press to open the front cover.
Press to change the view of the screen.
Press to turn the printer on and off.
On when the printer is turned on and ready.
Shortcut button to save data to an external
device or the internal CD drive (PM 280 only).
PictureMate PM 240 / PM 280
1
Advertisement
Table of Contents

Related Manuals for Epson PictureMate PM 240


Summary of Contents for Epson PictureMate PM 240
- Page 1 Press to turn the printer on and off. Power light On when the printer is turned on and ready. Save button Shortcut button to save data to an external device or the internal CD drive (PM 280 only). PictureMate PM 240 / PM 280...
-
Page 2: Printer Parts
Memory card slots Front cover: Receives the ejected CD drive : Reads data from or paper. Open the cover to insert or save data to a CD. (For eject a memory card. PictureMate PM 280 only) PictureMate PM 240 / PM 280... - Page 3 Bluetooth Photo Print Adapter and digital cameras that have USB Photo cartridge lever DIRECT-PRINT functionality. Cartridge compartment cover USB port for computer: Used to connect the computer and printer together using the USB cable. PictureMate PM 240 / PM 280...
-
Page 4: Table Of Contents
Inserting a Memory Card ..... . . 23 Inserting a CD into the CD Drive ....26 PictureMate PM 240 / PM 280... - Page 5 Options ........76 Using the Optional Battery ..... . 77 Transporting Your PictureMate Printer Specifications Index PictureMate PM 240 / PM 280...
- Page 6 Seiko Epson Corporation. The information USB DIRECT-PRINT™ and the USB DIRECT-PRINT logo are contained herein is designed only for use with this Epson printer. Epson trademarks of Seiko Epson Corporation. Copyright © 2002 Seiko Epson is not responsible for any use of this information as applied to other Corporation.
-
Page 7: Safety Instructions
Otherwise, ink may leak from the cartridge. ❏ Do not place or store the printer and the AC adapter outdoors. Safety Instructions PictureMate PM 240 / PM 280... - Page 8 Also, make sure that the total ampere rating of all devices plugged into the wall outlet does not exceed the wall outlet’s ampere rating. Safety Instructions PictureMate PM 240 / PM 280...
- Page 9 The following safety information applies to the AC adapter. ❏ Warning: Refer to the rating plate for the voltage and check that the appliance voltage corresponds to the supply voltage. Safety Instructions PictureMate PM 240 / PM 280...
-
Page 10: When Using The Printer
❏ Use only memory cards compatible with the printer. See “Inserting a Memory Card” on page 23 Safety Instructions PictureMate PM 240 / PM 280... - Page 11 Only use a dry, soft cloth to clean the LCD screen. immediately. Do not use liquid or chemical cleansers. ❏ Use only an Epson Li-ion battery model D121A for ❏ If the LCD screen on your printer's control panel this printer according to the directions in the user is damaged, contact your dealer.
- Page 12 Store the battery out of children’s reach. Prevent the battery from coming into contact with metal objects that could short-circuit it, such as coins or keys. ❏ Do not solder wires or terminals directly to the battery. Safety Instructions PictureMate PM 240 / PM 280...
- Page 13 For best results, use up the photo cartridge within six months of installing it. ❏ Do not dismantle photo cartridges or try to refill them. This could damage the print head. Safety Instructions PictureMate PM 240 / PM 280...
-
Page 14: Energy Star ® Compliance
Cautions must be observed to avoid damage to your equipment. Notes contain important information and useful tips on the operation of your printer. Safety Instructions PictureMate PM 240 / PM 280... -
Page 15: Welcome
1. Take Photos Take photos with your digital 4. Clear the Memory Card camera. After you save your photo files, delete them from your memory card so you have room for more photos. Welcome! PictureMate PM 240 / PM 280... -
Page 16: Special Features
If you have a PictBridge - or USB DP (USB Direct Print)-enabled camera, you can connect the camera to PictureMate and control printing right from your camera. See “Printing From a PictBridge-Enabled Camera” on page 43. Welcome! PictureMate PM 240 / PM 280... -
Page 17: Supported Photo Formats
Supported Photo Formats Where to Find Information All manuals are common to the PictureMate PM 240 and PM 280. Unpacking and setting up JPEG TIFF See the Start Here to set up your PictureMate and install the Make sure your photos meet these requirements for software. -
Page 18: Panel Setting Menu List
Decorate Photo You can add, edit, or remove decorations such as pop-up on/from your photos . (& page 35) Rotate Rotate your photos by 90 degrees. (& page 37) Welcome! PictureMate PM 240 / PM 280... -
Page 19: Maintenance Menu
CD drive. You can select from High Speed or Speed Date stamp Print the date your photo was taken. Normal. When High Speed is selected, the printer does not perform a verification check. Help Display guidance for each setting. Welcome! PictureMate PM 240 / PM 280... -
Page 20: Preparing To Print
The illustrations in this section show the PictureMate PM 240. The instructions for the PM 280 are the same. Loading Paper Handle When loading special paper distributed by Epson, read the instruction sheets packed with the paper first. Follow these steps to load PictureMate Photo Paper: Caution: Do not load plain paper;... - Page 21 Press the Open button to open the front cover. smearing. Slide the edge guides against the paper. Make sure they are snug, but not so tight that paper cannot move. Glossy side Preparing to Print PictureMate PM 240 / PM 280...
-
Page 22: Paper Handling Instructions
Do not stack printouts and conventional film photographs with the image sides touching. ❏ If you stack printouts, place a sheet of plain paper or other absorbent paper between the individual prints. Preparing to Print PictureMate PM 240 / PM 280... -
Page 23: Choosing A Photo Source
CompactFlash card or you cannot remove the card. ❏ If the CompactFlash card is not recognized, remove the card and insert it again. Preparing to Print PictureMate PM 240 / PM 280... - Page 24 Memory Stick MagicGate Memory Stick Memory Stick PRO Memory Stick Duo * microSDHC card * Memory Stick PRO Duo * microSD card * MagicGate Memory Stick Duo * * Adapter required Preparing to Print PictureMate PM 240 / PM 280...
-
Page 25: Removing The Memory Card
Now you can choose photos and layouts for printing from the LCD screen. See “Basic Photo Printing” on page 27. For the latest information on memory cards available for your printer, contact your dealer or regional Epson sales office. Lower slot Removing the memory card Press the button on the Pull the memory card out. -
Page 26: Inserting A Cd Into The Cd Drive
CD is being read. eject button Remove the CD from the slot. For how to save photos to the CD, see “Saving Photos to the CD (PictureMate PM 280 Only)” on page 55 Preparing to Print PictureMate PM 240 / PM 280... -
Page 27: Basic Photo Printing
The print settings set for the photo are shown as icons on the right side. View 1 photo at maximum size. The print settings set for the photo are shown as icons on the right side. Basic Photo Printing PictureMate PM 240 / PM 280... -
Page 28: Printing Selected Photos
To make optional settings, see “Printing Options” on page 32. 10. Press the z Print button to start printing. Press the right soft key to preview the print settings. Basic Photo Printing PictureMate PM 240 / PM 280... -
Page 29: Printing A Range Of Photos
Press the right soft key to preview the print settings. Press the u, d, l, or r button to highlight the first photo, then press the right soft key. Press the right soft key to open the Paper/Layout menu. Basic Photo Printing PictureMate PM 240 / PM 280... -
Page 30: Printing Photos Searching By Date
Press the right soft key to preview the print button to check the date. settings. Press the right soft key. Photos taken on the 10. Press the right soft key to open the Paper/Layout specified date are displayed. menu. Basic Photo Printing PictureMate PM 240 / PM 280... -
Page 31: Printing An Index
If you want to print all of the photos on the memory Press the d button to highlight Index (20-up), card, press the Cancel button. See “Printing All Photos” on page 27. then press the right soft key. Basic Photo Printing PictureMate PM 240 / PM 280... -
Page 32: Printing Options
35 × 45 mm Press the d button to highlight the desired size, size photos then press the right soft key. The layout menu is Half Page displayed. Index (20-up) Printing Options PictureMate PM 240 / PM 280... -
Page 33: Touching Up Your Photos (Manual/Auto)
Press the d button to select one of the following If your photos are too light or too dark, you can options, then press the right soft key. adjust their brightness or control the saturation and sharpness. Printing Options PictureMate PM 240 / PM 280... -
Page 34: Adding The Date
❏ Off (default, turns off the date stamp) Press the d button to highlight Brightness, Saturation, or Sharpness then press the right soft ❏ On (date, month, year: 26.Aug.2006) key. Printing Options PictureMate PM 240 / PM 280... -
Page 35: Decorating Your Photo
Press the d button to highlight Decorate Photo, then press the right soft key. Press the OK button to complete adding clip art. Highlight Add Decoration, then press the right soft key. Printing Options PictureMate PM 240 / PM 280... -
Page 36: Cropping And Sizing Your Photos
Press the d button to highlight the Edit menu, then press the right soft key. Use the following buttons to set the area you want to crop. Press the d button to highlight Red-Eye Reduction, then press the right soft key. Printing Options PictureMate PM 240 / PM 280... -
Page 37: Rotating A Photo On The Lcd Screen
Highlight the photo you want to rotate. You can copy P.I.F. Frames from your PC to a memory card by using EPSON PRINT Image Framer Tool Press the Menu button. software contained in the software CD-ROM. For details on using the software, see the on-screen User’s... - Page 38 ❏ Be sure to save the P.I.F. Frame to the memory card using the EPSON PRINT Image Choose the photo you want to apply this setting Framer Tool; otherwise the P.I.F. Frame file to, then press the right soft key.
- Page 39 P.I.F. Frames in PictureMate’s internal the P.I.F. Frame, then press the right soft key. memory. ❏ Memory card ❏ External device ❏ CD media in the internal CD drive (PictureMate PM 280 only) Printing Options PictureMate PM 240 / PM 280...
- Page 40 Frames read from the connected device are not checked. You can select or deselect the Frames to store in the internal memory by using the OK button. Press the right soft key to update. Printing Options PictureMate PM 240 / PM 280...
-
Page 41: Printing From An External Device
You can also print photos from a CD that you get from a photo processing lab. (Images should be in JPEG file format. Some CDs may not work.) Make sure PictureMate is on. Printing From an External Device PictureMate PM 240 / PM 280... - Page 42 PictureMate counts the photo on your drive, then shows the following screen: If you see this screen, you are ready to choose and print photos. See “Basic Photo Printing” on page 27 and print your photos. Printing From an External Device PictureMate PM 240 / PM 280...
-
Page 43: Printing From A Pictbridge-Enabled Camera
Press the d button to highlight the Setup menu, then press the right soft key. Press the d button to highlight Direct Print Settings, then press the right soft key. Printing From an External Device PictureMate PM 240 / PM 280... - Page 44 PictureMate. See your digital camera's documentation for information on more detailed settings. Print from the digital camera. Printing From an External Device PictureMate PM 240 / PM 280...
-
Page 45: Printing From A Bluetooth Device
Basic Imaging Profile (BIP) Printable file size is up to 2.5 MB. Up to 10 jobs can be queued (Maximum 3 MB). Hardcopy Cable Replacement Profile (HCRP) Object Push Profile (OPP) Up to 10 m PictureMate PM 240 / PM 280... - Page 46 Do not remove this product by pulling on its The Adapter’s light comes on for one second. If upper section. Doing so may damage the the LED does not turn on, disconnect the Adapter product. from PictureMate, then reconnect it. PictureMate PM 240 / PM 280...
-
Page 47: Bluetooth Settings
On/Off Select On to encrypt (Default = Off) communication. Encryption requires that the four-digit Passkey be entered into a device before it can communicate with and Bluetooth print from the printer. Encryption PictureMate PM 240 / PM 280... - Page 48 Passkey setting. See the “The Bluetooth Passkey Be sure that the printer is not operating Setting” on page 49 to set the Passkey. before connecting this product. Otherwise, the printer may malfunction. Press the Menu button. PictureMate PM 240 / PM 280...
- Page 49 For more information about printing from Bluetooth wireless-capable mobile phones, digital still cameras, digital video cameras, PDAs, mobile PCs and other Bluetooth wireless-capable device, refer to the documentation for both the device and the printer. PictureMate PM 240 / PM 280...
-
Page 50: Setting Picturemate Preferences
❏ Error Status : Beeps when the cartridge is Press the d button to highlight After Printing, then expended or the paper is out. press the right soft key. Setting PictureMate Preferences PictureMate PM 240 / PM 280... -
Page 51: Setting The Language On The Lcd Screen
When the memory card is removed. your own personal preferences. ❏ When PictureMate is turned off. Press the Menu button. Press the d button to highlight the Setup menu, then press the right soft key. Setting PictureMate Preferences PictureMate PM 240 / PM 280... -
Page 52: Resetting All Print Settings
Press the Menu button. Press the d button to highlight the Setup menu, then press the right soft key. Press the d button to highlight Restore default settings?, then press the right soft key. Setting PictureMate Preferences PictureMate PM 240 / PM 280... -
Page 53: Saving Your Photos (Backup)
CD-R/RW drive (CD-R/DVD-R media only) ❏ MO drive ® ® ❏ Iomega disk (100, 250, or 750 MB) ❏ Flash memory (thumb) drive Note: Epson cannot guarantee the compatibility of any drives. Saving Your Photos (Backup) PictureMate PM 240 / PM 280... - Page 54 Press the d button to highlight the Save Photo(s) menu, then press the right soft key. Select All Photo or Selected Photos, then press the right soft key. When the confirmation message appears, press the right soft key. Saving Your Photos (Backup) PictureMate PM 240 / PM 280...
-
Page 55: Saving Photos To The Cd (Picturemate Pm 280 Only)
Avoid turning off PictureMate. The CD itself may folder is named 002, and so on. If you save on be damaged and may not be reused later. a CD-R/DVD-R, PictureMate names the CD-R/DVD-R Photo. Saving Your Photos (Backup) PictureMate PM 240 / PM 280... - Page 56 CD drive slot. ❏ Do not vibrate or shock the printer. ❏ Do not connect or disconnect a USB cable. ❏ Do not open or close the top cover. Saving Your Photos (Backup) PictureMate PM 240 / PM 280...
- Page 57 If you want to save all of the photos, proceed to the next step. Press the Save button. (Or, press the Menu button, select Save Photo(s), then press the right soft key.) Saving Your Photos (Backup) PictureMate PM 240 / PM 280...
-
Page 58: Replacing The Picturepack
PictureMate uses PicturePack equipped with an IC menu, then press the right soft key. chip. The IC chip monitors the PicturePack status. Press the d button to highlight Check PicturePack Status, then press the right soft key. Replacing the PicturePack PictureMate PM 240 / PM 280... - Page 59 In addition to the ink used during an image printing, ink is consumed during the print head cleaning operation, and during the self-cleaning cycle which is performed when the printer is turned on. Replacing the PicturePack PictureMate PM 240 / PM 280...
- Page 60 The rate that a specific color of ink is consumed depends on the images printed. Pull the cartridge out of PictureMate and dispose of it properly. Replacing the PicturePack PictureMate PM 240 / PM 280...
- Page 61 Do not touch the ink supply ports or surrounding area. Replacing the PicturePack PictureMate PM 240 / PM 280...
- Page 62 If you cannot close the cartridge compartment cover, the photo cartridge is not installed correctly. Go back to the step 4 and eject the photo cartridge. Then install the photo cartridge again. Replacing the PicturePack PictureMate PM 240 / PM 280...
-
Page 63: Transporting Your Picturemate
Pack PictureMate and the travel case in the box cover. Remove the CD if it is in the CD drive that PictureMate came in. (PictureMate PM 280 only). Close the LCD screen. Transporting Your PictureMate PictureMate PM 240 / PM 280... - Page 64 PictureMate on its side or upside down, or ink may leak. Note: If your prints do not look as good after PictureMate has been moved, try aligning the print head. See “Aligning the Print Head” on page 66. Transporting Your PictureMate PictureMate PM 240 / PM 280...
-
Page 65: Maintaining Picturemate
Press the right soft key, then press the z Print Make sure that PictureMate is turned on and no button to print the nozzle check pattern. warnings or errors are displayed on the LCD screen. Maintaining PictureMate PictureMate PM 240 / PM 280... -
Page 66: Aligning The Print Head
72. You can also turn the printer off and wait for at least 6 hours - this allows any dried ink to soften-and then try cleaning the print head again. Maintaining PictureMate PictureMate PM 240 / PM 280... - Page 67 11. Select the number for set #2, then press the right soft key. Look at the alignment pattern in each set and find the patch which is most evenly printed, with no noticeable streaks or lines. Maintaining PictureMate PictureMate PM 240 / PM 280...
-
Page 68: Cleaning Picturemate
Use a soft brush to carefully clean away all dust and dirt from the paper feeder. When you use Epson Ultra Glossy Photo Paper, use this function to clean the roller inside PictureMate. If the outer case or the inside of the paper feeder is dirty, wipe it with a soft, clean cloth dampened Load several sheets of paper. -
Page 69: Troubleshooting
& See “Contacting Customer Support” Bluetooth adapter error. Disconnect the Adapter, then reconnect on page 75 Re-insert adapter. to the printer. & See “Printing From a Bluetooth Device” on page 45 Troubleshooting PictureMate PM 240 / PM 280... -
Page 70: Printer Power Problems
If the voltage does not match, DO NOT PLUG Cannot recognize CD Remove the CD from the CD drive and contents. See your printer check your CD is compatible with this YOUR PRINTER BACK IN. Contact your documentation. printer. dealer. Troubleshooting PictureMate PM 240 / PM 280... -
Page 71: Print And Noise Problems
Checking the Print Head Nozzles” on page 65. ❏ PictureMate will not work properly if it is tilted or at an angle. Place it on a flat, stable surface that extends beyond the printer base in all directions. Troubleshooting PictureMate PM 240 / PM 280... -
Page 72: Photo Quality Problems
Your printout is blurry or smeared. Photo Quality Problems You see banding (light lines) in your prints. ❏ Use only paper recommended by Epson to ensure proper saturation, ink absorption, and quality. See “Ink and Paper” on page 76. ❏... -
Page 73: Problems With Paper Feeding
The photo cartridge may be old or low on ink. To carefully reload it. replace the cartridge, see “Replacing the PicturePack” on page 58. ❏ If paper jams, remove the paper, then press the OK button to clear the jam. Troubleshooting PictureMate PM 240 / PM 280... -
Page 74: Miscellaneous Printout Problems
See “Printing From a ❏ Check your Layout setting to see if it is correct. PictBridge-Enabled Camera” on page 43. See “Making Paper and Print Layout Settings” on page 32. Troubleshooting PictureMate PM 240 / PM 280... -
Page 75: Contacting Customer Support
❏ Your computer operating system name and Regional Customer Services version If your Epson product is not operating properly and you ❏ Names and versions of the software applications cannot solve the problem using the troubleshooting you normally use with your product information in your product documentation, contact customer support services for assistance. -
Page 76: Ink, Paper, And Options
Guide manual. PictureMate Photo Paper) PictureMate PicturePack T5846 (PictureMate Photo Cartridge and 150 sheets of PictureMate Photo Paper) Options Epson Premium Glossy Photo Paper 10 × 15 cm S041706 (4 × 6 in.) S041729 Bluetooth Photo Print Adapter S041822 S041826 Bluetooth Photo Print Adapter 2 C12C82438* Epson Premium Semigloss Photo Paper 10 ×... -
Page 77: Using The Optional Battery
❏ You cannot save data on the memory card to an external device when using the battery. Connect the AC adapter to PictureMate when you save data. Ink, Paper, and Options PictureMate PM 240 / PM 280... -
Page 78: Charging The Battery
When the battery is fully charged, the power light turns off. When PictureMate is on during charging, icon blinks on the LCD screen. When the battery is fully charged, icon appears. Ink, Paper, and Options PictureMate PM 240 / PM 280... -
Page 79: Battery Performance
15 minutes. Battery is fully charged. Note: When a memory card is inserted and PictureMate is connected to a computer, it will not turn off automatically. Ink, Paper, and Options PictureMate PM 240 / PM 280... -
Page 80: Printer Specifications
Border printing: 3 mm margin for all sides Borderless printing: 0 mm margin Paper tray 20 sheets capacity Weight 2.4 Kg (5.3 lb) without 3.0 Kg (6.6 lb) without AC adapter and photo AC adapter and photo cartridge cartridge Printer Specifications PictureMate PM 240 / PM 280... - Page 81 Printer Operated by AC Adapter (PM 280) Humidity Operation:* 20 to 80% RH When not charging When charging optional battery optional battery * Without condensation 100-120 V 220-240 V 100-120 V 220-240 V Input Input Input Input Printer Specifications PictureMate PM 240 / PM 280...
-
Page 82: Memory Card Slots
Type H cards” xD-Picture Card Type M xD-Picture Card Type H Voltage 3.3 V Requirements 3.3 V/5 V Combined use Maximum current is 500 mA * Maximum capacity is 128 MB. ** Adapter required. Printer Specifications PictureMate PM 240 / PM 280... -
Page 83: Photo Cartridge
Note: Photo Cartridge For the latest information on memory cards available for your printer, contact your dealer or regional Epson PictureMate Photo Cartridge sales office. Color Black, Cyan, Magenta and Yellow CD drive Cartridge life Use within 6 months of opening the package. -
Page 84: Standards And Approvals
EN60950-1 EN55022 Class B EMC Directive 89/336/EEC EN55024 EN55022 Class B EMC Directive 89/336/EEC EN55024 EN61000-3-2 Australian model: (For PictureMate PM 240/250 only) EN61000-3-3 AS/NZS CISPR22 Class B Australian model: Safety AS/NZS 60950.1 AS/NZS CISPR22 Class B Printer Specifications PictureMate PM 240 / PM 280... - Page 85 Error Messages, 69 External device printing from, 41 external, 41 to 44 saving files to, 53 CD Index, 18, 55, 57 Cell phone printing from, 45 Faint images, 72 Charging ink, 71 File formats, 17 Index PictureMate PM 240 / PM 280...
- Page 86 Nozzle cleaning, 65 Jams paper, 73 On button, 23 JPEG, 17 Options, 76 LCD screen Packing PictureMate, 63 messages, 69 Paper buying types, 76 feeding problems, 73 to 74 jam, 73 Maintenance, 65 Manuals, 17 Index PictureMate PM 240 / PM 280...
- Page 87 USB DP (USB Direct Print), 16, 43 User’s Guide, 18 Quality, 72 to 73 xD Picture Card, 23 Removing memory card, 25 photo cartridge, 58 Zip disk Resolution, 17 printing from, 41 saving files to, 53 Index PictureMate PM 240 / PM 280...