Table of Contents
Advertisement
Advertisement
Table of Contents

Related Manuals for DigiTech Hardwire SC-2


Summary of Contents for DigiTech Hardwire SC-2
- Page 1 HARDWIRE SC-2 VALVE DISTORTION OWNER’S MANUAL...
-
Page 2: Declaration Of Conformity
Sandy, Utah 84070, USA Safety: IEC 60065 -01+Amd 1 Date: October 4, 2010 EMC: EN 55022:2006 European Contact: Your local DigiTech Sales and Service EN 55024:1998 Office or FCC Part 15 Harman Signal Processing Supplementary Information: 8760 South Sandy Parkway... -
Page 3: Electromagnetic Compatibility
WARNING If you want to dispose of this product, do not mix it with general household waste. There is a separate collection system for used electronic products in accordance with legislation that requires proper treatment, recovery, and recycling. For your protection, read the following: Private households in the 25 member states of the EU, in Switzerland and Norway may return their used electronic product free of charge to designated collection facilities or to a retailer (if you Important Safety Instructions... -
Page 4: Warranty
7. The foregoing is in lieu of all other warranties, expressed or implied, and DigiTech neither assumes nor authorizes any person to assume any obligation or liability in connection with the sale of this product. In no event shall DigiTech or its dealers be liable for special or consequential damages or from any delay in the performance of this warranty due to causes beyond their control. -
Page 5: Included Items
Introduction More than a remarkable achievement, DigiTech’s HardWire series represents ® a collection of significant improvements in guitar effects pedals. The HardWire series pedals provide a suite of well-known effects, each with superior tone and control. But these pedals go above and beyond their peers to provide such... - Page 6 Pedal Interface...
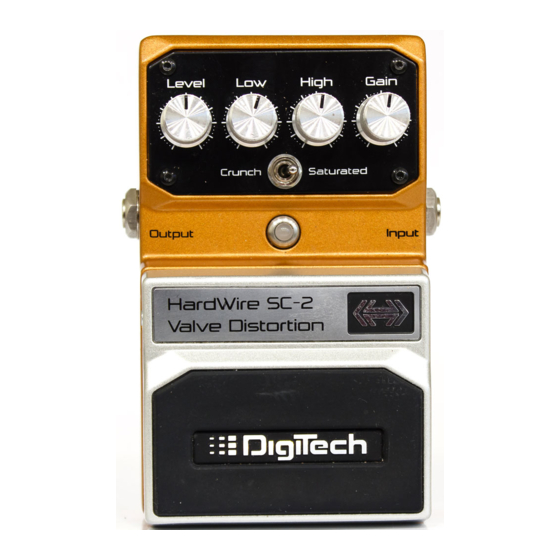
- Page 7 What Does This Do? 1. Level Knob - Controls the distortion output level. Turn the knob clockwise to increase and counter-clockwise to decrease the output level. 1. DC Adapter Jack - Connect the optional Harman power supply to this jack. Use the proper supply for your area’s mains line voltage. 2.
- Page 8 4. Gain Knob - Controls the overall distortion gain. Turn the knob clockwise to increase and counter-clockwise to decrease the amount of distortion gain. 5. Voicing Switch - This switches between the Distortion’s two voicings. Crunch provides a classic balanced distortion. Saturated features an extra gain stage for maximum sustain distortion making it ideal for solos.
- Page 9 8. Indicator LED - Lights when the effect is turned on. When battery power is low (approximately 15 minutes before it dies), the Indicator LED begins to dim giving you advanced warning that very shortly you will need to replace the battery. 9.
-
Page 10: Amplifier Setup
Amplifier Setup Harman Power Supply (optional) -
Page 11: Battery Operation
Battery Operation In the event that battery power is completely depleted, HardWire pedals automatically switch into bypass. This eliminates the need to remove the pedal from your pedal chain if the battery is dead. To replace the battery, do the following: 1. - Page 12 into place over the depressed pin. Release the pin. When the Foot Switch is properly fastened, both Release Pins are flush with the outer side of Foot Switch the pedal. Pedal Switch 9VDC Battery Foot Switch Release Pin Battery Compartment Foot Switch Spring Release Pin...
- Page 13 Performance Accessories The performance accessories make integrating a HardWire pedal into any pedal board a snap. The following accessories are included: • Hook-and-loop Pedalboard Pad (designed to attach to the surfaces found on most commercial pedalboards) • Foot Switch Glow Sticker (easily visible on dark stages) •...
- Page 14 Hook-and-loop Pedalboard Pad To attach the Pedalboard Pad, do the following: 1. Peel off the existing rubber skid pad from the bottom of the pedal. 2. Peel the adhesive protector from the back of the Pedalboard Pad. 3. Apply the Pedalboard Pad to the bottom of the pedal.
- Page 15 Foot Switch Glow Sticker To attach the Foot Switch Glow Sticker, do the following: 1. Peel the adhesive backing from the Foot Switch Glow Sticker. 2. Apply the Glow Sticker to the top of the Foot Switch.
- Page 16 StompLock To place the StompLock over the pedal knobs, do the following: 1. Set the knobs to your preferred setting. 2. Gently push the StompLock over the top of the knobs. 3. To remove the StompLock, gently lift one side and then the other.
-
Page 17: Specifications
Specifications Controls: Level, Low, High, Gain, Voice Switch, On/Off Pedal Jacks: Input, Output Input Impedance: >500 kΩ - effect on Output Impedance: 1 kΩ - effect on Input Impedance: True hardwire bypass - effect off Output Impedance: True hardwire bypass - effect off Power Supply: 9 V Alkaline Dry Battery or Harman power supply Current Draw:... - Page 20 8760 South Sandy Parkway Sandy, Utah 84070 PH (801) 566-8800 FAX (801) 566-7005 DigiTech and HardWire ® ® registered trademarks of Harman Designed in the USA Copyright - Harman Printed in China HardWire SC-2 Owners Manual 5024340-B Please visit our website at: www.digitech.com...