Table of Contents
Advertisement
Advertisement
Table of Contents

Related Manuals for VTech ES1310


Summary of Contents for VTech ES1310
- Page 1 User’s manual Models: ES1310/ w w w .v t ec h.c om ES1310-2/ES1320/ ES1320-2...
-
Page 2: Table Of Contents
SET Up THE TElEpHonE ..............3 Package Contents ..................3 Location ......................3 Connect the Base Station ................4 Connect the Charger (For ES1310-2 & ES1320-2 only) ......4 Install and Charge the Handset Batteries ..........5 GET To KnoW yoUr pHonE .............. 6 Overview of the Handset ................6 Overview of the Base Station ..............8... - Page 3 pHonEbooK ..................20 Add a New Phonebook Entry ..............20 Search a Phonebook Entry ..............20 View a Phonebook Entry ................20 Dial a Phonebook Entry ................20 5.3.1 To Search Alphabetically .............21 Edit a Phonebook Entry ................21 Delete a Phonebook Entry ...............21 Delete the Entire Phonebook ..............21 Check the Phonebook Usage ..............21 callEr DISplay (nETWorK DEpEnDEnT) ........
- Page 4 8.1.2 Through the Handset ..............31 Listen to the Messages in the Answering System ........32 8.2.1 Listen to New Messages through the Base ........32 8.2.2 Listen to New Messages through the Handset ......32 Delete All Messages in the Answering System ........33 8.3.1 Delete All Messages through the Base ........33 8.3.2...
-
Page 5: Important Safety Instructions
Do not overload wall outlets and extension cords as this can result in the risk of fire or electric shock. Unplug this product from the wall outlet and refer servicing to VTech under the following conditions: •... - Page 6 The correct disposal of your old appliance/battery will help prevent potential negative consequences for the environment and human health. For more detailed information about disposal of your old appliance/battery, please contact your city office, waste disposal service or The Shop where you purchased the product.
-
Page 7: Set Up The Telephone
SET Up THE TElEpHonE package contents The package contains the following items: ES1310 ES1310-2 ES1320 ES1320-2 Handset Base station AC power adapter Charger Telephone line cord rechargeable batteries User’s manual Warranty card location For maximum coverage and reduce the interference, here are some guidelines you... -
Page 8: Connect The Base Station
NOTES Always use the cables supplied with the product. Use only the power adapter supplied with the base station. connect the charger (for ES1310-2 & ES1320-2 only) Power adapter cable Plug the power cable into the charger base. Plug the other end into a power wall socket not controlled by a wall switch. -
Page 9: Install And Charge The Handset Batteries
Install and charge the Handset batteries Slide open the battery compartment cover to fit the NiMH rechargeable batteries into the handset. Place the two batteries as indicated. Check that the polarity is correct. Slide the battery compartment cover back until it clicks into place. place the handset on the base to charge for at least 14 hours. -
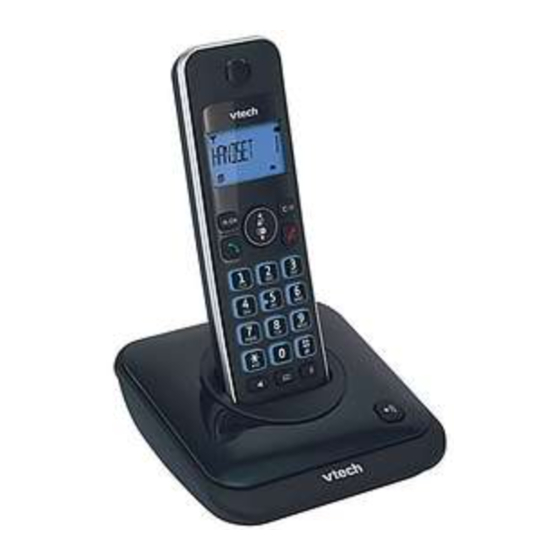
Page 10: Get To Know Your Phone
GET To KnoW yoUr pHonE overview of the Handset EarpIEcE call lIST / Up In idle mode: Press to access the call list. In menu mode: Press to scroll up the menu items. In Phonebook list / Redial list / Call List: Press to scroll up the list. During a call: Press to increase the volume. - Page 11 clEar / bacK /MUTE / InTErcoM In main menu mode: Press to return to idle screen. In sub-menu mode: Press to return to previous level. In sub-menu mode: Press and hold to return to idle screen. In editing / predialling mode: Press to clear a character / digit. In editing / predialling mode: Press and hold to delete all the characters / digits.
-
Page 12: Overview Of The Base Station
overview of the base Station 3.2.1 base Station (ES1320/ES1320-2) DElETE Press once to delete the message during playback. Press and hold to delete all the messages in idle mode. Note: New voice messages will not be deleted. VolUME Up (+) Increase speaker volume during message playback or increase the base ringer volume when there is an incoming external call. -
Page 13: Charging Cradle
--/XX Flashing XX alternatively with --: Time is not set and there are XX new voice messages received where XX is from 01 to 59. Flashing -- only: Time is not set and there are only old voice messages in the answering system memory. Steady: There are YY old voice messages (no new voice messages). -
Page 14: Base Station (Es1310/Es1310-2)
3.2.2 base Station (ES1310/ES1310-2) paGE Press the Page on the base station to page your handset. It will ring for approximately 60 seconds. cHarGInG craDlE Handset lcD Display Icons and Symbols The LCD display gives you information on the current status of the telephone. - Page 15 Indicates a call is in progress. Indicates that handsfree is being used. Indicates that the ringer is switched off. Steady when an alarm is set. Flashes when the alarm sounds. Indicates that the keypad is locked. Indicates when the batteries are fully charged. Flashes when the unit is charging.
-
Page 16: Menu Structure
Menu Structure In idle mode, press to access the main menu. Use to scroll through the menu. Refer to the following for the menu structure. Key Press Main Menu call lIST pHonEbooK bS SETTInGS Sub menu Review Call List Review DELETE HS Phonebook List FLASH TIME... -
Page 17: Text And Digit Entry Table
Text and Digit Entry Table The following table shows you where each letter and punctuation character can be found. This will be helpful when storing a name in the phonebook and renaming your handset. In editing mode, a cursor is displayed to indicate the current text entry position. It is positioned at the right of the last character entered. -
Page 18: Use Your Phone
USE yoUr pHonE Make a call 4.1.1 preparatory Dialling Enter the phone number and press to dial the number. Press to clear the entry. 4.1.2 Direct Dialing Press to access dial tone then enter the phone number. 4.1.3 call from the phonebook Press to access the phonebook then press to select the desired phonebook... -
Page 19: End A Call
End a call During a call connection, press to end the call. Put the handset on the base to end the call. adjust Earpiece and Handsfree Volume There are 5 volume levels (VOLUME 1 to VOLUME 5) to choose from for the earpiece and handsfree volume. -
Page 20: Redial A Number From The Redial List
4.8.1 redial a number from the redial list In idle mode, press to access the redial list. Remark: If redial entry is shown with a name, press to view the number. Press to browse the redial list. Press to dial to the selected redial number. NOTE If there are no numbers in the redial list, the display shows “EMPTY”. -
Page 21: Find The Handset
find the Handset You can locate the handset by pressing on the base. All the handsets registered to the base will produce the paging tone and “PAGING” is flashing on the screen. You can stop the paging by pressing on any handset or on the base again. -
Page 22: 4.10.3 Transfer An External Call To Another Handset
4.10.3 Transfer an External call to another Handset During an external call: Press then to select InTErcoM. Press to select the second handset with which to connect via intercom. If you have more than 2 handsets, the available handset numbers will be displayed on the screen. -
Page 23: Call Waiting
4.12 call Waiting Call Waiting tells you if a new caller is trying to contact you when you are already on the phone. A network tone alerts you to the new caller, so you can answer your second incoming call by putting the first caller on hold. Press . -
Page 24: Phonebook
pHonEbooK Your phone can store up to 50 phonebook entries with names and numbers. Each phonebook entry can have a maximum of 20 digits for the phone number and 12 characters for the name. You can also select different ringtones for your phonebook entries. -
Page 25: To Search Alphabetically
5.3.1 To Search alphabetically Press the relevant keypad button, e. g. for the entries beginning with T press 8 once then press to scroll through the entries. Edit a phonebook Entry In idle: Press to access the phonebook. Press to select the desired phonebook entry. Press then to select EDIT. -
Page 26: Caller Display (Network Dependent)
callEr DISplay (nETWorK DEpEnDEnT) If you have subscribed to Calling Number Display service, and provided the caller’s number is not blocked, the number (or name if stored in the phonebook) will be displayed when the phone is ringing. With some incoming calls, if the telephone number is not available, the handset may display one of the following explanations: UNAVAILABLE The number is not available. -
Page 27: Delete An Entry In The Call List
Delete an Entry in the call list Press to access the call list. Press then to select call lIST. Then press Press to select DElETE. Press to confirm. Delete the Entire call list Press to access the call list. to select call lIST. Then press Press then Press... -
Page 28: Phone Settings
pHonE SETTInGS Your phone comes with a selection of settings that you can change to personalize your phone the way you like it to work. Date and Time Settings You will need to set the correct date and time so that you know when Answering System messages were received. -
Page 29: Set The Date
7.1.4 Set the Date Press then to select HS SETTInGS. Press then to select DaTE & TIME. Press then to select SET DaTE. Press to enter the date information. Press to confirm. NOTE If date has been set before, the current date will display. alarm Settings You can use this phone to set an alarm clock. -
Page 30: Set The Alarm Time (If The Alarm Is Set To Be On)
7.2.2 Set the alarm Time (If the alarm is Set to be on) Press then to select HS SETTInGS. Press then to select alarM. Press then to select on/off. Press to confirm. Enter the alarm time. Press to set the snooze function. Press then to select on or off. -
Page 31: Set The Ringer Volume
7.3.3 Set the ringer Volume Press then to select HS SETTInGS. Press then to select rInG SETUp. Press then to select rInG VolUME. Press then to select the desired ringer volume (6 ringer volume levels including VolUME off are available) . If VolUME off is selected, will display. -
Page 32: Set The Auto Answer
7.3.7 Set the auto answer If you turn on the Auto Answer, you can pick up the call from the cradle without pressing any key. Press then to select HS SETTInGS. Press then to select aUTo anSWEr. Press then to turn on or off the auto answer feature. Press to confirm. -
Page 33: De-Register A Handset
7.4.3 De-register a Handset You are requested to enter the 4-digit PIN in order to de-register a handset from the base. The icon on the de-registered handset will blink. NOTE You cannot de-register the handset that you are currently using. Press then to select bS SETTInGS. -
Page 34: Eco Mode Setting
7.4.6 Eco Mode Setting Press to select bS SETTInGS. Press to select Eco MoDE. Press to select on or off. Press to confirm. registration Your handset and the base station are pre-registered. If for some reason, the handset is not registered to the base ( flashes even when the handset is near the base station), register your handset according to the following procedure. -
Page 35: Answering System (For Es1320/1320-2 Only)
anSWErInG SySTEM (for ES1320/1320-2 only) The ES1320,ES1320-2 includes a telephone answering system that records unanswered calls when it is switched on. The screen message counter (two digits) seven segment display on the base will show the number of the messages when the answering system is on. -
Page 36: Listen To The Messages In The Answering System
listen to the Messages in the answering System When new messages are recorded on the answering system, flashes on the handset display and the message counter on the base flashes with the number of new messages in the answering system until all the new messages are played. Old messages will be played after all new messages are played completely. -
Page 37: Delete All Messages In The Answering System
Alternatively, you can use the following shortcut keys to control different operation during message playback. Press to stop message playback. Press to skip to repeat playing the current message from the beginning. Press twice to skip backward to the previous message. Press to skip to play the next message. -
Page 38: Answering System Settings
answering System Settings You can use the TaM SETTInGS menu through the handset to change the settings of your answering system. 8.5.1 Set the answer Mode: By default, the answering system is set in anS & rEc mode which allows callers to leave a message. -
Page 39: Playback The Ogm
8.7.1 playback the oGM Press then to select anS. MacHInE. Press then to select TaM SETTInGS. Press then to select oGM SETTInGS. to select anS & rEc or anSWEr only. Press then Press then to select playbacK. Press to playback your personalised OGM (if you have recorded a personalised OGM before) and PLAYING OGM will be displayed on the screen. -
Page 40: Set The Recording Time Of Incoming Message
8.10 Set the recording Time of Incoming Message You can set the maximum length of the recording time of the incoming messages. Press then to select anS. MacHInE. Press then to select TaM SETTInGS. Press then to select rEcorD TIME (Available options: 60, 120, 180 seconds or UnlIMITED). -
Page 41: 8.11.3 Access Your Answering System Remotely
8.11.3 access your answering System remotely You can ring your phone from another tone-dialling phone to switch the answering system on or off then listen to your messages remotely. Place a call from a tone-dialling phone to your phone. When the answering system answers the calls and starts playing the OGM, press NOTE You must enter... -
Page 42: 8.11.4 Remote Commands
8.11.4 remote commands When the answering system is set to ON and when there is an incoming message, the base will start call screening automatically after the preset numbers of rings of answer delay. Keys Functions While message is NOT playing While message is playing Delete the current message playback... -
Page 43: Default Settings
DEfaUlT SETTInGS ITEMS Default Values Default Settings of Handset LANGUAGE ENGLISH EXT RING MELODY 1 INT RING MELODY 2 INT RING VOLUME VOLUME 5 EXT RING VOLUME VOLUME 5 EARPIECE VOLUME VOLUME 4 SPEAKER VOLUME VOLUME 4 HANDSET NAME HANDSET 1 / HANDSET 2 KEY TONE LOW BATTERY BEEP OUT OF RANGE BEEP... -
Page 44: 10. Troubleshooting
10. TroUblESHooTInG If you have difficulty with your phone, please try the suggestion listed below. problem Solutions My telephone does • Make sure the batteries are installed and charged not work at all. correctly. For optimum daily performance, return the handset to the telephone base after use. - Page 45 There is interference • The handset may be out of range. Move it closer to the during a telephone telephone base. conversation. My • If you subscribe to high-speed Internet service (digital calls fade out when I subscriber line - DSL) through your telephone line, you am using the handset.
- Page 46 common cure for If the telephone is not responding normally, put the electronic equipment. handset in the telephone base. If it does not respond, try the following (in the order listed): • Disconnect the power to the telephone base. • Disconnect the batteries on the handset.
-
Page 47: 11. Technical Specifications
11. TEcHnIcal SpEcIfIcaTIonS baSIc InforMaTIon Dimensions Handset: width / depth / height = 51 X33 X 154 mm Charger: width / depth / height =102X 52 X 118 mm Base: width / depth / height = 92X 52 X 108 mm Weight Handset: 90g Base: 130g... -
Page 48: Care And Maintenance Instructions
12. carE anD MaInTEnancE InSTrUcTIonS Take care of your telephone • Your cordless telephone contains sophisticated electronic parts, so you must treat it with care. • Avoid rough treatment. • Place the handset down gently. • Save the original packing materials to protect your telephone if you ever need to ship it. -
Page 49: 13. Technical Support
13. TEcHnIcal SUpporT Please read out the serial number of this telephone to Technical Center. The serial number can be found in the battery compartment after having the batteries removed. For use in New Zealand please note the following: The grant of a Telepermit for any item of terminal equipment indicates only that Telecom has accepted that the item complies with minimum condition for connection to its network. - Page 50 VTEcH TElEcoMMUnIcaTIonS lTD. a member of THE VTEcH GroUp of coMpanIES. © 2012-2013 VTech Telecommunications Ltd. All Rights Reserved.