
Related Manuals for Pioneer AVH-X550BT


Summary of Contents for Pioneer AVH-X550BT
- Page 1 Operation Manual DVD RDS AV RECEIVER AVH-X5500BT AVH-X3500DAB AVH-X2500BT AVH-X1500DVD English...
-
Page 2: Table Of Contents
Contents Thank you for purchasing this PIONEER product. To ensure proper use, please read through this manual before using this product. It is especially important that you read and observe WARNINGs and CAUTIONs in this manual. Please keep the manual in a safe and accessible place for future refer- ence. - Page 3 Contents Shuffle play 32 Bluetooth telephone Repeating playback 32 Bluetooth telephone operations 46 Playing videos from your iPod 32 Calling a number in the phone book 47 Browsing for a video/music on the iPod 33 Selecting a number by alphabet search Changing audiobook speed 34 mode 48 Displaying lists related to the song currently...
- Page 4 Contents Setting the DivX subtitle file 59 Selecting the background display 71 Displaying the DivXâ VOD registration Other functions code 59 Adjusting the response positions of the Automatic playback of DVDs 59 touch panels (Touch Panel System settings Calibration) 72 Switching the auxiliary setting 60 Using an AUX source 72 Setting AV input 60...
-
Page 5: Precautions
Section Precautions IMPORTANT SAFEGUARDS To ensure safe driving Please read all of these instructions regarding WARNING your display and retain them for future refer- ! LIGHT GREEN LEAD AT POWER CON- ence. NECTOR IS DESIGNED TO DETECT 1 Do not install the display where it may (i) PARKED STATUS AND MUST BE CON- obstruct the driver’s vision, (ii) impair the NECTED TO THE POWER SUPPLY SIDE... -
Page 6: To Avoid Battery Exhaustion
Section Precautions When using the rear view camera With an optional rear view camera, this unit can be used as an aid to keep an eye on trai- lers, or when backing into a tight parking spot. WARNING ! SCREEN IMAGE MAY APPEAR RE- VERSED. -
Page 7: Before You Start
Also, damage to this unit, smoke, and over- product undergoes the necessary treatment, heating could result from contact with liquids. recovery and recycling and thus prevent po- ! The Pioneer CarStereo-Pass is for use only in tential negative effects on the environment Germany. and human health. -
Page 8: About This Manual
“iPod”. If you experience problems Should this product fail to operate properly, please contact your dealer or nearest author- ized Pioneer Service Station. Demo mode The feature demo automatically starts when you select Off for the source and continues while the ignition switch is set to ACC or ON. -
Page 9: What's What
Section What’s what Head unit The display returns to the Launcher screen while a 3rd-party application is being used AVH-X5500BT in Advanced App Mode. Double-clicking the icon on the Launcher screen returns the display to the home dis- play. 6 MODE Turning the information display off. -
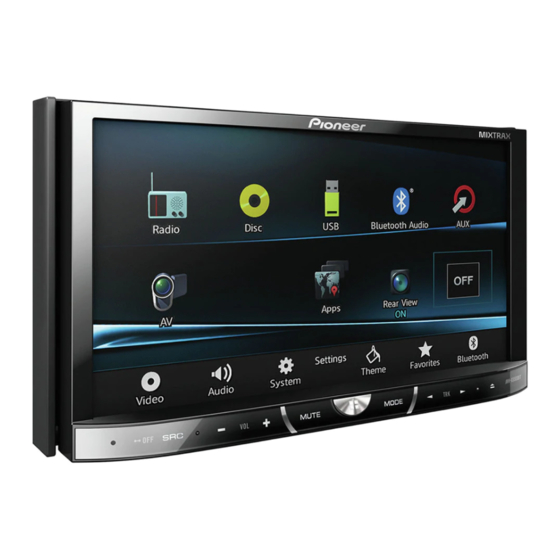
Page 10: Home Display
Section What’s what 3 Rear view key Home display Displaying the rear view image. Home display For details refer to Using the rear view on page 13. 4 Source off key Turning the source off. Radio Disc USB/iPod Bluetooth Audio 5 Bluetooth key Displaying the Bluetooth connection menu. -
Page 11: Selecting A Source
Section What’s what Selecting a source Available source modes ! DAB – Digital Audio Broadcasting tuner (AVH-X3500DAB) ! Radio – Radio tuner ! Disc – Built-in DVD and CD player ! USB/iPod – USB/iPod ! Bluetooth Audio – Built-in Bluetooth audio (AVH-X5500BT/AVH-X3500DAB/AVH-X2500BT) ! AUX –... -
Page 12: Common Operations
Section Common operations Common operations for DVD-V 12:43 1 JAN menu settings/lists (Function of AVH-X5500BT/AVH- X3500DAB/AVH-X2500BT) Starting the Bluetooth telephone Dolby D Multi ch 48kHz 16bit Dolby D menu. MENU FULL MENU For details refer to Bluetooth tele- 00'20'' -119'51'' phone on page 46. -
Page 13: Activating The Touch Panel Keys
Section Common operations Activating the touch panel Using the rear view key to display the rear view keys Touch panel keys Displaying the rear view image by turning the rear view image on. When the rear view image is dis- DVD-V played, you can switch to the 1 JAN... -
Page 14: Changing The Wide-Screen Mode
Section Common operations — MP3/WMA/AAC/WAV files on USB storage ! The video image will appear coarser when devices viewed in ZOOM mode. — MP3/WMA/AAC files on CD media ! This function is enabled for playback on the — iPod sources listed below. ! The sound retriever setting is turned Off when —... -
Page 15: Basic Operations
Section Basic operations Adjusting the angle of the LCD Setting the clock panel and ejecting media Touch the Clock key. The Clock Adjustment screen appears. CAUTION For details refer to Home display on page 10. Keep hands and fingers clear of the unit when Select the item to set. -
Page 16: Dab (Digital Audio Broadcasting)
Section DAB (Digital Audio Broadcasting) Digital Audio Broadcasting If the tuner cannot get good reception, the unit will automatically search for another tuner operations ensemble that supports the same Service (Function of AVH-X3500DAB) Component. If no alternative Service Com- To receive DAB signals, connect a DAB anten- ponent can be found or reception remains na (AN-DAB1) sold separately to the unit. -
Page 17: Storing And Recalling Stations
Section DAB (Digital Audio Broadcasting) Basic operations Listening to a recent broadcast (time shift) Switching preset channels using the buttons 1 Press c or d (TRK). You can navigate through recent broadcasts from the selected Service Component. Seek tuning using the buttons 1 Press and hold c or d (TRK). -
Page 18: Updating Service List Information
Section DAB (Digital Audio Broadcasting) Touch the desired service title to switch to the service from service list. Once selected, the following Service Compo- nent functions can be adjusted. SERVICE (service label) You can select a Service Component from the list of all components. -
Page 19: Tuner
Section Tuner 8 Text key Tuner operations Displaying radio text. Touch panel keys Storing and recalling radio text. 9 List key Displaying the preset channel list. Radio 12:05 8 AUG a Preset channel key WWWWWWWW Selecting a preset channel. WWWWWWWW WWWWWWWW WWWWWWWW Text... -
Page 20: Storing And Recalling Radio Text
Section Tuner Tuning in to strong signals Radio text data transmitted by RDS stations, such as station information, the name of the Local seek tuning allows you to tune in to only currently broadcast song and the name of the those radio stations with sufficiently strong artist, can be displayed on this tuner. -
Page 21: Receiving Traffic Announcements
Section Tuner Storing the tagged information Receiving alarm broadcasts to your iPod interrupting regular broadcasts Connect your iPod. When your iPod is connected to this unit, your (Only available on FM stations) iPod starts storing the tagged information You can choose to receive the alarm broadcast automatically. -
Page 22: Setting The Fm Tuning Step
Section Tuner Using news program interruption Touch FM Step on the system menu to select the FM tuning step. When a news program is broadcast from a Touching FM Step will switch the FM tuning PTY code news station, the unit can switch step between 50 kHz and 100 kHz. -
Page 23: Switching Auto Pi Seek
Section Tuner Notes ! Sound may be temporarily interrupted by an- other program during an AF frequency search. ! The AF feature can be set for FM1, FM2, and FM3. Switching Auto PI Seek The unit can automatically search for a differ- ent station with the same programming, even during preset recall. -
Page 24: Disc (Cd/Dvd)
Section Disc (CD/DVD) Introducing movie operations you can switch between languages/audio systems during playback. You can use this unit to view DVD/DVD-R/ Depending on the setting, the video may not DVD-RW/CD/CD-R/CD-RW movie files. be played back with the audio system used to record the DVD. - Page 25 Section Disc (CD/DVD) Basic operations ! You can set one bookmark per DVD video. You can set up to five bookmarks total. Playing back videos ! To clear the bookmark on a disc, touch 1 Insert the disc into the disc loading slot with the label side up.
-
Page 26: Sound Playback Operations
Section Disc (CD/DVD) 2 Search key ! You can also switch between languages/audio systems using Video Setup menu. For details, Displaying a list of track titles/file names to refer to Setting the audio language on page 56. select songs on a CD. ! This unit will return to normal playback if you Displaying the file name list to select the change the audio language during fast for-... -
Page 27: Random Play (Shuffle)
Section Disc (CD/DVD) Using the arrow keys Random play (shuffle) Display arrow keys to operate the DVD % Touch the random key. menu. ! Songs – Play back videos/songs in the se- lected list in random order. Select the desired menu item. ! Albums –... -
Page 28: Searching For The Part You Want To Play
Section Disc (CD/DVD) Searching for the part you ! Mix – Mixing left and right want to play Note You may not be able to select or use this function You can use the search function to find the depending on the disc and the playback part you want to play. -
Page 29: Selecting Files From The File Name List
Section Disc (CD/DVD) Selecting files from the file stricts playback of content to specific, registered devices. name list % If a message is displayed after loading (Function for compressed audio/DivX/MPEG-1/ a disc containing DivX VOD content, touch MPEG-2/MPEG-4) Play. File name list is a list of file names (or folder Playback of the DivX VOD content will start. -
Page 30: Moving Images Operations
Section iPod Moving images operations Returning to normal playback during paused, slow motion, or frame-by-frame You can use the unit to view iPod movie files. playback. ! Depending on your iPod, there may not be any output unless you use CD-IU201S/CD- Basic operations IU201V (sold separately). -
Page 31: Using This Unit's Ipod Function From Your Ipod
Section iPod a Change speed key Touch panel keys Changing the speed of audiobook playback iPod audio (Control Audio) on the iPod. b Genre iPod 12:43 1 JAN Displaying the Genres list on the iPod. Abcdefghi Abcdefghi c Album title Abcdefghi Displaying the Albums list on the iPod. -
Page 32: Shuffle Play
Section iPod Notes Repeating playback ! The following functions are still accessible % Touch the repeat key. from the unit even if the control mode is set to ! One – Repeat just the current video/song App Mode. ! All – Repeat all videos/songs in the selected However, the operation will depend on your list on the iPod applications. -
Page 33: Browsing For A Video/Music On The Ipod
Section iPod # If you want to switch to iPod music mode, Notes touch the icon. ! Depending on the generation or version of the iPod, some functions may not be available. ! You can play playlists created with the Switching to iPod music mode. -
Page 34: Changing Audiobook Speed
Section iPod Changing audiobook speed % Touch the change speed key to change the speed. Playback at a speed faster than normal Playback at normal speed Playback at a speed slower than normal Displaying lists related to the song currently playing (link search) Touch the artwork to open a list of the names of songs on the album currently playing. -
Page 35: Advanced App Mode
! Use the connected iPod to open an application. ! Pioneer is not liable for any issues that may arise from incorrect or flawed app-based content. Starting procedure ! The content and functionality of the sup-... -
Page 36: Setting The Keyboard
Section Advanced App Mode Setting the Keyboard Setting the App sound mixing You cannot turn on or off Mixing when this CAUTION unit is playing a song of iPod. For your safety, the keyboard functionality is only The sound of application during Advanced available when the vehicle is stopped and the App Mode can be adjusted. -
Page 37: Usb
Section Moving images operations Moving the selection ahead one frame at a time during playback. You can use this unit to view USB storage de- Touch and hold down the key for more than vice files. two seconds to slow down playback speed. 8 Stop key Touch panel keys Stopping playback. -
Page 38: Sound Playback Operations
Section 1 MIXTRAX EZ key ! This unit will return to normal playback if you change the subtitle language during fast for- Starting MIXTRAX EZ. ward/fast reverse, pause or slow motion 2 Information key playback. Switching the text information to display on this unit when playing MP3/WMA/AAC/ WAV files. -
Page 39: Music Browse Mode
Section Music browse mode Touch panel keys (Function for USB) This unit creates an index in order to facilitate 1 JAN 12:43 browsing for a song. You can search by the ca- tegories such as Albums and Artists. CAUTION ! This function is not available when the USB NORMAL Media storage device is locked. -
Page 40: Switching The Media File Type
Section Basic operations ! If you select USB source, the repeat play range changes to All. Playing still images 1 Connect the USB device. Playback will automatically start. Selecting files from the file ! When the source icon is not displayed, it can be name list displayed by touching the screen. - Page 41 Section Touch f to pause the slide show when the desired image is displayed. Touch Capture to capture the desired image. When “Do you save this image?” is dis- played, touch Yes. While storing the image to this unit, “Saving the image.
-
Page 42: Bluetooth Audio
Section Bluetooth Audio Sound playback operations Touch panel keys (Function of AVH-X5500BT/AVH-X3500DAB/ AVH-X2500BT) Bluetooth 12:22 22 JAN You can use this unit to listen to Bluetooth 8888 audio files. Abcdefghi Abcdefgh Abcdefgh Notes Abcdefgh ! Depending on the Bluetooth audio player con- nected to this unit, the available operations 88'88'' -88'88''... -
Page 43: Random Play (Shuffle)
Section Bluetooth Audio ! To ensure proper operation, connect the dock connector cable from the iPod directly to this unit. ! While the iPod is connected to this unit, the iPod cannot be turned on or off. ! If the characters recorded on the disc are not compatible with this unit, those characters will not be displayed. -
Page 44: Using Mixtrax
Section Using MIXTRAX MIXTRAX operation 60s (60 sec.)—90s (90 sec.)—120s (120 sec.)—150s (150 sec.)—180s (180 sec.) MIXTRAX is original technology for creating —Random (random)—Off (off) non-stop mixes of selections from your audio When Random is selected, the playback library, complete with DJ effects that make time varies between 60 s, 90 s, 120 s, 150 s, them sound as if a DJ is right there with you and 180 s selected at random when the... - Page 45 Section Using MIXTRAX Sound effects ! Cross Fade – A sound effect that creates a fade in and fade out effect between songs. ! Flanger1 – A rushing sound that mimics that rising and falling sounds of a jet en- gine.
-
Page 46: Bluetooth Telephone
Section Bluetooth telephone Bluetooth telephone When switching to the entering phone number mode operations 13 APR 12:25 (Function of AVH-X5500BT/AVH-X3500DAB/ AVH-X2500BT) Abcdefghi XXXXXXXXXXXXXXXX You can use Bluetooth telephone. Important ! Leaving the unit on standby to connect to your Private phone via Bluetooth while the engine is not running can drain the battery. -
Page 47: Calling A Number In The Phone Book
Section Bluetooth telephone c Off-hook key Notes Accepting an incoming call. ! The volume of the caller’s voice and ring tone Making a phone call, when selecting a may vary depending on the type of cellular phone number. phone. Switching between callers on hold. ! If there is a large volume difference between the ring tone and caller’s voice, the overall vo- d Voice control key... -
Page 48: Selecting A Number By Alphabet Search Mode
Section Bluetooth telephone Note Touch the off-hook key to make the call. The contacts on your phone will normally be transferred automatically when the phone is con- Touch the on-hook key to end the nected. If it is not, use your phone menu to trans- call. -
Page 49: Setting Automatic Answering
Section Bluetooth telephone Touch the history key to display the call % Touch the volume key to select history list. Far-End VOL. 1—2—3 Select Missed Calls, Dialed Calls or # This function can be performed even while Received Calls. talking on the phone. # Settings can be stored for each device. -
Page 50: Making A Call By Entering Phone Number
Section Bluetooth telephone Making a call by entering ! Operation varies depending on the type of cellular phone. Refer to the instruction phone number manual that came with your cellular phone for detailed instructions. 12:25 13 APR ! For details on cellular phone models that are compatible with this feature, refer to Abcdefghi the information on our website. -
Page 51: Settings
Section Settings Menu operations Touch any of the following touch panel keys to select the menu to be adjusted. Touch panel keys Settings Video Audio System Theme Favorite Bluetooth Audio Sonic Center Control L/R 0 Loudness Subwoofer Bass Booster High Pass Filter 125Hz Source Level Adjuster 1 Video setup key... -
Page 52: Audio Adjustments
Section Audio adjustments Using fader/balance Touch or to adjust the left/right speaker balance. adjustment Range: Left 15 to Right 15 Fader/Balance displays when Rear Speaker is Note set to Full on the System Menu. You can also set the balance by dragging the dot You can change the fader/balance setting to on the displayed table. -
Page 53: Using The Auto-Equalizer
Section Audio adjustments Touch Graphic EQ on the audio function ing) on page 64). menu. You can turn the auto-equalizer on or off. If you connect an optional microphone to this # You cannot select or adjust the equalizer unit, you can use this function. curves of Custom1 and Custom2 when using the auto-equalizer. -
Page 54: Using Subwoofer Output
Section Audio adjustments Touch c or d to select a desired level Touch c or d to select a desired level. for loudness. Range: 0 to +6 Off (off)—Low (low)—Mid (mid)—High (high) Using the high pass filter When you do not want low sounds from the Using subwoofer output subwoofer output frequency range to play This unit is equipped with a subwoofer output... - Page 55 Section Audio adjustments Touch to adjust the source vo- lume. Range: +4 to –4 Notes ! Source Level Adjuster is not available when FM is selected as the source. ! The MW/LW volume level can also be adjusted with this function. ! Video CD, CD, compressed audio, DivX, MPEG-1, MPEG-2 and MPEG-4 are automati- cally set to the same source level adjustment...
-
Page 56: Setting Up The Video Player
Section Setting up the video player Setting the subtitle language Setting the audio language You can set a desired subtitle language. When You can set the preferred audio language. available, the subtitles will be displayed in the Press the home button to switch to the selected language. -
Page 57: Setting The Multi-Angle Dvd Display
Section Setting up the video player Note ! Letter Box – The picture is the shape of a letterbox with black bands on the top and If the selected language is not available, the lan- bottom of the screen guage specified on the disc is displayed. ! Pan Scan –... -
Page 58: Setting Parental Lock
Section Setting up the video player Setting parental lock ! The parental lock level is stored on the disc. Look for the level indication written on the Some DVD video discs let you use parental disc package, included literature or on the lock to restrict children from viewing violent disc itself. -
Page 59: Setting The Divx Subtitle File
Section Setting up the video player Setting the DivX subtitle file Touch Registration Code. Your registration code is displayed. You can select whether or not to display DivX external subtitles. ! The DivX subtitles will be displayed even Displaying the deregistration code when Custom is selected if no DivX exter- If your device is already registered, deregister nal subtitle files exist. -
Page 60: System Settings
Section System settings Switching the auxiliary setting Changing the picture adjustment Activate this setting when using an auxiliary device connected to this unit. You can adjust the Brightness (brightness), Contrast (contrast), Color (color) , Hue (hue), Press the home button to switch to the Dimmer (dimmer), and Temperature (tem- home display. -
Page 61: Selecting The System Language
Section System settings # You can adjust Hue only when the color sys- Press the home button to switch to the tem is set to NTSC. home display. # With some rear view cameras, picture adjust- Touch the system key to open the sys- ment may not be possible. -
Page 62: Switching Sound Muting/Attenuation
Section System settings Switching sound muting/ Initially, the unit is set for a rear full-range speaker connection (Full). attenuation Turn the source off. Sound from this system is automatically Refer to Turning the source ON/OFF on page muted or attenuated when a signal from equipment with a mute function is received. -
Page 63: Setting The Bluetooth Audio
Section System settings Touch the system key to open the sys- Updating Bluetooth tem menu. connection software Touch Ever Scroll on the system menu This function is used to update this unit with to turn ever scroll on or off. the latest Bluetooth software. -
Page 64: Setting The Bluetooth Safe Mode
! Off – When a rear view camera is not con- nected to this unit CAUTION ! The rear view key setting also turns off on Pioneer recommends the use of a camera the home display screen. which outputs mirror-reversed images. Otherwise, the screen image will appear re- versed. - Page 65 Section System settings ! If the microphone is placed in an unsuitable — The fader/balance settings return to the position the measurement tone may become center position. (Refer to Using fader/ balance adjustment on page 52.) loud and measurement may take a long time, resulting in battery drainage.
-
Page 66: Selecting The Video Format
Section System settings Press the home button to switch to the When the car’s interior acoustic characteris- home display. tics cannot be measured correctly, an error message will be displayed. (Refer to Under- Touch the system key to open the sys- standing auto EQ error messages on page 80.) tem menu. - Page 67 Section System settings Press the home button to switch to the home display. Touch the system key to open the sys- tem menu. Touch Video Signal Setting on the func- tion menu. Video Signal Setting items are displayed. ! AV – Adjusts the AV video signal ! AUX –...
-
Page 68: Favorite Menu
Section Favorite menu Using the Favorite menu Display menu columns to register. Refer to Menu operations on page 51. # You can customize menus except Video Setup menu. Touch the star icon in the menu column for the desired menu to register the menu. The star icon for the selected menu is filled in. -
Page 69: Bluetooth Connection Menu
Section Bluetooth connection menu Bluetooth connection # If three devices are already paired, Memory Full is displayed and pairing cannot be menu operations performed. In such cases, delete a paired device (Function of AVH-X5500BT/AVH-X3500DAB/ first. Refer to this page. # If no device can be found, Not Found is dis- AVH-X2500BT) played. -
Page 70: Displaying Bluetooth Device Address
Section Bluetooth connection menu Touch the Bluetooth key to open the After inputting PIN code (up to 8 di- Bluetooth connection menu. gits), store in this unit. Touch Auto Connect to turn automatic connection on. Storing the PIN code in this unit. If your Bluetooth device is ready for a Bluetooth wireless connection, a connection to this unit will automatically be established. -
Page 71: Theme Menu
Section Theme menu Selecting the illumination The customized color has been stored in the memory. color The set color will be recalled from the memory This unit is equipped with multiple-color illu- the next time you touch the same icon. mination. -
Page 72: Other Functions
You can connect auxiliary devices to this unit. ! If the touch panel cannot be adjusted prop- erly, consult your local Pioneer dealer. Mini pin plug cable (AUX) Turn the source off. When connecting an auxiliary device using a... -
Page 73: Resetting The Microprocessor
Section Other functions Resetting the microprocessor By pressing RESET, you can reset the micro- processor to its initial settings without chan- ging the bookmark information. The microprocessor must be reset in the fol- lowing situations: ! Before using this unit for the first time after installation ! If the unit fails to operate properly ! When strange or incorrect messages ap-... -
Page 74: Additional Information
Appendix Additional information Troubleshooting Symptom Cause Action (Refer- ence page) Common There is no The parking Connect the park- Symptom Cause Action (Refer- image dis- brake cable is ing brake cable, ence page) played. not connected. and apply the park- ing brake. - Page 75 Appendix Additional information Symptom Cause Action (Refer- Symptom Cause Action (Refer- ence page) ence page) Nothing is dis- The rear view Connect a rear Dialog lan- The DVD being The language can- played. camera is not view camera. guage (and played does not not be switched if The touch...
-
Page 76: Error Messages
Video CDs that fea- search are not possible. ture PBC. Error messages When you contact your dealer or your nearest iPod Pioneer Service Center, be sure to note the Symptom Cause Action error message. The iPod does The cables are in-... - Page 77 DRM not embedded with contact your dealer protected files. Windows Mediaä or an authorized DRM 9/10. Pioneer Service TEMP The temperature Wait until the unit Station for assis- of the unit is out- returns to a tem- tance.
- Page 78 Appendix Additional information External storage device (USB) Message Cause Action (Refer- ence page) Message Cause Action (Refer- ence page) Check USB The USB connec- Check that the tor or USB cable USB connector or Unplayable This type of file Select a file that has short- USB cable is not File...
- Page 79 Appendix Additional information Message Cause Action (Refer- Message Cause Action ence page) Stop There are no Transfer songs to Your device is This unit’s DivX Register this unit songs. the iPod. not author- registration code to the DivX VOD There are no Select a list that ized to play has not been...
-
Page 80: Understanding Auto Eq Error Messages
! Connect the bat- please contact check battery. being supplied tery correctly. your dealer or an from the battery ! Check the battery authorized Pioneer to this unit. voltage. Service Station. Understanding messages Understanding auto EQ error messages Messages Translation Pioneer recommends When correct measurement of the car’s inter-... -
Page 81: Indicator List
Appendix Additional information Indicator list Indicates the sampling frequency. Area 1 Area 2 Indicates that the digital format is DTS. Indicates the audio channel. Area 3 Area 1 Indicates that the volume is ad- justed. Indicates that a disc with PBC On is being played. - Page 82 Appendix Additional information Shows the song title when receiv- Shows the chapter number cur- ing the tag information. rently being played. Shows the song title of the song currently being played for MP3/ WMA/AAC/WAV files. Shows the genre of the track/song currently being played.
-
Page 83: Handling Guidelines
Appendix Additional information Handling guidelines It may not be possible to play back some DVD video discs. Discs and player It is not possible to play back DVD-RAM discs. Use discs featuring any of the following logos. This unit is not compatible with discs recorded in AVCHD (Advanced Video Codec High Definition) for- mat. -
Page 84: Jpeg Picture Files
Appendix Additional information Depending on the application settings and the envir- Depending on the kind of USB portable audio player/ onment, playback of discs recorded on a personal USB memory you use, the device may not be recog- computer may not be possible. (For details, contact nized or audio files may not be played back properly. -
Page 85: Compressed Audio Compatibility (Usb)
Appendix Additional information Compressed audio Only DivX files downloaded from a DivX partner site are guarantee for proper operation. Unauthorized compatibility (disc, USB) DivX files may not operate properly. DRM rental files cannot be operated until playback is started. File extension: .wma Recommended file size: 2 GB or less with a transmis- Bit rate: 48 kbps to 320 kbps (CBR), VBR sion rate of 2 Mbps or less. -
Page 86: Ipod Compatibility
.avi (MPEG-4) Compatible audio codec: MP2 (MPEG-1/MPEG-2), CAUTION MP2, MP3, Dolby Digital (MPEG-4) ! Pioneer accepts no responsibility for data lost H.264 (MPEG-4AVC): Compatible on the USB memory/USB portable audio LPCM: Not compatible player even if that data is lost while using this unit. -
Page 87: Sequence Of Audio Files
Audiobook, Podcast: Compatible Example of a hierarchy CAUTION Pioneer accepts no responsibility for data lost on the iPod, even if that data is lost while this unit is used. : Folder : Compressed... -
Page 88: Using The Display Correctly
PIONEER Service Station. Do not use the unit ! Small black dots or white dots (bright dots) in this condition because doing so may result may appear on the LCD screen. -
Page 89: Bluetooth Profiles
! If the LED backlight reaches the end of its tered trademarks owned by Bluetooth SIG, Inc. product lifetime, the screen will become and any use of such marks by PIONEER dark and the image will no longer be pro- CORPORATION is under license. Other trade- jected. - Page 90 0.97, January 1998, through Please be aware in advance that Pioneer will 1.0.6, March 20, 2000, are Copyright (c) 1998, not respond to questions concerning the con- 1999 Glenn Randers-Pehrson, and are distribu- tents of the source code.
- Page 91 Appendix Additional information 3. This Copyright notice may not be removed Tom Lane Glenn Randers-Pehrson or altered from any source or altered source Willem van Schaik distribution. libpng versions 0.89, June 1996, through 0.96, The Contributing Authors and Group 42, Inc. May 1997, are Copyright (c) 1996, 1997 An- specifically permit, without fee, and encourage dreas Dilger Distributed according to the...
-
Page 92: Language Code Chart For Dvd
Appendix Additional information Language code chart for DVD Language (code), input code Japanese (ja), 1001 Dzongkha (dz), 0426 Kurdish (ku), 1121 Kinyarwanda (rw), 1823 English (en), 0514 Ewe (ee), 0505 Komi (kv), 1122 Sanskrit (sa), 1901 French (fr), 0618 Esperanto (eo), 0515 Cornish (kw), 1123 Sardinian (sc), 1903 Spanish (es), 0519... -
Page 93: Specifications
Appendix Additional information Specifications Continuous power output ... 22 W × 4 (50 Hz to 15 000 Hz, 5 % THD, General 4 W load, both channels dri- ven) Rated power source ....14.4 V DC Load impedance ...... 4 W (4 W to 8 W (2 W for 1 ch) (allowable voltage range: allowable) 10.8 V to 15.1 V DC) -
Page 94: Dab Tuner
Appendix Additional information Pixel Sampling ....4:2:2, 4:2:0 Signal-to-noise ratio ....62 dB (IEC-A network) Decode Size ..... MAX:8 192(H) x 7 680(W), LW tuner MIN:32(H) x 32(W) DivX decoding format .... Home Theater Ver. 3, 4, 5.2, Frequency range ...... 153 kHz to 281 kHz 6 (Except ultra and HD) Usable sensitivity ..... - Page 96 PIONEER ELECTRONICS OF CANADA, INC. 340 Ferrier Street, Unit 2, Markham, Ontario L3R 2Z5, Canada TEL: 1-877-283-5901 TEL: 905-479-4411 PIONEER ELECTRONICS DE MEXICO, S.A. de C.V. Blvd.Manuel Avila Camacho 138 10 piso Col.Lomas de Chapultepec, Mexico, D.F. 11000 TEL: 55-9178-4270 先鋒股份有限公司...