
Related Manuals for GE 27957


Summary of Contents for GE 27957
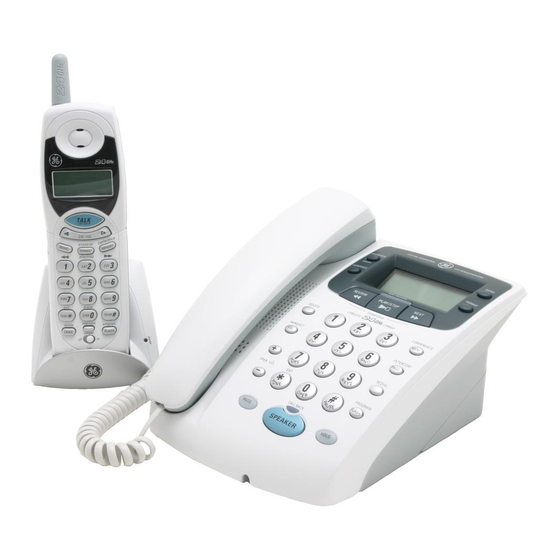
- Page 1 27957 2.4GHz Speakerphone and Answering System with Cordless Handset and Call Waiting Caller ID User’s Guide...
-
Page 2: Licensing
Equipment Approval Information Your telephone equipment is approved for connection to the Public SwitchedTelephone Network and is in compliance with parts 15 and 68, FCC Rules and Regulations and theTechnical Requirements forTelephoneTerminal Equipment published by ACTA. 1 Notification to the Local Telephone Company On the bottom of this equipment is a label indicating, among other information, the US number and Ringer Equivalence Number (REN) for the equipment.You must, upon request, provide this information to your telephone company. -
Page 3: Table Of Contents
Table of Contents QUIPMENT PPROVAL NFORMATION NTERFERENCE NFORMATION ...2 ICENSING EARING OMPATIBILITY ...5 NTRODUCTION ANDSET AND HARGE RADLE ...7 AYOUT ...8 EFORE EGIN ...8 ARTS HECKLIST ELEPHONE EQUIREMENTS MPORTANT NSTALLATION NFORMATION MPORTANT NSTALLATION ...9 NSTALLING THE HONE NSTALLING THE ANDSET AC P ONNECTING THE OWER... - Page 4 Table of Contents PEAKERPHONE PERATION ...22 ECEIVING A ...22 AKING A WITCHING ETWEEN PEAKERPHONE AND ...23 NTERCOM PERATION AKING AN NTERCOM NSWERING AN NTERCOM ECEIVING A NTERCOM SING NTERCOM WITH A ELEPHONE NTERCOM NTERCOM ...25 EMORY TORING A AME AND TORING A EDIAL UMBER...
- Page 5 SAFETY INSTRUCTIONS provided with this product and save them for future reference. Congratulations on purchasing this GE telephone/answering system. This system operates in the 2.4GHz frequency range, and is unique to conventional cordless telephones. When the base is connected to electrical power and a telephone line, it can support a cordless handset.
- Page 6 TVs, microwave ovens, and VCRs. To minimize or prevent such interference, the base of the cordless telephone should not be placed near or on top of a TV, microwave ovens, or VCR. If such interference continues, move the cordless telephone farther away from these appliances.
-
Page 7: Handset And Charge Cradle Layout
Handset and Charge Cradle Layout TALK/call back (button) CID/VOL (caller ID/volume button) REDIAL (button) (review button) erase (button) TONE */exit (button) CHAN/delete (button) Base Layout ANSWERER ON/OFF (button) ANNOUNCE (button) REVIEW (button) DELETE (button) HANDSET VOL (button) + / SPKR VOL (button) –... -
Page 8: Before You Begin
Before You Begin Parts Checklist Make sure your package includes the items shown here. Base and Base Handset Cordless handset Cordless charger handset Telephone Jack Requirements To use this phone, you need an RJ11C type modular telephone jack, which might look like the one pictured here, installed in your home. -
Page 9: Important Installation Guidelines
Important Installation Guidelines • Install telephone near both a telephone (modular) jack and an electrical power outlet. • Avoid sources of noise, such as a window by a busy street, and electrical noise, such as motors, microwave ovens, and fluorescent lighting. •... -
Page 10: Connecting The Telephone Line
Connecting the AC (Electrical) Power 1. On the base, plug the AC power adaptor cord into the power jack on the back of the base and the other into an electrical outlet. If desired, store the excess AC power adaptor line cord inside desktop pedestal. CAUTION: Use only the ATLINKS USA, Inc. -
Page 11: Connecting The Corded Handset
Connecting the Corded Handset 1. Connect one end of the coiled handset cord to the jack on the side of the base. 2. Connect the other end of the coiled cord to the jack on the handset, then place the handset in the base cradle. Wall Mounting the Base The base is packaged with the pedestal attached in desktop mode.To mount the base on the wall:... -
Page 12: Language
Telephone Set Up There are twelve programmable menus available on the base: Language, Display Contrast, Rings to Answer, Security Code, Ringer Level, Ringer Tone,Tone/Pulse, Set Day, Set Time, Local Area Code, Link Cordless Handset, and Default Setting. There are five programmable menus available on the handset: Language, Local Area Code, RingerTone, Link Base, and Default Setting. -
Page 13: Rings To Answer
2. Press 1, 2 or 3 on the base touch-tone pad to enter your selection, or use the REVIEW or NEXT button on the base to scroll to your selection. 3. Press FLASH/PROGRAM again to store your selection. Rings to Answer NOTE: This setting may only be made with the base. -
Page 14: Ringer Level
3. Press FLASH/PROGRAM again to store your selection.You will hear a confirmation tone. Ringer Level NOTE: This setting may only be made with the base. 1. Press the FLASH/PROGRAM button until SET RING LEVEL shows in the display. 1HI is the default setting. 2. -
Page 15: Setting Day/Time
NOTE: If you aren’t sure which dialing system you have, set the telephone to tone dialing and make a test call. If the call connects, the setting is correct. If the call does not connect, set the telephone to pulse dialing. Setting Day/Time NOTE: This setting may only be made with the base. -
Page 16: Registration
Registration (Link Cordless Handset) Registration links the base to a cordless handset. Once a handset is registered it can use the base’s phone connection. A cordless handset will not operate until it is registered to the base. During the registration process, keep the handset near the base. -
Page 17: Basic Operation
Basic Operation Answering a Call Check the display to see who is calling. Cordless Handset 1. Press theTALK/call back button on the handset. 2. When finished, pressTALK/call back or place the handset in the charge cradle to hang up. Corded Handset 1. -
Page 18: Speakerphone
Speakerphone 1. Press the SPEAKER/CALL BACK button. 2. Wait for a dial tone, then dial the desired number. Or, dial the number and then press the SPEAKER/CALL BACK button. 3. When finished, press SPEAKER/CALL BACK to hang up. Manual Channel Selection While talking, you might need to manually change the channel in order to reduce static caused by baby monitors, garage door openers, or other cordless phones. -
Page 19: Flash
Flash Use the FLASH/PROGRAM buttons on the base and cordless handset to activate custom calling services such as call waiting or call transfer, which are available through your local phone company. TIP: Don’t use the TALK/call back (handset) or SPEAKER/CALL BACK (base) button to activate custom calling service such as call waiting, or you’ll hang up the phone. -
Page 20: Hold
Hold Press the HOLD button on the base to put a call on hold.The hold indicator light turns on. To take a call off hold, press the HOLD button again, and the hold indicator light turns off. • To switch a call on hold from the base to the cordless handset, press TALK/call back on the cordless handset. -
Page 21: Peakerphone
Temporary Tone Dialing This feature is useful only if you use pulse dialing service.Temporary tone dialing enables pulse (rotary) service phone users to access touch-tone services offered by banks, credit card companies, etc. For example, when you call your bank you may need to enter your account number. Using the temporary tone allows you to temporarily make your phone touch tone compatible. -
Page 22: Speakerphone Operation
Speakerphone Operation For best speakerphone performance, avoid the following: • Areas with high background noise. (The microphone might pick up these sounds.) • Surfaces affected by vibration. • Recessed areas such as in a corner, under a cupboard, or next to a cabinet, which can generate an echo effect. -
Page 23: Making An Intercom Call
Switching Between Speakerphone and Handset You can switch between speakerphone and handset after dialing a number, or any time during a conversation. Speaker to Handset — PressTALK/call back on handset, and then press SPEAKER/CALL BACK on the base or lift the corded handset. Speak into the handset. -
Page 24: Using Intercom With A Telephone Call
ReceivinganIncomingTelephoneCallDuringanIntercomCall During an intercom call, if you receive a telephone call, both intercom users are alerted as follows: Cordless Handset - Receives a ringing tone.To take the call, pressTALK/call back. (The intercom connection is discontinued.) Base - Speakerphone rings.To take the call, press the SPEAKER/CALL BACK button or lift the corded handset. -
Page 25: Memory
2. If the originating unit is the handset, press the PAGE/INTERCOM button on the base to set up the intercom.Then press the MEMORY/conference button on the handset to retrieve the external caller.Three-way conversation begins, and CONFERENCE shows in the display. 3. -
Page 26: Storing A Redial Number
4. Use the base or cordless handset touch-tone pad to enter a name (up to 15 characters). More than one letter is stored in each of the number keys. For example, to enter Bill Smith, press the 2 key twice for the letter B. -
Page 27: Inserting A Pause In The Dialing Sequence
Inserting a Pause in the Dialing Sequence Press the #PAUSE button (base) or the PAUSE# (cordless handset) on the touch-tone pad to insert a delay in the dialing sequence of a stored telephone number when a pause is needed to wait for a dial tone (for example, after you dial 9 for an outside line, or wait for a computer access tone.) Each pause counts as 1 digit in the dialing sequence. -
Page 28: Chain Dialing From Memory
1. Make sure the phone is OFF (not inTALK mode). 2. Press the MEMORY/conference button. 3. Press the desired memory location button (0-9), or use the CID/VOL ) button to scroll to the desired telephone number. 4. Press theTALK/call back button.The stored telephone number dials automatically. - Page 29 Handset: Make sure the phone is ON. 1. Press MEMORY/conference and then press 7. 2. When you hear the access tone, press MEMORY/conference and then press 8. 3. At the next access tone, press MEMORY/conference and then press 9. Base: Press the SPEAKER/CALL BACK button, or lift the corded handset.
-
Page 30: Caller Id (Cid)
Caller ID (CID) Caller ID (CID) is a service available from your local telephone company. For Caller ID to work on this system, you must subscribe to Caller ID service.To receive Caller ID information for a Call Waiting call, you must subscribe to the combined Call Waiting Caller ID service. - Page 31 • Press the NEXT button (base) or the CID/VOL to review the oldest call records and scroll to newer records. When you reach the newest call, the display shows END OF LIST. • Press the REVIEW button (base) or the CID/VOL handset) to review new call records and scroll to older call records.
-
Page 32: Dialing A Caller Id Number
Dialing a Caller ID Number When reviewing any call record in the Caller ID memory, you can dial back the caller’s number. 1. Make sure the phone is OFF (not in talk mode). 2. Press REVIEW or NEXT button (base) or CID/VOL ( (cordless handset) until the desired call record is displayed. -
Page 33: Deleting All Caller Id Records
NOTES: If you find it necessary to dial all local calls with the area codes included press and release flash/program until “SET AREA CODE” appears, then enter “000.” If the number is corrupted, such as a number in a name or an alphabetical character in a number, an error tone comes from the handset and the number won’t dial. -
Page 34: Answering System Set Up
Call Waiting Caller ID Provided you subscribe to Caller ID with Call Waiting service from your phone company, you may see who is calling when you hear the call waiting tone in the receiver.The CID information appears in the display after you hear the tone. -
Page 35: Alls
3. Begin speaking after you hear the beep.You have up to two minutes of recording time. 4. Release the button after you finish your announcement. If you choose not to record an outgoing announcement, the default announcement plays.To return to the default announcement after you have recorded your personal announcement, press and release the ANNOUNCE button on the base when you hear the beep. -
Page 36: Memory Full
• Press and release the NEXT button to go to the next message. • Press the PLAY/STOP button to stop message playback. Memory Full When the memory is full, the system answers after 10 rings.You should erase some messages so the answering system can record new messages. The memory has a total recording time of 15 minutes (this includes the outgoing announcement, incoming messages, and voice time/date stamp). -
Page 37: Remote Access
2. Begin speaking after you hear the beep. 3. Release the MEMO button after you are finished. Remote Access This section explains two types of remote access: using the cordless handset to access the answering system and accessing the answering system from another phone. -
Page 38: Answering System Location
Answering System Indicator The answering system is active by default.The display will show ANSWERER OFF when the answering system is turned off. Screening Calls from the Handset Use the handset to screen calls even when you can’t hear the answering system. When the answering system picks up: 1. -
Page 39: Changing The Battery
Erase message Skip message Turn off/on answering system Review voice menu options The base LCD shows REMOTE ACCESS ANSWERING CALL. TIP: You can bypass the outgoing announcement by pressing any numbered key on the touch-tone pad while the announcement is playing. Then, you can enter your security code to access the answering system. -
Page 40: Headset And Belt Clip Operation
Battery Safety Precautions • Do not burn, disassemble, mutilate, or puncture. Like other batteries of this type, toxic materials could be released which can cause injury. • Keep batteries out of the reach of children. • Remove batteries if storing over 30 days. CAUTION: To reduce the risk of fire or personal injury, use only the battery listed in the instruction book. -
Page 41: Display Messages
Display Messages The following indicators show the status of a message or of the unit. BLOCKED NUMBER DELETE? DELETE ALL? DELETE CALL ID? END OF LIST ENTER NAME ERROR LINK HANDSET?/ LINK BASE? NO BATTERY NO DATA PAGING The person is calling from a number that has been blocked from transmission. -
Page 42: Troubleshooting Guide
REPT UNKNOWN CALLER WAITING HANDSET REGISTRATION Handset Sound Signals Signal A long warbling tone (with ringer on) Three short beeps One short beep (every 7 seconds) Troubleshooting Guide Telephone Solutions No dial tone • Check and repeat installation steps: Ensure the base power cord is connected to a working outlet . Ensure the telephone line cord is connected to the base and the wall jack. - Page 43 • Did the handset beep when you pressed theTALK/call back button?The battery may need to be charged. • Place handset in charge cradle for at least 20 seconds. Dial tone is OK, but can’t dial out • Make sure theTONE/PULSE setting on the base is set to the type of phone service you are subscribed to.
-
Page 44: Caller Id Solutions
Memory Dialing doesn’t work • Did you program the memory location keys correctly? • Did you follow proper dialing sequence? Unit locks up and no communication between the base and cordless handset • Unplug the AC power adaptor from the wall outlet and the back of the base. -
Page 45: General Product Care
General Product Care To keep your unit working and looking good, follow these guidelines: • Avoid putting the phone near heating appliances and devices that generate electrical noise (for example, motors or fluorescent lamps). • DO NOT expose to direct sunlight or moisture. •... - Page 46 Index Accessing the Answering System from Another Location 38 Accessory Information 48 Answering a Call 17 Answering an Intercom Call 23 Answering System 21, 34 Answering System Indicator 38 Answering System Set Up 34 Auto Standby 18 Base Layout 7 Base Speakerphone 17, 19 Base Unit 18 Basic Operation 17...
- Page 47 Index Language 12 Last Number Redial 19 Leaving a Memo 36 Licensing 2 Limited Warranty 49 Local Area Code 15 Making a Call 17, 22 Making an Intercom Call Manual Channel Selection 18 Memory 25 Memory Full 36, 38 Message Playback from Base Unit 35 Messages Indicator 35 Mute 20 Paging the Cordless Handset 20...
-
Page 48: Accessory Information
Service If trouble is experienced with this equipment, for repair or warranty information, please contact customer service at 1-800-448-0329. If the equipment is causing harm to the telephone network, the telephone company may request that you disconnect the equipment until the problem is resolved. This product may be serviced only by the manufacturer or its authorized service agents. -
Page 49: Limited Warranty
Limited Warranty What your warranty covers: • Defects in materials or workmanship. For how long after your purchase: • One year, from date of purchase. (The warranty period for rental units begins with the first rental or 45 days from date of shipment to the rental firm, whichever comes first.) What we will do: •... - Page 50 ATLINKS USA, Inc. 101 West 103rd Street Model 27957 Indianapolis, IN 46290 00003847 (Rev. 0 E/S) © 2005 ATLINKS USA, Inc. 05-12 Trademark(s) ® Registered Marca(s) Registrada(s) Printed in China...
- Page 51 27957 Teléfono Inalámbrico y Altavoz Alámbrico con Sistema de Mensajes, de 2.4 GHz con Identificador de Llamada en Espera Guía del Usuario...
-
Page 52: Información Sobre La Aprobación De Equipo
Información Sobre la Aprobación de Equipo El equipo de su teléfono esta aprobado para la conexión con la red Telefónica Pública (Public Switched Telephone Network) y cumple con los requisitos establecidos en las secciones 15 y 68 de las Reglas y Regulaciones de la FCC y con los Requerimientos Técnicos para Equipos de Terminales Telefónicas (Technical Requirements for Telephone Terminal Equipment), publicado por ACTA. -
Page 53: Tabla De Contenido
Tabla de Contenido NFORMACIÓN OBRE LA PROBACIÓN DE NFORMACIÓN DE NTERFERENCIAS ... 2 ICENSING OMPATIBILIDAD CON UDÍFONOS ... 5 NTRODUCCIÓN ORMATO DEL URICULAR Y DEL ... 7 ORMATO DE LA ... 8 NTES DE OMENZAR ... 8 ISTA DE ARTES EQUERIMIENTOS NCHUFE NFORMACIÓN... - Page 54 Tabla de Contenido ... 22 PERACIÓN DEL LTAVOZ ECIBIR UNA ACER UNA LAMADA LTERNAR ENTRE EL ... 23 Y EL URICULAR PERACIÓN DEL NTERFONO ACER UNA LAMADA ONTESTAR UNA ECIBIR UNA ELEFÓNICA XTERNA LAMADA DE TILIZAR EL NTERFONO CON LAMADA ELEFÓNICA LAMADAS DE ERSONAS...
-
Page 55: Ntroducción
DE SEGURIDAD IMPORTANTES provista con este producto y guárdela para referencia futura. Felicitaciones por su compra de este teléfono /sistema contestador GE. Este sistema opera a un rango de frecuencia de 2.4GHz, y es único en comparación a otros teléfonos inalámbricos. Cuando la base está conectada a una fuente de corriente eléctrica y a una línea telefónica, puede apoyar a un auricular inalámbrico.Y usted... - Page 56 IMPORTANTE: Para poder utilizar todas las funciones de este teléfono, usted debe suscribirse a dos servicios distintos a través de su compañía telefónica: el Servicio Estándar de Identificador de Nombre/ Número para saber quién llama cuando timbra el teléfono, y el Servicio Identificador de Llamadas con Identificación de Llamada en Espera para saber quién llama mientras usted está...
-
Page 57: Hold
Formato del Auricular y del Cargador TALK/call back (botón para hablar/devolver el llamado) CID/VOL (botón del identificador/ volumen) REDIAL (botón para volver a marcar) (botón para revisar) erase (botón para borrar) TONE */exit (botón para tono/salir ) CHAN/delete (botón para canal/ borrar) ringer (selector del timbre) -
Page 58: Antes De Comenzar
Antes de Comenzar Lista de Partes Asegúrese que su empaque incluya los artículos ilustrados aquí. Base/auricular de la base Cargador Auricular para auricular inalámbrico inalámbrico Requerimientos Para Enchufe Telefónico Para utilizar este teléfono, usted puede necesitar un enchufe modular telefónico tipo RJ11C como el ilustrado aquí, instalado en su hogar. -
Page 59: Pautas Importantes Para La Instalación
Pautas Importantes para la Instalación • Instale el teléfono junto a un enchufe (modular) telefónico y un enchufe para corriente eléctrica. • Nunca instale enchufes telefónicos en localizaciones mojadas a menos que el enchufe haya sido diseñado específicamente para localizaciones mojadas. •... - Page 60 Para Conectar la Corriente AC (Eléctrica) 1. En la base, conecte el cable de corriente dentro del enchufe en la parte posterior de la base y conecte el otro extremo en un enchufe de corriente eléctrica. Si usted quiere, almacene el exceso de cable dentro del pedestal para superficies planas. CUIDADO: Utilice únicamente el cable de corriente ATLINKS USA , Inc.
-
Page 61: Montaje De La Base Sobre Pared
Para Conectar el Auricular Alámbrico 1. Conecte un extremo del cable espiral dentro del enchufe al costado de la base. 2. Conecte el otro extremo del cable espiral en el enchufe en el auricular, y después coloque el auricular sobre el cargador. Montaje de la Base sobre Pared La base está... -
Page 62: Contraste De La Pantalla
Programación del Teléfono Hay doce menús programables disponibles en la base: Idioma, Contraste de la Pantalla,Timbres para Contestar, Código de Seguridad, Nivel delTimbre,Tono del Timbre,Tono/Pulso, Programación de Fecha, Programación de Hora, Clave de Área Local, Auricular de Enlace Inalámbrico, y Programaciones de Fábrica. Hay cinco menús programables disponibles en el auricular: Idioma, Clave de Área Local, Tono delTimbre, Enlace Base, y Programaciones de Fábrica. -
Page 63: C Ontrol
2. Oprima 1, 2, o 3 en el teclado numérico de la base para inscribir su selección, u oprima el botón REVIEW o NEXT en la base para llegar a su selección. 3. Oprima nuevamente el botón FLASH/PROGRAM para almacenar su selección. Timbres para Contestar NOTA: Esta programación puede hacerse únicamente con la base. -
Page 64: Nivel Del Timbre
Nivel del Timbre NOTA: Esta programación puede hacerse únicamente desde la base. 1. Oprima el botón FLASH/PROGRAM hasta que la indicación PROG NIVELTIMB. La programación de fábrica es 1ALT. 2. Oprima 1, 2, o 3 en el teclado numérico de la base para inscribir su selección, u oprima el botón REVIEW o NEXT para llegar a su selección. -
Page 65: Clave De Área Local
Para Programar la Fecha/Hora NOTA: Esta programación puede hacerse únicamente desde la base. La hora es transmitida automáticamente por su compañía telefónica local como parte del servicio de Identificador de Llamadas. Si usted está suscrito al servicio de Identificador del Llamadas, la hora actual se programa automáticamente cuando usted recibe su primera llamada del Identificador. -
Page 66: Registro
Registro (Enlace con el Auricular Inalámbrico) El registro enlaza la base a un auricular inalámbrico. Una vez que el auricular está registrado, puede utilizar la conexión telefónica de la base. Un auricular inalámbrico no operará hasta que esté registrado con la base. Durante el proceso de registro, mantenga el auricular cerca de la base. -
Page 67: Auricular
Operación Básica Para Contestar una Llamada Verifique la pantalla para saber quién llama. Auricular Inalámbrico 1. Oprima el botónTALK/call back en el auricular. 2. Al terminar, presioneTALK/call back o coloque el auricular en la base de carga para colgar. Auricular Alámbrico 1. -
Page 68: Selección Manual De Canales
Altavoz 1. Oprima el botón SPEAKER/CALL BACK. Espere al tono de marcar, y después marque el número deseado. 2. Marque el número primero y después oprima el botón SPEAKER/CALL BACK. 3. Cuando usted haya terminado, oprima el botón SPEAKER/CALL BACK para colgar. -
Page 69: Flash
Flash Utilice los botones FLASH/PROGRAM en la base o en el auricular inalámbrico o en la base para activar los servicios especiales, como llamada en espera, que le son disponibles a través de su compañía telefónica local. SUGERENCIA: No oprima el botón TALK/call back (auricular) o el botón SPEAKER/ CALL BACK (base) para activar un servicio de llamadas, como llamada en espera, porque de ser así, usted colgará... -
Page 70: En Espera
En Espera Oprima el botón HOLD en la base para poner una llamada en espera. El indicador de espera se ilumina. Para tomar una llamada que está en espera, oprima y sostenga el botón HOLD nuevamente, y el indicador de espera se apaga. •... -
Page 71: Base
Tono Temporal Esta función es útil únicamente para usuarios de servicio de pulso. El tono temporario le permite a los usuarios de servicio telefónico de pulso (rotatorio), tener acceso a los servicios para marcar de teclado (touch-tone) que ofrecen los bancos, las compañías de tarjetas de crédito, etc. -
Page 72: Operación Del Altavoz
Operación del Altavoz Para el mejor funcionamiento del altavoz, evite lo siguiente: • Áreas con mucho ruido de fondo. (El micrófono puede recoger estos sonidos). • Superficies afectadas por vibración. • Áreas remetidas, como una esquina, abajo de una gaveta, o junto a un gabinete, los cuales pueden generar un efecto de eco. -
Page 73: Operación Del Interfono
Para Alternar entre el Altavoz y el Auricular Usted puede alternar entre el altavoz y el auricular después de marcar un número, o en cualquier momento durante una conversación. Altavoz a Auricular- Oprima el botónTALK/call back en el auricular, y después oprima el botón SPEAKER/CALL BACK en la base o levante el auricular alámbrico. -
Page 74: Llamadas De Interfono De Dos Personas
ParaRecibirunaLlamadaTelefónicaExternaDuranteuna Llamada de Interfono Durante una llamada del interfono, si usted recibe una llamada telefónica, ambos usuarios del interfono reciben una señal de alerta de la siguiente manera: Auricular Inalámbrico- Recibe un tono del timbre. Para tomar la llamada, oprima el botónTALK/call back. - Page 75 2. Si el aparato en donde se origina la llamada es el auricular, oprima el botón PAGE/INTERCOM en la base para establecer el interfono. Después oprima el botón MEMORY/conference en el auricular para recobrar la llamada externa. La conversación de tres personas empieza, y la indicación CONFERE aparece en la pantalla.
- Page 76 4. Utilice el teclado de tono de la base o el auricular inalámbrico para almacenar un nombre (hasta 15 caracteres) y oprima el botón de memoria para salvarlo. Más de una letra es almacenada en cada una de las teclas numéricas. Por ejemplo, para inscribir “Bill Smith”...
- Page 77 Para Introducir una Pausa en la Secuencia de Marcado Oprima el botón #PAUSE (en la base) o el botón PAUSE# (en el auricular inalámbrico) en el teclado numérico para introducir un retraso en la secuencia de marcado de un número si se necesita una pausa (por ejemplo, después de que usted marca 9 para obtener líneta externa, o para esperar e tono de acceso en una computadora).
-
Page 78: Marcado En Cadena Desde La Memoria
1. Asegúrese que el teléfono esté desactivado (OFF) (no en modalidad para hablar –TALK). 2. Oprima el botón MEMORY/conference. 3. Oprima el botón de la localización de memoria deseada (0-9), u oprima el botón CID/VOL ( ) para recorrer los números hasta llegar al número deseado. 4. - Page 79 Auricular: Asegúrese de que el teléfono esté activado (ON). 1. Oprima el botón MEMORY/conference y después oprima el 7. 2. Cuando usted escuche el tono de acceso, oprima el botón MEMORY/conference y después oprima el 8. 3. Al siguiente tono de acceso, oprima el botón MEMORY/conference y después oprima el 9.
-
Page 80: Para Revisar Los Archivos Da Llamadas
FuncionesdelIdentificadordeLlamadas(CallerID) El Identificador de Llamadas (Caller ID) es un servicio disponible a través de su compañía telefónica local. Para que el identificador funcione en este sistema, usted debe suscribirse al servicio de Identificador de Llamadas. Para recibir servicio de Identificador en llamadas en espera, usted debe suscribirse al servicio combinado de Identificador de Llamada en Espera. -
Page 81: Memoria
• Oprima el botón NEXT (base) o el botón CID/VOL revisar los archivos más viejos y después ir hacia los más nuevos. Cuando usted llegue al fin de la lista, la pantalla indica que es FIN DE LISTA. • Oprima el botón REVIEW (base) o el botón CID/VOL para revisar los archivos más nuevos y después ir hacia los más viejos. - Page 82 Para Marcar un Número del Identificador de Llamadas Mientras usted revisa los archivos del Identificador de Llamadas, usted puede llamar al número telefónico que se muestra en la pantalla. 1. Asegúrese que el teléfono esté desactivado (OFF) (no en modalidad para hablar). 2.
-
Page 83: Llamadas
NOTA: Si usted encuentra necesario marcar todas las llamadas locales con los códigos de área incluidos presione y suelte flash/program hasta que “CODIGO AREA LOC” aparezca, y después inscriba “000.” Si el número es corrupto, como un número en un nombre, o una letra del alfabeto en un número, usted escuchará... -
Page 84: Lamada En Espera
Identificador de Llamada en Espera Suponiendo que usted está suscrito al servicio de Identificador de Llamadas con Llamada en Espera a través de su compañía telefónica, usted puede ver quién llama cuando usted escucha el tono de llamada en espera en el recibidor. La información del Identificador de Llamadas aparece en la pantalla después de que usted escucha el tono. -
Page 85: Indicador De Mensajes
3. Comience a hablar después de que usted escuche el tono. Ud. tiene hasta dos minutos de tiempo de grabación. 4. Suelte el botón después de que usted haya terminado su anuncio. Si usted elige no grabar un anuncio saliente, el anuncio de fábrica se reproduce. Para volver al anuncio de fábrica después de que usted ha grabado su anuncio personal, oprima y suelte el botón ANNOUNCE en la base cuando usted escuche el tono. -
Page 86: Memoria Llena
• Oprima y suelte el botón NEXT para ir al siguiente mensaje. • Oprima el botón PLAY/STOP para detener la reproducción de mensaje. Memoria Llena Cuando la memoria está llena, el sistema contesta después de 10 timbres. Usted debe borrar algunos mensajes para que el sistema contestador pueda grabar mensajes nuevos. -
Page 87: Acceso Remoto
2. Empiece a hablar después de que usted escuche el tono. 3. Suelte el botón MEMO cuando usted haya terminado de grabarlo. Acceso Remoto Esta sección explica dos tipos de acceso a control remoto: utilizando el auricular inalámbrico para tener acceso al sistema contestador, o tener acceso al sistema contestador desde otro teléfono. -
Page 88: Memoria Llena
Para Filtrar Llamadas desde el Auricular Utilice el auricular para filtrar llamadas, incluso cuando usted no pueda escuchar el sistema contestador. Cuando el sistema contestador contesta: 1. Oprima el botón FORMAT/answerer en el auricular inalámbrico para tener acceso al sistema contestador. 2. -
Page 89: Cómo Cambiar La Batería
Para borrar mensajes Para saltar el mensaje Para activar/ desactivar contestador Para revisar las opciones del menú La pantalla de la base muestra la indicación de control remoto (CONTESTANDO). SUGERENCIA: Durante el acceso por control remoto usted puede saltarse el anuncio saliente oprimiendo cualquier tecla numérica del teclado mientras el anuncio se reproduce. -
Page 90: Precauciones De Seguridad Para La Batería
Precauciones de Seguridad para la Batería • No queme, desarme, mutile, o agujere. Igual que otras baterías de este tipo, materiales tóxicos pueden escaparse y causarle daño. • Mantenga las baterías fuera del alcance de los niños. • Quite las baterías si va a guardar el aparato durante más de 30 días. CUIDADO: Para reducir el riesgo de fuego o daño personal, use unicamente la batería indicada en la Guía del Usuario. -
Page 91: Mensajes En La Pantalla
Mensajes en la Pantalla Los siguientes mensajes especiales indican el estado actual de un mensaje o del aparato: BORRAR? BORRAR ARCHIVO? BORRAR TODO? DESCONOCIDO ENLACE AURICULAR?/ ENLACE BASE? ERROR ESPERANDO REGISTRAR AURICULAR FIN DE LISTA INSCRIBA NOMBRE LOCALIZANDO NO ENVIADO NO HAY BATERIA Indicación preguntándole si quiere borrar uno de los 10 números almacenados en la memoria saliente... -
Page 92: Señales Sonoras Del Auricular
NUEVA NUMERO PRIVADO REPETIDA Señales Sonoras del Auricular Señal Un tono de gorgeo largo (con timbre encendido) Tres tonos cortos Un “bip” corto (cada 7 segundos) Solución de Problemas Soluciones para el Teléfono No hay tono de marcar • Verifique y repita los pasos de la instalación: Asegúrese que el cable de corriente de la base esté... - Page 93 El tono de marcar está bien, pero no da línea • Asegúrese que la programación deTONO/PULSO esté de acuerdo con el servicio al que usted esté suscrito. El Auricular/ Base noTimbra • Asegúrese de que el selector del auricular esté activado noTimbra y que el timbre de la base esté...
- Page 94 Soluciones para el Identificador del Llamadas La pantalla no muestra nada • ¿Está la batería completamente cargada? Intente cambiarla. • Asegúrese de que el aparato esté conectado a un enchufe eléctrico que no tenga selector para apagarse. Desconecte el aparato del enchufe y conéctelo nuevamente.
-
Page 95: Cuidado General Del Producto
Cuidado General del Producto Para mantener su aparato funcionando adecuadamente y en buenas condiciones, siga las siguientes pautas: • Evite poner el teléfono cerca de calentadores (calefactores) de ambiente y dispositivos que generen interferencia eléctrica ejemplo, motores o lámparas fluorescentes). •... -
Page 96: Índice
Índice Acceso Remoto 37 Almacenar un Nombre y Número 25 Almacenar un Número de Volver a Marcar 26 Altavoz 18, 21 Altavoz en la Base 17, 19 Alternar entre el Altavoz y el Auricular 23 Antes de Comenzar 8 Auricular 18 Auricular Alámbrico 17, 19, 21 Auricular Inalámbrico 17, 19, 21 Auto Alerta 18... - Page 97 Índice Licensing 2 Lista de Partes 8 Llamadas de Interfono de Dos Personas 24 Llamadas de Interfono deTres Personas 24 Localizando el Auricular Inalámbrico 20 Marcado en Cadena desde la Memoria 28 Marcar un Número Almacenado 27 Marcar un Número del Identificador de Llamadas 32 Memoria 25 Memoria Llena 36, 38...
-
Page 98: Cómo Obtener Servicios De Mantenimiento
Cómo Obtener Servicios de Mantenimiento Si usted experimenta problemas con este equipo, para reparaciones o para información de garantía, comuníquese con el departamento de servicio al cliente al 1-800-448-0329. Si el equipo está causando daños a la red telefónica, la compañía telefónica puede pedirle que desconecte su equipo hasta que el problema haya sido resuelto. -
Page 99: Garantía Limitada
Garantía Limitada Lo que cubre su garantía: • Defectos de materiales o de trabajo. Por cuánto tiempo después de la compra: • Un año, a partir de la fecha de compra. (El periodo de garantía para unidades arrendadas se inicia con la primera renta o 45 días de la fecha del embarque a la firma de arrendamiento, lo que ocurra primero). - Page 100 ATLINKS USA, Inc. 101 West 103rd Street Modelo 27957 Indianapolis, IN 46290 00003847 (Rev. 0 E/S) © 2005 ATLINKS USA, Inc. 05-12 Trademark(s) ® Registered Marca(s) Registrada(s) Impreso en China...