Panasonic SC-PM22 Operating Instructions Manual
Cd stereo system
Hide thumbs
Also See for SC-PM22:
- Operating instructions manual (65 pages) ,
- Operating instructions manual (64 pages)
Advertisement
Quick Links
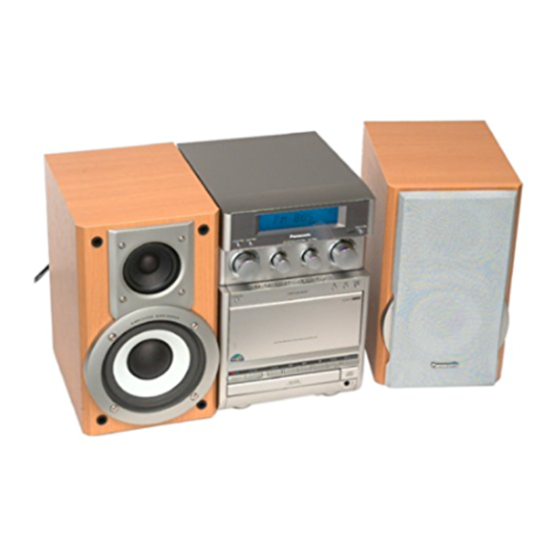
CD Stereo System
Operating Instructions
SC-PM22
Model No.
EB GN
EB GN
Note:
The "EB" indication shown on the packing case indi-
cates United Kingdom.
Before connecting, operating or adjusting this product,
please read these instructions completely. Please
keep this manual for future reference.
RQT5243-B
Advertisement

Related Manuals for Panasonic SC-PM22


Summary of Contents for Panasonic SC-PM22
-
Page 1: Operating Instructions
CD Stereo System Operating Instructions SC-PM22 Model No. Note: The “EB” indication shown on the packing case indi- cates United Kingdom. Before connecting, operating or adjusting this product, please read these instructions completely. Please keep this manual for future reference. -
Page 2: Dear Customer
AC mains lead ......1 pc. For United Kingdom For Australia and N.Z System SC-PM22 (VJA0733) (RJA0035-X) Main unit... - Page 3 Caution for AC mains lead ....4 Before recording ......18 Suggestions for safety .
-
Page 4: Before Use
(For United Kingdom) (“EB” area code model only) WARNING: DO NOT CONNECT EITHER WIRE TO THE EARTH TERMINAL WHICH IS MARKED WITH For your safety, please read the following text careful- THE LETTER E, BY THE EARTH SYMBOL COLOURED GREEN OR GREEN/YELLOW. This appliance is supplied with a moulded three pin THIS PLUG IS NOT WATERPROOF—KEEP DRY. - Page 5 Avoid placing the unit in areas of: Ensure that no foreign objects, such as needles, coins, direct sunlight screwdrivers etc., accidentally fall into the unit. high temperature Otherwise, a serious electric shock or malfunction could occur. high humidity Be extremely careful about spilling water or liquid on/into the unit, as excessive vibration a fire or electric shock could occur.
- Page 6 Do not connect the AC mains lead until all other connections are complete. To prepare the AM loop antenna wire and speaker cords, twist the vinyl cover tip and pull off. For your listening pleasure, keep your speakers from touching the system.
- Page 7 For United Kingdom FM outdoor antenna (not included) You may need an outdoor antenna if you use this system in a moun- tainous region or inside a reinforced-concrete building, etc. 75 coaxial cable (not included) Disconnect the FM indoor antenna if an FM outdoor antenna is in- 75∞...
- Page 8 Insert the batteries observing the correct polarities ( , Do not mix old and new batteries, or batteries of different types R6, AA, UM-3 (manganese and alkaline, etc.). Never subject batteries to excessive heat or flame; do not attempt to disassemble them; and be sure they are not short-circuited. If the remote control is not to be used for a long period of time, re- move the batteries and store them in a cool, dark place.
- Page 9 B C D E F G Number Name Page(s) Play timer/recording timer button PLAY/ REC) ......24, 25 Clock/timer button (CLOCK/TIMER) .
- Page 10 When CD or tape is selected as the source. To save power the unit turns off if it is left unused for four minutes. Note This function does not work if the source is tuner or AUX. Press [AUTO OFF]. AUTO OFF “AUTO OFF”...
- Page 11 Up to 15 stations can each be set in the FM and AM bands automat- ically. If broadcast frequencies are preset in the memory, you can easily tune in any of these frequencies from the unit or remote control. You can also preset just those stations you like. (See “Presetting only your favorite stations”...
- Page 12 Press [TUNER/BAND] to select “FM” or “AM”. The power will come on automatically. The glide panel retracts enabling access to the operation buttons. Each time you press the button; “FM” “AM”. Press [TUNE MODE] to select “PRESET” or “MANUAL”. Each time you press the button; “MANUAL” “PRESET”.
- Page 13 Preparations Press [ /I]. The glide panel retracts enabling access to the operation buttons. (For United Press [ ] to select the CD mode. Kingdom) Press [ OPEN/CLOSE] to open the CD tray. Insert the CD with label facing upward. POWERH/I Press [ OPEN/CLOSE] to close the CD tray.
- Page 14 Direct access allows you to start normal play from a specific track to the last track on the CD. Press [ ] to select the CD mode. Press the numeric button(s) to select the de- sired track number. Play will start with the track you select. ∫...
- Page 15 This function allows you to program up to 24 tracks. Press [ ] to select the CD mode. (In the stop mode) Press [PROGRAM]. Press the numeric button(s) to select the track you want to play in the desired sequence. Repeat step until you have programmed all the tracks you want.
- Page 16 Types of tapes which can be played correctly The system automatically identifies the type of tape. NORMAL POSITION/TYPE I HIGH POSITION/TYPE II METAL POSITION/TYPE IV (For United Kingdom) Preparations Press [ /I]. The glide panel retracts enabling access to the operation buttons. POWERH/I (For Australia and N.Z.) Press [ ] to select the tape mode.
- Page 17 Press [REW] or [FF] in the stop mode. To rewind To fast-forward REW FF Press [REW] or [FF] during play. Press the button once for each track to be skipped (up to 9 tracks). Backward Forward Button commands and positioning of current track work as follows. Current track Number of times the button is pressed...
- Page 18 Recording part The system automatically identifies the type of tape. Leader tape (no recording can be made) NORMAL POSITION/TYPE I HIGH POSITION/TYPE II METAL POSITION/TYPE IV This system cannot correctly record or erase metal position tapes . You cannot record on the leader part of the tape. Before recording, wind the tape past the leader to a point where recording can start immediately.
- Page 19 Press [ OPEN] and insert the tape. Close the holder by hand. Tape direction is automatically set to “ ”. Press [REV MODE] on the remote control to select the reverse mode. ∫ Each time you press the button; One side is recorded, then recording stops auto- matically.
- Page 20 Tracks are recorded in the order in which they are found on the CD. Tracks are cut in the middle when the end of the tape is reached. You can record from any point on the tape. Press [ OPEN] and insert the tape. Close the holder by hand.
- Page 21 Tracks are recorded in the order in which they are found on the CD. Tracks are cut in the middle when the end of the tape is reached, but recording is resumed on side B. Recording always starts from the beginning of side A on the tape. (Tapes are automatically rewound.) Be sure to use cassette tapes which have tabs on both side A and side B.
- Page 22 You can select one of your favorite tracks from a CD to record. Tracks are cut in the middle when the end of the tape is reached, but recording is resumed on side B. Recording can begin from any place on the tape. Perform steps on page 20.
- Page 23 BASS The tone level can be varied within a range of 6 to Turn [BASS] to adjust the low-frequency sound. Turn [TREBLE] to adjust the high-frequency sound. TREBLE Note The effect works only with playback. It cannot be used in recording. Hints Place speakers on stands (not included) to reproduce clearer low- range sounds.