
Related Manuals for Belkin OmniView F1DD102Lea


Summary of Contents for Belkin OmniView F1DD102Lea
-
Page 1: User Manual
OmniView SOHO KVM ® Switch with Audio DVI with USB Console and Host Support User Manual F1DD102Lea F1DD104Lea... -
Page 2: Table Of Contents
Table of Contents 1. Introduction ................1 Package Contents ............. 1 Overview ..................2 Feature Overview .............. 2 Equipment Requirements ..........3 Unit Display Diagrams ............4 Specifications ..............5 Installing the KVM Switch ............6 Pre-Configuration .............. 6 Connecting the KVM Switch ..........7 Audio and Microphone Connections ........ -
Page 3: Introduction
Introduction Congratulations and thank you for purchasing Belkin’s OmniView SOHO KVM Switch with Audio. The KVM Switch lets you share one DVI-D monitor, and one USB keyboard and mouse, with up to four computers. Designed to organize and save your desk space, the KVM Switch sits neatly on your desk to reduce clutter. -
Page 4: Overview
Overview Feature Overview Video Resolution The SOHO KVM Switch is able to support video resolutions of up to 1920x1200 so you can use the latest in video display technology for all your computers. Flash Upgrade With the firmware-upgrade feature, your investment in the KVM Switch is further ensured and its lifetime value is maximized. -
Page 5: Equipment Requirements
Overview Equipment Requirements Operating Systems OmniView SOHO KVM Switches with Audio are for use on CPUs using: Platforms Mac OS * X v10.x ® Windows 2000, XP, 2000, Vista , 2003 ® ® Linux ® Novell ® *with USB support Keyboards Supports 101-/102-/104-/107-key keyboards Mice... -
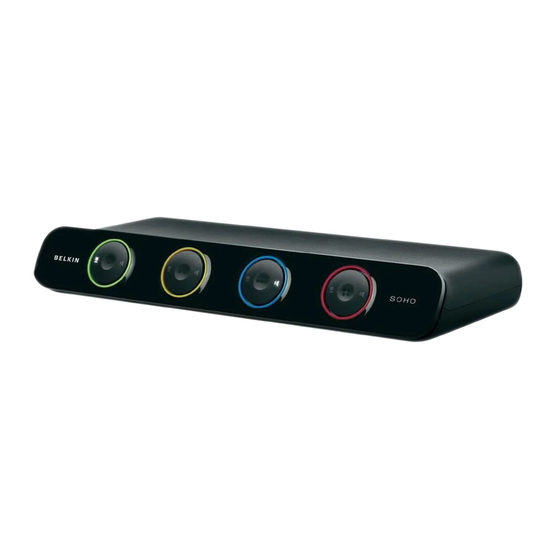
Page 6: Unit Display Diagrams
Overview M Soho VGA U-type 4 Port Enclosure Unit Display Diagrams t Graphics v.2.1 F1DS102L, F1DS104L Front View KVM Switch front panel M Soho VGA U-type 4 Port Enclosure Graphics v.2.1 F1DS102L, F1DS104L USB Hub Port 1 back panel front panel Audio/Mic Switch M Soho DVI 4 Port Enclosure t Graphics v.2.1 F1DD102L, F1DD104L... -
Page 7: Specifications
Overview Specifications Part No.: F1DD102Lea, F1DD104Lea Power: 9V, 1.1A DC adapter with center pin-positive polarity PCs Supported: 2 (F1DD102Lea), 4 (F1DD104Lea) Console Keyboard: Console Mouse: Monitor Supported: DVI-D Max Resolution: 1920x1200 Audio Input/Output: 3.5mm jack Microphone Input/Output: 3.5mm jack DVI Port:... -
Page 8: Installing The Kvm Switch
(e.g., vacuum cleaners). Single-Switch Installation This section provides complete instructions for the hardware setup of a single KVM Switch. F1DD102Lea or F1DD104Lea) Cable/model types: DVI models use: DVI/USB combo cable connected to the USB connector of the... -
Page 9: Connecting The Kvm Switch
Installing the KVM Switch Connecting the KVM Switch The KVM Switch is a plug-and-play device for installation. For a quick start on installation and operation, please follow the instructions below for the setup sequence: Step 1. Connect the shared keyboard, monitor, and mouse (also speaker set and microphone) to the console port of the KVM Switch. -
Page 10: Audio And Microphone Connections
Installing the KVM Switch Audio and Microphone Connections Note: Speakers and microphones are not required for use of your KVM Switch Connect the Audio Using the audio cable attached to your speakers, connect the male 3.5mm plug to the lime audio jack in the “Console” section of the KVM Switch. Using the mic cable attached to your microphone, connect the male 3.5mm plug to the pink mic jack in the “Console”... -
Page 11: Powering Up The Systems
Installing the KVM Switch Powering Up the Systems Once all cables have been connected, power up the CPUs that are attached to the KVM Switch. All computers can be powered on simultaneously. The KVM Switch emulates a mouse and keyboard on each port and allows your computer to boot normally. -
Page 12: Using The Kvm Switch
Using the KVM Switch Selecting a Computer Using Direct-Access Port Selectors You can directly select which computer you wish to control by pressing the corresponding direct-access port selector next to the appropriate port. The LED will be lit to indicate that the port is currently selected. KVM LED Center Function Audio LED... -
Page 13: Hot-Key Preceding Sequence Configuration
Using the KVM Switch Hot-Key Preceding Sequence Configuration For users who want to use a preceding sequence other than two consecutive Scroll Locks, there is also one convenient way to configure it. 1. Press “ScrollLock” + “ScrollLock” + H, and a beeping sound will signal readiness for a new preceding sequence selection [or press and hold down the center of the last front-panel button (Button 2 or Button 4) until you hear three beeps, then release the button]. -
Page 14: Quick-Reference Sheet
Using the KVM Switch To modify the hot-key preceding sequence from the default Scroll Lock, you can either hit the hot-key sequence: scrlk – scrlk – H – (y), y = y = SCROLL LOCK, CAPS, ESC, F12 or NUM LOCK (as detailed in the QIG). You can use another method: Press and hold the last button to enter the hot-key setting mode. -
Page 15: Switching The Audio/Mic
Using the KVM Switch Switching the Audio/Mic The audio/mic is independent to the KVM Switch and can be switched independently. This means that if you are working on port 1 of the KVM Switch, you can be listening to your music on port 3. You can switch the audio/mic in two ways: Using the direct-port selectors: The port selector has an Audio LED that indicates which port your audio/mic is on. -
Page 16: Firmware-Upgrade Guide
KVM Switch and plugged in directly to the host computer. The power supply should also remain connected to the KVM Switch. Step 2. Power on the host PC and copy/download the firmware-upgrade utility, “Uniloader.exe”, and the firmware-upgrade file, “*.uni”, from belkin.com/support. - Page 17 Firmware-Upgrade Guide Activate the Firmware-Upgrade Utility Program Note: You should close any unnecessary running programs such as antivirus, system-monitoring, or automatic updates; otherwise, the stability of the system during the firmware-upgrade process might be undermined. Step 3. Double-click the icon of “Uniloader.exe”, the firmware-upgrade utility program.
- Page 18 Firmware-Upgrade Guide Connect your KVM Switch to the Host PC Step 4. Now press the first front-panel button on the KVM Switch until you hear two beeps. The KVM Switch has now entered into the upgrade mode. Step 5. Check to make sure the KVM cables from port 1 are connected to the host PC. Note: A special upgrade cable is not needed to perform the upgrade since you can use the same KVM cable that you use for connecting to the computers.
- Page 19 Firmware-Upgrade Guide Begin the File Upload Note: Before hitting the “Upgrade” button on the utility program, you should make sure that you are focused on port 1 of the KVM Switch where you have the computer connected. If not, switch to that computer before hitting the “Upgrade”...
-
Page 20: Upgrade Using The Mac Version Utility
Firmware-Upgrade Guide Step 8. Finally, unplug the power cable from the back of the KVM Switch and all other cables from the KVM Switch, and perform a cold reset. Reconnect all the cables again to the KVM Switch. Now you can enjoy the newly added functionality and compatibility of the new firmware version. - Page 21 Firmware-Upgrade Guide Install and Activate the Firmware-Upgrade Utility Program Note: You should close any unnecessary running programs such as antivirus, system-monitoring, or automatic updates; otherwise, the stability of the system during the firmware-upgrade process might be undermined. Step 3. Double-click the icon of “Uniloader Installer.pkg”, the firmware-upgrade utility program, and a message box appears that will guide you through the installation process.
- Page 22 Firmware-Upgrade Guide Step 4. Now, double-click the “Uniloader” icon to activate the upgrade utility. Now the upgrade utility program is ready.
- Page 23 Firmware-Upgrade Guide Connect your KVM Switch to the Mac Host Step 5. Press the first front-panel button on the KVM Switch until you hear two beeps. Now the KVM Switch has entered into the upgrade mode. Step 6. Check to make sure the KVM cables from port 1 are connected to the Mac host. Note: A special upgrade cable is not needed to perform the upgrade since you can use the same KVM cable that you use for connecting to the computers.
- Page 24 Firmware-Upgrade Guide Step 7. Click the “Browse” button and locate the firmware-upgrade file, which is indicated with a file extension such as “*.uni”. Select the upgrade file (for example: “UCF-30-11-07.uni”) and click “Choose” to load the file. Then click “Upgrade” for upload. Begin the File Upload Note: Before clicking on the “Upgrade”...
- Page 25 Firmware-Upgrade Guide The file upload is finished when the progress bar runs through 100 percent and a prompt tells you that the upgrade is OK. Click “OK”. The firmware-upgrade process is complete. Step 9. Finally, unplug the power cable from the back of the KVM Switch and all other cables from the KVM Switch, and perform a cold reset.
-
Page 26: Faqs
What does flash-upgrade capability mean? You can update your KVM Switch firmware with flash upgrades, when needed, by going to belkin.com. This ensures that your KVM Switch works with the most current computers and devices. How does the KVM Switch allow the user to switch between ports? The KVM Switch supports two methods of port selection. - Page 27 FAQs Can I use the KVM Switch to switch video signals only? Yes, you may use the KVM Switch to switch between video signals only without having to connect the keyboard and mouse. The keyboard and mouse should be connected directly to the computer that the video signal is taken from to ensure that your computer functions properly.
-
Page 28: Troubleshooting
Troubleshooting VIDEO Problem: I am getting ghosting, shadowing, or fuzzy images on my monitor. Solution: • Check that all video cables are inserted properly. • C heck that the monitor you are using supports the resolution andrefresh-rate setting on your computer. • C heck that the graphics card you are using supports the resolutionand refresh- rate setting on your computer. • C onnect the monitor directly into the computer with which you are having trouble to see if the problem still appears. Problem: I am getting a black screen on my monitor. - Page 29 Troubleshooting KEYBOARD Problem: Computer does not detect keyboard and I get a keyboard error reported at boot up. Solution: • Check that the keyboard cable between the KVM Switch and the computer is connected properly. Tighten any loose connections. • Try swapping your keyboard with a different one. • Try connecting the computer to a different port. • If you are using the keyboard software that was included with your keyboard, uninstall it and install the standard Microsoft keyboard driver. MOUSE Problem: Mouse is lost when I switch to a different channel.
- Page 30 Troubleshooting Problem: The mouse is not detected at boot up. Solution: • C heck the cables and make sure that they are inserted properly. Problem: The computer boots up fine, but the mouse does not work. Solution: • M ake sure it is plugged in properly. • M ake sure the mouse works when directly plugged into the computer. Rebooting may be necessary when trying this. • Try a different mouse. Problem: When I switch from one port to another, mouse movement is completely erratic.
- Page 31 Troubleshooting Problem: I am connecting my computer to the SOHO KVM Switch via USB and my keyboard and mouse do not work. Solution: • P rior to connecting the SOHO KVM Switch, make sure that the HID USB driver is installed on each computer. (To install the HID USB driver, connect a USB mouse and USB keyboard to the computer.
-
Page 32: Firmware-Upgrade Troubleshooting
Troubleshooting Firmware-Upgrade Troubleshooting Problem: The progress bar stops for a long time without any advancement. Solution: Press and hold down the first front-panel button until two beeps are heard, and click the upgrade button on the upgrade utility program. The firmware-upload process will begin immediately, and you will see the progress bar advance gradually to full length. -
Page 33: Information
Information FCC Statement Declaration of Conformity with FCC Rules for Electromagnetic Compatibility We, Belkin International, Inc., of 501 West Walnut Street, Compton, CA 90220, declare under our sole responsibility that the products: F1DD102L, F1DD104L, to which this declaration relates: Comply with Part 15 of the FCC Rules. Operation is subject to the following two... -
Page 34: Product Warranty
What is not covered by this warranty? All above warranties are null and void if the Belkin product is not provided to Belkin for inspection upon Belkin’s request at the sole expense of the purchaser, or if Belkin determines that the Belkin product has been improperly installed, altered in any way, or tampered with. - Page 35 IN NO EVENT SHALL BELKIN BE LIABLE FOR INCIDENTAL, SPECIAL, DIRECT, INDIRECT, CONSEQUENTIAL OR MULTIPLE DAMAGES SUCH AS, BUT NOT LIMITED TO, LOST BUSINESS OR PROFITS ARISING OUT OF THE SALE OR USE OF ANY BELKIN PRODUCT, EVEN IF ADVISED OF THE POSSIBILITY OF SUCH DAMAGES.
- Page 36 +34 902 02 00 34 fax +46 (0) 8 5229 1874 fax © 2008 Belkin International, Inc. All rights reserved. All trade names are registered trademarks of respective manufacturers listed. Mac OS and Mac are trademarks of Apple Inc., registered in the U.S. and other countries. Windows, Windows Vista, and Microsoft are...