Garmin Forerunner 301 Owner's Manual
Personal trainer
Hide thumbs
Also See for Forerunner 301:
- Quick start manual (2 pages) ,
- Instructions manual (36 pages) ,
- Features (2 pages)
Table of Contents
Advertisement
Advertisement
Table of Contents

Related Manuals for Garmin Forerunner 301


Summary of Contents for Garmin Forerunner 301
- Page 1 Forerunner ® personal trainer owner’s manual...
- Page 2 Information in this document is subject to change without notice. Garmin reserves the right to change or improve its products and to make changes in the content without obligation to notify any person or organization of such changes or improvements.
- Page 3 Garmin Training Center ® heart rate zones. Be sure to read the Safety Information in this section to learn how to use your Forerunner 301 and the heart rate monitor safely and responsibly. Index—Contains a comprehensive index by subject.
-
Page 4: Table Of Contents
Setting HR Zones Manually ... 45 Appendix ...46 Training with Heart Rate Zones ... 46 Heart Rate Monitor Information ... 48 Garmin Training Center ... 50 Caring for the Forerunner ... 51 Storage ... 51 Water Immersion ... 51 Specifications ... 52 Product Registration ... -
Page 5: Getting Started
You can also charge the Forerunner with the USB cable and your personal computer. Charge the Forerunner 301 for three hours before you begin using it. Be sure the USB port, weather cap, and surrounding area are thoroughly dry before charging or connecting to a personal computer to prevent corrosion. -
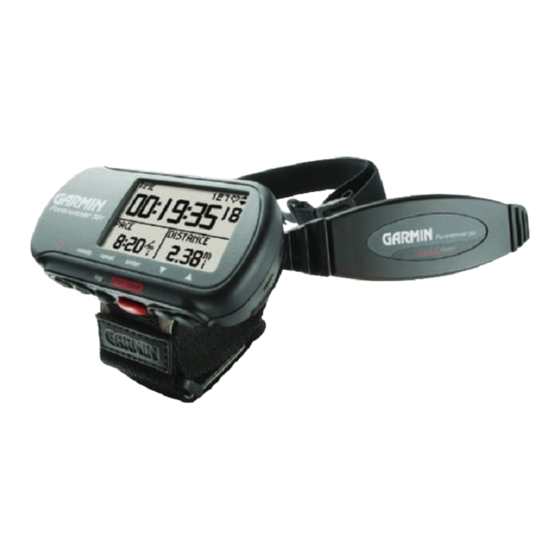
Page 6: Position The Heart Rate Monitor
It should be snug enough to stay in place during your workout. When positioned correctly, the heart rate monitor automatically transmits your heart rate to the Forerunner 301. Your heart rate appears next to a heart icon in Timer mode on the Forerunner (see... -
Page 7: Position The Forerunner
4. Tighten or loosen the strap as necessary so that it fits snugly against your body. Position the Forerunner For best results, wear the Forerunner 301 on your wrist as you would wear a watch, with the face oriented toward the sky. This position allows the GPS antenna to acquire satellite information quickly and easily. -
Page 8: Acquire Satellite Signals
Acquire Satellite Signals Before you begin using the Forerunner 301, you must acquire GPS satellite signals. The first time you turn on the Forerunner, you may need to wait as long as 15 minutes to acquire signals; after that, the Forerunner should acquire signals quickly each time you use it. -
Page 9: Main Modes
Main Modes Press the mode button to switch between Timer mode and Menu mode. Timer Mode Forerunner Icons Battery icon changes to show it is charging. Timer icon appears when timer starts. Satellite icon flashes when acquiring satellite signals. Heart Rate icon stops flashing when receiving data. -
Page 10: Buttons
Buttons Power • Press and hold to turn unit on/off. • Press to turn backlight on/off. • Press Power while pressing and holding the reset button to reset the unit if it freezes. mode • Press to switch between Timer and Menu modes. •... -
Page 11: Set Your Time Zone And User Profile
The Forerunner receives accurate time information from GPS satellites; however, you must enter your time zone to display the correct local time. The Forerunner 301 also uses information that you enter about yourself to calculate calorie consumption. Set your time zone and user profile before you begin workouts to ensure the Forerunner is recording accurate workout data. -
Page 12: Choose Your Sport
• You can change between pace and speed within a sport mode. For example, you can change from pace to speed within Running mode. See information. Garmin Training Center displays data about each workout in both pace and speed units. Forerunner for more information. -
Page 13: Workouts
ORKOUTS The Forerunner 301 offers a wide variety of training features that can help you train at any level you choose. Use your Forerunner to set goals and alerts, train with your Virtual Partner , program interval workouts from simple to ™... -
Page 14: Using Pace/Speed Alerts
4. Highlight the Alert At field and press enter. Select a preset distance or time from the menu or select Custom and press enter. 5. If you selected Custom, enter a time or distance using the arrows and enter. Then select OK. -
Page 15: Using Heart Rate Alerts
5. If you selected Custom in step 3, enter a fast pace or speed using the arrows and enter. Then select OK. Entering a custom pace. 6. Repeat steps 4 and 5 for Slow Pace Alert (Slow Speed Alert). 7. Press mode repeatedly to exit. Forerunner 301 Owner’s Manual ®... -
Page 16: Setting Auto Pause
6. Repeat steps 4 and 5 for Max HR Alert. 7. Press mode repeatedly to exit. Setting Auto Pause You can set the Forerunner 301 to pause the timer automatically during your workout when your pace/speed drops below a certain value. This setting is especially helpful if your course includes stop lights or other places where you need to slow down or stop. -
Page 17: Setting Auto Lap
6. Press mode repeatedly to exit. Setting Auto Lap You can set the Forerunner 301 to lap automatically after you travel a certain distance. This setting is helpful for comparing your performance over different parts of a workout (each mile or kilometer, for example). -
Page 18: Working Out With Virtual Partner
Working Out with Virtual Partner Meet your Virtual Partner , a unique tool designed to help you meet your training goals. Simply enter the distance, time, or pace/speed at which you want to complete a workout. Virtual Partner “runs” alongside of you, graphically displaying your goal pace/speed compared to your current pace/speed. - Page 19 5. Check the Pace (Speed) field to ensure that the calculated pace/speed (based on your distance and time inputs) seems reasonable. If not, make changes to the Distance and Time fields. Then highlight Done and press enter. To set up a workout by time & pace/speed: 1.
-
Page 20: Interval Workouts
Interval Workouts You can create simple interval workouts according to the following criteria: • Train for a certain distance and rest for a certain amount of time. • Train for a certain distance and rest for a certain distance. • Train for a certain amount of time and rest for a certain amount of time. - Page 21 Data for the Interval workout appears on the Lap page in Timer mode. Once you begin your workout, press the arrows to view other data pages in Timer mode. An audible alarm sounds when you reach a rest lap, and a banner appears, counting down the rest time or distance until a new interval lap begins.
-
Page 22: Advanced Workouts
Your Forerunner 301 allows you to create and save advanced workouts that include goals for each workout step and varied distances, times, and rest laps. Once you create and save a workout, you can use the Garmin Training Center software to schedule the workout for a particular ™... - Page 23 NOTE: To create a workout name with spaces, you must select a space from the character menu. 5. Highlight “1. Open No Target” and press enter. Then select Edit Step and press enter. 6. Highlight the Duration field (how long you want the step to last) and press enter.
-
Page 24: Starting Workouts
2. Select Training Assistant and then Advanced Workout. 3. Highlight the workout you want to start and press enter. If you have previously scheduled workouts from Garmin Training Center on your Forerunner, highlight one of the four options: • Today’s Workouts lists the workouts you scheduled for today in Garmin Training Center. - Page 25 For example, if you want to create an advanced workout in the Forerunner for Biking, you must switch to Biking mode. When you create workouts in Garmin Training Center, just save the workout in the correct sport folder.
-
Page 26: Editing Workouts
Forerunner, the changes will be overwritten the next time you transfer workouts from Garmin Training Center. To make a permanent change to a workout, edit the workout in Garmin Training Center and then transfer it to your Forerunner. -
Page 27: Multisport Workouts
MultiSport Workouts Triathletes, duathletes, and other multisport competitors can take advantage of the Forerunner’s MultiSport workouts. When you set up a MultiSport workout, you can switch between sport modes and still view your total time and distance for all sports. For example, you can switch from Biking mode to Running mode and view your total time and distance for biking and running throughout your workout. -
Page 28: Auto Multisport Workouts
Auto MultiSport Workouts If you are participating in a race or event, you can set up an Auto MultiSport workout that includes each sport in the event. You can also include transition time from one sport to the next. Move seamlessly from sport to sport by pressing the lap button. -
Page 29: Viewing Workout History
You can view the data on your Forerunner or transfer the data to the Garmin Training Center software, where you can analyze your workout. To view history by day: 1. - Page 30 NOTE: To view workout details for each sport in a MultiSport workout, you must switch sport modes. The best way to view workout History for most workouts is to send data to Garmin Training Center. Advanced Workout History MultiSport Workout History for all sport modes in the workout.
- Page 31 To view laps on a map: 1. While viewing details for a workout, highlight View Laps and press enter. 2. Highlight a lap in the list and press enter. Then highlight View on Map and press enter. arrows to zoom in and out on 3.
- Page 32 To view history totals: 1. Press mode to access Menu mode. Then select Run History (Bike History or Other History). 2. Highlight History Totals and press enter. Totals appear for distance, time, and calories for all of your saved workouts. 3.
-
Page 33: Navigating With Forerunner
AVIGATING WITH Use the GPS navigation features of your Forerunner to view your workout path on a map, save Locations you want to remember, create routes, and find your way home. Be sure to add Map mode, as explained below, so you can take advantage of these navigation features. - Page 34 Direction of travel Zoom scale Lap marker To remove Map mode: 1. Press mode to access Menu mode. Then select Navigation. 2. Highlight Remove Map Mode and press enter. To change the orientation of the map: 1. Press mode to access Menu mode. Then select Navigation.
-
Page 35: Marking And Finding Locations
Marking and Finding Locations A Location is a point on the map that you store in memory. If you want to remember landmarks or return to a certain spot, mark a Location there. The Location appears on the map with a name and symbol. You can find, view, and return to Locations at any time. - Page 36 6. Highlight GoTo and press enter. A straight line directs you to the Location. NOTE: You can also navigate to a starting point by fol- lowing your path (not a straight line). See “Navigating Back to Start.” To stop navigating to a Location: 1.
-
Page 37: Navigating Back To Start
Navigating Back to Start During each workout, the Forerunner 301 creates a tiny dotted line on the Map called a “track.” Tracks are like tiny footprints that show you exactly where you have traveled. When you want to return to your starting point, the Forerunner takes you back along the exact path you traveled. -
Page 38: Navigating With Routes
Navigating with Routes A route provides straight line directions between two or more points on the Map. After you create Locations, you can use them to build routes involving a few points or many points. Then you can save the routes and use them to navigate at any time. - Page 39 4. Select the point you want to route to as described in the previous procedure. Your route appears on the Map. To stop navigating a route: 1. Press mode to access Menu mode. Then select Navigation. 2. Highlight Stop GoTo and press enter. To edit a route: 1.
-
Page 40: Viewing Gps Information
Viewing GPS Information The GPS Information page displays information about the satellite signals the Forerunner 301 is currently receiving. Estimated accuracy Positions of satellites in space Each GPS satellite in space has a specific number that identifies it. The numbers of several GPS satellites appear on the circular graphic in the middle of the page. -
Page 41: Customizing The Forerunner
USTOMIZING THE You can customize both general Forerunner settings and settings that apply to individual sports, such as Custom pages, heart rate zones, and speed zones. Changing General Settings Settings such as time zone, units of measure, backlight, contrast, sounds, and language affect all sport modes in the Forerunner. - Page 42 To turn on automatic scrolling for data pages: 1. From the General Settings page, select Set Display. 2. Highlight the Data Page field and press enter. Select a speed setting for the automatic scrolling, or select Manual Switch to view these pages with the arrows only.
-
Page 43: Changing Sport Settings
To use the Forerunner indoors: 1. From the General Settings page, select Set System. 2. Highlight the GPS field and press enter. Then select Use Indoors. NOTE: When GPS is set to Use Indoors, speed and distance data are not available. The next time you turn on the Forerunner, it will search for satellite signals again. - Page 44 Pace smoothing averages your pace over a certain amount of time to avoid errors in GPS position and speed due to varying satellite signal reception. When you turn on or increase pace smoothing, the pace displayed on your Forerunner is steadier (fewer large jumps). To use pace smoothing, you must set your Forerunner to Running mode or set your speed units to Pace.
-
Page 45: Setting Up Custom Pages
Setting Up Custom Pages Each sport in your Forerunner 301 has its own Custom page. You can display several types of data on this page. When you are training, access the page from the Timer mode by pressing the arrows. To scroll through the Lap, Heart Rate, Custom, and Timer data pages automatically, see “Changing General Settings.”... -
Page 46: Setting Speed Zones
Setting Speed Zones For each sport, your Forerunner 301 contains several different speed zones, ranging from very slow to maximum speed. The values for these speed zones are entered by default and may not match your personal abilities. After you... -
Page 47: Setting Heart Rate Zones
1 to 5 based on intensity (1–lowest, 5–highest). About AutoLearn™ For each sport, the Forerunner 301 contains a set of default heart rate zones, which may not reflect your heart rate zones accurately. Consequently, the Forerunner employs... - Page 48 your workout. The Forerunner saves data from each workout and combines it with data from other workouts until it can calculate your heart rate zones. • Your lactate threshold will move no more than 3 bpm at a time. It takes the Forerunner at least four or five workouts to adjust to a different runner, so don’t worry if you let someone else borrow it.
-
Page 49: Setting Hr Zones Manually
Setting HR Zones Manually If you know your maximum heart rate, you can enter it and allow the Forerunner to calculate your heart rate zones automatically. You can also enter your heart rate zones manually. To base heart rate zones on your max HR: 1. -
Page 50: Appendix
Table 1 (see “Setting HR Zones Manually” in the Customizing section). However, the Forerunner 301 has a built-in feature called AutoLearn, which determines your heart rate zones automatically and continues to adjust them as your fitness level improves. To determine your heart rate zones, the Forerunner pinpoints your lactate threshold—the point where your body switches... - Page 51 consumption. The lactate threshold is a good way to measure your fitness level because, unlike your maximum heart rate, it is easily measured without pushing yourself to the point of exhaustion! The Forerunner determines your lactate threshold from workout data and uses it to calculate your heart rate zones.
-
Page 52: Heart Rate Monitor Information
Heart Rate Monitor Information What is pairing and how does it work? Pairing occurs automatically when you turn on the Forerunner and you are wearing the heart rate monitor. Pairing allows the Forerunner to receive reliable heart rate data from your heart rate monitor by means of a secure, digital signal. -
Page 53: Troubleshooting Tips
Troubleshooting Tips If you have trouble pairing, or if your heart rate reading is erratic, try the following suggestions. • Clean the sensors on the heart rate monitor. Dirt and sweat build-up on the sensors can weaken heart rate signals. •... -
Page 54: Garmin Training Center
Garmin Training Center The Garmin Training Center software is included in the Forerunner 301 product box. Locate the Garmin Training Center CD and use it to install Garmin Training Center on your personal computer. To install Garmin Training Center: 1. Insert the Garmin Training Center CD into your computer’s CD-ROM drive. -
Page 55: Caring For The Forerunner
Caring for the Forerunner The Forerunner 301 is constructed of high quality materials and does not require user maintenance other than cleaning. Clean the unit and the heart rate monitor using a cloth dampened with a mild detergent solution and then wipe dry. -
Page 56: Specifications
Specifications Physical Case: Fully-sealed, high-impact plastic alloy, waterproof to IEC 60529 IPX7 standards (waterproof to 1 meter for 30 minutes) Size: 3.26” x 1.71” x 0.69” (82.8 mm x 43.4 mm x 17.5 mm) Weight: Approx. 2.75 oz (78 g) Temperature Range: -4 °F to 140°F (-20 °C to 60°C) (operating) -
Page 57: Heart Rate Monitor
Heart Rate Monitor Case: ABS plastic, water resistant, Biocompatibility-compliant Size: 11.65” x 1.34” x 0.43” (296 mm x 34 mm x 11 mm) Elastic Strap Length: 12.6”–25.2” (32–64 cm) Weight: 1.55 oz (44 g) Temperature Range: -4°F to 140°F (-20 °C to 60°C) (operating) Battery: CR2032 (3 V @ 180 mAh) -
Page 58: Product Registration
Serial Number: ___ ___ ___ ___ ___ ___ ___ ___ Contact Garmin If you should encounter any difficulty while using your Forerunner 301, or if you have any questions, in the U.S.A. contact Garmin Product Support by phone: 913/397.8200 or 800/800.1020, Monday–Friday, 8 am–5 pm Central Time;... -
Page 59: Safety Information
OR TOPOGRAPHY. THIS PRODUCT SHOULD NOT BE USED TO DETERMINE GROUND PROXIMITY FOR AIRCRAFT NAVIGATION. CAUTION: Use the Forerunner 301 at your own risk. To reduce the risk of unsafe operation, carefully review and understand all aspects of this Owner’s Manual. When in actual use, carefully compare... -
Page 60: Limited Warranty
Limited Warranty This Garmin product is warranted to be free from defects in materials or workmanship for one year from the date of purchase. Within this period, Garmin will at its sole option repair or replace any components that fail in normal use. Such repairs or replacement will be made at no charge to the customer for parts or labor, provided that the customer shall be responsible for any transportation cost. -
Page 61: Fcc Compliance
FCC Compliance The Forerunner 301 complies with Part 15 of the FCC interference limits for Class B digital devices FOR HOME OR OFFICE USE. These limits are designed to provide more reasonable protection against harmful interference in a residential installation, and are more stringent than “outdoor”... -
Page 62: Software License Agreement
FOLLOWING SOFTWARE LICENSE AGREEMENT. PLEASE READ THIS AGREEMENT CAREFULLY. Garmin grants you a limited license to use the software embedded in this device (the “Software”) in binary executable form in the normal operation of the product. Title, ownership rights, and intellectual property rights in and to the Software remain in Garmin. -
Page 63: Index
Backlight Extension Strap, adding 3 adjusting 37 Forerunner 301 Owner’s Manual ® Extra Weight 39 setting manually 45 History. Garmin Training Center 18, installing 50 Icons 5 See also GPS 36. Satellite Interval Workouts 16–17 Signals workout history 26 turning on and off 39 GPS Info page 36 Lactate Threshold 46–47... - Page 64 Map Mode 29, 30 finding 34 Maximum Heart Rate 45 navigating 34 Menu Mode 5 Mode button 6 Safety Information 55 MultiSport Icon 5 Satellite Icon 5 MultiSport Workouts 23 Satellite Signals 36 auto MultiSport 24 acquiring 4 creating 23 Serial Number 1, 54 history 26 Settings...
- Page 66 For the latest free software updates (excluding map data) throughout the life of your Garmin products, visit the Garmin Web site at www.garmin.com. © Copyright 2004–2006 Garmin Ltd. or its subsidiaries Garmin International, Inc. 1200 East 151 Street, Olathe, Kansas 66062, U.S.A.