Table of Contents
Advertisement
Quick Links
Advertisement
Table of Contents

Related Manuals for Grizzly G9969


Summary of Contents for Grizzly G9969
- Page 1 MODEL G9969 RADIAL DRILL PRESS OWNER'S MANUAL COPYRIGHT © MAY, 2006 BY GRIZZLY INDUSTRIAL, INC. WARNING: NO PORTION OF THIS MANUAL MAY BE REPRODUCED IN ANY SHAPE OR FORM WITHOUT THE WRITTEN APPROVAL OF GRIZZLY INDUSTRIAL, INC. #JK8210 PRINTED IN CHINA...
- Page 2 ���� ������ �������� �������� ������ ������������ �� ��� ������ ������ ���������� ����������� ��� ������� �� ���� ������������������ ������� �� ����� ���������� ��� ������ ��� ������������ ����� �� ���� ������ ��� ������ �� ������� �������� ������� ��������� ����������� ������������� �� ������ ���...
-
Page 3: Table Of Contents
Foreword ... 4 Contact Info ... 4 Identification ... 5 Machine Data Sheet ... 6 SECTION 1: SAFETY... 8 Safety for Drill Presses ... 10 SECTION 2: CIRCUIT REQUIREMENTS ... 11 110/220V Operation ... 11 Grounding ... 12 Extension Cords ... 12 SECTION 3: SET UP ... -
Page 4: Introduction
INTRODUCTION Foreword We are proud to offer the Model G9969 Radial Drill Press. This machine is part of a growing Grizzly family of fine woodworking and metal- working machinery. When used according to the guidelines set forth in this manual, you can expect years of trouble-free, enjoyable operation and proof of Grizzly’s commitment to customer... -
Page 5: Identification
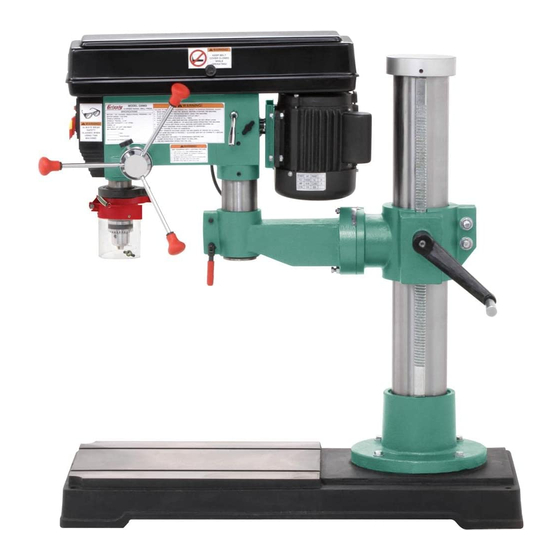
A. Main Power and Light Switches B. Downfeed Handles C. Belt Cover Knob D. Belt Tension Lever E. Belt Tension Lock Knob Pinion Hub G9969 Radial Drill Press Identification Figure 1. G9969 Identification. G. Headstock Lock Handles H. Headstock Tilt Scale Crank Handle Junction Box K. -
Page 6: Machine Data Sheet
Machine Data Sheet Customer Service #: (570) 546-9663 · To Order Call: (800) 523-4777 · Fax #: (800) 438-5901 MODEL G9969 RADIAL DRILL PRESS Product Dimensions: Weight... 375 lbs. Length/Width/Height... 39-1/2 x 22 x 51 in. Foot Print (Length/Width)... 39-1/2 x 18-1/2 in. - Page 7 ��� ����������� ��������� ������ �� ������ �������� �� �� ��������� ��� ���������� ��� ���� ������ ������� ��������������� ����� ����� ��� �� ��� ������� ����������� �������� ���� ����������� ��� ��� ���������� �������� ����� ���������� ���������� G9969 Radial Drill Press ���� � �� �...
-
Page 8: Section 1: Safety
���������� ������ ���� ������ ���������� ���������������� �� ���� ������ ��������� ��� ���� �������� ���������������������������������������������� ������������������������������������������ �������������������������������������������� ������������������������������������������ �� ����� ������� ��������� ���� ������ �� ����� ��� ��������� �� ��������� ����� �� �������� ������������������ ������������������������������������ ��������� ����������� G9969 Radial Drill Press... - Page 9 ��� �������� ��������� ���� ������ ����������������������������������������� �������������������������������������������� ������������������������������������� ��� ���� ���� ������ ��� �� ����� ��� ���� ��������� ������ ����� ���������� G9969 Radial Drill Press ��� ������ ��������������������������������������� ����� ���� ���������� ��������� ������� ����� ����������������� ��� ����� ������ ����� ����������� ������...
-
Page 10: Safety For Drill Presses
10. OPERATING SPEED. Always operate your drill press at speeds that are appropriate for the drill bit size and the material that you are drilling. 11. MOUNTING WORKPIECES. Use clamps or vises to secure workpiece before drill- ing. -
Page 11: Section 2: Circuit Requirements
110V Circuit ... 15 Amps 220V Circuit ... 15 Amps Plug Type The Model G9969 comes prewired with a NEMA 5-15 plug. If you wish to rewire the motor to 220V we recommend using the following plug (see Figure 2 for an example): 220V Plug &... -
Page 12: Grounding
Use at least a 16 gauge cord that does not exceed 50 feet in length! • The extension cord must also contain a ground wire and plug pin. • A qualified electrician MUST size cords over 50 feet long to prevent motor damage. G9969 Radial Drill Press... -
Page 13: Section 3: Set Up
Phillips Head Screwdriver #2 ... 1 • Rubber Mallet ... 1 The Model G9969 was carefully packed when it left our warehouse. If you discover the machine is damaged after you have signed for delivery, please immediately call Customer Service at (570) 546-9663 for advice. -
Page 14: Inventory
Remove this protective coating with a sol- vent cleaner or citrus-based degreaser such as Grizzly’s G7895 Degreaser. To clean thoroughly, some parts may need to be removed. For opti- mum performance from your machine, make sure you clean all moving parts or sliding contact surfaces that are coated. -
Page 15: Hardware Recognition Chart
Hardware Recognition Chart -13- G9969 Radial Drill Press... -
Page 16: Site Considerations
-14- Mounting Because the assembled G9969 drill press is extremely heavy and difficult to move, we recommend mounting the base to the floor before the drill press is assembled. Take note of the drill press working clearances on this page when determining a location for your drill press. -
Page 17: Column
Have an assistant hold the column steady- while you secure the column to the base with the hex bolts, as shown in Figure 6. G9969 Radial Drill Press Figure 6. Assembled column and base. Headstock Bracket Components and Hardware Needed: Headstock Bracket ... -
Page 18: Headstock
Figure 10. Figure 10. Mounting the headstock. Align the headstock with the base and tighten the two set screws shown in Figure 11. Lock Handles Set Screws Figure 11. Headstock set screws. Headstock G9969 Radial Drill Press... -
Page 19: Downfeed Handles & Belt Cover Knob
The downfeed handles must be installed to oper- ate the drill press. To install the downfeed handles: Thread the downfeed handles into the pinion hub, as shown in Figure 12. Figure 12. Downfeed handles installed. G9969 Radial Drill Press -17-... -
Page 20: Drill Chuck & Arbor
The arbor has a short taper and a long taper. Place the short taper into the socket in the back of the drill chuck and tap it with a rubber or wooden mallet, as shown in Figure 15. If the chuck fails to remain secure on the arbor, repeat Steps 1 &... -
Page 21: Test Run
Troubleshooting on Page 29. If you still cannot remedy a problem, contact our Tech Support at (570) 546-9663 for assistance. G9969 Radial Drill Press To test run your machine: Ensure that anyone in the vicinity of the drill press, including yourself, is wearing safety glasses. -
Page 22: Section 4: Operations
Figure 17. Removing key to disable switch. Changing Bits The Model G9969 is equipped with a key chuck, which can be opened and securely closed by using the included chuck key. Any drill bit you install in the chuck must be installed tightly enough that it will not come loose during opera- tion. -
Page 23: Arbor Removal
25, up against the depth stop bracket. This will prevent the quill from retracting when you release the downfeed handles. G9969 Radial Drill Press Figure 18. Using drift key to remove arbor. Insert the drift key into the drift key slot, and allow the quill to rise and trap the drift key by backing off the downfeed handles slightly. -
Page 24: Basic Drilling Operations
Basic Drilling Operations The Model G9969 is designed for drilling holes in wood, plastics or metal. The basic operation of a drill press is lining up your drill bit with the intended hole location, turning the drill press ON, and using the downfeed handles to move the spinning drill bit into the workpiece at a steady and controlled feed rate. -
Page 25: Choosing Speeds
Carbide Insert Type One-Piece Type T e n o n / P l u g C u t t e r s 3/8" – 1/2" 5/8" – 1" G9969 Radial Drill Press Choosing Speeds Lubrication Suggestions Wood ...None Plastics ... Soapy Water Brass ... -
Page 26: Changing Speeds
Changing Speeds The belts in the head of the drill press must be rearranged to change speeds. A chart under the belt cover shows the belt positions needed to make the drill press run at the desired speed. To change speeds: UNPLUG THE DRILL PRESS! ���������������������... -
Page 27: Depth Stop
Depth Stop Calibration Figure 23. Depth stop components. -25- G9969 Radial Drill Press... -
Page 28: Headstock Adjustment
Headstock Swivel To swivel the headstock: Loosen the two lock handles at the front of the headstock bracket. Swivel the headstock to the desired point. Tighten the two lock handles. G9969 Radial Drill Press... -
Page 29: Section 5: Accessories
Includes a heavy-gauge steel index case. Figure 25. Model G8865 13-Piece Alloy Drill Bits. G5753—Drill Press Vise 6" If you use a drill press and value your fingers, you need one of these. Made from high-grade cast iron, these hefty horizontal vises offer support and stability, allowing you to keep your hands well away from fast moving bits and cutters. -
Page 30: Section 6: Maintenance
Keep these surfaces rust-free with regular appli- cations of products like G96 ® SLIPIT , or Boeshield T-9. These are available ® ® in the latest Grizzly catalog under the model num- bers shown below: Gun Treatment ...H3788 ® SLIPIT Compound Gel ... G5562 ® Boeshield T-9 ...H7373... -
Page 31: Section 7: Service
6. Motor connection is wired incorrectly. 7. Pulley is slipping on shaft. 8. Low power supply voltage. 9. Motor bearings are at fault. 10. Motor has overheated. 11. Motor is at fault. G9969 Radial Drill Press About Service Troubleshooting incorrectly. OFF. resistance. - Page 32 4. Loosen return height nut. 1. Adjust the quill screw. 2. Replace the quill bearings. 1. Adjust headstock tilt (see Page 26). 1. Remove drill bit and reinstall. G9969 Radial Drill Press...
-
Page 33: Depth Stop Calibration
5. Test the depth stop by measuring how far the spindle actually moves with respect to where you set the depth stop. G9969 Radial Drill Press Feed Shaft Spring Tension The feed shaft return spring is adjusted at the factory;... - Page 34 Tighten the lock nut against the spring cover just until the nut stops, and then back off the nut approximately ⁄ turn, or just enough so there is no binding at complete spindle travel. G9969 Radial Drill Press ⁄ " (see...
-
Page 35: Electrical Components
Electrical Components Figure 32. G9969 Switch Wiring. Figure 33. G9969 Junction Box Wiring. -33- G9969 Radial Drill Press... -
Page 36: Wiring Diagram
���������� ������ � ����� �� �� ������� �� ����� ��� ���� ���� ��� ��������� �� �� �� ������ �� �� ����� � � � � � � �� ��������� �� �� ������� �� ������ �� �� G9969 Radial Drill Press... -
Page 37: Parts Breakdown
�� ��� �� �� ����� �� ����� ����� ��� �� ����� �� �� �� �� �� �� G9969 Radial Drill Press Parts Breakdown ���� �� �� �� �� �� �� �� �� �� �� ��� �� �� �� �� ��... -
Page 38: Parts List
BALL BEARING 6205ZZ INT RETAINING RING 62MM ROUND NUT M17 X 1 WASHER BALL BEARING 6203ZZ RUBBER WASHER 62 X 50 X 2 QUILL BALL BEARING 6205ZZ SPINDLE ARBOR MT4/JT3 CHUCK 5/8" JT3 CHUCK KEY LIGHT SOCKET 110V G9969 Radial Drill Press... - Page 39 MUST maintain the original location and readability of the labels on the machine. If any label is removed or becomes unreadable, REPLACE that label before using the machine again. Contact Grizzly at (800) 523-4777 or www.grizzly.com to order new labels. G9969 Radial Drill Press...
-
Page 40: Warranty And Returns
WARRANTY AND RETURNS Grizzly Industrial, Inc. warrants every product it sells for a period of 1 year to the original purchaser from the date of purchase. This warranty does not apply to defects due directly or indirectly to misuse, abuse, negligence, accidents, repairs or alterations or lack of maintenance. - Page 41 ���������������������������������������������������������������������������������� � ������������������������������������������������������������������������������������ ����� ����������������������� ������ � ������������������������ ���� ��������������������� ���������������������������� ������ ������������������������ ���������� � ���������������� ���������������������������� ������������������������������� ��������������������������� ��� ��������� ����������� �� ����� �� � ��������� ������ �� ���� �� ���� ��� ��������� �������� �� ���� �� ������� ������ �������� ��� ��������� �� ������� ��� ����������� �� �������� ������������� ���...
- Page 42 ���������������������� ���������������������� ����������������������������������� ����������������������������������� ������������������������������������� �������������������������������������� ������� ����������� ���� ���� ��� ���� ����������� �� ���������� �������������������������������������� ����� ����� ����...
- Page 44 ��� ������ ��� ���� ���� ������� ����� ��� ������� ����� ��� �������� ��� ������� � � � ���� ����� ��� � � �������� ������ ��� � ����� ������ � �� ��� �������� ������� � ������ �������� ������ ������� ������ �� ����� ������...