
Related Manuals for Navman FISH 4100


Summary of Contents for Navman FISH 4100
- Page 1 FISH 4100 / 4150 Installation and Operation Manual English ..... 3 Français ..24 Español ..46 Português ..68...
- Page 2 Connect the equipment into an output on a circuit different from that to which the receiver is connected. Consult the dealer or an experienced technician for help. A shielded cable must be used when connecting a peripheral to the serial ports. NAVMAN FISH 4100 Installation and Operation Manual...
-
Page 3: Table Of Contents
Documentation will be the official version of the Documentation. This manual represents the FISH 4100 and the FISH 4150 as at the time of printing. Navman NZ Limited reserves the right to make changes to specifications without notice. -
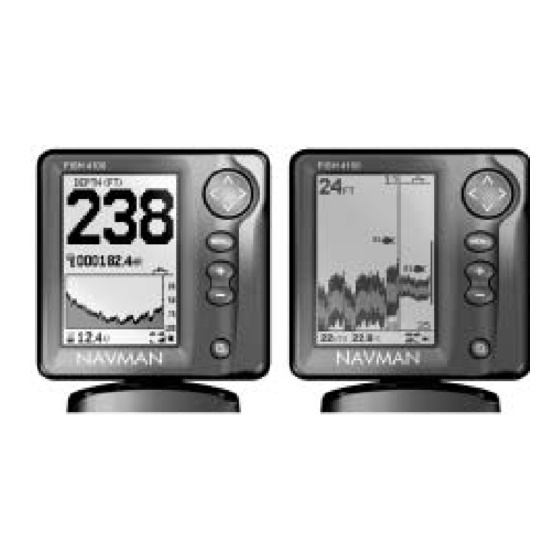
Page 4: Introduction
Installation manual very carefully. in a safe, dry, cool place such as the NAVMAN carry bag, or left on the installation bracket and securely All of the NAVMAN 4000 Series fishfinders use new covered. -
Page 5: Getting Started
Definition of Press and Hold in this manual: · Press means to push the key for less than one second. · Hold means to push and hold the key down for more than one second. NAVMAN FISH 4100 Installation and Operation Manual... -
Page 6: Simulation Mode
FISH 4100 the unit, then power the fishfinder on. Note: The FISH 4100 requires the use of the optional Through Hull adapter cable wired to a 3 Operation Use this screen for taking a closer look at interesting MAIN MENU screen underwater features. -
Page 7: Alarms
Alarms automatically re-enable The FISH 4100 has four alarms, TOO SHALLOW, The TOO SHALLOW, TOO DEEP and LOW TOO DEEP, FISH ALARM and LOW BATTERY. BATTERY alarms automatically re-enable when the value moves outside the alarm trigger setting. -
Page 8: History Screen Interpretation
Gain (sensitivity) controls the amount of detail The fish symbol option can be customized, or switched displayed on the screen. The NAVMAN fishfinder has off altogether so that the echoes are not converted to two gain modes, Auto Gain and Manual Gain: fish symbols on the screen. - Page 9 When looking for small objects including fish, users should consider that there are places where fishfinders cannot ‘see’. Shadow - where objects are hidden in the bottom echo. These fish will be hidden in the bottom echo. NAVMAN FISH 4100 Installation and Operation Manual...
- Page 10 NAVMAN fishfinders display the most recent events on the right of the screen. Moving boat 30 seconds ago 1 minute ago Air in water (e.g. from wake) When the fish symbol option is ON, any echo returned that fits the profile of a fish is displayed on the screen with a fish symbol.
-
Page 11: Zoom Screen
The sonar The bottom trace is the strongest echo shown in the display on the FISH 4100 / 4150 is 70 pixels wide, so lower part of the left side of the screen. -
Page 12: Navigate Screen
The FISH 4150 prominently displays the water depth, NAVIGATE screen. The screen display is different also the boat speed, the bottom and any alarms that for the FISH 4100 and the FISH 4150. are enabled. The NAVIGATE screen displays useful information while travelling at speed. -
Page 13: Data Screen (Fish 4150 Only)
(see section 4-2). 3-8 RANGE menu Select MAIN MENU - RANGE to change the manual The NAVMAN fishfinder has two range modes, Auto range and adjust the selected depth range. Range and Manual Range. The use of Auto Range is recommended. -
Page 14: Setup Menu
· Specify the trigger settings for the alarms (4-1). preferences. · Choose the units for depth, temperature and speed On a FISH 4100 use the SETUP menu to: (4-2). · Turn the key beep on or off (4-3). · Specify the trigger settings for the alarms (4-1). -
Page 15: Units Menu
Then press to exit. setting. The contrast level can be set at any level between 0 and 16. The default setting is 6. NAVMAN FISH 4100 Installation and Operation Manual... -
Page 16: Log Menu (Fish 4150 Only)
Select MAIN MENU - SETUP - INSTALL to display the menu. The FISH 4100 install menu is shown. An Enter a keel offset value when the transducer is extra option, CALIBRATION, is available on the FISH located below the water surface but a display of total 4150 to calibrate water temperature and boat speed. -
Page 17: Calibration Menu (Fish 4150 Only)
FISH SYMBOL ........Auto Gain ............ON Auto Range ............ ON INSTALL Manual Gain ............5 Keel Offset ........... 0.0 ft Bottom Lock ........... ON Key Beep ............ON Contrast ............. 6 Backlighting ............6 NAVMAN FISH 4100 Installation and Operation Manual... -
Page 18: Installation
Push the attached dust covers over the the three stainless steel screws. Do not exposed ends of the plugs. Keep the display unit in overtighten the screws, as the bracket may not a dry clean place such as the optional NAVMAN rotate. carry bag. NAVMAN... -
Page 19: Wiring Connection
5-4 Wiring Connection Auto Power Wiring Warning This option is possible on both the FISH 4100 and 1 Amp fuses must be positioned where shown in the FISH 4150. the wiring diagrams. Note: Green and white wires are on the FISH 4150 If possible, route the transducer cables away from only. -
Page 20: Connecting A Fish 4150 To Other Instruments
Repeater for depth, speed, water temperature and Please consult your NAVMAN dealer for more battery voltage. information. Please contact your NAVMAN dealer for information on NAVMAN’s full range of NMEA enabled instruments and connection options. NAVMAN FISH 4100 Installation and Operation Manual... -
Page 21: Appendix A - Specifications
The NAVMAN fishfinder Transom transducer cable length can output the following data: · FISH 4100 - 10 m (33 ft ). · DBT (Depth Below Transducer). · FISH 4150 - 8 m (26 ft). · DPT (Depth and Keel offset). -
Page 22: Appendix B - Troubleshooting
Repairs to the NAVMAN fishfinder may only be been impacted, it may have been kicked up on carried out by a service centre approved by NAVMAN the bracket. If it is not physically damaged, NZ. If the display unit must be sent into a service push it back down so it 'clicks' into place. - Page 23 Check that the plugs are clean and free of water or anything that may short deteriorate the quality of the connection. Inspect the transducer cable from end to end for damage such as cuts, breaks, stretched or squashed sections. NAVMAN FISH 4100 Installation and Operation Manual...
-
Page 24: Appendix C - How To Contact Us
Letro, Balco Stores, e-mail: 2871 JE SCHOONHOVEN. Moutran Street, Tripoli equinautic@equinautic.com.br +31 182 320 522 VIA Beirut. Fax: +31 182 320 519 +961 6 624512 e-mail: info@plastimo.nl Fax: +961 6 628211 Website: www.plastimo.nl e-mail: balco@cyberia.net.lb NAVMAN FISH 4100 Installation and Operation Manual... - Page 25 Made in New Zealand MN000141 1951332B Lat 36° 48.404'S...