Table of Contents
Advertisement
Advertisement
Table of Contents

Related Manuals for Navman F400


Summary of Contents for Navman F400
- Page 1 NAVMAN F440 NAVMAN...
- Page 3 NAVMAN FISHFINDER F400/F440 ENGLISH ................5 CHINESE ................. 21...
-
Page 5: Table Of Contents
Setting the alarms ........................16 Setup Menu ............................. 17 Changing the setup functions ....................17 Setup Menu – Speed & Temperature (FISH440 only) ............... 18 Changing the speed & temperature setup ................18 Troubleshooting ..........................19 NAVMAN Fishfinder User Manual... -
Page 6: Specifications
Thank you for purchasing a NAVMAN 400 series fishfinder. The 400 series is a powerful, yet easy to use sonar fish and bottom depth detector. Please read this manual carefully before installing and using your fishfinder. This manual deals with both the FISH400 and FISH440. The more you know and understand about the capabilities of the unit, the better it will perform for you. -
Page 7: Location
• protected from physical damage during bracket. rough sea passages. • have easy access to the 12 volt power source. • convenient to route the transducer cables. 35.0 (1.4") 132.0 (5.2") FISH400 NAVMAN 81.5 (3.2") NAVMAN Fishfinder User Manual... -
Page 8: Installation
Tighten the two screws. aerated water to flow over the face of the transducer. • be away from the propeller • be at least 150 mm ( 6" ) away from the keel of the boat. NAVMAN Fishfinder User Manual... -
Page 9: Other Types Of Transducers
• Other Types of Transducers black wire to the electrical ground. The shortest and most direct connection to the It is possible to use your NAVMAN Fish Finder boat’s battery will help to eliminate any with all the NAVMAN Transducers Range problems due to voltage drop or electrical (including thru-hull mounting). -
Page 10: Introduction
Press once to turn the alarm ON the screen, press the key. • Press again to turn the alarm Increases setting values in menus. Enters menu mode Advances to the next menu Moves through the list of items in each menu NAVMAN Fishfinder User Manual... -
Page 11: Echo Mode
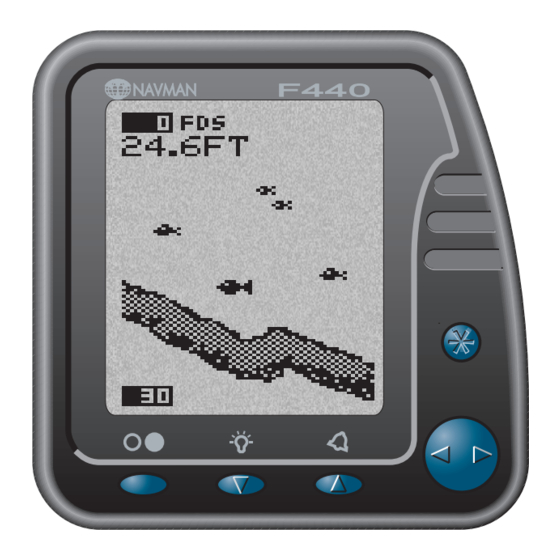
This mode is very useful for the experienced user. The digital display in this sample window is indicating the depth of the bottom. The display units are also user selectable NAVMAN Fishfinder User Manual... -
Page 12: Analogue-Scope Function
(see SETUP menu). When either or all of the Fish (F), Shallow (S) or Deep (D) alarms are active they are displayed at the top left corner of the screen. NAVMAN Fishfinder User Manual... -
Page 13: Changing The Mode Of Operation
Autofish + analogue scope mode Navigate data mode Depth Range Limit • Press the key until the range menu is displayed. • Press either the key or the key to move the pointer to the desired mode of operation NAVMAN Fishfinder User Manual... -
Page 14: Setting The Gain
In this situation the auto-gain can be reduced to display a weak bottom image but with improved fish images. NAVMAN Fishfinder User Manual... -
Page 15: Setting The Scroll Speed
• Press either the key or the key to move the pointer to the desired scroll speed • Press the key to accept the choice and return to normal display mode NAVMAN Fishfinder User Manual... -
Page 16: Alarms
An alarm will sound if your anchor drags and you drift into deeper or shallower water. Be sure to disable the fish alarms in this mode to prevent false anchor drag alarms due to fish. NAVMAN Fishfinder User Manual... -
Page 17: Setup Menu
This indicates the bottom hardness and also allows you to separate targets near the bottom of the sea bed. This function will also remove most surface echo signals from the top of the screen. NAVMAN Fishfinder User Manual... -
Page 18: Changing The Speed & Temperature Setup
Use the V or the ^ key to adjust the • setting to the desired value • Press the key to accept the choice and return to normal display mode NAVMAN Fishfinder User Manual... - Page 19 This often happens when you reverse the boat. The transducer must be mounted in a smooth flow of water in order for the Fishfinder to work at all boat speeds. 2. Again, electrical noise from the boat’s motor can interfere with the Fishfinder. NAVMAN Fishfinder User Manual...
- Page 20 NAVMAN Fishfinder User Manual...
- Page 21 NAVMAN Fishfinder User Manual...
- Page 22 0°C ~ 40°C ( 32°F ~ 104°F ) 0.0–50.0 kts, mph, kph 0.0~40.0C (32.0~99.0F) NAVMAN FISH400 NAVMAN Fishfinder User Manual...
- Page 23 35.0 (1.4") 132.0 (5.2") FISH400 NAVMAN 81.5 (3.2") NAVMAN Fishfinder User Manual...
- Page 24 NAVMAN Fishfinder User Manual...
- Page 25 Model FISH400 Model FISH440 NAVMAN Fishfinder User Manual...
- Page 26 NAVMAN Fishfinder User Manual...
- Page 27 NAVMAN Fishfinder User Manual...
- Page 28 NAVMAN Fishfinder User Manual...
- Page 29 NAVMAN Fishfinder User Manual...
- Page 30 0~15 NAVMAN Fishfinder User Manual...
- Page 31 NAVMAN Fishfinder User Manual...
- Page 32 NAVMAN Fishfinder User Manual...
- Page 33 0 ~ 7 NAVMAN Fishfinder User Manual...
- Page 34 NAVMAN Fishfinder User Manual...
- Page 35 NAVMAN Fishfinder User Manual...
- Page 36 NAVMAN Fishfinder User Manual...
- Page 37 NAVMAN Fishfinder User Manual...
- Page 38 NAVMAN Fishfinder User Manual...
- Page 39 NAVMAN Fishfinder User Manual...
- Page 40 NAVMAN Fishfinder User Manual...
- Page 41 NAVMAN Fishfinder User Manual...
- Page 42 NAVMAN Fishfinder User Manual...
- Page 43 NAVMAN Fishfinder User Manual...
- Page 44 NAVMAN Fishfinder User Manual...
- Page 45 NAVMAN Fishfinder User Manual...
- Page 46 NAVMAN Fishfinder User Manual...
- Page 47 NAVMAN Fishfinder User Manual...