Xerox DocuPrint C3055 User Manual
Xerox printers user guide
Hide thumbs
Also See for DocuPrint C3055:
- Installation manual (16 pages) ,
- User manual (123 pages) ,
- Settings manual (33 pages)
Table of Contents
Advertisement
Advertisement
Table of Contents

Related Manuals for Xerox DocuPrint C3055


Summary of Contents for Xerox DocuPrint C3055
- Page 1 DocuPrint C3055/C3055 DX User Guide...
- Page 2 The data saved in the hard disk of the machine may be lost if there is any problem in the hard disk. Fuji Xerox is not responsible for any direct and indirect damages arising from or caused by such data loss.
-
Page 3: Preface
- Connect the equipment into an outlet on a circuit different from that to which the receiver is connected. - Consult the dealer or an experienced radio/TV technician for help. Changes and modifications to this equipment not specifically approved by Fuji Xerox may void the user's authority to operate this equipment. -
Page 4: Docuprint C3055/C3055 Dx Features
This feature is ideal for printing confidential documents. • Print User Control *1: On the DocuPrint C3055, the duplex unit (optional) must Controls access to the printer by the be installed. Authentication feature. *2: The hard disk (optional) must be installed. -
Page 5: Table Of Contents
Contents Preface......................3 DocuPrint C3055/C3055 DX Features.............. 4 Contents......................5 Types of Manuals....................8 Using This Guide ....................9 Safety Notes ....................11 About License ....................17 Illegal Copies and Printouts ................18 Printer Environment Settings..............19 Supported Operating Environments ..............19 Connecting a Cable .................... - Page 6 Printing Confidential Documents - Secure Print - ..........59 Secure Print Feature .....................59 Printing Using the Secure Print Feature ..............59 Printing After Checking the Print Result - Sample Print - ........63 Sample Print Feature .....................63 Printing Using the Sample Print Feature ...............63 Printing PDF Files Directly..................
- Page 7 Non-condensing Mode ..................159 Non-genuine Mode ....................160 Maintenance................... 161 Replacing Consumables..................161 Types of Consumables ..................161 Replacing the Toner Cartridges ................164 Replacing the Drum Cartridge ................168 Printing the Reports/Lists ..................171 Types of the Reports/Lists ................... 171 Printing a Report/List ...................173 Monitoring/Managing the Printer on a Web Browser...........
-
Page 8: Types Of Manuals
CD-ROM Documentation Describes how to set up the printer’s operating environment and to (HTML) install a print driver and various Fuji Xerox software. • This guide is on the CD-ROM of the Driver CD Kit. Emulation Setting Guide (PDF) Contains information about the ESC/P and PCL emulation modes. -
Page 9: Using This Guide
Using This Guide Organization This guide is organized into the following chapters. The summary of each chapter is as follows: 1 Printer Environment Setting Describes how to set up the printer’s operating environment. 2 Basic Operation Provides the names and functions of the printer's components and the basic operating procedures (such as switching the power on/off and cancelling print jobs). - Page 10 Conventions In this guide, personal computers and workstations are collectively called "computers". The following terms are used throughout this guide: Important : Important information that must be read and followed. Note : Additional information that merits emphasis. Refer to " "...
-
Page 11: Safety Notes
The machine (including the consumables) injuries to your back. weighs 41.6 kg/42.6 kg (DocuPrint C3055/ DocuPrint C3055 DX). When moving the equipment, make sure that there are three or more persons carrying it. - Page 12 The machine has ventilation holes on the side, rear, and top panels. Ensure that the machine is installed with the minimum wall clearances of 130 mm from the rear vent and 100 mm from the side vent. A poorly ventilated machine can cause excessive internal heat and fire.
- Page 13 Only use the power cord supplied with the • Water faucet or pipe whose electrical equipment. Using a different power cord conductivity is broken by a non-metal may cause fire or electric shock. Do not use part the power cord supplied with the equipment on any other equipment.
-
Page 14: For Machine Operation
If the interrupter functions properly, press the RESET button to exit the Do not try to alter the machine test mode. configuration, or modify any parts. An unauthorized modification can cause If the circuit does not operate, an electric smoke or fire. shock can occur on a poorly earthed component. -
Page 15: For Consumables
For Consumables Never throw a toner cartridge into an open flame. It can cause an explosion and you can get burnt. Never throw a drum cartridge into an open flame. Toner remaining in the cartridge can cause an explosion and you can get burnt. Never use a vacuum cleaner when you clean spilled toner. -
Page 16: Warning And Caution Labels
Be sure to follow the warning and caution labels placed on the machine. Do not touch areas with labels indicating high voltage or temperature. This can cause an electric shock or burn. With the duplex unit Without the duplex unit (optional for the DocuPrint C3055) (optional for the DocuPrint C3055) Safety Notes... -
Page 17: About License
About License RSA BSAFE (For the Models Other than those Available in China) This product (network expansion card (optional)) includes RSA BSAFE encryption software from RSA Security Inc. JPEG Code Our printer software uses some of the codes defined by the Independent JPEG Group. About License... -
Page 18: Illegal Copies And Printouts
Illegal Copies and Printouts Copying or printing certain documents may be illegal in your country. Penalties of fines or imprisonment may be imposed on those found guilty. The following are examples of items that may be illegal to copy or print in your country. •... -
Page 19: Printer Environment Settings
Printer Environment Settings When you are finished installing your printer using the ‘Setup Guide’, go on to set up its operating environment. Supported Operating Environments The printer can be used both as a local and a network printer. When used as a local printer, the printer is connected directly to a computer. - Page 20 When the network expansion card (optional) is installed, the printer can be set up also in the following environments: • NetWare : Used when sharing and managing the printer using a NetWare server. (default: [Enable]) • SMB : Used when printing using a Windows network.
- Page 21 *2: USB port must be set on the computer connected to the printer. On Windows 98/Me, USB Print Utility (software by Fuji Xerox Co., Ltd.) must be used. USB Print Utility can be installed from the CD-ROM of the Driver CD Kit included with the printer.
-
Page 22: Connecting A Cable
Connecting a Cable Connect the printer to your computer using an interface cable appropriate for your connection method. An interface cable is not included with the printer. You must purchase it separately. Parallel Connection Switch the printer off. Plug the parallel cable into the interface connector on the printer. -
Page 23: Network Connection
Network Connection Use a straight-type network cable that supports 100BASE-TX or 10BASE-T. Switch the printer off. Plug the network cable into the interface connector on the rear side of the printer. Plug the other end of the network cable into a network device such as a hub. -
Page 24: Setting The Network Environment
Setting the Network Environment This section explains how to install your printer in a TCP/IP environment. When installing the printer in a different environment, refer to the ‘CD-ROM Documentation (HTML)’ on the CD-ROM of the Driver CD Kit. Setting the IP Address To use TCP/IP protocol, you must configure an IP address for the printer. - Page 25 Press the < > button to accept the Admin Menu selection. Network / Port [Network/Port] is displayed. Note • If you pressed the < > button on the wrong item, return to the previous screen by pressing the < > button.
- Page 26 Note • If you do not need to change the setting, press the < > button to advance to the next field. • Pressing the < > and < > buttons simultaneously increments the value by 10. • To return to the previous field, press the < >...
-
Page 27: Enabling Ports
Enabling Ports Set all ports you want to use to [Enable] on the control panel. Use the following procedure to enable each port. The following procedure uses IPP as an example. Press the <Menu> button on the control Menu panel to display the menu screen. Print Language Press the <... -
Page 28: Configuring The Printer Using Centreware Internet Services
Configuring the Printer Using CentreWare Internet Services Overview of CentreWare Internet Services CentreWare Internet Services is a service that allows you to monitor or remotely configure the printer using a web browser when the printer is on a TCP/IP network. Some of the control panel settings can be set also on the service’s [Properties] tab. -
Page 29: Setting Up The Printer
Setting Up a Web Browser When accessing CentreWare Internet Services, we recommend you to set your web browser: • not to use a proxy server when specifying the printer’s IP address. • to enable JavaScript. Note • If you access CentreWare Internet Services using a proxy server, the response from the service may be slow or the window of the service may not display. - Page 30 This feature allows you to control user access to the printer. If enabling this feature, register users who are granted access to the printer. • Logical Printer Settings Sets PostScript and ESC/P logical printers. On the DocuPrint C3055, [PostScript] appears only when the PostScript software kit (optional) is installed. Support •...
-
Page 31: Using Centreware Internet Services
Using CentreWare Internet Services Follow these steps when accessing CentreWare Internet Services. Start your computer and launch a web browser. In the URL field, enter the IP address or URL of the printer, and press the <Enter> key. The top page of CentreWare Internet Services is displayed. •... -
Page 32: Installing A Print Driver
• For information about PostScript print drivers, refer to the manual included in the PS Driver Library CD. For the DocuPrint C3055, PostScript print drivers are included in the PostScript software kit (optional). Uninstalling a Print Driver and Other Software... -
Page 33: Basic Operation
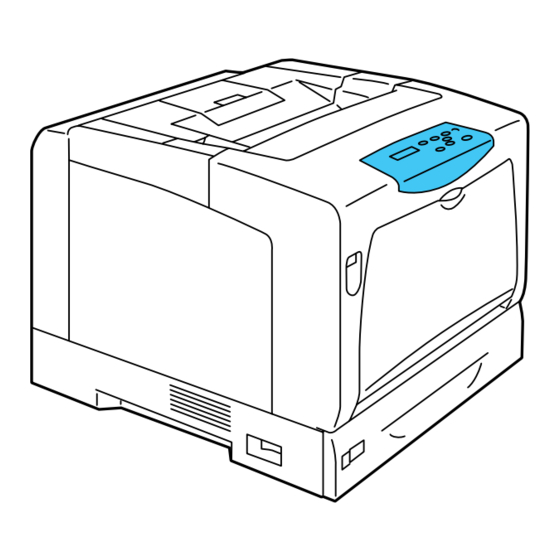
Basic Operation Main Components and Functions Main Unit Front/Left View Name Description Top cover Opened when replacing the toner cartridges. Ventilation hole Releases heat to prevent the interior of the printer from overheating. Important • Do not place any objects on the ventilation hole. Locking the ventilation hole causes heat build-up in the printer, which causes the printer to malfunction. - Page 34 Description Button B Pressed to open the front cover when installing the duplex unit (if your printer is the DocuPrint C3055) or clearing paper jams. Rear cover Removed when installing the optional hard disk, a memory card, or a ROM.
- Page 35 Fuses toner onto paper by means of heat and pressure. Important • Do not touch the fuser unit while the printer is in operation. The fuser unit becomes very hot during printing. Duplex unit Enables 2-sided printing. This is optional for the DocuPrint C3055. 2.1 Main Components and Functions...
-
Page 36: Control Panel
Control Panel Name Description Indicator In the event of an error, use this to verify the location of the button indicated in an error message displayed on the LCD display. LCD display Displays the status of the printer, menu options, and messages. Refer to •... -
Page 37: Control Panel Display
Control Panel Display The display shows two types of screens: the print screen and menu screen. The print screen displays messages that show the status of the printer. The menu screen displays menus that allow you to set various settings for the printer. Note •... -
Page 38: Switching On/Off The Power
Switching On/Off the Power Switching On the Power Press the power switch to the <|> position. When the power is switched on, the display reads [Please wait...]. Wait until the message changes to [Ready to print]. Note • When the display reads [Please wait...], the printer is warming up and is not ready to print yet. -
Page 39: About The Earth Fault Interrupter
About the Earth Fault Interrupter The power cord set of the printer has an earth fault interrupter. In the event of current leakage, the interrupter automatically shuts off the flow of electric current to prevent any current leakage or fire from occurring. If the interrupter trips (if the <RESET>... -
Page 40: Setting/Exiting The Power Saver Modes
Setting/Exiting the Power Saver Modes The printer has a power saving feature which reduces power consumption during periods of inactivity. This feature operates in two modes: the Low Power mode and Sleep mode. As delivered, the printer switches to the Low Power mode 3 minutes after the receipt of the last print request. -
Page 41: Cancelling/Checking A Print Job
Cancelling/Checking a Print Job Cancelling a Print Job Print jobs can be cancelled either from your computer or on the control panel. Cancelling a Print Job being Processed on a Computer Double-click the printer icon on the task bar at the lower right corner of your monitor. -
Page 42: Importing Printer Information To A Print Driver
Importing Printer Information to a Print Driver If your printer is networked, you can import printer information (such as accessory configuration, sizes and types of paper in the paper trays) into your print driver using SNMP protocol. This can be done on the [Options] tab on your print driver. The following procedure is described based on Windows XP using the PCL print driver. -
Page 43: Print
Print This chapter describes various printing methods using a PCL print driver. Printing from a Computer This section outlines the basic procedure for sending print jobs from Windows applications. The following procedure uses Windows XP WordPad as an example. (The procedure may vary depending on the application being used.) On the [File] menu of your application, click [Print]. - Page 44 Print Features in the Properties Dialog Box The following introduces some of the print features available on each tab of the print driver. For details on each feature, refer to the online help provided for the print driver. Feature Paper/Output •...
-
Page 45: Printing On Envelopes
Printing on Envelopes This section describes how to print on envelopes. Loading Envelopes Envelopes can be printed only from the bypass tray. The printer can print on envelopes only on the address side, and not on the reverse side. The following types of envelopes can be loaded into the bypass tray. •... -
Page 46: Printing On Envelopes
Envelopes with Non-adhesive Flaps Load the envelope with the address side facing down and the edge with the flaps against you. Make sure that the flaps are open. Adjust the paper guides to the size of the envelopes. Note • When loading the envelopes in the tray, make sure that the flaps are completely open. - Page 47 Click the [Layout] tab, and then select the output paper size from [Output Size]. As necessary, click [Booklet/Poster/Mixed Document/Rotation], and in the displayed dialog box, set [Image Rotation (180deg)]. Click [OK] to close the dialog box. 10. Click [OK] to close the [Printing Preferences] dialog box. 11.
-
Page 48: Printing On Transparencies
Printing on Transparencies This section describes how to print on transparencies. Loading Transparencies Transparencies can be loaded in all paper trays. To Load Transparencies in the Bypass Tray Important • Transparencies with white borders or those for full-color printing cannot be used. Fan the transparencies, and load them in the bypass tray with the print side facing down. -
Page 49: Printing On Transparencies
Printing on Transparencies The following procedure uses Windows XP WordPad as an example. Note • The method of displaying the Properties dialog box varies depending on the application being used. Consult the documentation for your application. • Leaving printed transparencies in the output tray can cause them to stick together. Remove them from the tray every 20 prints or so and fan them to cool them off. - Page 50 On the [Layout] tab, select the output paper size from [Output Size]. Click [OK] to close the [Printing Preferences] dialog box. Click [Print] in the [Print] dialog box to start printing. 3 Print...
-
Page 51: Printing On Non-Standard Size Paper
Printing on Non-standard Size Paper This section describes how to load non-standard size paper in the paper trays. The paper trays can accommodate paper of the following sizes: Bypass Tray Trays 1 - 4 Paper feed direction paper feed direction length: length: 98 - 431.8 mm... - Page 52 Click [Custom Paper Size...]. Select an item from the [Details] list box. Under [Settings For:], specify the lengths for [Short Edge] and [Long Edge] by using the [ ] and [ ] keys or by directly entering the values. Note that the long edge cannot be shorter than the short edge. If giving a name to the paper size, select [Name Paper Size] and enter the name in [Paper Name] within 14 bytes.
-
Page 53: Printing On Non-Standard Size Paper
Printing on Non-standard Size Paper The following procedure uses Windows XP WordPad as an example. Important • Make sure to set paper sizes correctly. Setting wrong paper sizes can cause printer failure. Note • The method of displaying the Properties dialog box varies depending on the application being used. Consult the documentation for your application. - Page 54 Click the [Layout] tab, and from [Output Size], select the custom output size you registered. Click [OK] to close the [Printing Preferences] dialog box. Click [Print] in the [Print] dialog box to start printing. 3 Print...
-
Page 55: Printing By Changing The Paper Types Of The Trays 1 - 4
Printing by Changing the Paper Types of the Trays 1 - 4 The trays 1 - 4 accept plain paper and special media such as heavyweight paper, labels, and transparencies. This section describes how to print by changing the paper type setting of the tray 1, 2, 3, or The following procedures use Windows XP WordPad as an example. - Page 56 Click the [Layout] tab, and select the size of the output paper from [Output Size]. Click [OK] to close the [Printing Preferences] dialog box. Click [Print] in the [Print] dialog box to start printing. Printing by Setting the Paper Type on the Print Driver The following example shows how to print when the paper type of the tray 1 is set to “Plain Paper”, but the actual type of the paper loaded is “Bond Paper”.
- Page 57 Note • The paper type selected here is only valid for this job. This setting does not change the paper type setting on the control panel. From [Paper Size], select the size of the document to be printed. Click the [Layout] tab, and select the size of the output paper from [Output Size]. Click [OK] to close the [Printing Preferences] dialog box.
- Page 58 The [Paper/Output] tab appears. From [Paper Source], select [Auto]. From [Paper Type], select the desired paper type to be used. From [Paper Size], select the size of the document to be printed. Click the [Layout] tab, and select the size of the output paper from [Output Size]. Click [OK] to close the [Printing Preferences] dialog box.
-
Page 59: Printing Confidential Documents - Secure Print
Printing Confidential Documents - Secure Print - If your printer has the optional hard disk installed, you can use the Secure Print feature. Important • In case the hard disk fails, we recommend you to back up the hard disk data on your computer. Secure Print Feature Secure Print is a feature that allows you to send a password-protected document to the printer. - Page 60 The [Paper/Output] tab appears. From [Job Type], select [Secure Print]. The [Secure Print] dialog box appears. Enter your user ID into [User ID]. The user ID can be up to 8 bytes of alphanumeric characters. As necessary, enter a password into [Password]. The password can be up to 12 bytes of numeric characters.
- Page 61 Operations on the Control Panel The following explains how to print a Secure Print job stored in the printer. Note • When deleting a Secure Print job without printing, select [Delete] after Step 8 in the following procedure. • If the menu screen is left idle for 3 minutes, the display returns to the print screen. Any incomplete setting on the menu screen made 3 minutes before becomes invalid.
- Page 62 Press the < > button to accept the Report selection. Print and Delete A screen that allows you to set whether to delete or save the document after printing it is displayed. Note • If you want to delete the document without printing, press the <...
-
Page 63: Printing After Checking The Print Result - Sample Print
Printing After Checking the Print Result - Sample Print - If your printer has the optional hard disk installed, you can use the Sample Print feature. Important • In case the hard disk fails, we recommend you to back up the hard disk data on your computer. Sample Print Feature Sample Print is a feature that allows you to print a proof copy of a multi-set job and print the entire sets once the print result has been verified. - Page 64 Note • [Sample Print] becomes active if you specify “2” or a larger quantity for [Copies]. The [Sample Print] dialog box appears. Enter your user ID into [User ID]. The user ID can be up to 8 bytes of alphanumeric characters. From [Retrieve Document Name], select [Enter Document Name] or [Auto Retrieve].
- Page 65 Operations on the Control Panel The following explains how to print or delete a Sample Print job depending on its print result. Note • If the menu screen is left idle for 3 minutes, the display returns to the print screen. Any incomplete setting on the menu screen made 3 minutes before becomes invalid.
- Page 66 If printing the document, select the desired Specify Quantity option by pressing the < > button. 1 sets* Enter the print quantity using the < > button, and press the <Eject/Set> button to print the document. The printing starts. 3 Print...
-
Page 67: Printing Pdf Files Directly
PDF Bridge is a feature that comes standard with the printer. There are two methods of printing PDF files using the PDF Bridge feature: • Using ContentsBridge Utility (software by Fuji Xerox Co., Ltd.) • Using commands such as lpr and ftp Note •... -
Page 68: Printing Pdf Files Without Using Contentsbridge Utility
• "[PDF]" (P. 95) Note • On the DocuPrint C3055, [2 Sided Print] appears only when the duplex unit (optional) is installed. • When printing using lpr command, the print quantity must be set also using lpr command. In such case, the [Quantity] setting on the control panel becomes invalid. -
Page 69: Supported Operating Systems
In a command prompt, enter a command as follows. Example: A command for printing “event.pdf” when the printer’s IP address is 192.168.1.100. C:\>ftp 192.168.1.100 <Enter> key Connectedbto 192.168.1.100. 220 FUJI XEROX DocuPrint C3055 User (192.168.1.100:(none)): <Enter> key 331 Password required Password: <Enter> key 230 Logged is ftp>bin <Enter>... -
Page 70: Printing Using E-Mail - E-Mail Print
Printing Using E-mail - E-mail Print - If the printer is networked and set up for e-mail and TCP/IP communication, you can send e-mails to the printer. The printer can automatically print e-mails and PDF files attached to e-mails. This feature is called "E-mail Print". - Page 71 Item Setting Item Description Port Status E-mail Print Select [Enabled]. Protocol Settings Machine’s E-mail Set the printer's e-mail address. This address will appear > E-mail Address as "From:" on e-mails sent from the printer. SMTP Server Set the IP address of the outgoing e-mail server to be Address connected via SMTP protocol or the FQDN (Fully Qualified Domain Name).
-
Page 72: Sending E-Mails
Sending E-mails Supported E-mail Attachments Files of the following format can be attached to e-mails: • PDF files To Send E-mails To perform E-mail Print, enter the printer’s address in the “To:” field on your e-mail application. Then, enter the following commands in the subject field or in the body message and write the text or attach the PDF file you want to print. - Page 73 The following explains how to write commands in e-mails, using Outlook Express as an example. Here, we suppose that the printer’s e-mail address is "printer1@example.com" and [Password for Print Job] is “prtuser". To print the text in the body message: To print the document attached to the e-mail: Note •...
- Page 74 To Specify Commands in the Subject Field The following commands can be specified in the subject field. Command Description #Print xxx When [Password for Print Job] is set, make sure to enter a space (xxx: password) and then the password after the "#Print". When the password is not set, enter "#Print"...
-
Page 75: Precautions When Using The E-Mail Print Feature
Precautions When Using the E-mail Print Feature Security Precautions E-mail uses the Internet, a network connecting computers around the world, as its transmission medium. So, exchanging e-mails involves security risks, such as information leakage and tampering. When exchanging important or confidential information, we recommend you to use a method other than e-mail that guarantees security. -
Page 76: Paper
• G.S.M (gram per square meter) refers to a weight in grams of one square meter of paper. Paper Tray Paper Size Paper Type (G.S.M.) Maximum Capacity Bypass tray 155 sheets (Fuji Xerox Plain (60 - 80 g/m , B4 , A4 , B5 paper) or up to 17.5... - Page 77 Customer Support Center or your dealers. Paper for 2-Sided Printing The following sizes and types of paper can be used for 2-sided printing when using the duplex unit (optional for DocuPrint C3055). Paper Size Paper Type Plain (60 - 80 g/m...
- Page 78 Recommended/Tested Paper The following paper or media are recommended or have been tested with the printer. For information about other paper or media, contact our Customer Support Center or your dealers. Paper Type Product Name G.S.M. Description Menu Name Colortech+90 Bond The standard paper for this printer, for both 90 g/m...
-
Page 79: Unsupported Paper
Unsupported Paper Do not use the following types of paper or media. They can cause paper jams or printer failure. • Transparencies other than those recommended • Ink jet paper, ink jet transparencies, or ink jet postcards • Paper that is too heavyweight or too lightweight •... -
Page 80: Storing And Handling Paper
Storing and Handling Paper Paper stored in poor conditions can get deteriorated, resulting in paper jams, image quality problems, or printer failure. Use the following guidelines when storing paper. Paper Storage Environment • Temperature: 10 - 30°C • Relative humidity: 30 - 65% Paper Storage Guidelines •... -
Page 81: Loading Paper
Loading Paper This section explains how to load paper in the bypass tray or trays 1 - 4. Loading Paper in the Bypass Tray Important • Make sure to load paper when the power is on. • Do not load paper of different types simultaneously. •... - Page 82 Adjust the paper guides to the size of the paper. Important • Make sure that the guides are positioned just lightly against the paper. The guides that are too tight or too loose can cause paper jams. Note • Do not fill paper above the maximum fill-line. Doing so can cause paper jams.
-
Page 83: Loading Paper In The Trays 1 - 4
Loading Paper in the Trays 1 - 4 When loading paper longer than 14" (279.4 mm) such as B4, A3, and 11 x 17" in the tray 1, 2, 3 or 4, you must extend the tray. When the tray is extended, the extended portion sticks out from the back of the printer. - Page 84 Extend (or unextend) the tray until the lock released in Step 2 is locked automatically. (Example: The tray is extended.) Pinch the guide clip on the left side of the tray and slide it to the size of the paper. (Example: A4 landscape) Pinch the rear guide clip and slide it to the size of the paper.
-
Page 85: Extending The Extension Output Tray
Push the tray all the way into the printer. If the tray is extended, the extended portion sticks out from the back of the printer. Important • When inserting the tray, be careful not to get your fingers caught between the tray and the printer or other tray (if the optional sheet feeders are installed). -
Page 86: Changing The Paper Types Of The Trays 1 - 4
Changing the Paper Types of the Trays 1 - 4 Use the following procedure when changing the paper types of the trays 1 - 4. Press the <Menu> button on the control Menu panel to display the menu screen. Print Language Press the <... -
Page 87: Setting The Paper Sizes Of The Trays 1 - 4
Setting the Paper Sizes of the Trays 1 - 4 Use the following procedure when setting non-standard paper sizes for the trays 1 - 4. Note • If you changed the paper loaded in a tray from standard-size paper to non-standard-size paper, select [Auto] in Step 8. - Page 88 12. Press the <Eject/Set> button to confirm Portrait (Y) your entry. 431mm* 13. After entering the length, proceed to enter Tray 1 Custom the width. Portrait (Y) Return to [Portrait (Y)] by pressing the < > button. 14. Press the < > button. Tray 1 Custom [Landscape (X)] is displayed.
-
Page 89: Auto Tray Selection Feature
Auto Tray Selection Feature If you request a print job with [Paper/Output] > [Paper Source] set to [Auto] on your print driver, the printer automatically selects a paper tray based on the size and orientation of the document to be printed. This feature is called “Auto Tray Selection”. If there is more than one tray that is appropriate for the document, the printer checks the [Paper Priority] setting and selects a paper tray that contains the paper of the highest priority. -
Page 90: Control Panel Menus
[Print Language] (one of the common menus) and provide menu items specific for print language settings. Note • On the DocuPrint C3055, [PostScript] appears only when the PostScript software kit (optional) is installed. Common Menus... - Page 91 The following table describes the overview of the common menus. Common menu Description Reference Print Language [ESC/P] ESC/P Emulation Setting Guide Sets the ESC/P emulation mode. and PCL Emulation Setting Guide on the Driver CD Kit included with [PCL] the printer. Sets the PCL emulation mode.
-
Page 92: Changing The Settings
Changing the Settings Basic Procedure To display a menu screen or to move up and down the menus, use the following buttons on the control panel. Press to display the menu screen (print screen) (menu screen) <Menu> Ready to print Menu Print Language Press to display the menu items in the same hierarchy... -
Page 93: Setting Example
Setting Example: Changing the Power Saver Mode Setting Use the following procedure to set a value on the control panel. In this example, we will set [Low Power Timer] (an interval at which the printer switches to the Low Power mode) to [60 Minutes]. Press the <Menu>... - Page 94 10. The setting is now complete. Ready to print Press the <Menu> button to return to the [Ready to print] screen. 5 Control Panel Menus...
-
Page 95: Setting The Common Menus
Allows you to send PDF files directly to the printer using PDF Bridge that comes standard with the printer. The [PDF] settings will be used when printing PDF files without using ContentsBridge Utility (software by Fuji Xerox Co., Ltd.). Refer to • "3.8 Printing PDF Files Directly" (P. 67) - Page 96 Prints on both sides of paper so that the finished document opens like a calender. Note • On the DocuPrint C3055, [2 Sided Print] appears only when the duplex unit (optional) is installed. Print Mode Sets the print mode to one of the followings: •...
- Page 97 Prints four pages onto one sheet of paper. When this is selected, the output size will be A4. Note • To use [Booklet] on the DocuPrint C3055, the duplex unit (optional) must be installed. If the duplex unit is not installed, the printer only performs 1-sided printing.
- Page 98 [PostScript] Sets the settings related to PostScript. Note • On the DocuPrint C3055, [PostScript] appears only when the PostScript software kit (optional) is installed. Print Language PostScript PostScript PS Error Report PostScript PS Job Time-out PostScript Init PS Disk PostScript...
-
Page 99: [Report/List]
[Report/List] Allows you to print a variety of reports/lists. For details on the reports/lists and how to print them, refer to "7.2 Printing the Reports/Lists" (P. 171). Note • The reports/lists that can be printed vary depending on the options installed on your printer. For details, refer to "Types of the Reports/Lists"... - Page 100 Allows you to view data received from a computer by printing it in ASCII codes (hexadecimal format). (See *3 on P. 131.) Note • On the DocuPrint C3055, [PS] appears only when the PostScript software kit (optional) is installed. Adobe Protocol Sets the PostScript communication protocol.
-
Page 101: Port Status
Allows you to view data received from a computer by printing it in ASCII codes (hexadecimal format). (See *3 on P. 131.) Note • On the DocuPrint C3055, [PS] appears only when the PostScript software kit (optional) is installed. 5.2 Setting the Common Menus... - Page 102 Allows you to view data received from a computer by printing it in ASCII codes (hexadecimal format). (See *3 on P. 131.) Note • On the DocuPrint C3055, [PS] appears only when the PostScript software kit (optional) is installed. 5 Control Panel Menus...
- Page 103 Allows you to view data received from a computer by printing it in ASCII codes (hexadecimal format). (See *3 on P. 131.) Note • On the DocuPrint C3055, [PS] appears only when the PostScript software kit (optional) is installed. 5.2 Setting the Common Menus...
- Page 104 Allows you to view data received from a computer by printing it in ASCII codes (hexadecimal format). (See *3 on P. 131.) Note • On the DocuPrint C3055, [PS] appears only when the PostScript software kit (optional) is installed. 5 Control Panel Menus...
- Page 105 Allows you to view data received from a computer by printing it in ASCII codes (hexadecimal format). (See *3 on P. 131.) Note • On the DocuPrint C3055, [PS] appears only when the PostScript software kit (optional) is installed. 5.2 Setting the Common Menus...
- Page 106 Allows you to view data received from a computer by printing it in ASCII codes (hexadecimal format). (See *3 on P. 131.) Note • On the DocuPrint C3055, [PS] appears only when the PostScript software kit (optional) is installed. 5 Control Panel Menus...
-
Page 107: Snmp Settings
[E-mail Printing] Set whether to use the E-mail Printing feature. Network / Port E-mail Printing E-mail Printing Port Status Setting Item Description E-mail Printing Sets whether to enable or disable the E-mail port at printer start-up. • [Enable] (default) • [Disable] Note •... - Page 108 [TCP/IP] Set this when using the TCP/IP port. Network / Port TCP/IP TCP/IP Get IP Address TCP/IP IP Address TCP/IP Subnet Mask TCP/IP Gateway Address Setting Item Description Get IP Address Sets the method of obtaining the information (the IP address, subnet mask, or gateway address) required to use the TCP/IP protocol.
-
Page 109: Internet Services
[Internet Services] Set whether to use the Internet Services port. Selecting [Enable] allows you to use CentreWare Internet Services. CentreWare Internet Services allows you to monitor or remotely configure the printer using a web browser on your computer. Network / Port InternetServices InternetServices Port Status... - Page 110 [Bonjour] Set whether to use the Multicast DNS feature. Note • [Bonjour] appears only when the network expansion card (optional) is installed. Network / Port Bonjour Bonjour Port Status Setting Item Description Port Status Sets whether to enable or disable the Bonjour port at printer start-up. •...
-
Page 111: Network Settings
Uses the SNAP frame type. Note • After changing this setting, reboot the printer. [Network Settings] Note • On the DocuPrint C3055, [Network Settings] appears only when the PostScript software kit (optional) is installed. Network / Port Network Settings Network Settings... - Page 112 [IP Filter] Set this when controlling data reception by IP addresses. Note • [IP Filter] can be set also on CentreWare Internet Services. For details, refer to "Controlling Data Reception by IP Address" (P. 184). Network / Port IP Filter IP Filter No.1/Address IP Filter...
-
Page 113: System Settings
[HTTP-SSL/TLS] Set this when encrypting HTTP communication using SSL/TLS protocol. [HTTP-SSL/TLS] appears only when a certificate is registered on the printer. Note • For details on encrypting HTTP communication and a certificate required for the printer, refer to "SSL Data Encryption for HTTP Communication" (P. 179). •... - Page 114 Setting Item Description Control Panel Sets whether or not to generate an audio tone when the correct button is pressed on the control panel. • [On] (default) • [Off] Invalid Key Sets whether or not to generate an audio tone when the wrong button is pressed on the control panel, or when an operation is attempted during an error.
-
Page 115: Panel Settings
[Panel Settings] System Settings Panel Settings Panel Settings Panel Lock Panel Settings Change Password Setting Item Description Panel Lock Sets a password to control access to the menus. • [Off] (default) • [On] Change Password Allows you to change the password. Enter a new password (4-digit number). The password takes effect when the first and second entries match. -
Page 116: Sleep Mode
[Sleep Mode] Note • This item does not appear on the model available in China. The Sleep mode cannot be disabled on the Chinese model. System Settings Sleep Mode Setting Item Description Sleep Mode Consumes less electricity than the Low Power mode. Set whether or not to enable this feature. -
Page 117: Banner Sheet
Sets whether to print the reports/lists 1-sided or 2-sided. • [1 Sided] (default) • [2 Sided] Note • On the DocuPrint C3055, [2 Sided Report] appears only when the duplex unit (optional) is installed. [Banner Sheet] System Settings Banner Sheet... - Page 118 [mm/inch] System Settings mm/inch Setting Item Description mm/inch Sets the unit of measure for length that will be displayed or entered on the con- trol panel. • [Millimeters (mm)] (default) Indicates length in millimeters (mm). • [Inch (")] Indicates length in inches ("). [Print Auditron] System Settings Print Auditron...
-
Page 119: Secure Print
[Secure Print] Note • [Secure Print] appears only when the hard disk (optional) is installed. System Settings Secure Print Secure Print ActivateFeature Secure Print Interrupt Print Setting Item Description Activate Feature Sets whether to permit printing of Secure/Sample Print jobs from the control panel. -
Page 120: Printer Settings
[Printer Settings] The [Printer Settings] menu allows you to set paper trays and the Auto Tray Selection feature. [Substitute Tray] Printer Settings Substitute Tray Setting Item Description Substitute Tray Sets whether to switch to another paper tray if the paper tray selected by Auto Tray Selection runs out of paper. -
Page 121: Bypass Mode
[Bypass Mode] Printer Settings Bypass Mode Setting Item Description Bypass Mode Sets how to specify a paper size and type for the bypass tray. • [Panel Specified] Allows users to specify a paper size and type on the control panel. Documents will be printed only when the values specified on your print driver and those on the control panel match. -
Page 122: Paper Priority
Setting Item Description Bypass Tray Sets the type of the paper loaded in the bypass tray. • [Plain Paper] (default), [Recycled Paper], [Bond Paper], [Transparency], [Heavyweight 1], [Heavyweight 2], [Labels], [Coated 1] to [Coated 3], [Envelope], [Postcard], [Plain S2], [Recycled S2], [Bond S2], [Heavyweight 1 S2], [Heavyweight 2 S2], [Coated 1 S2] - [Coated 3 S2], [Postcard S2], [1. -
Page 123: Tray Priority
[Tray Priority] Printer Settings Tray Priority Tray Priority Tray Priority Tray Priority Setting Item Description 1st to 3rd Sets the priority order of the paper trays. This setting will be used by the Auto Tray Selection feature. You cannot assign a priority order to the bypass tray. •... - Page 124 Setting Item Description Bypass Sets the paper size for the bypass tray. • [A3], [B4], [A4-P], [A4-L], [Driver] (default), [B5], [A5], [11x17], [8.5x13], [8.5x14], [7.2x10.5], [8.5x11-P], [8.5x11-L], [4.1x9.5], [3.9x7.5], [110x220mm], [162x229mm], [100x148mm], [148x200mm], [120x235mm], [Younaga3], [114x162mm], [98x148mm], [105x235mm] • [Custom] Sets the length and width of the paper loaded in the bypass tray.
- Page 125 [Paper Name] Printer Settings Paper Name Paper Name 1. [User1 ]* Paper Name 2. [User2 ]* Paper Name 3. [User3 ]* Paper Name 4. [User4 ]* Paper Name 5. [User5 ]* Setting Item Description [1. User 1] to Sets the names for [1. User 1] to [5. User 5] that are displayed under [Paper [5.
-
Page 126: Default Paper Size
[Default Paper Size] Printer Settings DefaultPaperSize Setting Item Description Default Sets the default of [Paper Size] for the PDF print mode. Paper Size • [A4] (default) • [8.5 x 11] [Size Conflict] Printer Settings Size Conflict Setting Item Description Size Conflict Sets the action to be taken if the specified output size does not match the size of the paper loaded in the requested paper tray. -
Page 127: Maintenance Mode
[Maintenance Mode] The [Maintenance Mode] menu allows you to perform maintenance tasks. [Adjust Paper Type] Maintenance Mode Adjust PaperType Adjust PaperType Plain Paper Adjust PaperType Labels Setting Item Description Plain Paper Sets the type of plain paper. • [Light] • [Heavy] (default) Labels Sets the type of labels. - Page 128 [Calibration] If colors look off after relocating the printer, or after replacing the drum cartridge, print the Calibration Chart to perform color calibration. For details on color calibration, refer to "7.9 Adjusting Color Density" (P. 194). Maintenance Mode Calibration Calibration Chart Print Calibration Enter Value...
-
Page 129: Print Adjustment
[Print Adjustment] Maintenance Mode Print Adjustment Print Adjustment Image Quality Print Adjustment Registration Setting Item Description Image Quality If you print a monochrome page after a color page, the image on the color page can get printed on the monochrome page. Setting this feature to [On] prevents such problem, but prints at a slower print speed. - Page 130 [Init/Del Data] The [Init/Del Data] menu allows you to initialize the settings stored in the NV memory, network ports, and hard disk, and delete data such as forms registered on the printer. Note • Executing initialization returns the settings to their default values. Admin Menu Init/Del Data Init/Del Data...
-
Page 131: [Replace Toner]
[Replace Toner] Menu Replace Toner Replace Toner Cyan [C] Replace Toner Magenta [M] Replace Toner Yellow [Y] Replace Toner Black [K] Setting Item Description Cyan [C], Moves a toner cartridge to the replacement position. Magenta [M], Refer to Yellow [Y] •... -
Page 132: Troubleshooting
Troubleshooting If you encounter a problem while using this printer and have trouble solving the problem, see if any of the symptoms in the following pages matches your problem. If your problem is described in the following pages, apply the suggested solution provided for the problem. - Page 133 CAUTION • When removing jammed paper, make sure that no pieces of torn paper are left in the machine. A piece of paper remaining in the machine can cause fire. If a sheet of paper is wrapped around the heat roller, or when clearing a jammed paper that is difficult or impossible to see, do not try to remove it by yourself.
-
Page 134: Paper Jams In The Bypass Tray
Paper Jams in the Bypass Tray Leave the jammed paper where it is and remove the rest of the paper from the bypass tray. Push up the lever A and open the front cover. Important • When opening the front cover with the bypass tray cover opened, be careful not to get your fingers caught between (the left or right edge of) the bypass tray cover and the front cover. -
Page 135: Paper Jams In The Trays 1 - 4
Paper Jams in the Trays 1 - 4 If paper is loaded in the bypass tray, remove the paper and close the bypass tray cover. Important • When closing the bypass tray cover, be careful not to get your fingers caught between (the left or right edge of) the cover and the printer. - Page 136 Remove any jammed paper. Make sure no torn pieces remain inside. Close the front cover. Important • When closing the front cover, be careful not to get your fingers caught between (the left, right, top, or bottom edge of) the cover and the printer. Push the tray all the way into the printer.
-
Page 137: Paper Jams In The Fuser Unit
Paper Jams in the Fuser Unit Lift up the levers on both sides of the fuser unit. Important • The fuser is hot. Do not touch any parts other than the levers. Otherwise, you can get burnt. Hold the lever E on the left side of the fuser cover and open the fuser cover. -
Page 138: Paper Jams Behind The Fuser Unit
Paper Jams Behind the Fuser Unit Push down the levers on both sides of the fuser unit toward the back of the printer, and remove the jammed paper. Important • The fuser is hot. Do not touch any parts other than the levers. - Page 139 If paper is jammed inside the fuser unit, hold the projection on its right side and open the duplex unit cover. Lift up the levers on both sides of the fuser unit. Important • The fuser unit is hot. Do not touch it or you will get burnt.
-
Page 140: Hardware Problems (Power Failure, Abnormal Noise, Etc.)
Hardware Problems (Power Failure, Abnormal Noise, etc.) WARNING • Never open or remove machine covers that are secured with screws unless specifically instructed in the related manuals. A high voltage component can cause electric shocks. • Do not try to alter the machine configuration, or modify any parts. An unauthorized modification can cause smoke or fire. -
Page 141: Printing Problems
Printing Problems Symptom Cause/Remedy The <Error> lamp is blinking. An error that cannot be resolved by users occurred. Copy down the error message or error code displayed on the control panel, switch the power off, unplug the power code from the power outlet, and contact our Customer Support Center or your dealers. The <Error>... - Page 142 Symptom Cause/Remedy Printing takes too much time. Is the [Graphics] tab > [Print Mode] on your print driver set to [High Quality]? Changing the [Print Mode] setting to [Standard] may improve print speed. Refer to • Online help for the print driver Printing may take time depending on the printing method for TrueType fonts.
-
Page 143: Print Quality Problems
Print Quality Problems Symptom Cause/Remedy Output is too light. The paper is damp. Load fresh paper. (faded or unclear) The paper is not appropriate for the printer. Load appropriate paper. Refer to • "Supported Paper" (P. 76) The drum cartridge or the fuser unit is damaged or deteriorated. The drum cartridge or fuser unit may need replacement depending on its condition. - Page 144 Symptom Cause/Remedy Streaks appear inside or The paper that had been stored unwrapped for an extended period of time (especially in outside of halftone images. low humidity condition) may be used. Load fresh paper. Shadow is printed around The paper is not appropriate for the printer. Load appropriate paper. solid-filled images Refer to •...
- Page 145 Symptom Cause/Remedy Output is partially blanked-out. The paper is not appropriate for the printer. Load appropriate paper. Vertical white streaks appear on output. Refer to • "Supported Paper" (P. 76) The paper is damp. Load fresh paper. The drum cartridge or transfer roll cartridge is not installed correctly. Correctly install the drum cartridge or transfer roll cartridge.
- Page 146 Symptom Cause/Remedy Texts are garbled. The data was printed using a font that does not come standard with the printer. Check Output printed is not the same the font used by the application. If using PostScript, download fonts as necessary. as the original data displayed Isn’t the printer set to substitute TrueType fonts with the built-in fonts? on your computer screen.
-
Page 147: Paper Feeding Problems
Paper Feeding Problems Symptom Cause/Remedy Paper does not feed properly. Is the paper loaded correctly? Reload the paper correctly. Before loading labels, transparencies, postcards, or Paper jams occur. envelopes, fan them to make sure that they are separated. Isn't the paper damp? Multiple sheets feed at once. -
Page 148: Error Messages And Error Codes
Error Messages and Error Codes Error Messages (in Alphabetical Order) The following table lists the error messages that appear on the control panel. Note • When a message cannot be displayed in one screen, the display switches between two or three screens to display the entire message. - Page 149 Message Symptom/Cause/Remedy Install X Load the X toner cartridge and close the top cover. If you close the top cover, the Toner then cartridge slot rotates allowing you to install the next cartridge. Refer to Close Top Cover • "Replacing the Toner Cartridges" (P. 164) (X: Black Cyan, Magenta, or Yellow) Invalid feature...
- Page 150 Message Symptom/Cause/Remedy Magenta Toner The toner cartridge is not appropriate for the printer. ID Error Use an appropriate toner cartridge and install it correctly in the printer. Refer to Press SET • "Replacing the Toner Cartridges" (P. 164) Replace Toner •...
- Page 151 Message Symptom/Cause/Remedy Open Tray N A paper jam occurred in the printer. Clear Jam Pull out the tray N to identify the jammed area, and remove the jammed paper. Then, push up the lever A and open and close the front cover. Open the front cover even then when there is no jammed paper inside the cover.
- Page 152 Message Symptom/Cause/Remedy Ready to print The part needs to be replaced soon. Replace (***-***) Copy down the "***-***" and contact our Customer Support Center or your dealers. Refer to • "Error Codes" (P. 154) Ready to print The toner in the X toner cartridge is low. Have a new cartridge ready. X Toner Ready to print Replace soon...
- Page 153 Message Symptom/Cause/Remedy Wrong paper size The job requested the tray N, but the paper size of the tray does not match the paper Reload Tray N size specified by the job. Change the paper size setting on the control panel. (N: tray 1 - 4) Refer to •...
-
Page 154: Error Codes
Error Codes Error codes are six-digit numbers that appear on the control panel when errors occur. Such errors include abnormal print jobs and printer malfunction. Error codes are important information that identifies the causes of errors. Please have error codes ready when calling our Customer Support Center or your dealers. error code The following table lists the error codes that can be resolved by users. - Page 155 Error Code Cause/Remedy 091-321 The drum cartridge is not installed in the correct location. Remove the drum cartridge, reboot the printer, and then reinstall the drum cartridge. 093-310 The toner cartridges are not installed in the correct position. Remove the toner cartridges, reboot the printer, and then reinstall the toner cartridges.
-
Page 156: Network-Related Problems
Network-related Problems For information on how to resolve network-related printing problems, refer to the ‘CD-ROM Documentation (HTML)’ on the CD-ROM of the Driver CD Kit. The followings are the problems you may encounter when using CentreWare Internet Services, E-mail Print, or StatusMessenger. When an error message or error code is displayed, refer to "6.6 Error Messages and Error Codes"... - Page 157 Symptom Cause/Remedy The [Refresh] button does not Is your operating system or web browser supported by CentreWare Internet work. Services? The contents in the right frame Refer to"1.5 Configuring the Printer Using CentreWare Internet Services" (P. 28) to does not change even when a see if your operating system or web browser is supported by the service.
-
Page 158: E-Mail Print/Statusmessenger Problems
E-Mail Print/StatusMessenger Problems Symptom Cause/Remedy Cannot check the printer's status Check to see if [Properties] > [Port Status] > [StatusMessenger] or [E-mail Print] on via e-mail. CentreWare Internet Services is set to [Enabled]. (StausMessenger) Check the following settings under [Properties] > [E-mail] on CentreWare Internet Services. -
Page 159: Non-Condensing Mode
Non-condensing Mode The Non-condensing mode allows you to reduce dew condensation in the printer. Sudden changes in temperature and/or humidity (such as rapid heating of a cold room using a heater, or early morning hours in winter) can cause dew condensation in the printer, resulting in poor print quality or paper jams in the fuser unit. -
Page 160: Non-Genuine Mode
Non-genuine Mode When the toner within a toner cartridge is empty, the [Replace X Toner Cartridge] (X: Black, Cyan, Magenta, or Yellow) message appears. When you want to use the printer in Non-genuine mode, use the following procedure to program the mode and replace the toner cartridge. Important •... -
Page 161: Maintenance
Toner cartridge 6.5 K (magenta) CT200807 Approx. 6,500 pages Toner cartridge 6.5 K (yellow) CT200808 Approx. 6,500 pages DocuPrint C3055 China Toner (K) 6.5K (for China only) CT200895 Approx. 6,500 pages DocuPrint C3055 China Toner (C) 6.5K (for China only) CT200896 Approx. 6,500 pages DocuPrint C3055 China Toner (M) 6.5K (for China only) -
Page 162: Drum Cartridge
Drum Cartridge The drum cartridge consists of a photosensitive drum (drum), an intermediate transfer belt, and a waste toner box. An electric charge is first projected to the drum and develops a print image on the drum's surface. For information on when and how to replace the drum cartridge, refer to "Life of Consumables and Regular Replacement Parts"... -
Page 163: Handling Consumables
Handling Consumables • Do not store consumables upright. • Do not unpack consumables/maintenance parts until they are ready to be used. • Avoid storing consumables/maintenance parts in the following locations: • in high temperature and humidity • near heat sources •... -
Page 164: Replacing The Toner Cartridges
Replacing the Toner Cartridges The printer has toner cartridges of four colors: black (K), yellow (Y), magenta (M), and cyan (C). When a toner cartridge is near or reaches the end of its life, the following messages appear on the printer’s control panel. Message Action Ready to print... -
Page 165: Replacement Procedure
Replacement Procedure Use the following procedure when replacing the toner cartridges. The replacement procedure when the [Replace X Toner Cartridge] (X: Black, Cyan, Magenta, or Yellow) message is displayed differs from that when the [Replace soon] message is displayed on the control panel. Make sure that the printer's power is on and check the message on the control panel. - Page 166 Place your fingers into the inset grip on the left side of the top cover, and lift the cover open. Rotate the lever on the right side of the toner cartridge to the front, and align the mark on the cartridge with the mark on the printer.
- Page 167 13. Hold the toner cartridge horizontally with the label facing front (toward the control panel). The side that indicates the toner color comes to the left. Insert the cartridge into the printer, aligning the arrow on its left side with the arrow on the printer.
-
Page 168: Replacing The Drum Cartridge
Replacing the Drum Cartridge When the drum cartridge is near or reaches the end of its life, the following messages appear on the printer’s control panel. Message Action Ready to print The drum cartridge does not need to be replaced right Drum Cartridge away, but have a new drum cartridge ready. - Page 169 Replacement Procedure Use the following procedure to replace the drum cartridge and to clean inside the printer. If paper is loaded in the bypass tray, remove the paper and close the bypass tray cover. Important • When closing the bypass tray cover, be careful not to get your fingers caught between (the left or right edge of) the cover and the printer.
- Page 170 Remove the new drum cartridge out of the box and take off the protective sheet. Important • Do not touch the surface of the intermediate transfer belt (black portion on the bottom) or the photosensitive drum (blue portion on the back side). Scratches, dirt, or oil from your hands can decrease print quality.
-
Page 171: Printing The Reports/Lists
(PCL Font List) PostScript Lists the supported PostScript fonts. PostScript Font List software kit (PS Font List) (DocuPrint C3055 only) User Defined List Lists the forms, logos, patterns registered in the ESC/P mode. (User Defined) 7.2 Printing the Reports/Lists... - Page 172 Lists the settings of the logical printers 1 - 5 created in PostScript. PostScript Logical Printers software kit List (DocuPrint C3055 Note (PS Logical) only) • Logical printers can be created using CentreWare Internet Services. For more information, refer to the online help for CentreWare Internet Services.
-
Page 173: Printing A Report/List
Printing a Report/List The reports/lists can be printed using the control panel. The following shows how to print the [Printer Settings] list. The procedure is the same also for other reports/lists. Note • The reports/lists are printed on A4 size paper. Press the <Menu>... -
Page 174: Monitoring/Managing The Printer On A Web Browser
Monitoring/Managing the Printer on a Web Browser When your printer is installed in a TCP/IP environment, you can monitor or remotely configure the printer using a web browser on a networked computer. This feature is called CentreWare Internet Services. CentreWare Internet Services can be used also to check the status of consumables and the paper levels of the paper trays. -
Page 175: Checking The Printer Status Via Simplemonitor
Checking the Printer Status via SimpleMonitor SimpleMonitor is a tool that allows you to check the status of print jobs when your printer is local or when it is connected to an LPD port. This tool runs on Windows operating systems and can be installed from the CD-ROM of the Driver CD Kit included with the printer. -
Page 176: Checking The Printer Status Via E-Mail
Checking the Printer Status via E-mail If your printer is networked and set up for e-mail and TCP/IP communication, you can perform the following. This feature is called “StatusMessenger”. • If you send the printer an e-mail asking for the its status, the printer sends you the information by e-mail. -
Page 177: Setting The Statusmessenger Feature
Setting the StatusMessenger Feature To use the StatusMessenger feature, you must configure the network and e-mail environments of the printer. Ask your network administrator to find out if the following settings have been configured. Network Environment • Create an e-mail account E-mail Environment (Printer) Use CentreWare Internet Services to configure ports, an e-mail server, and the printer's e- mail address. -
Page 178: Checking The Printer Status Via E-Mail
Checking the Printer Status via E-mail Follow these guidelines when sending an e-mail to the printer. • Use the e-mail application on your computer and enter the printer's e-mail address in the "To:" field. • The subject can be whatever you like. •... -
Page 179: Security Features
Security Features This section explains various security features of the printer and how to configure them. The information in this section is intended for the system administrator of the printer. For details on each feature, refer to the reference pages in the following table. Feature Description Refer to... - Page 180 To Enable Data Encryption The following explains how to create a certificate on CentreWare Internet Services and set various settings required to enable data encryption. For more information, refer to the online help provided for CentreWare Internet Services. Note • If you install the network expansion card (optional) used on this printer to another printer, the certificate created for this printer will be deleted and the settings for SSL/TLS server communication will become invalid.
- Page 181 On the displayed page, set [Public Key Size] and click the [Generate Certificate] button. A page that allows you to reboot the printer is displayed. On the page, click the [Reboot Machine] button. After rebooting the printer, refresh your browser window. From the menu on the left, click [SSL/TLS Server Communication] again and display the [SSL/TLS Server Communication] page.
- Page 182 11. Set [SSL/TLS Server Communication Port Number]. Note • The SSL/TLS port number should not be the same as the HTTP port number. 12. Click the [Apply] button and reboot the printer. Accessing CentreWare Internet Services when Data Encryption is Enabled When data encryption is enabled, enter "https"...
- Page 183 Select [Connect to a printer on the Internet or on a home or office network], and then enter the following URL into [URL]: https://IP_Address/ipp/ (where IP_Address is the IP address of the printer). Click [Next]. Click [Have Disk]. In the dialog box displayed, enter the following path: x:\Art_ex\Win2000_XP (where x is the CD-ROM drive.) Click [OK].
-
Page 184: Controlling Data Reception By Ip Address
Controlling Data Reception by IP Address When the printer uses an LPD port or Port9100 port, the printer can deny or accept data from certain IP addresses. The following explains how to set this feature using CentreWare Internet Services. Note •... - Page 185 To reject printing from a specific user: Example: Reject printing from “192.168.100.50” To permit printing from a specific network address, reject printing from a particular address within the network, but permit printing from a particular user within the rejected address: Example: (1) Permit printing from “192.168.200.10”...
-
Page 186: Checking The Meter Reading
Checking the Meter Reading The printer can count the number of printed pages/sheets by different categories such as output color and computer. Checking the Meter Reading by Output Color (Meter) The meter information can be checked for each output color. The total number of prints for each output color can be viewed on the control panel. -
Page 187: Checking The Meter Reading By Computer (Meter Report)
Checking the Meter Reading by Computer (Meter Report) The [Meter Report] shows the number of printed page/sheets in both color and monochrome for each computer (job owner). The [Meter Report] can be printed from the control panel. Note • When the Authentication and Auditron Administration features are enabled, you can print the [Auditron Report] instead of the [Meter Report]. -
Page 188: Authentication And Auditron Administration Features
Authentication and Auditron Administration Features The printer provides the Authentication and Auditron Administration features. The Authentication feature controls access to the printer's features. Whereas the Auditron Administration feature manages the use of each printer’s feature. This section briefly explains the overview of the Authentication and Auditron Administration features and the settings required for both features. -
Page 189: Configuring The Authentication And Auditron Administration Features
Auditron Administration Feature When the Authentication and Auditron Administration features are enabled, you can print the [Auditron Report] instead of the [Meter Report]. The [Auditron Report] lists the number of monochrome and color pages /sheets printed to date by each user. Note •... -
Page 190: Registering Login Information On The Printer
Registering Login Information on the Printer The following briefly explains how to enable the Authentication feature on CentreWare Internet Services and register users who are permitted to use the printer. For details about each setting item, refer to the online help for CentreWare Internet Services. Launch your web browser and access CentreWare Internet Services. - Page 191 Verify that [User Account] is displayed on the [Print Auditron] page. Click [Edit User Account]. 10. On the [Edit User Account] page, enter [User Account Number] and click [Edit]. 7.8 Authentication and Auditron Administration Features...
- Page 192 11. On the displayed page, enter each field and click [Save]. Note • The user ID and password set on this page will be used also on your print driver. 12. If registering more than one user, click the [back] button and repeat Steps 10 and 11. Registering the Login Information on the Print Driver (Computer) Configure the following settings under the Properties dialog box on your print driver.
- Page 193 On the [Configuration] tab, click [Detailed User Settings] to display the [Detailed User Settings] dialog box. Set each item, and then click [OK] to close the dialog box. Click [OK] to close the Properties dialog box. 7.8 Authentication and Auditron Administration Features...
-
Page 194: Adjusting Color Density
Adjusting Color Density When colors look off, adjust the color density by performing color calibration. Color calibration allows you to maintain the consistency of print quality. To perform color calibration, print the Calibration Chart from the printer, compare the chart with the supplied “Color Sample for gray level correction”... -
Page 195: Performing Calibration
Performing Calibration Printing the Calibration Chart The Calibration Chart can be printed from the bypass tray on A4 paper. Press the <Menu> button on the control Menu panel to display the menu screen. Print Language Press the < > button until [Admin Menu] is Menu displayed. - Page 196 Fold the Calibration Chart along the guide (dotted line) of the color to be adjusted. Align the density area to be adjusted on the Calibration Chart with that on the Color Sample. (Example: low density (L); when adjusting the low density area, align the “Low” on the Calibration Chart with the “Low”...
- Page 197 Enter the margin in the appropriate [Margin] box. Obtain the margin for the other two density areas. Repeat Steps 1 to 5 to obtain the density margins for the rest of the colors. After entering the density margins of all colors, enter the values in the appropriate [Margin] boxes under [Computation Table].
- Page 198 Entering the Density Values Set the values entered in [Adjustment Value] on the Calibration Chart using the control panel. The following shows how to set the high density cyan to “-2”. Press the <Menu> button on the control Menu panel to display the menu screen. Print Language Press the <...
- Page 199 12. After entering the values, press the <Eject/ Cyan Set> button to confirm your entry. L= 0,M= 0,H=-2* 13. When adjusting the density of other colors, return to Step 9 by pressing the < > button and repeat the same steps. 14.
-
Page 200: Adjusting The Image Transfer Voltage
7.10 Adjusting the Image Transfer Voltage If the following problems occur frequently, the image transfer voltage may not be appropriate. Complete the following steps to adjust the voltage. • White patches appear on images (reduce the voltage) • Toner scatters around images (increase the voltage) •... - Page 201 11. Press the <Eject/Set> button to confirm Bond Paper your entry. 12. When adjusting the transfer voltage for other paper types, press the < > button to return to Step 8, and repeat the same steps. 13. When the setting is complete, press the <Menu>...
-
Page 202: Cleaning The Printer
7.11 Cleaning the Printer This section explains how to clean the printer to keep it in good condition and to ensure optimum print quality. CAUTION • Be sure to switch off and unplug the machine before accessing the interior of the machine for cleaning, maintenance, or fault clearance. -
Page 203: Cleaning Procedure
If you experience the following problems, clean the part of the printer indicated in the table. Symptom Cleaning Area Refer to White vertical patches appear on output. Printer interior "Cleaning Procedure" (P. 203) Paper does not feed through (this hap- Feed rolls "Cleaning the Feed Rolls"... - Page 204 Gently wipe the glass window at the back of the cartridge slot with a soft dry cloth. Hold the drum cartridge by the handles with both hands. Gently insert the drum cartridge in the printer, aligning the projections marked with arrows on both sides with the arrow labels on the printer.
-
Page 205: Cleaning The Feed Rolls
Cleaning the Feed Rolls If you load postcards with pre-printed pictures, the anti set-off powder sticks to the feed rolls, preventing the postcards from being fed properly. If this happens, wipe the feed rolls thoroughly with soft, firmly wrung cloth moistened with water. The feed rolls can be found in the following locations. -
Page 206: Feed Roll Inside The Printer
Feed Roll Inside the Printer If paper is loaded in the bypass tray, remove the paper and close the bypass tray cover. Important • When closing the bypass tray cover, be careful not to get your fingers caught between (the left and right edge of) the cover and the printer. - Page 207 Feed Rolls for the Trays 1 - 4 The following explains how to clean the feed rolls for the tray 1. The procedure is the same for all trays. Pull out the tray until it stops. Hold the tray with both hands, lift it up slightly, and then pull it out completely.
- Page 208 Wipe the rubber part of both feed rolls thoroughly with a soft, firmly wrung cloth moistened with water. After cleaning the feed rolls, place them back on the printer. Place one of the feed short tab long tab rolls on the back shaft from the side with the short tab first.
- Page 209 Feed Roll for the Bypass Tray If paper is loaded in the bypass tray, remove the paper and close the bypass tray cover. Important • When closing the bypass tray cover, be careful not to get your fingers caught between (the left or right edge of) the cover and the printer.
- Page 210 Wipe the feed roll with a soft, firmly wrung cloth moistened with water. After cleaning the feed roll, place it back on the printer. Hold the feed roll with the flat side to the right and push it horizontally onto the shaft. Note •...
-
Page 211: Moving The Printer
CAUTION • The machine (including the consumables) weighs 41.6 kg/42.6 kg (DocuPrint C3055/ DocuPrint C3055 DX). When moving the equipment, make sure that there are three or more persons carrying it. • When lifting the machine, firmly grip the recessed areas on both sides of the machine with three or more persons. - Page 212 CAUTION • When unplugging the machine, grasp the plug instead of the cord. Forcibly pulling on a cord can damage it and cause fire or electric shocks. Push up the lever A and open the front cover. Press the orange button on the left to open the output tray cover.
-
Page 213: A.1 Main Specifications
8.5 x 11" (Letter), custom size paper (width: 210 - 297 mm; length: 148 - 431.8 mm) 2 Sided printing (optional for the DocuPrint C3055): A3, B4, A4, B5, A5, 11 x 17" (Ledger), 8.5 x 14" (Legal), 8.5 x 13" (Legal), 8.5 x 11" (Letter), 7.25 x 10.5" (Executive) Image loss: 4 mm from the top, bottom, left, and right edges A.1 Main Specifications... - Page 214 Bond (81 - 105 g/m ), Heavyweight 1 (106 - 163 g/m transparency (for monochrome), label 2 Sided Printing (optional for the DocuPrint C3055): Plain (60 - 80 g/m ), Recycled (60 - 80 g/m Bond (81 - 105 g/m...
- Page 215 Customer Support Center or your dealers. Mac OS 7.6.1 - 9.2.2 and Mac OS X 10.1.5/10.2.8/10.3.9/10.4 are supported. On the DocuPrint C3055, the above operating systems can be used only if the PostScript software kit (optional) is installed.
-
Page 216: Printable Area
When the bypass tray is closed and the paper tray is not extended. Weight DocuPrint C3055 41.6 kg (only the main unit including consumables) DocuPrint C3055 DX 42.6 kg (only the main unit including consumables) Printable Area Note • The actual printable area may vary depending on the printer control language. -
Page 217: Optional Accessories
Optional Accessories The following table lists the main accessories available for the printer. To purchase them, contact the dealer where you purchased the printer. Product C3055 Product Name C3055 Description Code Internal hard disk EL300586 Must be installed to use the following features: •... -
Page 218: Life Of Consumables And Regular Replacement Parts
Life of Consumables and Regular Replacement Parts Consumables Consumable Page Yield Toner cartridge 3K (included with the printer) Approx. 3,000 pages (black/cyan/magenta/yellow) Toner cartridge 6.5K Approx. 6,500 pages (black/cyan/magenta/yellow) Drum cartridge (including waste toner box) Approx. 24,000 pages Fuser unit Approx. -
Page 219: Obtaining The Product Information
• You can browse our web site also on the CD-ROM of the Driver CD Kit included with the printer. To access the web site, click [Fuji Xerox Web Site] on the startup window of the CD-ROM. • The URL of the driver download service page is as follows: http://www.fxprinters.com/... -
Page 220: Connecting The Printer To A Scanner (Associated Product)
Connecting the Printer to a Scanner (Associated Product) Connecting the printer to a scanner (associated product) allows you to use copy features on the printer. This section describes the guidelines for connecting the printer to a scanner and installing them using a scanner stand (associated product). Note •... - Page 221 Install the printer using the following steps: 1) Mount the printer or a sheet feeder to the cabinet or castor base. (Refer to the installation guide for each accessory.) 2) Plug the power cord to the printer. 3) Wrap the power cord around the cable hook on the cabinet or castor base. (Refer to the installation guide for the cabinet or castor base.) Power cord wrapped around the cable hook 4) Remove the two tape strips from the back of the earth fault interrupter on the power...
- Page 222 Unlock the castor stoppers. Hold the printer as in the figure and push it underneath the scanner stand. Important • When moving the printer, be careful not to step on its power cord. After moving the printer, lock the castor stoppers. Plug the other end of the USB cable connected to the scanner into the USB connector located on the rear side of the printer.
-
Page 223: Installing Additional Memory
Note • The DocuPrint C3055 DX comes with 256 MB memory already installed in the memory slot. WARNING • Never open or remove machine covers that are secured with screws unless specifically instructed in the related manuals. - Page 224 Loosen the two screws that secure the rear cover to the printer. Then, pull the rear cover forward and remove it from the printer. If another memory card is already installed, push the retaining clips on both ends in the outward direction and pull the memory card straight out.
- Page 225 Note • You can check whether the memory card is installed correctly by printing out the [Printer Settings] list. [Memory Capacity] under [General] shows the total memory capacity of the printer (which is the memory on the controller board (128 MB) plus the memory you just added). For information on how to print the [Printer Settings] list, refer to "...
-
Page 226: Notes And Restrictions
• To use the Secure Print/Sample Print feature, install the optional hard disk to the printer. • To use the DocuPrint C3055 as a PostScript printer, install the PostScript software kit (optional) to the printer. If installing the PostScript software kit, additional memory (optional) of 256 MB or above is recommended. -
Page 227: Glossary
Computer software designed to perform a specific task. Software for various needs, such as word processing, spreadsheets, graphics, and databases, are available. ART EX: A page description language developed by Fuji Xerox. ART IV: An acronym for Advanced Rendering Tool and is a printer control language developed by Fuji Xerox. -
Page 228: Full Color
Default: A particular settings or value for a variable that is assigned to the printer before it was shipped from the factory. Any settings or values cancelled or changed by users will return to the defaults when the NV memory is initialized. DHCP: An acronym for Dynamic Host Configuration Protocol. -
Page 229: Interface Cable
Interface: The surface or point where two things (systems) meet or touch each other. It is commonly used to describe a boundary between a computer and a printer, or that between a user and a device. The (electronic) specifications of an interface is sometimes just called "interface". Interface cable: A cable that is used to connect multiple devices together. -
Page 230: Print Driver
Windows Me, Windows 2000, Windows XP, and Windows Server 2003. To use this on Windows 98 or Windows Me, TCP/IP Direct Print Utility of Fuji Xerox is required. On Windows 2000, Windows XP, or Windows Server 2003, this can be used on the standard TCP/IP port monitor. -
Page 231: Web Browser
TCP/IP: A network protocol developed by DARPANET (Defense Advanced Research Project Agency NetWork). It is the standard protocol of the Internet and is supported by a variety of computer platforms, from personal computers to mainframes. Tone: A smoothness of colors represented by the number of gradation steps. The higher the number of gradation steps, the smoother the gradation of colors. -
Page 232: Index
Index Symbols, Numerics consumables checking toner levels....174 < >, < >, < >, and < > buttons ..36 drum cartridge . -
Page 233: Non-Standard Size Paper
fuser unit......35, 162 Network Settings..... . 111 network, setting network environment . - Page 234 print driver Secure Print feature ..44, 59, 119, 179 downloading ..... . . 219 security features .
-
Page 235: Control Panel Menu Tree
Control Panel Menu Tree Control Panel Menu Tree Print Menus The print menus appear on the display only when the optional hard disk is installed. < > button Ready to print Print Menu Select User ID Password+SET key Select Document Print and Delete Specify Quantity xxx sets... - Page 236 From B (bottom left) ([Network / Port] continued) Enable * , DHCP/Autonet * , DHCP, Network / Port Parallel Port Status TCP/IP Get IP Address Disable BOOTP, RARP, Panel Auto * , ESC/P, PDF, Print Mode IP Address, 000.000.000.000 * Enter when [Get IP Address] is [Panel] PS, PCL, HexDump Subnet Mask,...
- Page 237 From E (bottom left) ([System Settings] continued) System Settings Audio Tones Secure Print Enable * , Control Panel Off, ActivateFeature On * Disable Off, Invalid Key Off, Interrupt Print On * On * Machine Ready Off, On * Print Priority Disable * , Job Complete Off,...
- Page 238 From G (previous page) ([Printer Settings] continued) B * , C, S, T, A Paper Image Qual 1. User 1 - 5. User 5 Paper Name 1. User 1 - 1. User 1 * - 1 - 8 alphanumeric characters 5.
- Page 239 DocuPrint C3055/C3055 DX User Guide Fuji Xerox Printing Systems Co., Ltd. ME3677E2-1 November 2006 Copyright© 2006 Fuji Xerox Co., Ltd.