Table of Contents
Advertisement
Owner's Manual
CD-R/RW Master Recorder
L
POWER
MIN
MAX
MIN
MAX
USB
INPUT LEVEL
(KYBD ONLY)
PHONES
ACCESS
PLAY MODE
PROGRAM SET
REPEAT
R
OPEN/CLOSE
MIN
MAX
MEMORY
MEMORY SET
DISPLAY
LOCATE
SHIFT
1
2
3
space
ABC
DEF
CONTRAST
EDIT TIME
CLEAR
FILE SEL
4
5
6
+10
DIR SEL
GHI
JKL
MNO
REC RDY
7
8
9
0
PQRS
TUV
WXYZ
symbol
REC END
ABS 0
RECORD
PLAY
REWIND
STOP/HOME
438100
8588076000
EXIT/NO
PUSH
MENU/ENTER/YES
SKIP/CURSOR
F FWD
Advertisement
Table of Contents

Related Manuals for Fostex CR500


Summary of Contents for Fostex CR500
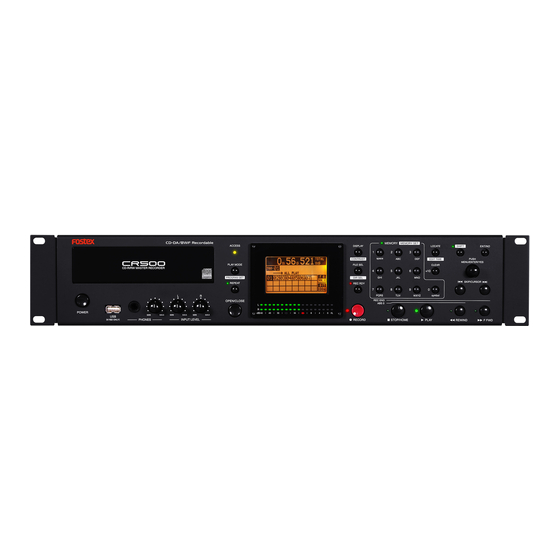
- Page 1 Owner’s Manual CD-R/RW Master Recorder PLAY MODE PROGRAM SET OPEN/CLOSE POWER INPUT LEVEL (KYBD ONLY) PHONES ACCESS DISPLAY space CONTRAST FILE SEL DIR SEL REPEAT REC RDY PQRS REC END ABS 0 RECORD 438100 8588076000 MEMORY MEMORY SET LOCATE SHIFT EXIT/NO PUSH EDIT TIME...
-
Page 2: Safety Instructions
CD-R/RW MASTER RECORDER CR500 (Safety instructions/Contents) CAUTION RISK OF ELECTRIC SHOCK DO NOT OPEN CAUTION: TO REDUCE THE RISK OF ELECTRIC SHOCK, DO NOT REMOVE COVER (OR BACK). NO USER - SERVICEABLE PARTS INSIDE. REFER SERVICING TO QUALIFIED SERVICE PERSONNEL. -
Page 3: Important Safety Instructions
CD-R/RW MASTER RECORDER CR500 (Safety instructions/Contents) Important Safety Instructions Read these instructions. Keep these instructions. Heed all warnings. Follow all instructions. Do not use this apparatus near water. Clean only with dry cloth. Do not block any ventilation openings. Install in accordance with the manufacturer's instructions. -
Page 4: Table Of Contents
CD-R/RW MASTER RECORDER CR500 (Safety instructions/Contents) Table of contents About this manual ...7 Precautions ...7 Precautions on installation ...8 Chapter-1 Overview ...9 Main features ...10 Chapter-2 Preparation before using the CR500 ...13 Power connection ...14 Realtime clock setting ...14 Initial format of a CD-R/RW disc ...16 Usable discs ...16... - Page 5 CD-R/RW MASTER RECORDER CR500 (Safety instructions/Contents) Connecting a sound source ...41 Selecting the input ...42 Adjusting recording levels ...42 Recording a WAV file ...44 Starting recording ...44 Stopping recording ...44 Checking the recorded audio file ...45 Playing back a recorded audio file ...45 Closing a disc ...46...
- Page 6 CD-R/RW MASTER RECORDER CR500 (Safety instructions/Contents) Playing back an ISO9660 formatted disc ...67 Locate/skip functions ...68 Locating an audio file (or audio track) ...68 Skipping between audio file (or audio track) ...69 Locating the specific ABS time ...69 Locating a point by entering a time ...70 Chapter-7 MENU mode ...71...
-
Page 7: About This Manual
About this manual This manual intends to be used as a guide for using the Fostex CR500 CD- R/RW master recorder. This manual is written assuming that you have experience of using pro- fessional digital recorders and basic knowledge of digital recording. -
Page 8: Precautions On Installation
<About replacing the lithium battery> The CR500 uses a lithium battery internally. To replace the battery, ask your dealer or the nearest FOSTEX service station. If the battery is not cor- rectly replaced, there may be a risk of explosion, etc. -
Page 9: Chapter-1 Overview
CD-R/RW MASTER RECORDER CR500 (Overview) Chapter-1: Overview This chapter describes the main features of the CR500. -
Page 10: Main Features
CD-R/RW MASTER RECORDER CR500 (Overview) The CR500 is a two-track digital master recorder which uses a CD-R or CD-RW disc as a recording medium. The CR500 supports both the BWF-P (interleave) and CD-DA formats for file for- mats of CD-R/RW discs. It also supports the UDF rev.1.02 (Universal Disk Format), CD-DA (Compact Disc Digital Audio) and ISO9660 file systems, enabling high quality recording and playback (playback only with a ISO9660 disc). - Page 11 • High-performance CD-R/RW drive built in. The CR500 is equipped with a high-performance CD-R/RW drive. The anti-buffer-underrun function enables reliable stereo recording/playback. CD-R/RW drive • Various playback modes The CR500 supports various playback modes described below. ALL PLAY mode Plays back all disc tracks continuously.
- Page 12 [DIGITAL INPUT] connector [DIGITAL OUTPUT] connector • For worldwide use The CR500 has the [AC IN] connector, to which a separate power cable is connected. You can use the CR500 anywhere in the world by using an appropriate power cord.
-
Page 13: Chapter-2 Preparation Before Using The Cr500
This chapter explains preparation before using the CR500 for the first time, including power connection, internal clock setting and initial formatting of a CD-R/RW disc. You must do these things correctly in order to use the CR500. Read this chapter before using the CR500. -
Page 14: Power Connection
OUTPUT 1:GND 2:HOT 3:COLD <Notes>: Connect the CR500 to the AC outlet of the voltage indicated on the rear panel. If you use the unit in another country where the power voltage or AC connec- tor type is different, consult your dealer or local Fostex service station. - Page 15 CD-R/RW MASTER RECORDER CR500 (Preparation before using the CR500) The display now shows the "SYS SETUP" menu, where "Default File Name highlighted. Use the [MENU] dial to scroll through the menu and highlight "Adjust RTC press the [ENTER/YES] key. The display now shows current clock data which runs in realtime.
-
Page 16: Initial Format Of A Cd-R/Rw Disc
CD-R/RW MASTER RECORDER CR500 (Preparation before using the CR500) Initial format of the CD-R/RW disc Usable discs With the CR500, you can use a CD-R or CD-RW disc which has any of the following logos. Also we recommend using discs manufactured by the following makers. Recommended makers:... -
Page 17: Setting A Disc
CD-R/RW MASTER RECORDER CR500 (Preparation before using the CR500) Setting a disc After turning on the CR500, press the [OPEN/CLOSE] key to open the disc tray. After setting a CD-R/RW disc to the tray, press the [OPEN/CLOSE] key again closes the disc tray. -
Page 18: Initial Format Of A Disc
The following description shows how to do the initial format of an unused disc, assum- ing that the CR500 is turned on and no disc is set on the disc tray. <The recordable time and the maximum number of tracks>... - Page 19 CD-R/RW MASTER RECORDER CR500 (Preparation before using the CR500) Use the numeric keys or [MENU] dial to edit the volume label. You can enter a desired alphanumeric character at the flashing point. You can move the flashing point by using the [SKIP/CURSOR ] keys.
- Page 20 CD-R/RW MASTER RECORDER CR500 (Preparation before using the CR500) <Note>: Formatting by the "CD-DA" type is executed immediately. After "Com- pleted" is shown, the following Home screen appears. <Note>: If you eject a CD-DA formatted disc without making recording or if you turn off the power and then on, the display shows "Blank Disc"...
- Page 21 Do not use the CR500 for reformatting a CD-RW disc on which you have make record- ing using another machine such as a PC. If you reformat such a disc using the CR500, data may not be completely erased. When you reformat a CD-RW disc using the "For- mat"...
-
Page 22: Adjusting Display Contrast
CD-R/RW MASTER RECORDER CR500 (Preparation before using the CR500) Adjusting display contrast The display contrast of the unit is adjusted suitably when shipped. If you want to change the contrast, follow the procedure described below. ACCESS PLAY MODE PROGRAM SET... -
Page 23: Chapter-3 Names And Functions
CD-R/RW MASTER RECORDER CR500 (Names and functions) Chapter-3: Names and functions ACCESS PLAY MODE PROGRAM SET REPEAT OPEN/CLOSE POWER PHONES INPUT LEVEL (KYBD ONLY) ANALOG INPUT ANALOG OUTPUT BALANCED [+4dBu] UNBALANCED [-10dBV] BALANCED [+4dBu] DIGITAL INPUT OUTPUT 1:GND 2:HOT 3:COLD Table of contents Front panel section ...24... -
Page 24: Front Panel Section
CD-R/RW MASTER RECORDER CR500 (Names and functions) POWER PHONES INPUT LEVEL (KYBD ONLY) About Non-shift mode and Shift mode Some keys have the secondary function which is available when the SHIFT indicator is lit (i.e. in the Shift mode), while the primary function is available when the SHIFT indicator is unlit (i.e. -
Page 25: Lcd Display
CD-R/RW MASTER RECORDER CR500 (Names and functions) [PLAY MODE/ PROGRAM SET This key has primary (unSHIFTed) and secondary (SHIFTed) functions. While stopped, pressing this key switches the play mode in the following order (see page 54). “ALL PLAY” -> “SINGLE PLAY” -> “PROGRAM When unSHIFTed: PLAY”... - Page 26 CD-R/RW MASTER RECORDER CR500 (Names and functions) [MEMORY/ ] key MEMORY SET The keys in this key group have primary (unSHIFTed) and secondary (SHIFTed) functions. Depending on the current play mode, the function dif- fers. • In ALL PLAY, SINGLE PLAY or PROGRAM PLAY...
- Page 27 CD-R/RW MASTER RECORDER CR500 (Names and functions) [MENU] dial/[ENTER/YES] key This knob has dual functions; the [MENU] dial for selecting an option and the [ENTER/YES] key for confirming the selection. Pressing the [ENTER/YES] key enters the MENU mode. In the MENU mode, you can use the [MENU] dial to make settings of each menu item of the MENU mode.
- Page 28 CD-R/RW MASTER RECORDER CR500 (Names and functions) RECORD] key While the [REC RDY] indicator flashes, pressing this key • automatically creates a new audio file (or audio track) and starts recording. [REC RDY] key Pressing this key switches the record ready mode on and off.
-
Page 29: Rear Panel Section
This jack is used to connect to a mixing console providing the fader start/stop facility, which enables start/stop control of the CR500 from a console's fader (see page 36). [DIGITAL OUTPUT] connector This connector sends AES/EBU or S/P DIF digital signals (see page 36). -
Page 30: Screen Details
CD-R/RW MASTER RECORDER CR500 (Names and functions) Home screen (available in stop or playback mode) When a formatted CD-R/RW disc is loaded and the unit is stopped or playing back, the "Home screen" is shown. The screen example below shows the Home screen when a recorded CD-R/RW disc is loaded. - Page 31 CD-R/RW MASTER RECORDER CR500 (Names and functions) 0m00s000ms 0m00s000ms 1m00s000ms File 1 (1 minute) 0m00s000ms 1m00s000ms • File name Shows a track number and a name of the currently selected track (file). • WAV file A file name according to the setting of the "Default File Name" menu item of the "SYS SETUP"...
-
Page 32: Input Monitor Screen (Available While In Record Ready Or Recording)
CD-R/RW MASTER RECORDER CR500 (Names and functions) • Audio file (or audio track) information Numbers of recorded audio files (or audio tracks) are shown. The file (or track) which can be played back currently is highlighted. If no audio file (or audio track) is re- corded to the disc, all boxes are blank. - Page 33 CD-R/RW MASTER RECORDER CR500 (Names and functions) • Current track Shows the track number of the currently selected file (or track). When recording a WAV file, a file name is also shown (if the disc is blank, only the track number is shown).
-
Page 34: Menu Mode Screen
CD-R/RW MASTER RECORDER CR500 (Names and functions) MENU mode screen The following screen is the MENU list screen which appears when you enter the menu mode by pressing the [ENTER/YES] key while the recorder is stopped (see page 72). This screen is the first level screen of the MENU mode and you can select a menu from 6 menus listed on this screen. -
Page 35: Chapter-4 Connection
CD-R/RW MASTER RECORDER CR500 (Connection) Chapter-4: Connection This chapter describes details about connection of analog and digital audio devices, as well as USB keyboard connection and functions. -
Page 36: Connecting To Other Devices
DIF) format. It automatically detects the format (AES/EBU or S/P DIF) of the digital input signal. Regardless of the Fs/bit information of the input signal, the CR500 records the input signal at the Fs/bit which is set when a disc is format- ted. -
Page 37: Fader Start Connection
"Keyboard Sel" menu item is set to "US". Numeric keyboard 0 through 9 keys Duplicates the function of the keys in the CR500 [MEMORY] key group. , Del key Duplicates the function of the [CLEAR/+10] key on the CR500 panel. - Page 38 Acts the same as the [REWIND] key on the CR500 panel. F11 key F12 key Acts the same as the [F FWD] key on the CR500 panel. ALT + F keys Enters the "FILE SEL" menu in the MENU mode.
-
Page 39: Chapter-5 Recording
This chapter describes how to record audio data using the CR500. The CR500 can record audio to a BWF formatted or CD-DA formatted disc. To a BWF formatted disc, you can record WAV audio files. You can then export files to a Windows computer after closing the disc. -
Page 40: Before Starting Recording
You can close a disc when ejecting a recorded disc (see page 46). If you use a recorded disc only with the CR500 and do not use it with your com- puter, you do not need to close it (see <Notes> below). -
Page 41: Preparation For Recording
Before making recording of analog or digital audio, you must make preparation for recording as described below. The following description assumes that the CR500 is turned on and a BWF formatted or CD-DA formatted blank CD-R/RW disc is set to the disc tray. To record WAV files, use a BWF formatted CD-R/RW disc. -
Page 42: Selecting The Input
CD-R/RW MASTER RECORDER CR500 (Recording) Selecting the input According to the sound source, select the "Select Input" menu item of the "SYS SETUP" menu in the MENU mode appropriately to "Analog" or "Digital". See page 76 for details about the "Select Input" menu item. - Page 43 In such a case, check the digital output setting of the source device and connection between the source device and the [DIGI- TAL INPUT] connector of the CR500. <Note>: By default, the file name shown on the input monitor screen for a BWF formatted disc is "<Scene Name>...
-
Page 44: Recording A Wav File
CD-R/RW MASTER RECORDER CR500 (Recording) Recording a WAV file You can record analog or digital audio in the WAV file format. The following description assumes that a BWF formatted blank CD-R (or CD-RW) disc is loaded. POWER PHONES (KYBD ONLY) -
Page 45: Checking The Recorded Audio File
<Hint>: The CR500 has four play modes. By default, the play mode is set to "ALL PLAY". Therefore, if there are more than one audio file is recorded, the recorder starts play- back from the first (earliest) file continuously. -
Page 46: Closing A Disc
CD-R/RW MASTER RECORDER CR500 (Recording) If you press the [REWIND] key while holding down the [STOP/HOME] key, the recorder executes the "Locate ABS 0" function to go to the beginning of the disc and stops. If you press the [1/space] key in the [MEMORY] key group, the recorder goes to the beginning of the first audio file and automatically starts playback. -
Page 47: Recording A Cd-Da Track (Creating An Audio Cd)
Stopping recording • To stop recording, press the [STOP/HOME] key. After finishing post-processing of recording ("Please Wait..." is shown on the display), the disc stops at the last recording position. CD-R/RW MASTER RECORDER CR500 (Recording) [REC RDY] key ACCESS DISPLAY CONTRAST... -
Page 48: Checking The Recorded Audio Track
<Hint>: The CR500 has four play modes. By default, the play mode is set to "ALL PLAY". Therefore, if there are more than one audio track is recorded, the recorder starts play- back from the first track continuously. -
Page 49: Finalizing A Disc
If you press the [ENTER/YES] key, "Please Wait Finalizing track..." pops up. After completing finalizing, the disc is ejected. Note that it takes some time for finalizing. If you press the [EXIT/NO] key, the disc is ejected immediately. CD-R/RW MASTER RECORDER CR500 (Recording) -
Page 50: Selecting A Song To Be Played Back
CD-R/RW MASTER RECORDER CR500 (Recording) Selecting a song to be played back When a disc contains more than one song ("audio file" on a BWF formatted disc or "audio track" on a CD-DA disc), you can select a desired song to be played back by any of the following three methods. -
Page 51: Method 3>: Using The "File Sel" Screen
[ENTER/YES] key. The display changes to show the Home screen of the selected song and you can now play back the song. CD-R/RW MASTER RECORDER CR500 (Recording) ] key to bring up the "FILE SEL" screen directly. DIR SEL ] key brings up the "FILE SEL"... - Page 52 CD-R/RW MASTER RECORDER CR500 (Recording)
-
Page 53: Chapter-6 Playback/Locate
Chapter-6: Playback/Locate This chapter describes playback functions of the CR500, as well as locate functions. The CR500 can play back commercially available audio CD discs, as well as CD-R/CD-RW discs recorded by the CR500 or other devices. About play mode ...54 Playback in the ALL PLAY mode ...55... -
Page 54: About Play Mode
CD-R/RW MASTER RECORDER CR500 (Playback/Locate) The CR500 has four play modes. Normally, the "ALL PLAY" or "SINGLE PLAY" mode is used when playing back a disc regardless of whether it is commercially available audio CD disc or CD-R/CD- RW discs recorded by the CR500 or other devices. -
Page 55: Playback In The All Play Mode
In the ALL PLAY mode, while the Home screen is shown, pressing the [PLAY] key starts playback of all songs on a disc continuously. When finishing playback of the last song, the CR500 stops at the end of the last song. (If you wish to play back tracks in a desired order, use the "PROGRAM PLAY"... -
Page 56: Cueing/Digital Scrub
CD-R/RW MASTER RECORDER CR500 (Playback/Locate) Cueing In the cueing mode, you can cue forward or backward at up to three times the normal speed. <Note>: The maximum cueing speed depends on the recording Fs/bit of a play- back disc. During playback, you can cue forward or backward by pressing the [F FWD] or [RE- WIND] key. -
Page 57: Playback In The Program Play Mode
Therefore, to select 02 of program number 4, use method (2) or (3). <Note>: You can store the play lists for 100 discs to the CR500 system memory. If you attempt to store a play list for a new disc when play lists for 100 discs are already stored, the CR500 deletes the oldest play list and stores the new play list. -
Page 58: Creating The Play List
CD-R/RW MASTER RECORDER CR500 (Playback/Locate) Creating the play list The description below assumes that a BWF formatted disc on which more than one WAV file is recorded is loaded. However, it is also applicable to a CD-DA formatted disc on which more than one audio track is recorded. - Page 59 To check the play list created, press the [PLAY MODE/ PROGRAM SET GRAM PLAY mode is selected. The play list created is saved to the CR500 memory. If you load the same disc later and select the PROGRAM PLAY mode, the play list previously created is effective.
-
Page 60: Deleting A Song From The Play List
CD-R/RW MASTER RECORDER CR500 (Playback/Locate) Deleting a song form the play list You can delete a song from the play list. The following description assumes that some songs are set to the play list and the Home screen of the PROGRAM PLAY mode is shown. -
Page 61: Playback In The Memory Play Mode
<Note>: In the MEMORY PLAY mode, unlike other modes, you cannot use the repeat and auto play functions. <Note>: You can store memory play data for 100 discs to the CR500 system memory. If you attempt to store a memory play data for a new disc when memory play data for 100 discs are already stored, the CR500 deletes the oldest memory play data and stores the new memory play data. -
Page 62: Assigning Audio Data To A Memory
CD-R/RW MASTER RECORDER CR500 (Playback/Locate) Assigning audio data to a memory The description below assumes that a BWF formatted disc on which more than one WAV file is recorded is loaded, however, it is basically also applicable to a CD-DA formatted disc. -
Page 63: Replacing The Audio File In A Memory Bank
The flash memory of the CR500 can have memory play data for up to 100 discs. If you attempt to store memory play data for a new disc when memory play data for 100 discs are already stored, the CR500 deletes the oldest memory play data and stores the new memory play data. -
Page 64: Editing A Memory Name
CD-R/RW MASTER RECORDER CR500 (Playback/Locate) Editing a memory name By default, the original file name is set as the memory name in a memory bank. You can edit this name. The following description assumes that at lease one memory bank has audio data and the display shows the Home screen of the MEMORY PLAY mode. -
Page 65: Editing The Start Time/End Time Using The Digital Scrub Function
1 (MEMORY 1). Move the cursor to "<SCRUB-S>" or "<SCRUB-E>", and press the [ENTER/YES] key. CD-R/RW MASTER RECORDER CR500 (Playback/Locate) Use the numeric ([MEMORY]) keys or [MENU] dial to enter the desired number. Use the [SKIP/CURSOR move the cursor point (flashing point). -
Page 66: Deleting Memory Play Data
CD-R/RW MASTER RECORDER CR500 (Playback/Locate) <Example when you select "<SCRUB-E>"> Use the [MENU] dial to scrub forward or backward for adjusting the start (or end) point. At a point where audio is recorded, You can hear the scrubbing sound. Deleting memory play data You can delete data in a memory bank. -
Page 67: Playing Back An Iso9660 Formatted Disc
Pressing the [PLAY] key starts playback from the first file on the audio file table. You can use various playback functions as with a disc recorded by the CR500. CD-R/RW MASTER RECORDER CR500 (Playback/Locate) <Note>: The CR500 displays the directory... -
Page 68: Locate/Skip Functions
CD-R/RW MASTER RECORDER CR500 (Playback/Locate) The CR500 provides versatile locate/skip functions. Locating an audio file (or audio track) When more than one song is recorded on a CD-R/RW disc, you can immediately locate the beginning of a song. While the recorder is stopped, pressing a numeric key of the [MEMORY/ group locates the beginning of a corresponding numbered song. -
Page 69: Skipping Between Audio File (Or Audio Track)
CD-R/RW MASTER RECORDER CR500 (Playback/Locate) Skipping between audio files (or audio tracks) When more than one song is recorded on a CD-R/RW disc, you can immediately skip to the beginning of a desired song. While the recorder is stopped, pressing the [SKIP/CURSOR key skips to the beginning of the next or current/previous song. -
Page 70: Locating A Point By Entering A Time
CD-R/RW MASTER RECORDER CR500 (Playback/Locate) Locating a point by entering a time By entering a time, you can immediately locate the corresponding point Depending on the current time mode, you can specify the point by the disc elapsed time or track elapsed time. -
Page 71: Chapter-7 Menu Mode
CD-R/RW MASTER RECORDER CR500 (MENU mode: SYSTEM SETUP menu) Chapter-7: MENU mode Table of contents About MENU mode ...72 SYS SETUP menu ...73 Basic procedure for using the “SYS SETUP” menu ...74 Default file name setting [Default File Name] ...75 Input selections [Select Input] ...76... -
Page 72: About Menu Mode
CD-R/RW MASTER RECORDER CR500 (MENU mode: SYSTEM SETUP menu) In the MENU mode, various essential setting menus and execution menus are available. While the recorder is stopped, pressing the [ENTER/YES] key enters the MENU mode and the display shows the MENU list screen. There are six menus in the MENU list. You can select a desired menu using the [MENU] dial. -
Page 73: Sys Setup Menu
CD-R/RW MASTER RECORDER CR500 (MENU mode: SYSTEM SETUP menu) In the SYS SETUP menu, 12 menu items are available. The following table shows each menu item name and available values (or action), as well as the default setting. <Note>: This section explains all the menu items except "Adjust RTC". For the details about "Adjust RTC"... -
Page 74: Basic Procedure For Using The Sys Setup Menu
CD-R/RW MASTER RECORDER CR500 (MENU mode: SYSTEM SETUP menu) Basic procedure for using the "SYS SETUP" menu The basic procedure for using the "SYS SETUP" menu is as described below, though the actual procedure may differ depending on menu. It is assumed that a blank or recorded CD-R/RW disc is set to the disc drive. -
Page 75: Default File Name Setting [Default File Name]
CD-R/RW MASTER RECORDER CR500 (MENU mode: SYSTEM SETUP menu) Default file name setting [Default File Name] The "Default File Name" menu item selects the default name format of an audio file which is created automatically when recording is made to a BWF formatted disc. -
Page 76: Input Selections [Select Input]
CD-R/RW MASTER RECORDER CR500 (MENU mode: SYSTEM SETUP menu) SCENE Up to 19 ASCII characters can be entered. The first character must be alphabetical. NAME The ".wav" extension is automatically added, therefore, you do not need to enter it. After entering the scene name and pressing the [ENTER/YES] key, the cursor automati- cally moves to "001"... -
Page 77: Digital Output Signal Format Selection [Digital Out]
CD-R/RW MASTER RECORDER CR500 (MENU mode: SYSTEM SETUP menu) Digital output signal format selection [Digital Out] The "Digital Out" menu item selects the format (AES/EBU or S/P DIF) of the digital signal which is output from the [DIGITAL OUTPUT] connector. -
Page 78: Reference Level Setting [Ref. Level]
CD-R/RW MASTER RECORDER CR500 (MENU mode: SYSTEM SETUP menu) Reference level setting [Ref. Level] The "Ref. Level" menu item selects the reference input level. The reference level is set to "-12dB" by default, but you can change it to "-20dB". -
Page 79: Saving Sys Setup Data [Sys User Save]
CD-R/RW MASTER RECORDER CR500 (MENU mode: SYSTEM SETUP menu) Saving SYS SETUP data [Sys User Save] Using the "Sys User Save " menu item, you can save the current setup data (including SYS SETUP data, PLAY SETUP data and contrast level) to the user memory. The saved setup data can be loaded using the "Sys User Load"... -
Page 80: Initializing System Memory Data [Sys Default Set]
CD-R/RW MASTER RECORDER CR500 (MENU mode: SYSTEM SETUP menu) Initializing system memory data [Sys Default Set] Using the "Sys Default Set " menu item, you can initialize the setup data (including SYS SETUP data, PLAY SETUP data and contrast level) to the factory preset data. -
Page 81: Rom Version Checking [Version]
CD-R/RW MASTER RECORDER CR500 (MENU mode: SYSTEM SETUP menu) ROM version checking [Version] Using the "Version " menu item, you can check the version of the unit. Select "Version " on the "SYS SETUP" menu screen and press the [ENTER/YES] key. -
Page 82: Play Setup Menu
CD-R/RW MASTER RECORDER CR500 (MENU mode: PLAY SETUP menu) In the PLAY SETUP menu, four menu items are available. The following table shows each menu item name and its function, as well as the default setting. Menu item Selects the play mode. You can also use the [PLAY MODE/... -
Page 83: Play Mode Selection [Play Mode]
CD-R/RW MASTER RECORDER CR500 (MENU mode: PLAY SETUP menu) Play mode selection [Play Mode] The "Play Mode" menu item selects the play mode. <Note>: The play mode also can be selected using the [PLAY MODE/ The selection using the [PLAY MODE/ menu screen. -
Page 84: Auto Play Mode On/Off [Auto Play]
CD-R/RW MASTER RECORDER CR500 (MENU mode: PLAY SETUP menu) Auto play mode on/off [Auto Play] The "Auto Play" menu item selects whether or not the recorder automatically starts play- back after carrying out either of the following operations. Selecting a song by using the numeric and [CLEAR/+10] keys while the recorder is stopped or playing. -
Page 85: Disk Utility Menu
CD-R/RW MASTER RECORDER CR500 (MENU mode: DISK UTILITY menu) DISK UTILITY menu In the DISK UTILITY menu, six menu items regarding a disc and file are available. The following table shows each menu item name and its function. Menu item Executes the initial format or reformat of a CD-R/RW disc. -
Page 86: Formatting A Disc [Format]
CD-R/RW MASTER RECORDER CR500 (MENU mode: DISK UTILITY menu) Formatting a disc [Format] This menu item is used to format an unformatted CD-R/RW disc or reformat a format- ted CD-RW disc. <Note>: When you load an unformatted CD-R/RW disc, the display automatically goes down to the second level screen of the "Format"... - Page 87 CD-R/RW MASTER RECORDER CR500 (MENU mode: DISK UTILITY menu) Use the [MENU] dial to highlight "Audio format type" and press the [ENTER/YES] key. The currently selected format type (the default is "CD-DA") flashes and you can now select the format type.
-
Page 88: Rewriting The File System [Rewrite File Sys]
CD-R/RW MASTER RECORDER CR500 (MENU mode: DISK UTILITY menu) Rewriting the file system [Rewrite File Sys] This menu item rewrites the file system. It is available only with a BWF formatted disc (Note: This menu item is not available with CD-DA discs and finalized BWF discs). After you edit a WAV file on the UDF file system (such as file name editing, file deletion and file restoring), you have to rewrite the file system using this menu item. -
Page 89: Editing A File Name [Edit File Name]
CD-R/RW MASTER RECORDER CR500 (MENU mode: DISK UTILITY menu) Editing a file name [Edit file name] The "Edit File Name" menu item edits the file name of a WAV file on an unfinalized BWF disc. This menu item is not available with CD-DA discs and finalized BWF discs. -
Page 90: Deleting An Unnecessary Audio File [Delete File]
CD-R/RW MASTER RECORDER CR500 (MENU mode: DISK UTILITY menu) Deleting an unnecessary audio file [Delete File] The [Delete File] menu item deletes an unnecessary WAV file on an unfinalized BWF disc. This menu item is not available with CD-DA discs and finalized BWF discs. -
Page 91: Restoring A Deleted Audio File [Restore Del. File]
CD-R/RW MASTER RECORDER CR500 (MENU mode: DISK UTILITY menu) Restoring a deleted audio file [Restore Del. File] Using the "Restore Del. File" menu item, you can restore a hidden file which has been deleted by the "Delete File" menu item. This menu item is not available with CD-DA discs and finalized BWF discs. -
Page 92: Finalizing A Disc [Finalize]
CD-R/RW MASTER RECORDER CR500 (MENU mode: DISK UTILITY menu) Finalizing a disc [Finalize] The "Finalize" menu item finalizes a BWF formatted or CD-DA formatted CD-R/RW disc. A finalized CD-DA disc can be played back by a normal CD player. You can also finalize a CD-DA formatted disc when you eject it after recording (see page 49). -
Page 93: Chapter-8 Specifications
CD-R/RW MASTER RECORDER CR500 (Specifications) Chapter-8: Specifications... -
Page 94: Digital Input
CD-R/RW MASTER RECORDER CR500 (Specifications) CR500 main specifications Inputs/Outputs * 0dBu = 0.775Vrms, 0dBV = 1Vrms Reference level: -12dBFS/-20dBFS (default: -12dBFS, selectable in the “Ref.Level” menu item of the SYS SETUP menu) ANALOG INPUT L, R (balanced) Connector Input impedance... - Page 95 Specifications and appearance are subject to change without notice for product improvement. All company names and model names mentioned in this manual are trademarks or registered trademarks of their respective holders. CD-R/RW MASTER RECORDER CR500 (Specifications) ATAPI (E-IDE) CD-R/RW drive fs 44.1kHz / 48kHz, 16bit fs 44.1kHz / 48kHz / 88.2kHz / 96kHz, 24bit...
- Page 96 CD-R/RW MASTER RECORDER CR500 (Specifications) Physical dimensions MOISTURE. EQUIPMENT THIS EXPOSE ELECTRIC FIRE OUVRIR ELECTRIQUE CHOC CAUTION POWER INPUT LEVEL (KYBD ONLY) PHONES 3:COLD 2:HOT RAIN [+4dBu] BALANCED [-10dBV] SHOCK, RISK REDUCE WARNING: AVIS: RISQUE OUTPUT ANALOG MEMORY ACCESS DISPLAY...
-
Page 97: Declaration Of Ec Directive
In the electrical fast transient/burst requirements, surge, conducted disturbances by radio-frequency fields, power frequency magnetic field, radiate electromagnetic field requirements and static electricity discharging environment, this could be affected by generation of noise in some cases. FOSTEX DISTRIBUTORS LIST IN EUROPE * Including non-EU countries (as of January, 2005) <AUSTRIA>... - Page 98 (180) days. Fostex America will repair and / or replace parts during the term of this warranty. Labor costs are also covered by Fostex America for one (1) year from the date of original purchase. Except as specified below, this warranty covers all defects in material and workmanship in this product.
- Page 99 NOTE: Fostex America will not assume responsibility for damages or losses occurred in transit, but will reasonably assist the sender in processing any claims whenever possible (such as submitting statements to the carriers when applicable).
- Page 100 FOSTEX CO. 3-2-35, Musashino, Akishima-shi, Tokyo, Japan, 196-0021 FOSTEX AMERICA 13701 Cimarron Avenue Gardena, CA 90249 U.S.A. © PRINTED IN JAPAN MARCH 2006 8588 076 000 FX 438100...