Fostex MR-8 Owner's Manual
Fostex mr-8 digital multitracker owner's manual
Hide thumbs
Also See for MR-8:
- Specifications (5 pages) ,
- Brochure & specs (3 pages) ,
- Operation manual (3 pages)
Table of Contents
Advertisement
Quick Links
Advertisement
Table of Contents

Related Manuals for Fostex MR-8


Summary of Contents for Fostex MR-8
- Page 1 (376785) 8588 018 100 Owner’s Manual Digital Multitracker...
-
Page 2: Safety Instructions
MR-8 Owner’s Manual CAUTION RISK OF ELECTRIC SHOCK DO NOT OPEN CAUTION: TO REDUCE THE RISK OF ELECTRIC SHOCK, DO NOT REMOVE COVER (OR BACK). NO USER - SERVICEABLE PARTS INSIDE. REFER SERVICING TO QUALIFIED SERVICE PERSONNEL. "WARNING" "TO REDUCE THE RISK OF FIRE OR ELECTRIC SHOCK, DO NOT EXPOSE THIS APPLIANCE TO RAIN OR MOISTURE."... -
Page 3: Table Of Contents
Introduction ...5 MR-8 Main features ...5 About power supply ...5 Precaution upon handling the MR-8 ...6 Notes on repair ...6 About copyrights ...6 About damages ...6 The basics of the MR-8...7 Recording method ...7 Song mode ...7 About song ...7 Time base ...8... - Page 4 (s) ...73 Exchange parts between tracks ...75 Synchronizing with MIDI ...77 Synchronization using MTC ...77 Settings of the MR-8 and MIDI sequencer ...77 MIDI sync/MTC frame rate settings ...77 Synchronization using MIDI clock ...78 Using the rhythm guide function ...79 Creating the signature/tempo map ...79...
-
Page 5: Introduction
You can record audio at 44.1 kHz/16 bits (in the normal mode) or 22.05 kHz/16 bits (in the extended mode). The MR-8 is also equipped with an 8-channel digital mixer, digital effects including the delay/reverb, mastering effects and insert effects (simula- tion effects). -
Page 6: Precaution Upon Handling The Mr-8
* Near a strong magnetic field (such as a TV or speaker). Notes on repair • The MR-8 does not use any parts that user can repair easily. Contact your dealer or the nearest FOSTEX service station to ask about repairs. -
Page 7: The Basics Of The Mr-8
The basics of the MR-8 The chapter describes the basics of the MR-8 you should know before using the MR-8. Recording method The MR-8 records audio on a CompactFlash card. Songs are recorded on a card along with the ABS time (00m00.000s through 60m00.000s). -
Page 8: Time Base
You can see "clk" at the right-top. The Bar/Beat/Clk information is initially off- set by "-2 bars" at 0m00.000s ABS time (which is called "bar offset"). The MR-8 determines the Bar/Beat/Clk values in a song according to the offset, time signature and tempo. -
Page 9: Remain Display
Note that the remaining time shown on the screen is an approximate time. Input monitor and repro monitor Each of the MR-8 tracks has two output modes: repro monitor and input monitor. In the repro monitor mode, the track playback signal is output. -
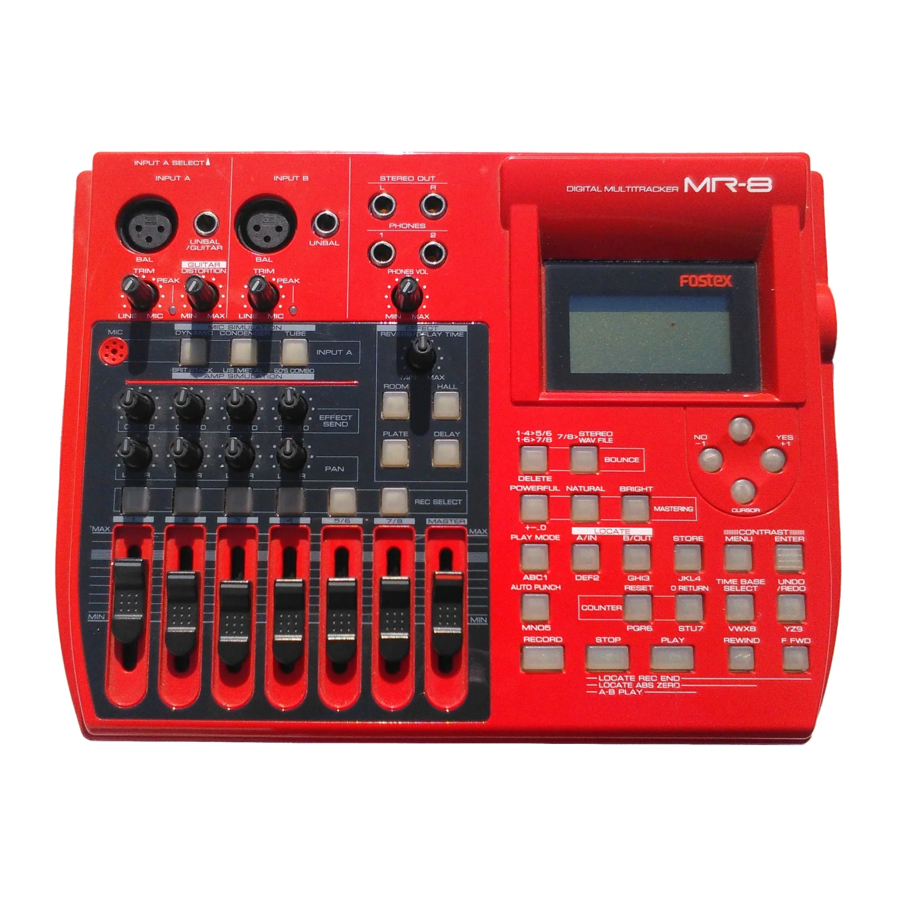
Page 10: Names And Functions
MR-8 Owner’s Manual INPUT A SELECT TRIM LINE 1. [INPUT A] connectors Both the [BAL] XLR and [UNBAL/GUITAR] phone connectors are provided. You can connect a gui- tar, microphone, keyboard, etc. According to the source connected, select the [INPUT A SELECT] switch appropriately. - Page 11 4. [PHONES] jacks (1, 2) Two jacks (1 and 2) are provided. You can use two pairs of stereo headphones with the MR-8. 5. [PHONES VOL] control Adjusts the headphone output level. 6. [REVERB/DELAY TIME] control Controls the reverb time or delay time (see page 40).
-
Page 12: Top Panel (Right Part)
MR-8 Owner’s Manual INPUT A SELECT INPUT A UNBAL /GUITAR GUITAR TRIM DISTORTION PEAK LINE MIC SIMULATION DYNAMIC CONDENSER BRIT STACK US METAL AMP SIMULATION 17. [1-4 > 5/6, 1-6 > 7/8] / [DELETE] key Selects the bounce mode (see page 43). - Page 13 Selects the play mode from among normal, auto play, auto return and loop (see page 50). In the menu mode, this key is used for charac- ter entry of A (a), B (b), C (c) and 1 (see page 21). MR-8 Owner’s Manual...
-
Page 14: Rear Panel
By setting the switch to "LIGHT", the backlight of the LCD display lights up (see page 18). <Note> When driving the MR-8 by batteries, we rec- ommend not to use the backlight, because the batteries are exhausted quickly. 3. [USB] port Used to connect with a personal computer using a standard USB cable (see page 88). -
Page 15: Side Panel
1. Card slot A CompactFlash card is inserted to this slot (see page 16). 1. Battery compartment To use the MR-8 with batteries, insert six stan- dard alkaline AA-type batteries to this compart- ment (see page 17). Side panel COMPACT FLASH CARD MIDI OUT 2. -
Page 16: About Recording Medium
(When shipped, the supplied card is inserted.) <Important!> make sure that the power of the MR-8 is off. If you insert or remove a card when the power is on, the card may be damaged or the recorded data may be lost. -
Page 17: About The Power
You can use the MR-8 either with the supplied AC adaptor (Model AD-12A) or alkaline batteries (AA-type x 6, not supplied with the MR-8). When preparing the power source, make sure that the [POWER] switch of the MR-8 is set to off. -
Page 18: Turning Off The Power
(i.e. monitor devices -> MR-8 -> source devices). <Important!> If you turn off the MR-8 power while the card is accessed, the recorded songs or card itself may be damaged. You do not have to shut down the MR-8 before turning it off. -
Page 19: Listening The Demo Song
1) Connect headphones or a monitor system to the MR-8. 2) Set the [POWER] switch to ON. The MR-8 turns on the power. After the LCD display shows the startup screen, the demo song (Song 01: FOSTEX_FEVER) is loaded. 3) Raise the [MASTER] fader to the " " position. -
Page 20: Preparation Of A Compactflash Card
1) Make sure that the supplied card is set to the slot, then turn on the MR-8 power. The recorded demo song is loaded. 2) Press the [MENU] key to enter the menu mode. - Page 21 You can use “+” for a song name with 8 or more characters. flashing “AAA+BBBBB”. MR-8 Owner’s Manual Some keys on the MR-8 top panel act as character entry keys in the menu mode. For example, the [PLAY MODE] key (shown at the left) can be used for entering A, B, C, a, b, c and 1.
-
Page 22: Preparation For Recording Onto A New Card
See page 25 for formatting a card with the MR-8. 1) While the MR-8 power is off, remove the supplied card from the slot and insert a new card to the slot. 2) Turn on the MR-8 power. -
Page 23: Creating A Song/Selecting A Song
6) Press the [CURSOR The cursor (flashing point) moves to the first character entry position of a song name. 7) Enter a desired name following the same procedure as described on page 21. MR-8 Owner’s Manual ] key. ] key. flashing flashing... -
Page 24: Selecting A Desired Song
MR-8 Owner’s Manual 8) After completing song name entry, use the [CUR SOR ] key to move the cursor to "ENTER" at the bottom of the screen, then press the [ENTER] key. The screen now shows the song list in which you see the new song added. -
Page 25: Formatting A Card
7) Press the [CURSOR ] key while holding down the [RECORD] key. The MR-8 starts formatting. When completed, "Completed!" is shown on the display. 8) Press the [ENTER] key. The screen exits the "Card Format" menu, and automatically change to the "Select Song"... -
Page 26: Connections
You can connect sound sources, recorders, a monitor amplifier, headphones, a personal computer, etc. to the MR-8, as show in the figure below. When making connection or disconnection, make sure that the [MASTER] fader and [PHONES VOL] control are turned down. Otherwise, the noise generated when making connection or disconnection may damage external equipment. -
Page 27: Display
In this condition, the previously loaded song (or the demo song when you first use the MR-8 with the supplied card) is loaded and the recorder is located at the begin- ning of the song. -
Page 28: Selecting A Time Base
MENU screen. In the menu mode, you can make setting or editing via the appropriate MENU screen. If a serious problem happens to the MR-8 during operation, an appropriate warning message is shown on the display. Most warning messages are being shown until the [ENTER] key is pressed. -
Page 29: Mr-8 Recording Basics
MR-8 recording basics Before starting recording, we recommend to understand the MR-8 recording basics (such as the relation between the input jacks and tracks and useful recording functions) described below. Relation between the input jacks and tracks The MR-8 provides eight tracks (1 through 8) and you can record onto a selected mono track or stereo tracks at a time. -
Page 30: Input Level Setting
[INPUT A SELECT] switch setting, a microphone or amplifier simulation effect can be used. About simulation effect INPUT B The microphone and amplifier simulation effects on the MR-8 simulate some of popular UNBAL microphones and guitar amplifiers. Each simulation effect can produce the similar sonic PEAK performance that it would have with the ac- tual modeled microphone or guitar amplifier. -
Page 31: Recording Onto A Single Track
Track 1 is armed, while track number "1" starts flashing on the screen. In the song name display section on the screen, the remaining time (available recording time) of the card is shown. MR-8 Owner’s Manual DIGITAL MULTITRACKER 1-4 > 5/6 STEREO 7/8 >... -
Page 32: Starting Recording
MR-8 Owner’s Manual 5) Set the track 1 fader and [MASTER] fader to the nominal position (marked by “ ”). Raising these faders allows you to monitor the input sound. If these faders are not raised, you cannot monitor the sound via headphones. -
Page 33: Recording Onto Two Tracks
5) Press the [RECORD] key. The armed tracks (tracks 5/6, in this case) now changes from tape monitoring to input monitoring, while " screen. MR-8 Owner’s Manual DIGITAL MULTITRACKER 1-4 > 5/6 STEREO 7/8 > 1-6 > 7/8... -
Page 34: Starting Recording
MR-8 Owner’s Manual 6) While playing the keyboard, adjust the recording level using the [TRIM] controls on the [INPUT A] and [INPUT B] sections. The screen shows the input levels of tracks 5 and 6, as well as the output levels of the stereo outputs (L and R). -
Page 35: Punch In/Out
Using the punch in/out function of the MR-8, you can overwrite a desired part of the re- corded track. "Punch in" means switching from playback to record, while "punch out" means switching form record to playback. The following description is assumed that the song you are going to make punch in/out recording to is loaded and the preparations for recording is completed. -
Page 36: Auto Punch In/Out
MR-8 Owner’s Manual 6) Rewind the recorder and play back the part you made punch in/out to check the result. If you are not satisfied with the result, use the undo function to cancel the punch in/out recording and try again. -
Page 37: Actual Auto Punch In/Out
<Note> By using the loop function when rehearsing auto punch in/out, you can concentrate on playing without bothering to operate the MR-8. See page 51 for details about the loop function. Actual auto punch in/out After rehearsing, let's execute actual auto punch in/out. -
Page 38: Using Effects
MR-8 Owner’s Manual The MR-8 provides the insert effects for recording (microphone and amplifier simulation effects), the delay/reverb for track bounce or mixdown (for tracks 1 through 4 only) as well as the mastering effects. The following describes how to use the effects and details about each effect. -
Page 39: Using The Reverb Or Delay
LINE LINE [DISTORTION] control Using the reverb or delay The MR-8 incorporates the original reverb/de- lay effects featuring the newly-developed algo- rithm. You can apply the reverb or delay to play- back signals of tracks 1 through 4 during mixdown and track bounce. -
Page 40: Adjusting The Delay/Reverb Time
MR-8 Owner’s Manual Adjusting the delay/reverb time You can adjust the reverb time or delay time us- ing the [REVERB/DELAY TIME] control, depend- ing on the selected effect type. EFFECT REVERB / DELAY TIME [REVERB / DELAY TIME] control ROOM... -
Page 41: Using The Mastering Effects
Using the mastering effects The MR-8 provides the dedicated mastering ef- fects for the stereo busses (L and R). You can use the mastering effects when bounc- ing more than one track to stereo tracks or when mixing down tracks 1 through 8 to stereo and sent to an external master recorder for record- ing. -
Page 42: Bouncing Tracks
MR-8 Owner’s Manual The track bounce function of the MR-8 allows you to mix several tracks and record onto two other tracks. Two modes of track bounce are available: bouncing tracks 1 through 4 to tracks 5/6 ("1-4 > 5/6" mode), and bouncing tracks 1 through 6 to tracks 7/8 ("1-6 > 7/8"... -
Page 43: Selecting The Bounce Mode
(5/6 or 7/8) are automati- cally armed and change to input monitoring, as well as the screen shows the appropriate bounce mode. lights up BOUNCE lights up MR-8 Owner’s Manual Delay Reverb Playback Playback Mixing Playback Playback... -
Page 44: Rehearsal Of Track Bounce
MR-8 Owner’s Manual Before executing track bounce, you can rehearse it. During rehearsal, you can control the playback level, panning and reverb (or delay) send setting of each source track, as well as apply the mastering effect to the mixed L/R signals. We recommend to make rehearsal thoroughly until you satisfy the sound. -
Page 45: Actual Track Bounce
<Auto punch in/out of track bouncing> You can bounce a desired part using the auto punch in/out function (see page 35). MR-8 Owner’s Manual Actual track bounce... - Page 46 MR-8 Owner’s Manual <Notes on "1-4 > 5/6" mode> You can bounce tracks in the "1-4 > 5/6" mode in the same manner as the "1-6 > 7/8" mode described above. However, you can monitor the playback sounds of tracks 7/8 (if any sounds are recorded) simultaneously.
-
Page 47: Mixdown
This process is called "mixdown". The MR-8 is equipped with the [DIGITAL OUT] connector, so you can make mixdown recording in digital domain to a digital recorder (DAT, MD, etc.) which accepts an S/P DIF digital signal. -
Page 48: Digital Mixdown
S/P DIF signal. Generally, a digital recorder does not have a facility for controlling the digital input level. 3) Use the [MASTER] fader of the MR-8 to adjust the output level. Adjust the level appropriately so that the level meter of the master recorder shows "0"... -
Page 49: Playback Functions
This chapter describes basic and advanced playback functions of the MR-8. Basic playback In the following description, it is assumed that a CompactFlash card with recorded data is set in the slot. 1) Load a desired song to be played back. -
Page 50: Play Mode
MR-8 Owner’s Manual Play mode The MR-8 offers special play modes including Auto play, Auto return and Loop playback. • Selecting a play mode 1. While the recorder is stopped, pressing the [PLAY MODE] key switches play modes among "Off", "Auto Play", "Auto return"... -
Page 51: Loop Function In Auto Punch In/Out Mode
You can change the pre-roll and post-roll time within the range between 0.1 and 10.0 seconds (in 0.1 sec steps) in the menu mode (see "Pre-roll and post-roll setting" on page 55). LOCATE A point punch in/out range MR-8 Owner’s Manual LOCATE B point 1sec. LOOP END... -
Page 52: Locate Functions
• LOCATE ABS ZERO function * While the recorder is stopped, press the [REWIND] key while holding down the [STOP] key. The MR-8 immediately locates to the beginning of the song (ABS ZERO). RECORD STOP... -
Page 53: Locating To Counter Zero
The time value of the recorder position at which you operate above is stored to the LOCATE A point, while “Store LOCATE A” is shown on the display. the current position zero return MR-8 Owner’s Manual LOCATE A / IN B / OUT STORE... -
Page 54: Locating
MR-8 Owner’s Manual • Storing a LOCATE B point * To store the LOCATE B point, while the recorder is playing back (or stopped), press the [LOCATE B/ OUT] key while holding down the [STORE] key. The time value of the recorder position at which you operate above is stored to the LOCATE B point, while “Store LOCATE B”... -
Page 55: Setting The Pre-Roll/Post-Roll
You can select the post-roll time between 0.1 s and 10.0 s in 0.1 s steps. 8) After setting the pre-roll and post-roll, press the [MENU] key to exit the menu mode. MR-8 Owner’s Manual ] key to highlight "Pre Roll flashing ]/[CURSOR ] keys to select ] key to highlight "PostRoll... -
Page 56: Setting The Beat Resolution
MR-8 Owner’s Manual Setting the beat resolution As described earlier, while the time base is set to "Bar/Beat", setting "Beat resolution" in the menu to "On" allows you to store the LOCATE A or B point in beat resolution. When "Beat resolution" is set to "On", the clock digit of the Bar/Beat/Clock value is automati- cally rounded down or up, so that the clock digit is always "00". -
Page 57: Editing A Song
"Select Song" is highlighted. 5) Press the [MENU] key to exit the menu mode. The display shows the home screen of the selected song. MR-8 Owner’s Manual ] key scrolls down the list. / ] keys to select a desired... -
Page 58: Editing A Song Name
The display now shows the screen in which "Rename Song" is highlighted. 7) Press the [MENU] key to exit the menu mode. The MR-8 exits the menu mode and the display flashing shows the home screen of the current song. -
Page 59: Selecting An Unnecessary Song
The display now shows the confirmation screen for deleting the song. In this screen, “Delete Song” and “Can’t Undo!” are shown for warning, as well as “Yes-> RECORD+YES” and “No-> NO Key” alternately flash. The MR-8 asks for confirmation because you cannot undo deleting the song. <Note>... -
Page 60: Protecting A Song
MR-8 Owner’s Manual Protecting a song You can protect a song to prevent an accidental erasure. The protection can be released when- ever you want. To keep a recorded song, we recommend to pro- tect it. <Note> You cannot make recording or editing to a pro- tected song. -
Page 61: Deleting The Unnecessary File In A Song
(undo WAV) file. In this screen, “DEL Unused” and “Can’t Undo!” are shown for warning, as well as “Yes-> RECORD+YES” and “No-> NO Key” alternately flash.The MR-8 asks for confirmation because you cannot undo deleting the undo WAV file. -
Page 62: Track Editing
MR-8 Owner’s Manual The following describes how to edit whole selected (mono or stereo) track data. <Undo/redo of track editing> By pressing the [UNDO/REDO] key after executing the track edit operation, you can undo the editing. By pressing the [UNDO/REDO] key after the undo operation, you can return the track(s) to the condition after being edited. -
Page 63: Copying/Pasting Whole Track Data
] key to move the cursor to "ENTER" on the screen, then press the [ENTER] key. The display shows "Please Wait!", immediately fol- lowed by "Completed!" when the MR-8 completes erasing. <Note> If you want to cancel the erase operation, move the cursor to "... - Page 64 ] key to move the cursor to "ENTER" on the screen, then press the [ENTER] key. The display shows "Please Wait!", immediately fol- lowed by "Completed!" when the MR-8 completes the copy/paste operation. <Note> If you want to cancel the copy/paste op- eration, move the cursor to "...
-
Page 65: Moving Whole Track Data
8) Use the [CURSOR "ENTER" on the screen, then press the [ENTER] key. The display shows "Please Wait !", immediately followed by "Completed!" when the MR-8 completes the move operation. <Note> If you want to cancel the move operation, move the cursor to " [CANCEL] " on the screen, then press the [ENTER] key. -
Page 66: Exchange Whole Track Data
MR-8 Owner’s Manual <Note> If a destination track has recorded data, moving data overwrites the previous data. 9) Press the [ENTER] key. The display returns show to the screen in which "Move Track" is highlighted. 10) Press the [MENU] key to exit the menu mode. - Page 67 ] key to move the cursor to "ENTER" on the screen, then press the [ENTER] key. The display shows "Please Wait!", immediately followed by "Completed!" when the MR-8 completes the exchange operation. <Note> If you want to cancel the exchange opera- tion, move the cursor to "...
-
Page 68: Part Editing
1. Press the [PLAY] key while holding down the [STOP] key. The MR-8 starts playback between the LOCATE A and LOCATE B points (see also page 49). 2. During playback, raise the appropriate track fader(s) and the [MASTER] fader. -
Page 69: Erasing A Desired Part
"[ENTER]" at the lower right on the screen, then press the [ENTER] key. The display shows "Please Wait!", immediately fol- lowed by "Completed!" when the MR-8 completes erasing. If you want to cancel the erase operation, move the cursor to "[CANCEL]" on the screen, then press the [ENTER] key. -
Page 70: Copying/Pasting (1)
"[ENTER]" at the lower right on the screen, then press the [ENTER] key. The display shows "Please Wait!", immediately fol- lowed by "Completed!" when the MR-8 completes the copy operation. To cancel the copy operation, move the cursor to "[CANCEL]" at the lower left on the screen, then press the [ENTER] key. -
Page 71: Pasting Clipboard Data
(“ Clip board Empty! ”) is shown on the display and the MR-8 does not accept the opera- tion. Press the [MENU] key to exit the menu mode and copy the desired data to the clipboard be- fore carrying out the paste operation. -
Page 72: Copying/Pasting (2)
"ENTER" at the lower right on the screen, then press the [ENTER] key. The display shows "Please Wait!", immediately fol- lowed by "Completed!" when the MR-8 completes the copy operation. To cancel the copy/paste operation, move the cur- sor to "[CANCEL]" at the lower left on the screen, then press the [ENTER] key. -
Page 73: Moving The Desired Part To The Other Track(S)
"System" is highlighted initially. 4) Use the [CURSOR ] key to highlight "Part", then press the [ENTER] key. The display now shows the part edit menu selec- tion screen, in which "Erase Part" is highlighted ini- tially. MR-8 Owner’s Manual LOCATE B point... - Page 74 "ENTER" at the lower right on the screen, then press the [ENTER] key. The display shows "Please Wait!", immediately fol- lowed by "Completed!" when the MR-8 completes the move operation. To cancel the move operation, move the cursor to "[CANCEL]" at the lower left on the screen, then press the [ENTER] key.
-
Page 75: Exchange Parts Between Tracks
"[ENTER]" at the lower right on the screen, then press the [ENTER] key. The display shows "Please Wait!", immediately followed by "Completed!" when the MR-8 completes the part exchange operation. To cancel the part exchange operation, move the cursor to "[CANCEL]" at the lower left on the screen, then press the [ENTER] key. - Page 76 MR-8 Owner’s Manual 10) Press the [ENTER] key. The display returns show to the screen in which "Change Part" is highlighted. 11) Press the [MENU] key to exit the menu mode. <Note> If you are not satisfied with the result, press the [UNDO/REDO] key to undo the opera- tion (see page 68).
-
Page 77: Synchronizing With Midi
[MIDI OUT] connector of the MR-8, you can make powerful recording. For example, by synchronizing a sequencer with the MR-8 during playback, you can mix down signals (such as a vocal, guitar, etc.) recorded on the MR-8 tracks and audio from a sound module. -
Page 78: Synchronization Using Midi Clock
3) Enable the external MIDI sequencer to synchronize to MIDI clock. See the operation manual of the sequencer for details. 4) Press the [PLAY] key of the MR-8 to start playback. The sequencer also starts playback while synchronizing to the MR-8. -
Page 79: Using The Rhythm Guide Function
Using the rhythm guide function The MR-8 provides the metronome function which can output the guide click for recording. To output the guide click, create the signature/tempo map using the "Signature Map" and "Tempo Map" items and set the click level using the "Click level" item in the menu mode. The rhythm guide click is output together with the stereo output signals during recording/play- back. -
Page 80: Changing The Bar Number Or Signature
MR-8 Owner’s Manual 5) Use the [CURSOR / ] keys to enter "4". 6) Use the [CURSOR ] key to flash "4/4" for "Sig." setting. You can select a desired signature from among 1/4, 2/4, 3/4, 4/4, 5/4, 1/8, 2/8, 3/8, 4/8, 5/8, 6/8, 7/8 and 8/8. -
Page 81: Deleting An Unnecessary Bar/Signature Setting
1) Bring up the song edit menu screen and use the [CURSOR ] key to highlight "Bar Offset" on the first page of the screen, then press the [ENTER] key. The current bar offset flashes ("-2bar" by default), showing that you can now edit it. flashing MR-8 Owner’s Manual flashing... -
Page 82: Creating The Tempo Map
MR-8 Owner’s Manual You can select from among the following op- tions. option meaning option -8bar -3bar ABS Zero=-8bar -7bar ABS Zero=-7bar -2bar ABS Zero=-6bar -6bar -1bar -5bar 0bar ABS Zero=-5bar -4bar ABS Zero=-4bar 2) Use the [CURSOR / ] keys to select a desired option, then press the [ENTER] key. - Page 83 Then, in order to use the rhythm guide function, continue to the procedure for click level setting described on page 85. To edit the tempo map you created, see below. MR-8 Owner’s Manual flashing / ] keys to enter "180". flashing ] key to highlight "[ENTER]"...
-
Page 84: Editing The Tempo Map
MR-8 Owner’s Manual Editing the tempo map You can edit the tempo map you created. 1) While the display shows the tempo map screen, use the [CURSOR / ] key to highlight the setting you want to change, then press the [ENTER] key. -
Page 85: Setting The Click Level
When mixing down tracks or recording the mixed stereo signals to an external master recorder, set the "Click Level" to "Off". Otherwise, the click is also output from the [STEREO OUT (L, R)] jacks together with the mixdown signals. flashing MR-8 Owner’s Manual... -
Page 86: Wav File Conversion
MR-8 Owner’s Manual You can convert track data recorded on tracks 7/8 (which consists of an L/R pair of mono WAV files) to a stereo WAV file, which can be exported to a personal computer. The following describes how to convert data on tracks 7/8 (which may be bounced from other tracks or simply recorded in stereo) to a stereo WAV file. - Page 87 When completing the conversion, the screen shows "Completed!". 3) Press the [ENTER] key. The MR-8 quits the conversion function and the display returns to the home screen. <Editing a file name> You can edit a file name by the following procedure.
-
Page 88: Exporting Data To A Personal Computer
MR-8 Owner’s Manual Exporting data to a personal The MR-8 is equipped with the USB port for direct connection to a personal computer using a USB cable. This allows you to export stereo WAV file data, which is converted from a pair of mono WAV files for tracks 7/8, to your computer. -
Page 89: Exporting A Wav File To A Personal Computer
*********.wav <Note> While the MR-8 is in the USB mode, no keys except the [STOP] key are ineffective. Press- ing the [STOP] key exits the USB mode. 4) Connect the MR-8 to a personal computer using a USB cable. - Page 90 To disconnect the MR-8 from the personal computer after completing the data export, make sure that the [RECORD] key indica- tor of the MR-8 is not lit, and follow the procedure for hardware disconnection of Windows. 8) Press the [MENU] key to exit the menu mode.
-
Page 91: Initializing The Mr-8
By initializing the MR-8, you can initialize all global menu settings common to all songs, as well as the time base and display contrast level. Pre-roll time setting Post-roll time setting Delay type setting MIDI sync out setting MTC frame rate setting... -
Page 92: Troubleshooting
MR-8 Owner’s Manual If you encounter any problem while operating the MR-8, check the following for the possible cause of the problem before contacting our service station or dealer. Troubles for recording <Trouble 1> I am going to make recording using the inter- nal microphone but I cannot see the input level on the display. - Page 93 Cannot record audio data of a song onto an external digital recorder. • Is the connection between the [DIGITAL OUT] connector on the MR-8 and the optical input connector of the digital recorder made correctly? Check the connection, as well as the optical cable (see page 48).
- Page 94 • Are the plugs of the AC adaptor plugged in firmly? Check the connection of the AC adaptor with the MR-8 and AC main outlet (see page 17). • Are the batteries empty? (when supplying the power from batteries) Check the batteries (see page 17).
-
Page 95: Mr-8 Specifications
Corporation in U. S. A. and licensed to CFA (CompactFlash The polarity of the supplied AC adaptor is center plus/outer minus. card [Pin assignment of XLR connectors] MR-8 Owner’s Manual : FAT16 (VFAT) : approximately 25 minutes/128 MB (mono track) : 16-bit, delta-sigma... -
Page 96: Physical Dimensions
MR-8 Owner’s Manual DC IN INPUT A SELECT INPUT A /GUITAR GUITAR TRIM DISTORTION PEAK LINE DYNAMIC BRIT STACK When using the normal mode INPUT A UNBAL INPUT FX INT MIC TRIM DISTORTION INPUT B TRIM UNBAL Physical dimensions FOOT SW... - Page 97 OUT 4 TRK 4 EFF TRK 5/6 FADER OUT 5 DA/C OUT 6 TRK 7/8 FADER OUT 7 OUT 8 MR-8 Owner’s Manual MASTERING FX REVERB/DELAY ST OUT L ST OUT R PHONES PHONES 1 PHONES 2 DIGITAL OUT ENCODE...
-
Page 98: Midi Implementation Chart
MR-8 Owner’s Manual MIDI Implementation Chart (Digital Multitracker) Model MR-8 Function... Default Basic Changed Channel Default Mode Message Altered Note Number: True Voice Velocity Note ON Note OFF After Key's Touch Channel's Pitch Bend Control Change Program Change: True #... -
Page 99: Index
Track ...29, 62 Trouble shutting ...92 Trim ...9, 30, 32, 34 Track fader ...19, 31, 33, 44 Track exchange ...66 <U> Undo ...32, 34, 62, 68 Undo file ...61 USB ...88 <W> WAV file ...7, 86 Warning message ...27 MR-8 Owner’s Manual... -
Page 100: Optional Accessaries
MR-8 Owner’s Manual Dynamic microphone Model M521 XLR type (Female) -> PHONE Stereo Headphone Model T-5 Dynamic type, Semi-open type Stereo Headphone Model T-7 Dynamic type, Semi open type RP Stereo Headphone Model T20RP RP dynamic type, Semi-open type Optional accessaries... -
Page 101: Declaration Of Ec Directive
In the electrical fast transient/burst requirements, surge, conducted disturbances by radio-frequency fields, power frequency magnetic field, radiate electromagnetic field requirements and static electricity discharging environment, this could be affected by generation of noise in some cases. FOSTEX DISTRIBUTORS LIST IN EUROPE * Including non-EU countries (as of January, 2003). <AUSTRIA>... - Page 102 FOSTEX CORPORATION 3-2-35, Musashino, Akishima-shi, Tokyo, Japan 196-0021 FOSTEX AMERICA 15431, Blackburn Ave., Norwalk, CA 90650, U. S. A. © PRINTED IN JAPAN FEB. 2003 8588018100 376785...