Fishman Loudbox 100 Owner's Manual
Acoustic instrument amplifier
Hide thumbs
Also See for Loudbox 100:
- User manual (20 pages) ,
- Training manual (3 pages) ,
- Replacement (5 pages)
Table of Contents
Advertisement
Quick Links
Advertisement
Table of Contents

Related Manuals for Fishman Loudbox 100


Summary of Contents for Fishman Loudbox 100
- Page 1 Owner’s Manual Loudbox 100 Acoustic Instrument Amplifier...
-
Page 2: Table Of Contents
Acoustic Instrument Amplifier Read Me! Take a few minutes to read through this manual before you power-up the Loudbox 100. To jump in immediately, start with the Important Safety Instructions and the Getting Started sections. While this information will get you on your way, it is not considered a substitute for reading the entire manual. -
Page 3: Safety Warnings
To reduce the risk of fire or electric shock, do not expose this apparatus to rain or moisture. Hear This! The Loudbox 100 amplifier is capable of cleanly reproducing the sound of your instrument at very high volume levels. Prolonged repeated exposure to high sound pressure levels (SPLs) without protection can cause permanent hearing loss. -
Page 4: Welcome
...and thank you for choosing the Fishman Loudbox 100! Our passion for acoustic instruments inspired us to create this amp - it is our sincere wish that the Loudbox 100 will inspire you as well! With its unique bi-amplified design, the potent... -
Page 5: Getting Started
Owner's Manual Getting Started Here are some basic setup tips to help get you going. To operate the Loudbox 100 safely, please read the entire manual, especially the Important Safety Instructions on page 3. If your amplifier has an operating voltage of 120V, plug the provided AC line cord into the back of the amplifier. -
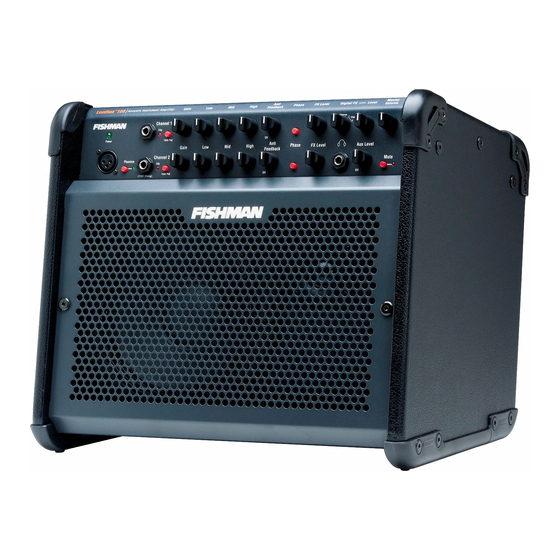
Page 6: Front Panel
3. Channel 2, XLR Input Plug in a balanced mic here for vocal or for your instrument. The Loudbox 100 makes an excellent mini-PA or vocal monitor. You may also connect an outboard preamp with balanced XLR out to this input. - Page 7 Channel 1 & 2 FX Levels. 17. Master Volume Set the overall level of the Loudbox 100 with the Master Volume. In general put the Master Volume as high as possible (2 o’clock to 5 o’clock) to achieve the cleanest sound.
-
Page 8: Rear Panel
Loudbox 100 Acoustic Instrument Amplifier Rear Panel 1. Tweeter Level Set the front panel controls flat and adjust the tweeter level to where it sounds best to you. 2. Aux Input Plug in a line level stereo audio source such as a CD or MP3 player in this input. The 1/4 inch stereo (TRS) Aux Input mixes the signals to mono when amplified, but will retain the source's stereo image through the headphones jack. -
Page 9: Rear Panel
Owner's Manual Rear Panel Power Switch Lower the master volume or engage the Mute switch before you turn on the amp. Flip the power switch to the up position and it will light, indicating the amp is on. AC Power Operate the amplifier only at the voltage indicated in the check box on the rear panel. -
Page 10: Tone Tips
Acoustic Instrument Amplifier Tone Tips You can find a balanced tone with the Loudbox 100 when you hear how tone changes as the volume rises. Set Up For reference, start with the tone controls flat (straight-up, twelve o’clock). In this position, there is no equaliza- tion applied to your sound. -
Page 11: About Acoustic Feedback
A: All the following can be used safely with phantom power: 1. All balanced condenser microphones. 2. All balanced dynamic microphones. 3. Many new wireless units. Check with the manufacturer for compatibility. 4. A preamp/DI designed for phantom-power operation, such as the Fishman Pro-EQ Platinum. Anti Feedback Lower... -
Page 12: Stereo Blending
3) Turn on phantom power if mini-mic requires it. ������������������ ��������������������� Below are setup instructions for two common Fishman products with stereo blending capability. For other products, follow the manufacturer’s instructions for setup. Prefix Premium Blend & Prefix Stereo Blender Open battery compartment and move switch to “stereo.”... -
Page 13: Block Diagram
Owner's Manual Block Diagram... -
Page 14: Specifications
Loudbox 100 Acoustic Instrument Amplifier Technical Specifications Rated Power: Cumulative Woofer Amp Tweeter Amp All measurements @ nominal line 120V, 60Hz Acoustic Response: SPL @ 1 Meter Frequency Response Power Consumption: Input Impedance: Ch.1 Ch.2, 1/4”Jack (tip) Ch.2, 1/4”Jack (ring) Ch.2, XLR Input... -
Page 15: Specifications
Owner's Manual Techical Specifications Cont'd Channel 1 & 2 D.I. Out Output Impedance Channel 1 & 2 Effects Sends: Output Impedance Output Voltage Channel 1 & 2 Effects Returns: Input Impedance Input Voltage Sends and returns are compatible with battery operated effects processors Mix D.I. -
Page 16: Warranty
If your local Fishman Dealer cannot service the amplifier, contact Service & Support at www.fishman.com and we will recommend an authorized Fishman Service Center in your area. If there is no service center close to you, return the amplifier to the factory as described below.