Advertisement
Advertisement
Table of Contents

Related Manuals for Fishman Loudbox Mini


Summary of Contents for Fishman Loudbox Mini
- Page 1 USER GUIDE LOUDBOX MINI...
-
Page 2: Important Safety Instructions
The apparatus should be connected to mains outlet with a protective earthing connection. Disconnect device is Mains Plug, which should remain readily operable. Copyright © 2010 FISHMAN TRANSDUCERS, INC. All rights reserved. No part of this document may be reproduced in any form without the... - Page 3 Before using Loudbox Mini, carefully read the following sections: Important Safety Instructions (Page 2) Getting Started (Page 5) Save Your Packing Materials The box and packing materials were specially designed to protect the amplifi er during shipping. Save all this stuff in case you need to re-ship the Loudbox Mini. Hear This! The Loudbox Mini amplifier is capable of cleanly reproducing the sound of your instrument at very high volume levels.
- Page 4 Welcome Thank you for making Fishman a part of your acoustic experience. We are proud to offer the fi nest acoustic amplifi cation products available; high-quality professional-grade tools which empower you to sound your very best.
-
Page 5: Getting Started
Getting Started Here are some basic setup tips to help get you going. To operate your Loudbox Mini safely, please read the entire manual, especially the Important Safety Instructions on page 2. If your amplifi er has an operating voltage of 120V, plug the provided AC line cord into the back of the amplifi... -
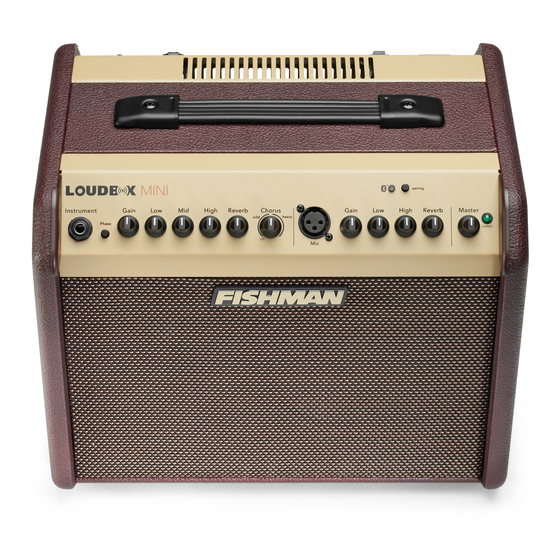
Page 6: Front Panel
Front Panel 1. Instrument Input This 1/4” input accepts all types of passive or active acoustic pickups. 2. Phase Use the Phase switch to improve bass at low volume and suppress feedback at high volumes. 3. Gain Use the Gain knob to set the signal level for the instrument input. 4. -
Page 7: Mic Input
Front Panel (cont.) 9. Mic Input Plug in a balanced mic into this XLR input for vocal or for your instrument. The Loudbox Mini makes an excellent mini-PA or vocal monitor. You may also connect an outboard preamp with balanced XLR out to this input. 10. -
Page 8: Rear Panel
Rear Panel 1. AC power Operate the amplifi er only at the voltage indicated on the rear panel. For 120V amplifi ers purchased in the USA, Canada and Mexico, plug in the supplied detachable AC power cable. For 100V and 230V amplifi ers purchased outside the USA and Canada, you will need to supply your own detachable AC cable. - Page 9 Tone Tips Set up For reference, start with the tone controls fl at (straight-up, twelve o’clock). In this position, there is no equalization applied to your sound. Begin at a very low volume and work your way up. As you turn up, try adjusting the Loudbox Mini’s tone controls as recommended below.
-
Page 10: Block Diagram
Block Diagram Instrument Class-A Hi-pass Gain Low, High Middle Phase Input Buffer Filter Mix D.I. Output (mic level) Master 60Watt Instrument Limiter Crossover Volume Power Amp Reverb Level Chorus In Digital Tweeter Effects Reverb In Reverb Level Woofer Hi-Pass Gain Low, High Input Preamp... -
Page 11: Technical Specifications
Technical Specifi cations Rated power: Output power 60Wrms SPL @ 1 Meter 108dB SPL Frequency Response 80Hz – 20kHz (-4dB) Power consumption: 145W max Input impedance: Ch. 1 10MOhm Ch. 2 2kOhm Aux Input (stereo) 10kOhm Tone controls: ±12dB @ 80Hz (resonant) ±10.5dB @ 750Hz (resonant) High ±12.5dB @ 15kHz (shelving) - Page 12 Fishman and Fishman Transducers are trademarks or tradenames of Fishman Transducers Inc. 513-300-170 Rev C 8-10...