Table of Contents
Advertisement
Advertisement
Table of Contents

Related Manuals for Focusrite Saffire


Summary of Contents for Focusrite Saffire
- Page 1 UG-Rev 1.1...
-
Page 2: Table Of Contents
Introduction ..........1 represents Focusrite s many years of manufacturing for the recording Getting Started Guide . -
Page 3: Getting Started Guide
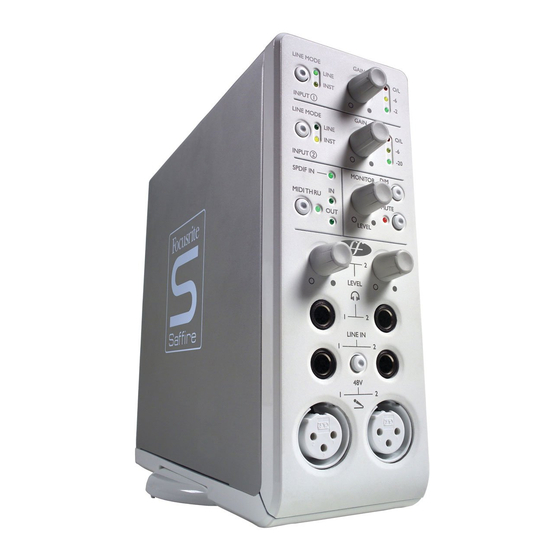
Getting Started Guide Step 1: Sequencer Installation 8.The first time you run Saffire it may prompt you to update 1. If you don t already have a sequencer installed in your firmware. Ensure you have an internet connection and follow the computer, then insert the Cubase LE CDROM (the sequencer on screen instructions. - Page 4 3. Digital and MIDI displays and control 5. Microphone and line inputs When an SPDIF (digital) signal is connected to the SPDIF RCA Front panel inputs are supplied for both microphone and line-level (phono) input on the rear panel, the SPDIF In LED in this section will sources.
-
Page 5: Rear Panel Connections
Rear Panel Connections 1. Eight balanced analogue outputs on 1/4 TRS jack, labelled 1-8 in ascending order from bottom to top These could be used for mixing in 7.1 (or 5.1) surround so the outputs are marked with Left, Right, Centre, LeftSurround, RightSurround, LowFrequencyEffects, LeftCentre and RightCentre accordingly. -
Page 6: Recording And Monitoring A Source Using Saffire
SaffireControl. For more detailed instructions, clockwise to increase the level, making sure that the O/L LED (top consult the relevant sections of the Saffire User Guide and help files red LED) never illuminates as this indicates that the at www.focusrite.com. -
Page 7: Soundcard (S/Card) Mode
The recorded source should be heard on both headphones and monitors as the INPUT MIX-P/BACK MIX sliders will all be in a central position (as shown in the diagram on page 5).This means that equal amounts of the (playback) tracks from the sequencer and the incoming audio will be sent to each stereo output pair. -
Page 8: Saffirecontrol: Session Management & Advanced Settings
SaffireControl: Session Management & Advanced Settings Software SaffireControl is a software application that allows total control of the interface performance and, of course, all settings within one or the Saffire hardware, so that plug-ins can be applied and different input other mode can be saved so that a session can be picked up again at and playback mixes can be created.The software has two main modes a later date (see SOFTWARE SETTINGS section on page 15). -
Page 9: Input Stage
Input stage The Input stage, in the top left of the main software panel, is the area ins (as shown in the picture above). The default order of the plug-ins where both EQ/Amp Sim and/or compression can be applied to is compression then EQ/Amp Sim, with the first plug-in in the chain analogue Inputs 1 and 2. - Page 10 FREQ and Q dial will be active to select the cut-off frequency of the the same curves as the classic Focusrite EQ; all that s required to filter. For example, if wanting to set up a low shelf to increase the bass,...
-
Page 11: Amp Sim
Amp Sim The Amp Sim plug-in is designed to allow high quality tracking of guitar Five dials are included to allow control over the amp s settings.The first parts without the need for a whole host of physical amplifiers. With is DRIVE, which increases the level of distortion when rotated Saffire, the guitar can simply be plugged direct into the front panel clockwise. -
Page 12: Compression
The Saffire Compressor plug-in is modelled on the legendary Set the RATIO next, as this determines how much the signal is Focusrite hardware devices, with individually tuned optos to help reduced by when it exceeds the threshold. For example, a ratio of create the sound of vintage 1960s compression. -
Page 13: Balancing Tracks From The Sequencer/Recording Platform
Two buttons in the bottom right of the Compressor window allow Saffire Compressor locations, running in SaffireControl or on the copying and pasting of Compressor settings to and from other host computer. Balancing tracks from the sequencer/recording platform The top right hand side of the Main Application window has five The mix created with these faders will become the default output faders, which represent the levels of the first 10 tracks from the signal sent to each set of the stereo outputs, controlled by the lower... -
Page 14: Processing/Mixing Of Stereo Outputs
Processing/mixing of stereo outputs The lower half of the Main Application window is the area where the last one, 9/10, which is the SPDIF output and so contains no level signal sent to each set of stereo outputs (monitors, headphones, control as the digital output level is fixed. - Page 15 The top segment of each stereo output portion is devoted to mixing FOLDBACK REVERB section on page 15 for details on how to modify the levels of the input channels.This may simply be a case of blending reverb settings. between analogue inputs 1 and 2 (probably most common) or inputs 3 and 4 (either dry signal or SPDIF In) or it might be a custom mix of This mix of inputs now becomes the INPUT MIX for that pair of all four input channels.
-
Page 16: Foldback Reverb
buttons. To the left of the dial is a Mute button (labelled M), above is hardware sets its level, to deselect it simply press the button allowing a button that sets the Monitor dial on the hardware to control the software control. -
Page 17: Stereo Link Button Controls
Stereo link button controls Pressing the stereo link button within the Input stage of SaffireControl results in a changing of the Main Application window format, as follows: In this mode, analogue input 2 is disabled and settings for the stereo last change that the software undergoes is a simplification in the Input pair (inputs 1 and 2) are both controlled from analogue input 1. - Page 18 Pressing the TRACK button will change to the tracking (recording) window to be expanded back to full size. mode in which a mix of input channels with optional foldback reverb and a mix of the playback tracks from the recording The last control is the S/RATE button, which launches a separate software/sequencer can both be blended for monitoring and foldback window in which the sample rate of the Saffire hardware s digital...
-
Page 19: Midi
MIDI Operation The Saffire operates as a MIDI interface with one input and one capabilities. This mode is necessary when the sequencer is running, output. The Saffire can operate in one of two possible MIDI modes. because it will prevent doubling of notes that occur when the same The state of the THRU button on the front panel determines which MIDI information is transmitted by both the input device and the MIDI mode will be used. -
Page 20: Saffire Signal Flow Diagram - Dual Mono Mode
Saffire Signal Flow Diagram - Dual Mono Mode... -
Page 21: Troubleshooting
Troubleshooting LEDs on the Saffire hardware aren t working low enough for the signal to exceed it for the compressor to have ¥ Does the unit have power? This is supplied by the Firewire cable, any effect. (See page 11 for more information). is one connected? If connecting to a 4-pin Firewire port, is the external PSU connected? The EQ is not working... -
Page 22: Specifications
Specifications ANALOGUE INPUTS WEIGHT and DIMSENSIONS Mic: 2 x XLR on front panel 1.1kg Mic Gain: +13 dB to + 60 dB 6.5cm x 17cm x 17cm Line: 2 x 1/4 TRS Jack Line Gain: -10 dB to +36 dB POWER REQUIREMENTS Instrument: As above, switched to Instrument 12v AC @ 1A... -
Page 23: Warranty
No part of this manual may be reproduced, photocopied, stored on a retrieval system, transmitted or passed to a third party by any means In these circumstances, or if you need an out-of-warranty repair to or in any form without the express prior consent of Focusrite Audio your Focusrite...