JVC MX-KA6 Instructions Manual
Compact component system
Hide thumbs
Also See for MX-KA6:
- Service manual (63 pages) ,
- Manuel d'instructions (30 pages) ,
- Service manual (34 pages)
Table of Contents
Advertisement
Quick Links
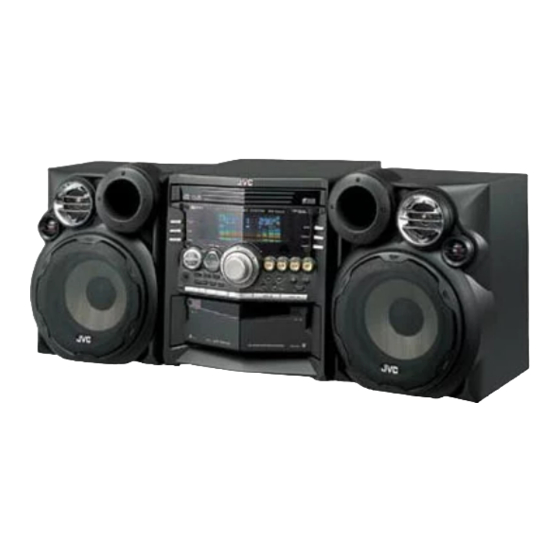
COMPACT COMPONENT SYSTEM
MX-KA6
Consists of CA-MXKA6 and SP-MXKA6
STANDBY/ON
SLEEP
AUX
FM MODE
FM /AM
CD
CD
1
CD
2
CD
3
REPEAT
PROGRAM /RANDOM
TAPE
TAPE
A/B
SOUND
VOLUME
MODE
ACTIVE
SOUND
FADE
BASS EX.
TURBO
MUTING
RM-SMXKA6J REMOTE CONTROL
SP-MXKA6
INSTRUCTIONS
SP-MXKA6
CA-MXKA6
For Customer Use:
Enter below the Model No. and Serial No.
which are located either on the rear, bot-
tom or side of the cabinet. Retain this
information for future reference.
Model No.
Serial No.
LVT1014-001A
[J]
Advertisement
Table of Contents

Related Manuals for JVC MX-KA6


Summary of Contents for JVC MX-KA6
- Page 1 COMPACT COMPONENT SYSTEM MX-KA6 Consists of CA-MXKA6 and SP-MXKA6 STANDBY/ON SLEEP FM MODE FM /AM REPEAT PROGRAM /RANDOM TAPE TAPE SOUND VOLUME MODE ACTIVE SOUND FADE BASS EX. TURBO MUTING RM-SMXKA6J REMOTE CONTROL SP-MXKA6 SP-MXKA6 CA-MXKA6 INSTRUCTIONS For Customer Use: Enter below the Model No.
- Page 2 Warnings, Cautions and Others CAUTION RISK OF ELECTRIC SHOCK DO NOT OPEN CAUTION: TO REDUCE THE RISK OF ELECTRIC SHOCK DO NOT REMOVE COVER (OR BACK) NO USER SERVICEABLE PARTS INSIDE REFER SERVICING TO QUALIFIED SERVICE PERSONNEL. The lightning flash with arrowhead symbol, within an equilateral triangle is intended to alert the user to the presence of uninsulated “dangerous voltage”...
- Page 3 CLASS 1 LASER PRODUCT DANGER 1. Invisible laser radiation when open and interlock failed or defeated. Avoid direct exposure to beam. CAUTION 1. Do not open the top cover. There are no user serviceable parts inside the unit; leave all servicing to qualified service personnel.
-
Page 4: Introduction
❏ The controls and operations have been redesigned to make them very easy to use, freeing you to just enjoy the music. • With JVC’s COMPU PLAY you can turn on the System and automatically start the Radio, Cassette Deck, or CD Player with a single touch. -
Page 5: Table Of Contents
Table of Contents Introduction ........................1 Features..............................1 How This Manual Is Organized....................... 1 IMPORTANT CAUTIONS........................1 Table of Contents ......................2 Getting Started ......................3 Accessories .............................. 3 How To Put Batteries In the Remote Control..................3 Using the Remote Control ........................3 Connecting the FM Antenna........................ -
Page 6: Getting Started
Getting Started Accessories Make sure that you have all of the following items, which are supplied with the System. AM Loop Antenna (1) FM Wire Antenna (1) Remote Control (1) Batteries (2) If any of these items are missing, contact your dealer immediately. How To Put Batteries In the Remote Control Match the polarity (+ and –) on the batteries with the + and –... -
Page 7: Connecting The Fm Antenna
Getting Started CAUTION: • Make all connections before plugging the System into an AC power outlet. Connecting the FM Antenna Using the Supplied Wire Antenna FM wire antenna (supplied) Extend the supplied FM Wire Antenna horizontally. Strip vinyl shield from cut line, twist wire core. -
Page 8: Connecting The Am Antenna
Getting Started Connecting the AM Antenna Rear Panel of the Unit AM antenna wire (not supplied) If reception is poor, connect the outside antenna. Turn the loop until you have the best reception. AM loop antenna (Supplied) Attach the AM loop to its base by snapping the tabs on the loop into the slot in the base. -
Page 9: Connecting External Equipment
COMPU Play JVC’s COMPU PLAY feature lets you control the most frequently used System functions with a single touch. With One Touch Operation you can play a CD, a tape, turn on the radio, or listen to an external equipment with a single press of the play button for that function. -
Page 10: Basic Operations
Basic Operations STANDBY/ON STANDBY/ON Display SLEEP Numeric SOUND MODE keys VOLUME SOUND TURBO FM MODE FM /AM ACTIVE BASS EX. PHONES STANDBY indicator STANDBY/ON REPEAT PROGRAM /RANDOM TAPE TAPE SOUND SOUND VOLUME MODE MODE VOLUME +,– ACTIVE SOUND FADE MUTING BASS EX. -
Page 11: Fade-Out Muting (Fade Muting)
Basic Operations ROCK Boosts low and high frequencies. Good for Fade-out Muting (FADE MUTING) acoustic music. Good for vocal music. CLASSIC Set for wide and dynamic sound stereo You can mute the output with one touch operation. systems. No sound effect applies. To muting the output, press the FADE MUTING button on the Remote Control. -
Page 12: Using The Tuner
Using the Tuner Numeric keys ¢ ¡ FM/AM FM MODE FM/AM Band display, Frequency display, Preset channel FM mode indicators * When the System is in use, the display shows other items as well. For simplicity, we show here only the items described in this section. You can listen to FM and AM stations. -
Page 13: Presetting Stations
Using the Tuner CAUTION: • Even if the System is unplugged or if the power • In AM broadcast, reception sensitivity will be changed by failure occurs, the preset stations will be stored turning the AM loop antenna. Turn the AM loop antenna for best reception. -
Page 14: Using The Cd Player
Using the CD Player REPEAT PROGRAM RANDOM Numeric CD1-CD3 keys CD Open/ Close 0 DISC SKIP ¢ CANCEL ¡ ¢ CD1-CD3 CD 6 REPEAT PROGRAM Track number, Playing time, /RANDOM Program number, etc. Program indicator Disc indicators Random Repeat indicator indicator * When the System is in use, the display shows other items as well. -
Page 15: To Load Cds
Using the CD Player ❏ When you use an 8 cm (3'') CD, place it on the inner circle of the Example of indication: tray. When CD tray has ejected once and then ❏ You can load CDs while listening to the other source or while CD1 is pressed. -
Page 16: Basics Of Using The Cd Player-Normal Play
Using the CD Player • Removing/changing the CDs during playback Basics of Using the CD Player- While playing back a CD (e.g. CD1), you can remove or change the other CDs (e.g. CD2 and CD3) by pressing the CD Open/Close Normal Play 0 button. -
Page 17: Programming The Playing Order Of The Tracks
Using the CD Player Repeat steps 3 and 4 to program other tracks Programming the Playing Order on the same CD or the other CD. of the Tracks To play the program, Press the CD but- You can program the playing order of the tracks on all the CDs. ton. -
Page 18: Random Play
Using the CD Player Random Play Tray Lock Function The tracks of all the CDs will play in no special order when you In order to safely keep the CD in the CD Player, the tray can be use this mode. electronically locked. -
Page 19: Using The Cassette Deck (Listening To A Tape)
Using the Cassette Deck (Listening to a Tape) ¡ TAPE A/B TAPE 3 ¢ 0 EJECT (Deck B) 0 EJECT (Deck A) TAPE TAPE A/B 3: Tape indicator Deck indicators * When the System is in use, the display shows other items as well. For simplicity, we show here only the items described in this section. -
Page 20: Using The Cassette Deck (Recording)
Using the Cassette Deck (Recording) REC START/STOP CD REC START PROGRAM DUBBING TAPE A/B 0 EJECT (Deck B) 0 EJECT TAPE 3 (Deck A) TAPE A/B TAPE 3: Tape indicator Deck indicators REC indicator * When the System is in use, the display shows other items as well. For simplicity, we show here only the items described in this section. -
Page 21: Standard Recording
Using the Cassette Deck (Recording) Insert a blank or erasable tape into the Deck Standard Recording B and wind past the tape leader. Press the CD REC START button on the Unit. This is the basic method for recording any source. The System also “CD REC”... -
Page 22: Using An External Equipment
Using an External Equipment Listening to the External Equipment You can listen to the external equipment such as MD recorder, cas- sette deck, or other auxiliary. ❏ First, make sure that the external equipment is properly connect- ed to the System. (See page 6.) Set the volume level to the minimum posi- tion. -
Page 23: Using The Timers
Using the Timers SLEEP ¢ CLOCK/TIMER DAILY Timer indicator Timer indicator REC (Recording) Timer indicator SLEEP indicator * When the System is in use, the display shows other items as well. For simplicity, we show here only the items described in this section. The timers lets you control recording and listening functions auto- display, the hour digits of the current clock blink on the dis- matically. -
Page 24: Setting The Daily Timer
Using the Timers 2. Press the ¢ or 4 button to set the minute, then press the Setting the Daily Timer SET button. Once you have set the Daily Timer, the timer will be activated at the same time every day. The Timer indicator ( ) and “DAILY”... -
Page 25: Setting The Rec (Recording) Timer
Using the Timers Preparation for each music source: Perform the following operation according to the music source you have selected. Then, the System enters Volume Setting • If the System is already on when the timer ON-time mode. comes, the Daily Timer does not work. When selecting TUNER FM or TUNER AM: Press the ¢... - Page 26 Using the Timers When the timer ON-time comes: Using the Unit • When the timer ON-time comes, the System automatically You can set the time in the same way as for setting the Daily Tim- turns on. The station you have set is played. The Timer indica- tor ( ) blinks during timer operation.
-
Page 27: Setting The Sleep Timer
Using the Timers Setting the SLEEP Timer Timer Priority Use the Sleep Timer to turn the System off after a certain number Since each timer can be set independently, you may wonder what of minutes when it is playing. By setting the Sleep Timer, you can happens if the settings overlap. -
Page 28: Care And Maintenance
Care And Maintenance Cassette Tapes Handle your CDs and tapes carefully, and they will last a long time. • If the tape is loose in its cassette, take up Compact Discs the slack by inserting a pencil in one of the reels and rotating. -
Page 29: Troubleshooting
Troubleshooting • If you are having a problem with your System, check this list for a possible solution before calling for service. • If you cannot solve the problem from the hints given here, or the System has been physically damaged, call a qualified person, such as your dealer, for service. - Page 30 To prevent electrical shock,do not open the cabinet.There are no user serviceable parts inside.Please refer to qualified service personnel for repairs. Accessories To purchase accessories for your JVC product,please call toll free:1 (800)882-2345 or on the web at www.JVC.com BT-51001-5...
- Page 31 If service is not available locally, box the product carefully, preferably in the original carton, and ship, insured, with a copy of your bill of sale plus a letter of explanation of the problem to the nearest JVC Factory Service Center, the name and location of which will be given to you by the toll-free number.
-
Page 32: Specifications
Specifications Amplifier Output Power 150 W per channel, min. RMS, driven into 6 Ω at 1kHz, with no more than 10% total harmonic distortion Input Sensitivity/Impedance (1 kHz) AUX IN 300 mV/50 kΩ Speaker terminals 6 - 16 Ω Phones 32 Ω - 1 kΩ 15 mW/ch output into 32 Ω...