Table of Contents
Advertisement
Operating Instructions
Commercial Microwave Ovens
Models No.
NE-12521 / NE-12523 / NE-17521 / NE-17523 /
NE-17723 / NE-21521 / NE-21523
*Model No. NE-17723
Please read these instructions carefully before using this product and save
this manual for future use.
Before Calling for Service:
If failure code "F" appears in the display, unplug oven and wait for
5 seconds before reconnecting. If normal operation does not resume,
call the service agent with the information of failure code.
Advertisement
Chapters
Table of Contents

Related Manuals for Panasonic NE12521


Summary of Contents for Panasonic NE12521
-
Page 1: Operating Instructions
Operating Instructions Commercial Microwave Ovens Models No. NE-12521 / NE-12523 / NE-17521 / NE-17523 / NE-17723 / NE-21521 / NE-21523 *Model No. NE-17723 Please read these instructions carefully before using this product and save this manual for future use. Before Calling for Service: If failure code “F”... -
Page 2: Table Of Contents
Heating and Defrosting Time Charts ..........24 PANASONIC COMMERCIAL MICROWAVE OVEN WARRANTY ..... .38 Technical Specifications . -
Page 3: Precautions To Avoid Possible Exposure To Excessive Microwave Energy
PRECAUTIONS TO AVOID POSSIBLE EXPOSURE TO EXCESSIVE MICROWAVE ENERGY Do not attempt to operate this oven with the Do not operate the oven if it is damaged. It is door open since open-door operation can result particularly important that the oven door close in harmful exposure to microwave energy. -
Page 4: Installation And Grounding Instructions
Installation and GROUNDING INSTRUCTIONS Placement of the Oven A. For Models No. NE-12521/NE-12523 Locate the oven on a smooth, flat and stable surface. The oven must be on a SEPARATE, 20 amp, There should be no gap between the table surface and 60 Hz-120 V GROUNDED CIRCUIT. -
Page 5: Attention
ATTENTION PLEASE READ THE FOLLOWING CAUTIONS BEFORE USING THIS MICROWAVE OVEN Failure to follow these instructions and properly maintain this unit may lead to premature failure of the Microwave and may void the warranty. Please read the following guidelines along with the included owner’s manual prior to operating this unit. and front of the unit. -
Page 6: Self Diagnostics Failure Code Explanation
Self Diagnostics Failure Code Explanation This oven monitors its operation and displays a Failure Code in Digital Display Window when a problem occurs. What to do when a Failure Code appears: When “F” is displayed, remove the plug, wait 5 seconds, and reinsert. If “F”... -
Page 7: Power Source Voltage Adjustment
Power Source Voltage Adjustment Models No. NE-17521/NE-17523/NE-17723/NE-21521/NE-21523 The microwave automatically detects 208 V and 230 V–240 V. Insert the plug, and if the Digital Display Window goes blank 10 seconds after use, unplug and insert the plug again. How Does The Microwave Work? Microwaves are a form of high frequency radio waves Absorption similar to those used by a radio including AM, FM, and... -
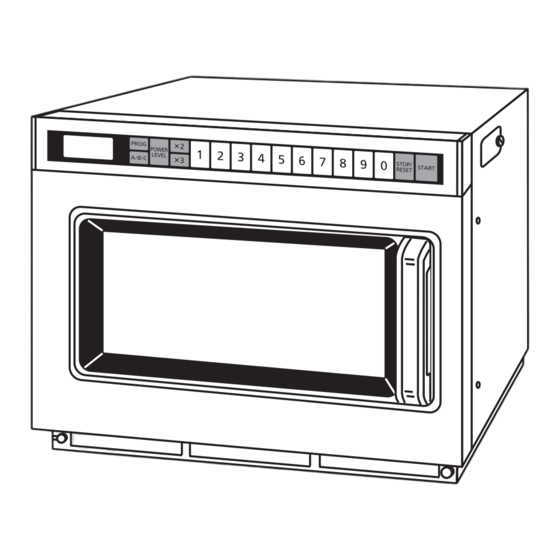
Page 8: Outline Diagram
Outline Diagram (2) (3) (4) (5)(6) (12) (13) (10) (11) Digital Display Window (see below) Stop/Reset pad Program pad Start pad Shift (A/B/C) pad (10) Door Handle Power Level Selector pad (11) Air Filter Double Quantity pad (12) SD Memory Card Cover* Triple Quantity pad (13) Splatter Shield (top of inner cavity) -
Page 9: Sd Memory Card
SD Memory Card *Model No. NE-17723 only ( An SD Memory Card is included in the unit purchased. the oven. How to insert / remove the SD Memory Card * Before you insert / remove an SD Memory Card, always disconnect the oven from the power supply. If this is not possible, the display window should be blank, otherwise, the data on the SD Memory Card may be damaged. -
Page 10: How To Operate
How to Operate POWER LEVEL SELECTOR PAD Each time the pad is pressed, the Power Level switches as the illustration below. again. P10: Models No. NE-12521 / NE-12523 (1200 W), NE-17521 / NE-17523 / NE-17723 (1700 W), HIGH NE-21521 / NE-21523 (2100 W) 95 % 35 % PU1:... -
Page 11: To 5 Stage Heating
How to Operate A. MANUAL HEATING — 2 to 5 stage heating — Example: To cook food at HIGH power for 2 minutes and at DEFROST power for 1 minute INSTRUCTION DIGITAL DISPLAY WINDOW Follow steps 1 to 3 on page 10. Press Power Level Selector pad. -
Page 12: Programmed Heating
How to Operate PROGRAM MEMORY Model No. NE-17723 (1300 memory): 1 digit input = 0 to 9, 2 digit input = 00 to 99, 3 digit input = 000 to 999 and A00 to C99 Other models (30 memory): A0 to C9 *For A settings, you do not need to press Shift (A/B/C) pad. To change the number of memory digits: Press “Start”... -
Page 13: To 5 Stage Heating
How to Operate INSTRUCTION DIGITAL DISPLAY WINDOW Press Shift (A/B/C) pad, Number/Memory pads “1” and “5”. The selected pad number will appear and currently programmed information will be indicated. Press Power Level Selector pad. Each time the pad is pressed, the Power Level switches as in the Power Level Selector pad illustration on page 10. -
Page 14: Programming Double Or Triple Quantity Pad
How to Operate D. PROGRAMMING DOUBLE OR TRIPLE QUANTITY PAD THE OVEN CAN NOT BE PROGRAMMED WHEN PROGRAM LOCK IS ACTIVATED! (See pages 14-15) Example: To program 1.5 times of heating time for double quantity into Number/Memory pads “1” and “5”... -
Page 15: Beep Tone
How to Operate INSTRUCTION DIGITAL DISPLAY WINDOW Open the door and leave it open. The oven lamp will turn on, and “0” will appear. While pressing Start pad, press Prog pad until “PROG” and “P” appear. (more than 2 seconds) “PROG”... - Page 16 How to Operate INSTRUCTION DIGITAL DISPLAY WINDOW Within 3 seconds after pressing Prog pad at step 4, press Start pad. “PROG” will start to blink. The display changes to 1st, 2nd, and 3rd each time the pad is pressed and the settings change. *The length of beep tone at the end of heating cycle 1st : 3 beeps 2nd : short beeps for 60 seconds...
-
Page 17: Program List
How to Operate G. PROGRAM LIST INSTRUCTION DIGITAL DISPLAY WINDOW Open the door and leave it open. The oven lamp will turn on and “0” will appear. While pressing Start pad, press Number/Memory pad “1”. e.g. All currently programmed information (the program set into each Number/Memory pad [A/B/C sides (000 to 999)], Beep Tone, Program Lock, Oven Lamp settings when the door is open, Oven Lamp blink settings at the end of heating cycle and Oven Lamp reduction settings... -
Page 18: Cycle Counter
How to Operate H. CYCLE COUNTER INSTRUCTION DIGITAL DISPLAY WINDOW Open the door and leave it open. The oven lamp will turn on and “0” will appear. While pressing Start pad, press Number/Memory pad “3”. e.g. All the cooking times that were ever used appear. INSTRUCTION DIGITAL DISPLAY WINDOW Open the door and leave it open. -
Page 19: Oven Lamp
How to Operate Example: To display the filter cleaning alarm counter INSTRUCTION DIGITAL DISPLAY WINDOW Open the door and leave it open. The oven lamp will turn on, and “0” will appear. While pressing Start pad, press Number/Memory pad “5”. e.g. - Page 20 How to Operate Example: To turn the blinking Oven Lamp ON at the end of heating cycle INSTRUCTION DIGITAL DISPLAY WINDOW Within 3 seconds after pressing Prog pad at step 4, press Start pad. “PROG” will start to blink. The previously set Oven Lamp blink settings are displayed. Press Start pad.
-
Page 21: Installation Instructions For Stacking
For stacking installation, you must use the PANASONIC Joint Plate (sold separately). The combination of the units for stacking is limited to only the following PANASONIC models: Models No. NE-12521, NE-12523, NE-17521,... -
Page 22: Care Of Your Oven
Care of Your Oven Remove the plug from the electrical socket before The outside surface of this microwave oven should cleaning. be cleaned with soap and water, then dried with a Keep the inside of the oven clean. If pieces of food soft cloth. -
Page 23: Cleaning And Maintenance Procedures
Cleaning and Maintenance procedures ALWAYS COVER pan(s). Use a ½ Pan for smaller DO NOT stack pans. portions and add a little water in pan to create steam. DO NOT OPERATE EMPTY! ALWAYS clean oven interior DAILY with rag SOAKED DO NOT HEAT BAGGED PRODUCTS! with Sanitizer, set Microwave for 1 minute and Place the food in a microwave-safe container with a lid... -
Page 24: Heating And Defrosting Time Charts
MICROWAVE BASICS ..........25 GENERAL GUIDELINES FOR HEATING IN PANASONIC MICROWAVE OVEN..25 APPETIZERS . -
Page 25: Heating And Defrosting Time Charts
Heating and Defrosting Time Charts MICROWAVE BASICS GENERAL GUIDELINES FOR HEATING IN A PANASONIC Fundamental principles determine the success of microwave food preparation. MICROWAVE OVEN They include: For specific time, see each food category for appropriate heating techniques, plus necessary pre- –... -
Page 26: Appetizers
Heating and Defrosting Time Charts APPETIZERS Quantities of appetizers can be prepared conventionally Most cooked appetizers heat on HIGH power, between in advance and refrigerated until needed. Most 7 and 11 seconds per ounce depending on weight, appetizers, with the exception of “nacho” platters and density, and bone content. -
Page 27: Baked Goods And Desserts
Heating and Defrosting Time Charts BAKED GOODS AND DESSERTS Breads, pastries and pies should be heated uncovered, Because crusts of breads, pastries and pies are drier at HIGH power. They should be placed on absorbent than insides or fillings, they heat more slowly. After material, such as a napkin or paper towel to prevent heating let rest about 1 minutes for equalization of sogginess. -
Page 28: Breakfast
Heating and Defrosting Time Charts BREAKFAST All foods listed are prepared in advance and reheated When preparing breakfast foods conventionally, at HIGH power from refrigerated temperatures (40˚F). undercook slightly and immediately chill and store, covered, for later reheating. Most breakfast foods are heated covered to retain moisture, with the exception of breads and pastries, Cured breakfast meats will reheat faster than uncured which should be heated uncovered on absorbent... - Page 29 Heating and Defrosting Time Charts Approximate Times Instructions for Instructions for Power NE-12521 NE-17521 NE-21521 Item Quantity Pre-preparation Microwave Heating Setting NE-12523 NE-17523 NE-21523 NE-17723 French 2 slices Prepare Place toast on plate HIGH 45 sec. 35 sec. 30 sec. toast with 4 strips conventionally,...
-
Page 30: Fish And Seafood
Heating and Defrosting Time Charts FISH AND SEAFOOD Defrost Primary Cooking Fish and seafood can be defrosted and heated Cooking individual portions demands close attention as successfully in this microwave oven. To defrost evenly, well as slight ubdercooking. Delicate fish and shellfish fish should be arranged in a single layer in container should always be undercooked and should from rest and should only be thawed to the point of being flexible... -
Page 31: Gravies, Sauces And Soups
Heating and Defrosting Time Charts GRAVIES, SAUCES AND SOUPS Some water-based gravies, sauces and soup mixes Refrigerated gravies, sauces and soups can be may be prepared in large portions using this oven to reheated quickly at HIGH and requires stirring during heat water and thicken the blended mixes. -
Page 32: Plated Meat And Poultry Entrees
Heating and Defrosting Time Charts PLATED MEAT AND POULTRY ENTREES Meat and poultry can be reheated successfully in this CAUTION oven. Pork products must be fully cooked prior to reheating. Undercook meat slightly. Arrange meat or poultry slices in single layer, overlapping pieces as little as possible. When appropriate, cover meats or poultry evenly with sauces. -
Page 33: Rice And Pasta
Heating and Defrosting Time Charts RICE AND PASTA For best results: reheat covered at HIGH power. Adding Rice and pasta dishes with cheese sauce, require more moisture, such as a sauce, can facilitate reheating stirring than tomato-based sauces to avoid over- though its not essential. -
Page 34: Sandwiches
Heating and Defrosting Time Charts SANDWICHES Preassembled sandwiches can be heated quickly and Thin sliced means, lightly packed, allow for more even easily in this microwave oven. For best results, heating. Place meat over bread. assemble sandwiches no more than 3 hours in All but openfaced sandwiches should be heated advance. -
Page 35: Vegetables
Heating and Defrosting Time Charts VEGETABLES Most vegetables, small and bulk portions, defrost, heat, Icy sections should be broken up during heating for and cook very successfully in the microwave, retaining even temperature distribution. fresh color and texture as well an nutritional value. The Canned vegetables can be heated using HIGH in thicker and more fibrous the vegetable, the longer the approximately 1 minute per pound. - Page 36 Heating and Defrosting Time Charts Vegetable, Fresh—Heating Approximate Times Instructions f or Instructions for Power NE-12521 NE-17521 NE-21521 Item Quantity Pre-preparation Microwave Heating Setting NE-12523 NE-17523 NE-21523 NE-17723 Carrots (cook) 4 lb. Peel carrots; cut Wash vegetables well. HIGH 8 min. 6 min.
-
Page 37: Casseroles
Heating and Defrosting Time Charts CASSEROLES Food-Service casseroles can be cooked successfully in Preparation this microwave oven. For best results, follow Remove all casseroles from their foil baking trays, while instructions below. still frozen and place in a microwave safe 4-inch half pan. -
Page 38: Panasonic Commercial Microwave Oven Warranty
On-site service in the continental U.S.A. can be obtained during the Obtain Product Information and Operating Assistance, warranty period from a Panasonic authorized service center. Call 1-888 locate your nearest Dealer or Service Center, by visiting 350 9590, toll free, to locate an authorized service center. Defects must be... - Page 39 Note - 39 -...
-
Page 40: Technical Specifications
˝ (464 mm) ⁄ ˝ (404 mm) ⁄ ˝ (9 mm) www.panasonic.com/cmo Panasonic Consumer Electronics Company, Division of Panasonic Corporation of North America One Panasonic Way Secaucus, New Jersey 07094 A00033E80AP Or Call (201) 348-5377 F0612-0 © Panasonic Corporation 2012...