Table of Contents
Advertisement
Quick Links
Panasonic'
Operatirg Instructions
Commercial Microwave Oven
Model NE-l0647
r ' - - E - . - ] '
t - t i
t
t
l
I
-q'i_
l
mlltr.i---o-l
"Itr-€]
i
trlit[.:'--T.r
l
-
lrF-C=l I
ffil1il':.--cr I
-
l--:-l
I
ltq.: r, rl I
--rltEr'_o_lll
3 E ' e r 1
G;;1 {E:rrl i
(s
ra-:-:--l:'s-1
|
tj!
tlgjl--\JJl I
Betore operating this oven, please read these instructions completely.
Advertisement
Table of Contents

Related Manuals for Panasonic NE-1064F


Summary of Contents for Panasonic NE-1064F
- Page 1 Panasonic' Operatirg Instructions Commercial Microwave Oven Model NE-l0647 Betore operating this oven, please read these instructions completely. r ' - - E - . - ] ' t - t i -q'i_ mlltr.i---o-l "Itr-€] trlit[.:'--T.r lrF-C=l I ffil1il':.--cr I l--:-l ltq.: r, rl I...
-
Page 2: Table Of Contents
TABLE OF CONTENTS TO AVOID POSSIBLE EXPOSURE TO EXCESSIVE PRECAUTIONS ENERGY... MrcRowAVE SAFETY INSTRUCTIONS TMPORTANT and Grounding Instructions lnstallation How Does the Microwave Safety Statements... Outline Diagram How to Operate Before Operating Heating A . M a n u a l S i n g l e S t a g e H e a t i n g ... B . -
Page 3: Mrcrowave Energy
Your microwave oven is a cooking device and you should use as much care as you use with a stove or any other cooking device. When using this electric appliance, basic safety precautions should be followed, including the following: reduce the risk of burns, electric WARNING-fo shock, fire, injury to persons or exposure to excessrve mrcrowave energy:... - Page 4 (120 V). Usrng a higher voltage rs danoerous and mav result in a fire or other accident cauJing oven damage. Using a lower voltage will cause slow heatino. Panasonic is NOT responsible tor damage resulting lro; the use of the oven with other than specilied voltage.
- Page 5 Microwaves are a torm of high frequency radio waves similar to those used by a radio including AM, FM and CB. They are, however, much shorter than radio waves; approximately five inches long. Electricity is converted into microwave energy by the magnetron tube.
- Page 6 General Use '1. Do NOT tamper with or make any adjustments or repairs to door, control panel housing, safety inlerlock switches or any other part of the oven. Do NOT remove outer panel from oven. Repairs should only be done by a qualjfied seruice person. 2.
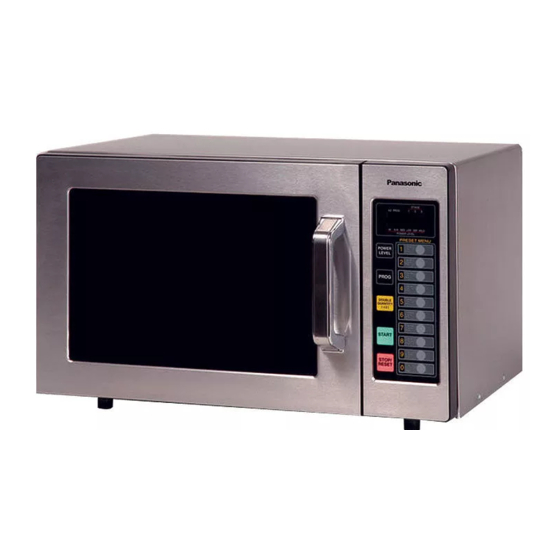
- Page 7 DigitalDisplay Window Indicator Locations A - Program Change Indicator B - Double Quantity (x2) Heaiing Indicatot C - Memory Pad Number and Heating Time Display (min, sec.) - each indicator 0-9 D - Stage Heating Indicator - 3 maximum (1) Digital Display Window (see below) (2) Memory Pads (3) Power Level Selector Pad (4) StoF/Beset Time Pad...
-
Page 8: Before Operating
Before Operating Make sure the oven is connected to a properly grounded electrical ouilet. When the door is closed, the display is still blank. When the door is opened, the display shows For the detail operation, see the page on each feature. This oven is preset at the factory for the following: 1. -
Page 9: Heating
HEATING Open the door and place food in the oven cavity. Close the door. "0" must be showing in the dlsptay window. A. Manual Single Stage Heating: This feature gives the user maximum tlexibility to set the oven to desired heating time and power level. ldeal for menus that require various heating requirements. -
Page 10: P R O G R A M M E D H E A T I N
C. Programmed Heating: Example: 1 stage; Memory Pad 9 to heat tor 3 minutes at HIGH Power t. (E.r-O-l 3. Beep tone will sound. (See page 16) Example: 2 stage; Memory Pad 3 (to heat tor 3 minutes at HIGH and 2 minutes at DEFROST) See page 12 to program Memory Pad. -
Page 11: Programming
Programming _ DO NOT OPEN THE DOOB - The display window MUST be blank betore programming can begin. lf any indicator light is illuminated in the digital Display Window: close the door, press STOP/RESET Pad and wait 1 minute unlil the Display goes blank. A. -
Page 12: P R O G R A M M I N G M E M O R Y P A D S F O R 2 O R 3 S T A G E H E A T I N
NOTE: . Program the remaining Memory Pads as desired by repeating steps 1-5. You may insert up to 10 memory Programs. . When the PROG indicator is blinkjng, the program can be cancelled and/or the Pad erased by pressing the STOP/RESET B. -
Page 13: Programming The Double Quantity Pad For Multiple Portion Heating
C. Programming the Double Quantity Pad - For multiple portion heating: Your oven is factory set to automatically double the programmed time for multiple portion heating - this is the correct setting for heating multiple portions of most small loods items. No further programming of the time is necessary for these food items. -
Page 14: T O A C T I V A T E P R O G R A M L O C
A. To Activate Program Lock: This procedure "Locks" the control panel Memory Pads into their programmed heating times and power levels. DO NOT OPEN THE DOOR. The Display Window must be blank before the Program Lock tealure can be activated. NOTE: .Do not press PROG Pad tor longer than 30 seconds continuously, .In "Program Lock"... -
Page 15: T O R E A D P R O G R A M L I S
C. To Read Program List: Allows you to review all currently programmed Pad Number, heating time and power level for each stage. 1. Open the door. fsr-o-P/) [!!sErJ s. [El;T--l NOTE: .lf you want to go to another program, press the Memory Pad you desire in order to read program, while the information of Memory Pad is being displayed. -
Page 16: T O S E L E C T B E E P T O N E O P T I O N
D. To Select Beep Tone Options: The Beep Tone can be set, ON or OFF. 1. Open the door. s. [0-.:., t _l E. To Read the Cycle Counter: The oven can dlsplay the total number of times the oven has been operated cumulalively. Great for analyzing usage of the oven and tratfic ilow at the location. - Page 17 This oven monitors its operation and displays a Failure Code in the display window when a problem occurs. What to do when a failure code appears: CODE 'Overcooked tood .Temperature of exhaust air too high. 'Detective sensor circuit F33-34 'When a pad was pressed for more than 30 seconds .Defective pad or control circuit NOTE: Above codes shown in display do not indicate all the possible lailures on the unit.
- Page 18 - 1 8 -...
- Page 19 Power Source Required Power Output. Frequency Outer Dimensions ( H x W x D ) Cavity Dimensions ( H x W x D ) Net Weight Shipping Weight Timer 201ts, 15" Zlt{ Front View N E - 1 0 6 4 7 '120V, 60 Hz, single phase 13.4A...
- Page 20 PANASONIC CONSUMER ELECTONIC COMPANY COMPANY DIVISION OF MATSUSHITA ELECTRIC CORPORATION OF AMERICA One Panasonic Way, 4A-4, Secaucus, NJ 07094 (201)348-5377 Tooo36P2oAP Printed in Taiwan...