Palm Treo 700P Quick Reference Manual
Hide thumbs
Also See for Treo 700P:
- User manual (432 pages) ,
- Using manual (339 pages) ,
- Getting started manual (130 pages)
Table of Contents
Advertisement
Available languages
Available languages
Quick Links
Q U I C K R E F E R E N C E G U I D E
G U Í A D E R E F E R E N C I A R Á P I D A
English . . . . . . . . . . . . . . . . . . . . . . . . . . . . . . . . . . . . . . . . . . . . . . . . . . . . . . . . . . . . . . 1
Español . . . . . . . . . . . . . . . . . . . . . . . . . . . . . . . . . . . . . . . . . . . . . . . . . . . . . . . . . . . . 97
Advertisement
Chapters
Table of Contents

Related Manuals for Palm Treo 700P


Summary of Contents for Palm Treo 700P
- Page 1 Q U I C K R E F E R E N C E G U I D E G U Í A D E R E F E R E N C I A R Á P I D A English .
-
Page 3: Table Of Contents
C O N T E N T S About this guide ......1 Learning the basics . - Page 4 Playing media files ......56 Camera and Camcorder ........56 Pics&Videos .
-
Page 5: About This Guide
A B O U T T H I S G U I D E This guide provides an overview of the key features and functionality of your Treo™ 700 smartphone. Use it when you need a quick reference for how to complete your most frequent and important tasks. -
Page 6: Learning The Basics
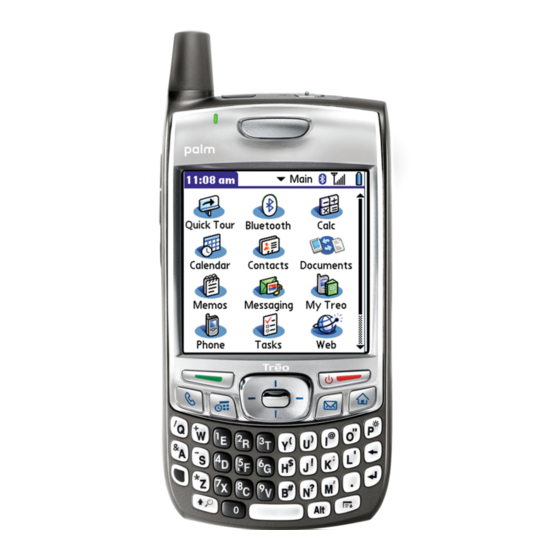
L E A R N I N G T H E B A S I C S TREO™ 700 SMARTPHONE OVERVIEW Earpiece Indicator light (phone and charge indicator) 5-way navigator and Center button Power/End button Applications button Messaging button Volume button Side button Menu button Send button... - Page 7 Antenna Stylus Expansion card slot Infrared (IR) port Ringer switch Self-portrait mirror Battery door release button Camera lens (camera versions only) Speaker...
-
Page 8: Synchronizing Information-Basics
® NOTE To sync your info, you must install Palm Desktop software from the Palm Software Installation CD that came with your Treo 700 smartphone—even if you sync with Outlook or another third-party application. See the User Guide for info. -
Page 9: Moving Around The Screen
NOTE You can customize which applications synchronize; see the User Guide for information. 1. Connect your Treo 700 smartphone to your computer; see the User Guide for instructions. Sync button 2. Press the sync button on the sync cable. 3. Messages appear on both your smartphone and on your computer indicating that synchronization is in progress. - Page 10 Scrolling through screens As on a computer, you scroll on your smartphone to move from field to field or page to page, or in some cases to highlight an item or option in a list. There are several methods of scrolling: Press the 5-way on the front of your smartphone.
- Page 11 Colored background: When a phone number, text, an email address, or ■ a web link is highlighted, the item is displayed as white type on a colored background. After highlighting an item, you can select or activate it by pressing Center or by tapping the item with the stylus.
- Page 12 Selecting menu items Many applications have menus to give you access to additional features. These menus are usually hidden from view, but they appear when you open the menus . To get the most out of your Treo smartphone, it’s a good idea to familiarize yourself with the additional features available through the various application menus.
-
Page 13: Using The Keyboard
To exit the pick list without making a selection, press Left or Right . ■ USING THE KEYBOARD When using the keyboard, most people find it easiest to hold the smartphone with two hands and to use the tips of both thumbs to press the keys. Backlight Backspace Option... - Page 14 Entering lowercase and uppercase letters To enter lowercase letters, press the desired keys. ■ To enter an uppercase letter, press Shift/Find and then press a letter key. You don’t need ■ to press and hold Shift while entering a letter. When Shift is active, an up arrow appears in the lower-right corner of the screen.
-
Page 15: Opening Applications
2. Press Alt 3. Press Up , Down , Left , or Right to highlight the desired character. 4. Press Center to insert the character. NOTE To see a list of additional alternate characters, position the cursor at the beginning of the line or after a space, and then press Alt. - Page 16 Each of the three application quick buttons opens two applications: To access a button’s primary application, simply press the quick button. ■ To access a button’s secondary application, press Option and then press the quick button. ■ Button Primary application Secondary application Phone Calendar...
-
Page 17: Using Your Phone
U S I N G Y O U R P H O N E TURNING YOUR SMARTPHONE ON/OFF NOTE Throughout this guide the term smartphone is used to describe your device and it’s physical aspects. The term phone is used to describe the feature of your smartphone that enables you to connect to the Verizon Wireless network. You can turn on your smartphone screen and your phone independently. - Page 18 Turning your phone on and off When your phone is on, it is connected to a mobile network (provided you are in a coverage area) so that you can make and receive phone calls and use wireless services, such as email, messaging, and the web browser.
-
Page 19: Phone Overview
PHONE OVERVIEW Opening the Phone application Press Phone to open the Main View of the Phone application. ■ Status icons Dial Pad Favorite buttons What’s my number? 1. Make sure your phone is on (see “Turning your Look here for phone on and off”... -
Page 20: Making Calls
MAKING CALLS Your smartphone offers several options for making phone calls. As you become familiar with your smartphone, you’ll discover which method you prefer. NOTE Be sure your phone is on before you make calls using any of these methods (see “Turning your phone on and off” on page 14). - Page 21 Text appears here as 1. Press Phone you enter it 2. Select the Contacts favorite button. 3. Using the keyboard, just start entering one of the following for the contact you want to call: First name (JOH for John) ■ Last name (SMI for Smith) ■...
- Page 22 3. Use the 5-way to highlight the desired speed-dial favorite button 4. Press Center to dial the number associated with the selected button. Dialing from a web page or message Your smartphone recognizes most phone numbers that appear on web pages or in text, email, or multimedia messages.
-
Page 23: Receiving Calls
RECEIVING CALLS To receive calls, your phone must be on. This is different from having only the screen turned on (see “Turning your phone on and off” on page 14). When your phone is off, your calls go to voicemail. To answer a call, do one of the following: Press Send ■... -
Page 24: Using Voicemail
USING VOICEMAIL Your Verizon Wireless service includes voicemail. Keep in mind that airtime and other charges apply when using voicemail from your smartphone. Setting up voicemail 1. Make sure your phone is turned on (see “Turning your phone on and off” on page 14). 2. -
Page 25: Managing Active Calls
MANAGING ACTIVE CALLS When you make or receive a call, the Active Call View appears. Use the 5-way to access the onscreen Call duration buttons in this view. The onscreen buttons in the Active Call View perform the Caller’s name and number following functions: Ends the call immediately. - Page 26 Enables you to place another call while the first call is on hold. For information on handling a second outgoing call, see the User Guide. Opens the Dial Pad so you can manually dial additional numbers, such as an extension or a response to a voice prompt.
- Page 27 Switching applications during an active call You can use many other applications on your smartphone while holding a phone conversation, including the organizer and text messaging features. You cannot, however, make a data connection while on an active call. This means that you also cannot browse the web or send and receive email or multimedia messages while on an active call.
- Page 28 To decline adding this number, select Cancel. ■ To disable the Add New Number prompt, check the Don’t ask me this again box. ■ Answering a second call (call waiting) When you are on an active call, you can receive a second call. When the second call comes in, you hear a call waiting tone and the Call Waiting dialog box appears.
-
Page 29: Defining Favorite Buttons
1. While the first call is active, place a second call. 2. Use the 5-way to select Conf. This joins the two active calls in a conference session. 3. To end the conference, press Power/End to end all the calls. DEFINING FAVORITE BUTTONS Your Treo smartphone provides 70 favorite buttons for quick access to common tasks, including dialing a phone number (speed dial), opening... -
Page 30: Using A Phone Headset
3. Enter a label for the favorite: If the entry is for an existing contact, select Lookup. Start ■ entering the last name of the contact, and select the contact when it appears in the lookup list. If the entry is for a new contact, enter the label, press Down , ■... - Page 31 Performance and range may be reduced by physical obstacles, radio interference from nearby electronic equipment, and other factors. NOTE Partnership is also know as paired relationship, pairing, trusted device, and trusted pair. For a list of compatible hands-free devices, go to www.palm.com/bluetooth/ treo700p_bluetooth_compatibility.html. 1. Go to Applications...
- Page 32 3. Enter a device name for your smartphone. This is the name that appears on the other Bluetooth device’s screen when it connects to your smartphone. 4. Prepare your headset or car kit to accept a connection from another Bluetooth device. See the documentation that came with your hands-free device for instructions.
-
Page 33: Customizing Phone Settings
CUSTOMIZING PHONE SETTINGS Selecting ringtones 1. Press Phone 2. Open the menus 3. Select Options, and then select Sound Preferences. 4. Select the Application pick list and select Ring Tones. 5. Select the Volume pick list and select the volume level. 6. - Page 34 Selecting phone alert tones 1. Press Phone 2. Open the menus 3. Select Options, and then select Sound Preferences. 4. Select the Application pick list and select Phone Alerts. 5. Select the Volume pick list and select the volume level. 6.
- Page 35 Adjusting call volume While a call is in progress, press the Volume button on the side of your smartphone to adjust the call volume. Adjusting ringer volume When a call is not in progress and music is not playing, press the Volume button on the side of your Treo smartphone to adjust ringer volume, and then press the Side button to confirm your selection.
-
Page 36: Using Email
U S I N G E M A I L Your Treo™ 700 smartphone includes two email applications: the Wireless Sync application and ® the VersaMail application. You can also access web-based email from your smartphone’s web browser. NOTE You must activate data services on your Verizon Wireless account before you can use email on your smartphone. WHICH APPLICATION SHOULD I USE? I want to…... -
Page 37: The Wireless Sync Application
I want to… Use this app… Connect to my company’s Wireless Sync server Wireless Sync Access email on my smartphone, my computer, and the Verizon Wireless Wireless Sync website Use the Advanced Encryption Standard (AES) while sending and receiving Wireless Sync messages NOTE An email application is not an email provider. - Page 38 How do I get started? 1. If you are setting up a personal email account, or if your corporate email account does not use a Microsoft Exchange Server or a Domino server, gather the following info, and then follow the steps in “Setting up Wireless Sync to work with Internet email” on page 35. Wireless Sync password (if you have one) ■...
- Page 39 Setting up Wireless Sync to work with Internet email In the Wireless Sync application, all personal email accounts, such as Earthlink, AOL, or Yahoo! Mail Plus, are considered Internet email accounts. In addition, any corporate email account that does not use a Microsoft Exchange or Domino server is referred to as an Internet email account. 1.
- Page 40 6. Set the following Account Setup info, and then select Next: Confirm home time zone: Select the pick list and select the time zone where you live. ■ Enable weather info for my ZIP code: Enter the ZIP code where you live, so that you can ■...
- Page 41 Leave messages on server: Check this box if you want to leave a copy of your messages ■ on the mail server after you download them to your smartphone. If you want to delete the messages from your mail server after downloading them to your smartphone, leave this box empty.
- Page 42 I agree to the terms & conditions: Check the box to indicate that you agree to the terms ■ and conditions. You cannot continue unless you check this box. 6. Set the following Account Setup info, and then select Next: Confirm home time zone: Select the pick list and select the time zone where you live.
- Page 43 4. Enter the URL for your company’s Wireless Sync server, and then select Next. 5. Select Yes or No to indicate whether you have a Wireless Sync password. If you select No, your smartphone’s web browser opens and you are taken through a series of steps to create an account.
-
Page 44: The Versamail Application
After you enter your email account settings, see the User Guide for the VersaMail Application on the Palm Software Installation CD for information on sending and receiving messages and customizing your VersaMail application settings. - Page 45 4. If your email provider is listed in the following table, then skip to “Setting up VersaMail to work with common providers” on page 42. Comcast Apple.Mac CompuServe SBC/PacBell AT&T Global Covad SBC/Prodigy AT&T Worldnet EarthLink Speakeasy Bell South Gmail Verizon DSL Cablevision Mail.com...
- Page 46 Setting up VersaMail to work with common providers 1. Go to Applications and select Email NOTE The first time you set up VersaMail, you are asked if you want to continue with account setup after you open the application. Select Continue and go to step 3. 2.
- Page 47 Setting up VersaMail to work with other providers 1. Go to Applications and select Email NOTE The first time you set up VersaMail, you are asked if you want to continue with account setup after you open the application. Select Continue and go to step 3. 2.
-
Page 48: Using Other Wireless Features
U S I N G O T H E R W I R E L E S S F E A T U R E S MESSAGING You can use the Messaging application to exchange brief text messages (SMS) and multimedia messages (MMS) with other devices and email addresses that support these forms of messaging. - Page 49 5. (Optional) Open the menus , and then select High Priority from the Compose menu to mark the message as urgent. 6. Select Send. NOTE If you see numbers when you expect to see letters (or the other way around), you need to turn Option Lock on by pressing Option twice or turn it off by pressing Option once.
- Page 50 4. Select the To field to address the message with up to 25 addresses: Press Center . If the recipient’s name appears in the list of recent addresses, select it ■ from the list. If the recipient is in your Contacts list, enter the first initial and last name (no spaces), and ■...
- Page 51 Attach voice memo: Select a memo you recorded in the Voice Memo application. ■ Attach ringtone: Select a ringtone. ■ 8. Enter a text message or caption. 9. Select Add slide to insert additional slides. 10. (Optional) Select Preview to view the message as the recipient will see it. 11.
- Page 52 Viewing/playing a multimedia message 1. Press Messaging 2. Select the message you want to view. 3. If there are sounds or multiple slides, playback begins immediately. 4. Do any of the following: Use the onscreen controls to scroll to other slides and messages. ■...
-
Page 53: Web Browser
Chatting with Messaging When you exchange more than one message with a single contact, the messages you exchange with that person are grouped into a chat session. When you select a chat session from your message list, the upper part of the Chat view displays all messages you’ve exchanged with this contact, and the lower part provides an entry area. - Page 54 Viewing a web page 1. Make sure your phone is turned on (see “Turning your phone on and off” on page 14). 2. Press Phone and confirm that data services are available. You should see either the NationalAccess or the BroadbandAccess icon in the title bar.
- Page 55 6. Use the 5-way to access any of the following icons in the title bar: Goes to your home page. Opens a dialog box where you can enter a web address you want to go to or view a list of recently viewed web pages. Goes to the previous web page.
- Page 56 Creating a bookmark With bookmarks you can instantly access a web page without entering the address every time. The web browser can store up to 100 bookmarks or saved pages, allowing you to open your favorite web pages quickly. Note that a bookmark is different from a favorite (see “Defining favorite buttons”...
- Page 57 1. Go to the page with the link to the file you want to download. 2. Press Left or Right to highlight the link to the file, and then press Center 3. If prompted, select what you want to do with the file: Play, Save To Device, or Save To Card. 4.
-
Page 58: Connections With Bluetooth ® Devices
® CONNECTIONS WITH BLUETOOTH DEVICES With your smartphone’s built-in Bluetooth wireless technology, you can connect to a number of Bluetooth devices, such as a headset, car kit, printer, or GPS receiver, as well as to other smartphones and handhelds that are equipped with Bluetooth wireless technology. You can create a list of Bluetooth devices that you trust to communicate with your Treo smartphone. - Page 59 1. Go to Applications and select Bluetooth 2. Select On. 3. If you haven’t already done so, enter a device name for your smartphone. This is the name that appears on the other Bluetooth device’s screen when it connects to your smartphone. 4.
-
Page 60: Playing Media Files
Camera 2. By default, the Camera application stores pictures you take in the Palm album on your smartphone. If you have an expansion card inserted in your smartphone’s expansion card slot, the Camera application creates a Palm album on the card and store pictures there. - Page 61 1. Go to Applications and select Camcorder 2. By default, the Camcorder application stores videos you record in the Palm album on your smartphone. If you have an expansion card inserted in your smartphone’s expansion card slot, the Camcorder application creates a Palm album on the card and store videos there. To...
- Page 62 New Albums: Opens a dialog box where you can enter an album name and select the ■ storage location (smartphone or expansion card). 3. Adjust the position of your smartphone until you see the subject you want to record on the screen. 4.
-
Page 63: Pics&Videos
PICS&VIDEOS Viewing a picture In addition to viewing the pictures you capture with the built-in camera, you can view pictures captured on many popular digital cameras or downloaded from the Internet. Your smartphone supports the JPG, TIF, BMP, and GIF picture formats. 1. - Page 64 3. Select the video you want to view. 4. Hold down Right or Left to seek within the current video, or press Right or Left scroll to the next item in the album. 5. Tap the video or press Center to return to the Thumbnail View.
-
Page 65: Pocket Tunes
6. Address and send the message. (See “Creating and sending a multimedia message” on page 45 for details.) Saving a picture as wallpaper You can select a picture to use as wallpaper for the Main View in the Phone application. 1. - Page 66 music files to your smartphone or an expansion card. After you transfer the music files, you can play them using the Pocket Tunes application on your smartphone. [ ! ] IMPORTANT If you are transferring files from a Mac computer, you need an expansion card (sold separately) to listen to music on your smartphone.
- Page 67 7. Click the Devices tab, select Palm Handheld from the Devices list, and then click Properties. Select your smartphone Click Properties 8. Click the Quality tab, uncheck the Convert files as required by this handheld (recommended) box. Click Apply. Uncheck box...
- Page 68 9. Click OK, and then click OK again. Setting up iTunes for MP3 On a Mac, use iTunes (included with OS X) to convert music from a CD to MP3 format. For more information on using the iTunes software, see the documentation that came with your Mac. 1.
- Page 69 Select Start Sync. The files are transferred to your smartphone. Mac: Drag and drop the MP3 files onto the Send To Handheld droplet in the Palm folder. ■ Select your device name, the file name, and the destination (card). Click OK. Synchronize your smartphone with your computer.
- Page 70 Listening to music on your smartphone 1. Go to Applications and select pTunes 2. Do any of the following: To play or resume playback of the current song, select Play ■ To play the next song, select Next Song ■ To play the previous song, select Previous Song ■...
-
Page 71: Staying Organized
CONTACTS Adding a contact ® NOTE If you have several contacts to enter, it’s more efficient to use Palm Desktop software or Microsoft Outlook on your computer and then synchronize your Treo™ 700 smartphone with your computer. For more information, see “Synchronizing information—basics”... - Page 72 4. Select Business Card from the Record menu, and then select OK. ® NOTE After you define your business card, you can beam it to other Palm OS devices. In any Phone view or the Contacts application, open the Record menu and select Beam Business Card.
-
Page 73: Calendar
Creating an event NOTE If you have several appointments to enter, it’s more efficient to use Palm Desktop software or Microsoft Outlook on your computer and then synchronize the info on your smartphone with the info on your computer. For more information, see... - Page 74 1. Press Calendar until Day View appears. 2. Press Left or Right to select the desired day. Selected Selected date 3. Using the keyboard, enter a starting hour and minute for the event. For example, enter 545 for 5:45. (Remember to press Option before entering numbers.) 4.
- Page 75 Type of time units Number of time units Scheduling a repeating event 1. Create an event, and then select it. 2. Select Details. 3. Select the Repeat pick list, and then select a repeat interval. If the interval you need doesn’t appear on the list, select Other to define a custom interval.
-
Page 76: Tasks
TASKS Adding a task 1. Go to Applications and select Tasks 2. Select New to create a new task. 3. Enter a description of the task. The text can be longer than one line. 4. (Optional) To enter details for a task, select the task description, and then select Details. -
Page 77: Staying Productive
If you install the Documents To Go desktop software (from the Palm Software Installation CD), you can use Documents To Go to transfer files to your smartphone when you synchronize. -
Page 78: Voice Memo
VOICE MEMO Voice Memo provides a place for you to record and play back notes and other important thoughts directly on your smartphone. Creating a voice memo 1. Go to Applications and select Voice Memo 2. Press the Side button on your smartphone. Face your smartphone and begin speaking. 3. -
Page 79: Managing Files And Applications
NOTE The instructions in this section tell you how to install basic PRC (Palm OS application) and PDB (Palm OS database) files on your Treo smartphone. Some Palm OS software uses an installer or wizard to guide you through the process. For details, consult the documentation that came with the software. - Page 80 4. Follow the onscreen instructions to accept and install the application. Installing applications from a computer NOTE To install an application from your computer to your Treo smartphone, you must first install Palm Desktop software on your computer (see the User Guide for instructions).
-
Page 81: Beaming Information
IR (infrared) port so that you can beam information to another Palm OS device with an IR port. The IR port is located on the top of your smartphone, between the antenna and the Ringer switch, behind the small dark shield. -
Page 82: Using Expansion Cards
4. When the Beam Status dialog box appears, point the IR port on your Treo smartphone directly at the IR port of the receiving device. 5. Wait for the Beam Status dialog box to indicate that the transfer is complete before you continue using your smartphone. - Page 83 Inserting and removing expansion cards 1. Press down and release the dummy card. 2. After you feel the expansion card slot eject the dummy card, remove the card from the slot. 3. Hold your smartphone with the screen facing you, and hold the card with the label facing you. The notch on the card should be in the lower-left corner next to the antenna.
-
Page 84: Customizing Your Smartphone
C U S T O M I Z I N G Y O U R S M A R T P H O N E SYSTEM SOUND SETTINGS Silencing sounds You can immediately silence all alerts, ringtones, music, and system sounds by sliding the Ringer switch to the Sound Off position. - Page 85 2. Press Left and Right to adjust the brightness. 3. Select Done. Changing the text size You can change the screen font in Calendar, Contacts, Memos, Messaging, Tasks, and Web. The font styles may vary between applications, and some applications may offer fewer choices. 1.
-
Page 86: Application Settings
APPLICATION SETTINGS Reassigning buttons With Buttons Preferences you can select which applications are associated with the quick buttons and the Side button on your Treo smartphone. You can assign a primary and secondary application to each of the three quick buttons that open an application. NOTE We recommend that you keep the primary button assignments on the factory settings until you become comfortable with the features of your smartphone. - Page 87 By default, Keyguard turns on whenever the screen is off. Each time you wake up the screen, you must turn off Keyguard to unlock the keyboard and use your smartphone. To turn off Keyguard, do the following: 1. When the screen is off, press Power/End to wake up the screen.
- Page 88 Locking your screen You can set your smartphone to automatically lock the screen’s touch-sensitive features in certain situations. 1. Go to Applications and select Prefs 2. Select Keyguard. 3. Check one of the following boxes: Incoming calls received: Disables the screen when the phone rings. You must use the ■...
-
Page 89: Getting Help
G E T T I N G H E L P PERFORMING A SOFT RESET If your smartphone is not responding or you have trouble synchronizing with your computer, a soft reset may help. All your info is retained when you perform a soft reset. 1. -
Page 90: Where To Learn More
■ including descriptions of advanced features not included in this reference guide. To access the User Guide on your computer, click Start > Programs > Palm > Treo 700p User Guide. A copy of the guide is also available right on your smartphone. Go to Applications... - Page 91 If you need more information ® Books: Many books on Palm OS devices are available in local or online book retailers ■ (look in the computers section), or visit www.palm.com/mytreo700pVerizon Online forums: Consult online Treo user discussion groups to swap information and learn ■...
-
Page 93: Regulatory Information
This device complies with part 15 of the FCC Rules. ® A Palm brand body-worn accessory that has been Operation is subject to the following two conditions: (1) tested for SAR compliance and is intended for use This device may not cause harmful interference, and (2) with this product. - Page 94 Treo 700 Model Wi-Fi card has been approved by the FCC for use with the Palm declares that the above model of Treo smartphone is Treo 700 smartphone. For a list of SDIO Wi-Fi cards compliant with the regulations below. The declaration...
- Page 95 Compatibility (HAC) requirements. For additional HAC telecommunications device that allows people who are deaf information, including the HAC rating of this product, or hard of hearing, or who have speech or language www.palm.com/treoHAC please refer to disabilities, to communicate by telephone. Your Treo 700 smartphone is compatible with select TTY devices.
- Page 96 D429,252; D466,128; D478,091. Patent pending. © 2006 Palm, Inc. All rights reserved. Blazer, HotSync, Palm, Palm OS, Treo, VersaMail, and the Palm and Treo This product also is licensed under United States patent logos are among the trademarks or registered trademarks 6,058,304.
-
Page 97: Index
I N D E X I N D E X on 5-way navigator 5 selecting application 11 Numerics selecting or activating 6 5-way navigator 5 Calendar application 69 Calendar button 69 Active Call View 21, 23 call waiting 24 alarms calls. - Page 98 customizing applications 82 hands-free devices 27 buttons 82 smartphone 56 information system sounds 80 entering 9, 10 synchronizing 4 dialog boxes 7 updating 4 Documents application 73 infrared (IR) port 78 downloading from the web 52 installing applications 75 email keyboard active calls and 23 dialing with 16, 17...
- Page 99 I N D E X adjusting volume 66 saving 23 listening to 61 Phone screen icons 31 selecting 66 photos adding for caller IDs 67 creating wallpaper with 61 opening deleting 58 applications 12 saving 57 web pages 50 viewing 56 PowerPoint files 73 partnership 28 phone...
- Page 100 video clips 56 videos setting up displaying 58 Bluetooth devices 28, 55 saving 58 email accounts 32 sending 56 smartphone viewing connecting Bluetooth devices to 28, 55 calendar 69 customizing 56 menus 8 dialing 18 photos 56 getting additional information about 87 video clips 58 resetting 85 web pages 50...
- Page 101 G U Í A D E R E F E R E N C I A R Á P I D A...
- Page 103 C O N T E N I D O Acerca de esta guía ......101 Conceptos básicos ......102 Descripción general del teléfono Smartphone Treo™...
- Page 104 Reproducción de archivos multimedia ... . 165 Cámara y videocámara ........165 Multimedia (Fotos y vídeos) .
-
Page 105: Acerca De Esta Guía
A C E R C A D E E S T A G U Í A Esta guía proporciona una descripción general de las características y funciones clave del teléfono Smartphone Treo™ 700 . Utilícela como referencia rápida para realizar las tareas más importantes y frecuentes. -
Page 106: Conceptos Básicos
C O N C E P T O S B Á S I C O S DESCRIPCIÓN GENERAL DEL TELÉFONO SMARTPHONE TREO™ 700 Auriculares Indicador luminoso (indicador de carga Navegador de cinco y teléfono) direcciones y botón Centro Botón de encendido/ apagado Botón Aplicaciones Botón Mensajes... - Page 107 Antena Lápiz óptico Ranura de la tarjeta de expansión Puerto de infrarrojos (IR) Selector de timbre Espejo para autorretratos Botón de liberación de la tapa de la batería Objetivo de la cámara (sólo para la versión con cámara) Altavoz...
-
Page 108: Sincronización De La Información: Conceptos Básicos
SINCRONIZACIÓN DE LA INFORMACIÓN: CONCEPTOS BÁSICOS ® NOTA Para sincronizar la información, debe instalar el software Palm Desktop del CD de instalación del software de Palm incluido con el teléfono Smartphone Treo 700 , incluso si sincroniza con Outlook u otra aplicación de otro fabricante. Para obtener información, consulte la Guía del usuario. -
Page 109: Desplazamiento Por La Pantalla
NOTA Puede personalizar las aplicaciones que se van a sincronizar; para obtener información, consulte la Guía del usuario. 1. Conecte el teléfono Smartphone Treo 700 al equipo; para obtener instrucciones, consulte la Guía del Botón de sincronización usuario. 2. Pulse el botón de sincronización del cable de sincronización. - Page 110 El navegador de cinco direcciones incluye los botones Derecha , Izquierda , Arriba Arriba Abajo y Centro Izquierda Derecha Abajo Desplazamiento por las pantallas Al igual que en un equipo, en el teléfono Smartphone puede desplazarse para pasar de un campo a otro o de una página a otra, o incluso, en algunos casos, para resaltar un elemento u opción en una lista.
- Page 111 Con el lápiz óptico, toque en una flecha de desplazamiento en pantalla o arrastre la guía de ■ desplazamiento de una barra de desplazamiento en pantalla. Resaltado y selección de elementos En la mayoría de las pantallas, aparece un elemento (un botón, una entrada de lista o una casilla de verificación) resaltado de forma predeterminada.
- Page 112 En una pantalla de lista cualquiera, como la lista Contactos o la lista Memos presione ■ Derecha para saltar al primer botón. En una pantalla en la que se puedan crear o editar entradas, como Editar contactos, pulse ■ Centro para saltar al primer botón.
- Page 113 Selección de opciones en una lista de selección Con frecuencia, hay una variedad de opciones que se presentan en un tipo de menú llamado lista de selección, que se identifica por una flecha hacia abajo. Las listas de selección son diferentes de los menús de aplicación descritos anteriormente.
-
Page 114: Uso Del Teclado
USO DEL TECLADO Al utilizar el teclado, la mayoría de los usuarios encuentran que es más cómodo sujetar el teléfono Smartphone con las dos manos y utilizar ambos pulgares para pulsar las teclas. Retroiluminación Retroceso Opción Entrar Tecla de Menú mayúsculas/Buscar Espacio Introducción de mayúsculas y minúsculas... - Page 115 Para activar el bloqueo de mayúsculas, pulse Tecla de mayúsculas/Buscar dos veces. ■ Para desactivarlo, pulse Tecla de mayúsculas/Buscar una vez. Cuando Bloqueo de mayúsculas está activo, aparece un símbolo de flecha hacia arriba subrayada en el ángulo inferior derecho de la pantalla. Introducción de números, puntuación y símbolos Los números, signos de puntuación y símbolos aparecen encima de las Símbolo...
-
Page 116: Abrir Las Aplicaciones
4. Pulse Centro para insertar el carácter. NOTA Para ver una lista adicional de caracteres alternativos, sitúe el cursor al principio de la línea o después de un espacio, y luego pulse Alt. Para obtener una lista completa de caracteres alternativos, consulte la Guía del usuario. ABRIR LAS APLICACIONES Cuando abra una aplicación usando un botón de acceso rápido o la vista Aplicaciones, se cerrará... - Page 117 Cada uno de los tres botones de acceso rápido abre dos aplicaciones: Para acceder a la aplicación principal de un botón, simplemente presione el botón de acceso ■ rápido. Para acceder a la aplicación secundaria de un botón, pulse Opción y, a continuación, ■...
- Page 118 En la vista Aplicaciones, puede también realizar una de las siguientes acciones: Pulse Aplicaciones varias veces para alternar entre las distintas categorías de ■ aplicaciones. Para obtener más información sobre las categorías, consulte la Guía del usuario. Escriba las primeras letras del nombre de la aplicación para resaltarla. Por ejemplo, si ■...
-
Page 119: Uso Del Teléfono
U S O D E L T E L É F O N O ENCENDIDO Y APAGADO DEL TELÉFONO SMARTPHONE NOTA Dentro de esta guía, el término teléfono Smartphone se utiliza para describir el dispositivo y su aspecto físico. El término teléfono se utiliza para describir la función del teléfono Smartphone que permite conectarse a la red Verizon Wireless. - Page 120 3. Pulse y suelte el botón de encendido/apagado para desactivar la pantalla. NOTA Para ahorrar energía, la pantalla se apaga tras un período de inactividad. Para cambiar el intervalo, vaya a Aplicaciones, seleccione Pref. y, a continuación, Encendido. Seleccione en la lista de selección Apag. autom. tras y, a continuación, cambie el intervalo.
-
Page 121: Descripción General Del Teléfono
3. Mantenga pulsado el botón de encendido/apagado de nuevo para apagar el teléfono. Cuando esté apagado, Teléfono apagado y el icono de teléfono apagado aparecen en la parte superior de la pantalla y el teléfono Smartphone no está conectado a ninguna red de móviles. -
Page 122: Realización De Llamadas
¿Cuál es mi número? 1. Compruebe que el teléfono está encendido Busque aquí su (consulte “Encendido y apagado del teléfono” en la número teléfono página 116). 2. Pulse el botón Teléfono 3. Abra los menús 4. Seleccione Opciones y, a continuación, seleccione Info. - Page 123 Realización de una llamada con el Teclado numérico en pantalla 1. Pulse el botón Teléfono 2. Escriba el número de teléfono tocando en el teclado numérico en pantalla con el lápiz óptico. 3. Toque Marcar o pulse Enviar para realizar la llamada. Realización de una llamada con el teclado 1.
- Page 124 El texto aparece tal y 1. Pulse el botón Teléfono como lo ha escrito 2. Seleccione el botón favorito Contactos. 3. Con el teclado, escriba uno de los siguientes elementos correspondientes al contacto al que desea llamar: Nombre (JUA para Juan) ■...
- Page 125 3. Utilice el navegador de cinco direcciones para resaltar el botón favorito de marcación rápida que desea 4. Pulse el botón Centro para marcar el número que está asociado con el botón seleccionado. Realización de una llamada desde una página Web o un mensaje de texto El teléfono Smartphone reconoce la mayoría de los números que aparecen en las páginas Web o en mensajes de texto, de correo electrónico o multimedia.
-
Page 126: Recepción De Llamadas
Para seleccionar de una lista cronológica de llamadas: seleccione el botón favorito ■ Registro de llamadas. También puede acceder al Registro de llamadas desde la vista Principal en la aplicación Teléfono pulsando Enviar y seleccionando Registro de llamadas de la lista de rellamadas. -
Page 127: Uso Del Correo De Voz
Para silenciar el teléfono cuando está sonando, realice una de las siguientes acciones: Pulse cualquier tecla del teléfono Smartphone excepto Enviar , encendido/apagado ■ o el navegador de cinco direcciones Desplace el selector de timbre a la posición Sonido desactivado . -
Page 128: Administración De Llamadas Activas
Recuperación de mensajes de voz 1. Pulse el botón Teléfono 2. Mantenga pulsada la tecla 1 o seleccione el botón favorito de correo de voz para llamar al sistema de correo de voz. 3. Introduzca su contraseña para acceder a los mensajes de voz con el teclado, o bien seleccione Dígitos extra si ha definido esta opción (consulte la Guía del usuario para obtener más información sobre la definición de dígitos extra). - Page 129 Los botones en pantalla de la vista Llamada activa realizan las siguientes acciones: Finaliza la llamada inmediatamente. También puede pulsar el botón del auricular (si está conectado). Enciende el altavoz. Si el altavoz está encendido, puede apartar el teléfono Smartphone del oído y utilizar otras funciones durante una llamada.
- Page 130 Marca los dígitos extra (como, por ejemplo una contraseña o una extensión) que se hayan asignado a un botón favorito. Este botón sustituye al botón de Teclado numérico durante las llamadas salientes a números que incluyen dígitos extra predefinidos. Consulte “Definición de los botones favoritos” en la página 130 para obtener más información sobre la definición de dígitos extra.
- Page 131 Cambio de aplicaciones durante una llamada activa Puede utilizar cualquier otra aplicación en el teléfono Smartphone mientras mantiene una conversación telefónica, incluidas las funciones del organizador y de mensajes de texto. Sin embargo, no puede realizar una conexión de datos durante una llamada activa. Es decir, no puede explorar la Web, enviar o recibir mensajes de correo electrónico o multimedia durante una llamada activa.
- Page 132 Para agregar el número a una entrada de contacto existente, seleccione Agregar a un ■ contacto y, a continuación, seleccione el contacto. El número se pegará en el primer campo de número de teléfono disponible para ese contacto. Para rechazar el número, seleccione Cancelar. ■...
- Page 133 Realización de una multiconferencia Puede unir dos llamadas en una conferencia, siempre y cuando el servicio esté disponible en su área. Para obtener más información, póngase en contacto con Verizon Wireless Se pueden aplicar cargos adicionales y los minutos de su cuenta móvil se irán reduciendo con cada llamada activa que realice.
-
Page 134: Definición De Los Botones Favoritos
DEFINICIÓN DE LOS BOTONES FAVORITOS El teléfono Smartphone Treo proporciona aproximadamente 70 botones favoritos que permiten acceder rápidamente a las tareas habituales, incluidos el marcado de un número de teléfono (marcación rápida), la apertura de una aplicación, el acceso a una página Web o al correo de voz. -
Page 135: Uso De Los Auriculares Del Teléfono
4. (Opcional) Introduzca una Tecla rápida, que pueda mantener pulsada en la aplicación Teléfono para marcar al instante este número de marcación rápida. 5. (Opcional) Seleccione Más y, a continuación, elija las opciones avanzadas: Dígitos extra: define dígitos adicionales, como una contraseña o extensión. Para ■... - Page 136 La asociación también se denomina relación emparejada, emparejamiento, dispositivo de confianza y emparejado de confianza. Para obtener una lista de dispositivos manos libres de tecnología Bluetooth compatibles, visite www.palm.com/bluetooth/treo700p_bluetooth_compatibility.html. 1. Vaya a Aplicaciones y seleccione Bluetooth o toque en el icono Bluetooth de la barra de título.
- Page 137 3. Introduzca un nombre de dispositivo para el teléfono Smartphone. Éste es el nombre que aparecerá en la pantalla del otro dispositivo Bluetooth cuando se conecte a su teléfono Smartphone. 4. Prepare el auricular o el kit para coche para que acepte una conexión de otro dispositivo Bluetooth.
-
Page 138: Personalización De La Configuración Del Teléfono
PERSONALIZACIÓN DE LA CONFIGURACIÓN DEL TELÉFONO Selección de tonos 1. Pulse el botón Teléfono 2. Abra los menús 3. Seleccione Opciones y, a continuación, Preferencias de sonido. 4. Seleccione la lista de selección Aplicación y, a continuación, Tonos de llamada. 5. - Page 139 Itinerancia: tono especial de llamadas entrantes cuando el teléfono se encuentra fuera de ■ la red de móviles local. Este tono anula los demás tonos de llamada, a menos que se configure para que no suene. 9. Seleccione Hecho. NOTA Puede grabar sonidos y utilizarlos como tonos de llamada.
- Page 140 Con/sin cober.: indica que se encuentra dentro o fuera de un área de cobertura. ■ Señal atenuada: indica que la señal ha perdido intensidad y que la llamada se ha ■ cancelado. 8. Seleccione Hecho. Ajuste del volumen de la llamada Con la llamada en curso, pulse el botón Volumen situado en el lateral del teléfono Smartphone para ajustar el volumen de la llamada.
-
Page 141: Uso Del Correo Electrónico
U S O D E L C O R R E O E L E C T R Ó N I C O El teléfono Smartphone Treo™ 700 incluye dos aplicaciones de correo electrónico: Wireless ® Sync y VersaMail . También se puede acceder al correo electrónico basado en Web desde el explorador Web del teléfono Smartphone. -
Page 142: La Aplicación Wireless Sync
Quiero… Utilice esta aplicación… Consultar los mensajes de varias direcciones de correo electrónico VersaMail Conectarme al servidor Wireless Sync de la empresa Wireless Sync Acceder al correo electrónico en el teléfono Smartphone, el equipo y el sitio Wireless Sync Web de Verizon Wireless Utilizar el AES (Estándar de cifrado avanzado) mientras envío y recibo Wireless Sync mensajes... - Page 143 ¿Cómo comenzar? 1. Si está configurando una cuenta personal de correo electrónico, o si la cuenta de correo de la empresa no utiliza Microsoft Exchange Server o un servidor Domino, reúna la siguiente información y, a continuación, siga los pasos descritos en “Configuración de Wireless Sync para que funcione con correo electrónico de Internet”...
- Page 144 3. Si la cuenta de correo electrónico de la empresa utiliza un servidor Wireless Sync que se conecta a Microsoft Exchange Server o a un servidor Domino, reúna la siguiente información y, a continuación, siga los pasos descritos en “Configuración de Wireless Sync para que funcione con un servidor de empresa Wireless Sync”...
- Page 145 5. Introduzca la siguiente información de Configuración de cuenta y, a continuación, seleccione Siguiente: Número de móvil: introduzca el número de teléfono del teléfono Smartphone, si aún no la ■ ha hecho. Contraseña: introduzca la contraseña de la cuenta Wireless Sync. ■...
- Page 146 Dirección de correo electrónico: introduzca la dirección de correo electrónico a la que ■ desea que acceda Wireless Sync. Contraseña: introduzca la contraseña que utiliza para acceder a esta dirección de correo ■ electrónico. 8. La primera sincronización comienza cuando Wireless Sync reconoce la configuración del correo, dando así...
- Page 147 Configuración de Wireless Sync para que funcione con correo electrónico de empresa Si su empresa utiliza Microsoft Exchange Server o un servidor Domino, realice los pasos siguientes para llevar a cabo la configuración de la cuenta de correo electrónico de la aplicación Wireless Sync.
- Page 148 Acepto los Términos y condiciones: active esta casilla para indicar que acepta los ■ términos y condiciones. No puede continuar a menos que marque esta casilla. 6. Introduzca la siguiente información de Configuración de cuenta y, a continuación, seleccione Siguiente: Confirmación de la zona horaria local: seleccione la lista de selección y elija la zona ■...
- Page 149 Configuración de Wireless Sync para que funcione con un servidor de empresa Wireless Sync Si su empresa utiliza un servidor Wireless Sync para conectarse a Microsoft Exchange Server o a un servidor Domino, siga los pasos siguientes para establecer la configuración de la cuenta de correo electrónico de la aplicación Wireless Sync.
- Page 150 seleccione este botón para obtener información sobre la cuenta Términos y condiciones: ■ Wireless Sync. active esta casilla para indicar que acepta los términos Acepto los Términos y condiciones: ■ y condiciones. No puede continuar a menos que marque esta casilla. 7.
-
Page 151: La Aplicación Versamail
3. Si va a establecer la configuración de una cuenta de correo electrónico en un servidor ® Microsoft Exchange ActiveSync , Lotus Notes o Microsoft MAPI, consulte la Guía del usuario de la aplicación Versamail en el CD de instalación de software de Palm para seguir los pasos de configuración. - Page 152 4. Si su proveedor de correo electrónico aparece en la siguiente tabla, vaya a “Configuración de VersaMail para que funcione con los proveedores habituales” en la página 149. Comcast Apple.Mac CompuServe SBC/PacBell AT&T Global Covad SBC/Prodigy AT&T Worldnet EarthLink Speakeasy Bell South Gmail Verizon DSL...
- Page 153 Configuración de VersaMail para que funcione con los proveedores habituales 1. Vaya a Aplicaciones y seleccione Correo electrónico NOTA La primera vez que configure VersaMail, se le preguntará si desea continuar con la configuración de la cuenta después de abrir la aplicación. Seleccione Continuar y vaya al paso 3. 2.
- Page 154 Configuración de VersaMail para que funcione con otros proveedores 1. Vaya a Aplicaciones y seleccione Correo electrónico NOTA La primera vez que configure VersaMail, se le preguntará si desea continuar con la configuración de la cuenta después de abrir la aplicación. Seleccione Continuar y vaya al paso 3. 2.
-
Page 155: Uso De Otras Funciones Inalámbricas
U S O D E O T R A S F U N C I O N E S I N A L Á M B R I C A S MENSAJERÍA Se puede utilizar la aplicación Mensajería para intercambiar breves mensajes de texto (SMS) y mensajes multimedia (MMS) con otros dispositivos y direcciones de correo electrónico que admitan este sistema de mensajería. - Page 156 Si el destinatario no se encuentra en la lista de direcciones recientes o en la lista de ■ Contactos, introduzca el número de móvil, la dirección de correo electrónico o un alias de Verizon Wireless. 4. Introduzca su mensaje, o bien seleccione Texto rápido para insertar frases predefinidas.
- Page 157 1. Presione Mensajería 2. Seleccione Nuevo. 3. Seleccione Agregar medio. 4. Seleccione el campo A para dirigir el mensaje hasta un máximo de 25 direcciones: Pulse Centro . Si aparece el nombre del destinatario en la lista de direcciones ■ recientes, selecciónelo.
- Page 158 Tomar nueva foto: tome una fotografía con la cámara incorporada y agréguela al mensaje ■ (sólo para la versión con cámara). Grabar nuevo vídeo: tome un vídeo con la cámara incorporada y agréguelo al mensaje ■ (sólo para la versión con cámara). 7.
- Page 159 La alerta de nuevo mensaje puede incluir cualquiera de los siguientes botones: OK: descarta la alerta y pone el mensaje en la carpeta Entrada. ■ Resp.: abre la vista de chat, donde puede responder con un mensaje ■ de texto. Para enviar una respuesta MMS, seleccione Agregar en la vista de chat.
- Page 160 Para guardar el sonido, abra los menús y seleccione Guardar sonido en el menú ■ Mensaje. Para guardar una imagen, abra los menús y seleccione Guardar imagen en el menú ■ Mensaje. Para acceder más tarde a las fotos guardadas vaya a Aplicaciones seleccione Multimedia (Fotos y vídeos) Para guardar una entrada de contacto o de calendario, selecciónela.
-
Page 161: Explorador Web
1. Presione Mensajería 2. Realice una de las siguientes acciones: Iniciar nuevo chat: seleccione un mensaje y respóndalo. ■ Continuar un chat existente: seleccione un mensaje con el ■ icono de chat 3. Introduzca su mensaje. 4. Seleccione Enviar. EXPLORADOR WEB El explorador Web del teléfono Smartphone Treo proporciona acceso fácil y rápido a las páginas Web. - Page 162 Si no ve un icono de acceso nacional o de acceso a banda ancha, los servicios de datos no están disponibles en la ubicación actual y no se puede conectar a Internet. 3. Vaya a Aplicaciones y seleccione Web 4. Introduzca la dirección de una página Web (URL) en la barra de direcciones y seleccione Ir. Si va a una página Web segura, aparecerá...
- Page 163 6. Utilice el navegador de cinco direcciones para acceder a cualquiera de los siguientes iconos en la barra de título: Permite ir a la página principal. Abre un cuadro de diálogo donde se puede introducir una dirección Web a la que se desea ir o ver una lista de páginas Web vistas recientemente. Va a la página Web anterior.
- Page 164 Creación de un marcador Con los marcadores se puede acceder de forma instantánea a una página Web sin necesidad de escribir la dirección correspondiente cada vez. El explorador Web puede almacenar hasta 100 marcadores o páginas guardadas, lo que permite abrir rápidamente las páginas Web favoritas.
- Page 165 Elemento Tipos de archivo compatibles Tonos de timbre MIDI, AAC Música MP3, WMA 1. Vaya a la página que contiene el enlace al archivo que desea descargar. 2. Pulse Izquierda o Derecha para resaltar el enlace al archivo y, a continuación, pulse Centro 3.
-
Page 166: Conexiones Con Dispositivos Bluetooth
2. Una vez que se inicia la transmisión, la reproducción empieza automáticamente. Utilice los siguientes controles para ver o escuchar: Seleccione para volver a la página Web que contiene el contenido de transmisión. ■ Seleccione o pulse Centro para hacer una pausa en la reproducción. ■... - Page 167 Al configurar el auricular (consulte “Conexión a un auricular o un kit para coche Bluetooth” en la página 132), éste se añade automáticamente a la lista de dispositivos de confianza. Siga los pasos que se describen en esta sección para añadir otros dispositivos a la lista de dispositivos de confianza, como la computadora de mano de un amigo.
- Page 168 9. Introduzca la misma clave en el teléfono Smartphone y en el dispositivo Bluetooth y seleccione OK. [ ! ] IMPORTANTE Algunos dispositivos Bluetooth, como los auriculares y receptores GPS, pueden tener una clave incorporada; mientras que otros le muestran una pantalla donde debe introducirla. Se recomienda, siempre que sea posible, utilizar una clave de 16 dígitos para aumentar la seguridad del teléfono Smartphone.
-
Page 169: Reproducción De Archivos Multimedia
Smartphone. Si se ha insertado una tarjeta de expansión en la ranura del teléfono Smartphone, la aplicación Cámara crea un álbum Palm en la tarjeta y almacena las fotografías ahí. Para almacenar la fotografía en una ubicación distinta, seleccione la lista de selección Álbum en la esquina inferior derecha de la... - Page 170 <Nombre del álbum>: almacena la fotografía en el álbum seleccionado. La ubicación de ■ almacenamiento depende de la ubicación del álbum (el teléfono Smartphone o la tarjeta de expansión). Álbumes nuevos: abre un cuadro de diálogo en el que se puede introducir el nombre de ■...
- Page 171 2. De manera predeterminada, la aplicación Videocámara almacena los vídeos que se graban en el álbum Palm del teléfono Smartphone. Si se ha insertado una tarjeta de expansión en la ranura del teléfono Smartphone, la aplicación Videocámara crea un álbum Palm en la tarjeta y almacena los vídeos ahí.
-
Page 172: Multimedia (Fotos Y Vídeos)
6. Seleccione una de las siguientes opciones: Permite reproducir el vídeo para que pueda verlo. Permite guardar el vídeo en la ubicación que ha seleccionado en el paso 2. Permite eliminar el vídeo. Permite abrir un mensaje MMS para que pueda enviar el vídeo a un número de teléfono o a una dirección de correo electrónico que admita mensajes con vídeo. - Page 173 3. Seleccione la fotografía que desee ver. 4. Pulse Derecha o Izquierda para desplazarse al siguiente elemento del álbum. 5. Si la fotografía tiene una leyenda con voz, seleccione para escucharla. 6. Toque en la fotografía o pulse Centro para volver a la vista Miniatura. Visualización de un vídeo Además de ver los vídeos que se graban con la cámara incorporada, puede ver vídeos grabados en varias cámaras digitales populares.
- Page 174 2. Toque en en la esquina inferior derecha de la pantalla. 3. Seleccione las fotografías o vídeos que desee enviar, o bien elija Seleccionar todo para enviar el álbum completo. (Junto a los elementos seleccionados aparecerá un signo +). 4. Seleccione Compartir. 5.
-
Page 175: Pocket Tunes
POCKET TUNES™ Puede escuchar música a través del altavoz de la parte posterior del teléfono Smartphone o por medio de los auriculares estéreo (se necesita un adaptador para auriculares estéreo o unos auriculares estéreo de 2,5 mm que se venden por separado). Para escuchar música en el teléfono Smartphone, debe convertir los archivos de música al formato MP3 con el Reproductor de Windows Media (equipos Windows) o iTunes (equipos Mac) y, a continuación, transferir los archivos de música al teléfono Smartphone o a una tarjeta de expansión. - Page 176 7. Haga clic en la ficha Dispositivos, seleccione Palm en la lista Dispositivos y, a continuación, haga clic en Propiedades. Seleccionar el teléfono Smartphone Haga clic en Propiedades 8. Haga clic en la ficha Calidad, desactive la casilla Convertir archivos según lo precise este dispositivo (recomendado).
- Page 177 9. Haga clic en Aceptar, y a continuación, vuelva a hacer clic en Aceptar. Configuración de iTunes para MP3 En equipos Mac, utilice iTunes (incluido con OS X) para convertir música de un CD a formato MP3. Para obtener más información sobre el software iTunes, consulte la documentación que acompaña al Mac.
- Page 178 Mac: arrastre y suelte los archivos MP3 en el droplet Enviar a la computadora de mano de ■ la carpeta Palm. Seleccione el nombre del dispositivo, el nombre del archivo y el destino (tarjeta). Haga clic en Aceptar. Sincronice el teléfono Smartphone con el equipo. Tenga paciencia, la transferencia de música a una tarjeta de expansión puede tardar algunos...
- Page 179 Escuchar música en el teléfono Smartphone 1. Vaya a Aplicaciones y seleccione pTunes 2. Realice una de las siguientes acciones: Para realizar una pausa o reanudar la reproducción de la canción actual, seleccione ■ Reproducir Para reproducir la canción siguiente, seleccione Canción siguiente ■...
-
Page 180: Mantenimiento De La Organización
Agregar un contacto ® NOTA Si tiene que introducir más de un contacto, resulta más eficaz usar el software Palm Desktop o Microsoft Outlook en el equipo y, a continuación, sincronizar el teléfono Smartphone Treo™ 700 con el equipo. Para obtener más información, consulte “Sincronización de la información: conceptos básicos”... - Page 181 Agregar un tono de llamada a un ID de llamada: elija la lista de selección Tono y ■ seleccione un tono de la lista para asignar a las llamadas entrantes del contacto un tono específico. Coloque la entrada en una categoría o márquela como confidencial: seleccione ■...
-
Page 182: Calendario
4. Seleccione Tarjeta del menú Registro y, a continuación, seleccione OK. ® NOTA Una vez que ha definido la tarjeta, puede transmitirla a otro dispositivo Palm OS . En cualquier vista Teléfono o en la aplicación Contactos, abra el menú Registro y seleccione Transmitir tarjeta. - Page 183 NOTA Si tiene que introducir más de una cita, resulta más eficaz usar el software Palm Desktop o Microsoft Outlook en el equipo y, a continuación, sincronizar los datos entre el teléfono Smartphone y el equipo. Para obtener más información, consulte “Sincronización de la información: conceptos básicos”...
- Page 184 7. Introduzca una descripción de la cita. NOTA Para asignar automáticamente zonas horarias a las citas, abra el menú Opciones, seleccione Preferencias y active la casilla Zonas horarias para nuevas citas. A todas las citas nuevas se les asigna la zona horaria local (las que ya están programadas no sufren variación alguna), y se puede cambiar la configuración de zona horaria de citas concretas.
-
Page 185: Tareas
3. Seleccione la lista de selección Repetir y elija un intervalo de repetición. Si el intervalo que necesita no aparece en la lista, seleccione Otro para definir un intervalo personalizado. 4. Seleccione OK. Este icono indica una cita repetitiva. TAREAS Agregar una tarea 1. - Page 186 Prioridad: seleccione el número de prioridad de esta tarea (1 es el más importante). ■ Más adelante, puede reorganizar las tareas según su importancia. Categoría: asigne la tarea a una categoría específica. ■ Vencimiento: seleccione la lista de selección de vencimiento y seleccione la fecha de ■...
-
Page 187: Mantenimiento De La Productividad
Si instala el software de escritorio Documents To Go (desde el CD de instalación del software de Palm), podrá utilizarlo para transferir archivos al teléfono Smartphone cuando realice la sincronización. A continuación puede ver algunos ejemplos de lo que puede hacer con Documentos: Enviar y recibir archivos adjuntos de correo electrónico en formatos de archivo de Word,... -
Page 188: Notas De Voz
NOTA La aplicación Documentos no admite algunas funciones de edición, como el uso de varios tamaños de fuente y la revisión ortográfica. NOTAS DE VOZ Notas de voz proporciona un lugar para grabar y reproducir notas y otra información importante directamente en el teléfono Smartphone. -
Page 189: Administración De Archivos Y Aplicaciones
Las instrucciones de esta sección le brindan información sobre cómo instalar archivos PRC (aplicación de Palm OS) y PDB (base de datos de Palm OS) básicos en el teléfono Smartphone Treo. Algunos programas de Palm OS utilizan un instalador o asistente que guía al usuario a través de todo el proceso. Para obtener más información, consulte la documentación que se incluye con el software. - Page 190 Para instalar una aplicación desde el equipo al teléfono Smartphone Treo, necesita tener instalado el software Palm Desktop en el equipo (para obtener instrucciones, consulte la Guía del usuario). 1. Windows: arrastre y suelte los archivos en el icono Instalación rápida de Palm del escritorio de Windows.
-
Page 191: Transmisión De Información
El teléfono Smartphone Treo 700 está equipado con un puerto de infrarrojos (IR), que permite transmitir información a otro dispositivo Palm OS que disponga también de un puerto de infrarrojos. Este puerto se encuentra situado en la parte superior del teléfono Smartphone, entre la antena y el selector de timbre, detrás del pequeño protector oscuro. -
Page 192: Uso De Tarjetas De Expansión
4. Cuando aparezca el cuadro de diálogo Estado de la transmisión, oriente el puerto IR del teléfono Smartphone Treo directamente hacia el puerto IR del dispositivo receptor. 5. Espere hasta que este cuadro de diálogo indique que la transferencia ha finalizado para continuar utilizando el teléfono Smartphone. - Page 193 Inserción y eliminación de tarjetas de expansión 1. Presione y libere la tarjeta ficticia. 2. Cuando note que la ranura de la tarjeta de expansión expulsa la tarjeta ficticia, extráigala. 3. Sostenga el teléfono Smartphone con la pantalla y la etiqueta de la tarjeta de expansión hacia usted.
-
Page 194: Personalización Del Teléfono Smartphone
P E R S O N A L I Z A C I Ó N D E L T E L É F O N O S M A R T P H O N E AJUSTES DE SONIDO DEL SISTEMA Silenciamiento de sonidos Puede silenciar de inmediato todas las alertas, tonos de llamada, música y sonidos del sistema desplazando el selector de timbre a la posición Sonido desactivado. -
Page 195: Valores De Presentación Y Aspecto
VALORES DE PRESENTACIÓN Y ASPECTO Ajuste del brillo de la pantalla y el teclado 1. Pulse Opción y, a continuación, Retroiluminación Retroiluminación 2. Presione Izquierda y Derecha para ajustar el brillo. 3. Seleccione Hecho. Cambio del tamaño del texto Puede cambiar la fuente de pantalla de Calendario, Contactos, Memos, Mensajería, Tareas y Web. Los estilos de fuente pueden ser distintos en las distintas aplicaciones y algunas pueden ofrecer menos tipos. -
Page 196: Ajustes De Las Aplicaciones
4. Seleccione un estilo de fuente. (En el explorador Web, seleccione la lista de selección Tamaño de fuente y elija Grande o Pequeño). Fuente pequeña Fuente grande Fuente pequeña Fuente grande en negrita en negrita 5. Seleccione OK. AJUSTES DE LAS APLICACIONES Reasignación de botones En Preferencias de botones puede seleccionar qué... -
Page 197: Bloqueo Del Teléfono Smartphone Y De La Información
1. Vaya a Aplicaciones y seleccione Pref. 2. Seleccione Botones. 3. Seleccione la lista de selección junto al botón o la combinación Opción + Botón que desea cambiar y seleccione una aplicación. 4. Seleccione Hecho. BLOQUEO DEL TELÉFONO SMARTPHONE Y DE LA INFORMACIÓN NOTA Además de las funciones de bloqueo de este manual, también puede bloquear el teléfono, el teléfono Smartphone y entradas individuales. - Page 198 Para desactivar el bloqueo del teclado, siga los pasos siguientes: 1. Cuando la pantalla está apagada, pulse encendido/apagado para activarla. 2. Pulse Centro para desactivar el bloqueo del teclado. Puede cambiar el tiempo que tarda el bloqueo del teclado en activarse o bien, puede desactivar esta función.
- Page 199 Bloqueo de la pantalla Puede configurar el teléfono Smartphone para que bloquee de forma automática las funciones de la pantalla táctil en situaciones concretas. 1. Vaya a Aplicaciones y seleccione Pref. 2. Seleccione Bloq. teclado. 3. Marque una de las casillas siguientes: Recibir llamadas: desactiva la pantalla cuando suena el teléfono.
-
Page 200: Obtener Ayuda
O B T E N E R A Y U D A EFECTUAR UN RESTABLECIMIENTO AUTOMÁTICO Si el teléfono Smartphone no responde o si encuentra dificultades para llevar a cabo la sincronización con el equipo, el restablecimiento automático puede ser de utilidad. Toda su información se conserva cuando se realiza un restablecimiento automático. -
Page 201: Recursos Adicionales
Para acceder a la Guía del usuario en el equipo, haga clic en Inicio > Programas > Palm > Guía de usuario Treo 700p. También puede acceder a una copia de la guía directamente desde el teléfono Smartphone. - Page 202 Información adicional ® Libros: se puede obtener un gran número de libros sobre los dispositivos Palm OS ■ a través de minoristas locales o en línea (busque en la sección relativa a equipos informáticos), o visite www.palm.com/mytreo700pVerizon Foros en línea: consulte en línea los grupos de discusión de usuarios del Treo para...
-
Page 203: Información Reguladora
I N F O R M A C I Ó N R E G U L A D O R A SAR (del inglés RF Safety Exposure To Radio Frequency Energy, Exposición segura a Declaración de la FCC (Comisión Federal de energía de radiofrecuencia) Los dispositivos de Comunicaciones) - Page 204 DEBEN utilizar uno de los tipos de accesorios de exposición a la radiofrecuencia establecidos por la FCC. protección corporal siguientes: Entidad responsable: ® Accesorio de protección corporal de la marca Palm (Norteamérica) (Europa) para el que se ha comprobado el cumplimiento de la Palm Inc.
- Page 205 Modelo Treo 700 Un TTY (también conocido como TDD o teléfono de texto) Palm declara que el modelo anteriormente citado del es un dispositivo de telecomunicaciones que le permite a las teléfono Smartphone Treo cumple con las normas personas sordas o con dificultades de audición, o a aquellas...
- Page 206 Palm Inc. y sus proveedores renuncian a todo tipo de responsabilidad ante pérdidas o reclamaciones por Este producto está protegido por una o más de las parte de terceros que puedan derivarse de la utilización de...
-
Page 207: Índice
Í N D I C E Í N D I C E Botón Aplicaciones 113 Botón Calendario 178 Botón Volumen 136 botones abrir definir favoritos 130 aplicaciones 113 desactivar 195 páginas Web 158 en el navegador de cinco direcciones 106 alarmas seleccionar aplicación 112 agregar a calendario 180... - Page 208 correo electrónico descripción general 157 adjuntar fotos a 165 configurar cuentas para 137, 139 fotos llamadas activas y 127 agregar para ID de llamada 176 marcar desde 121 crear papel tapiz con 170 crear eliminar 168 citas 179 guardar 166 mensajes de multimedia 165 ver 165 cuadros de diálogo 108...
- Page 209 Í N D I C E finalizar 125, 126, 128, 129 poner en espera 125, 127, 128 páginas Web realizar 118 acceder 157 recibir 122, 128 marcar desde 121 llamadas. Véase llamadas telefónicas pantalla activar 115, 126 marcadores 160 activar elementos en 107 mensajes de texto ajustar brillo 191 desactivar 116...
- Page 210 solucionar problemas 198 silenciar 123 transmitir 187 sonidos 135 tarjetas 178 calendario 178 tarjetas de expansión fotos 165 transferir música a 173 menús 108 utilizar 188 páginas web 158 teclado vídeo clips 168 bloquear 193 videocámara 167 introducir información con 110 vídeos introducir texto de 110 enviar 165...
- Page 211 A/N 185-10350-00 P/N 406-10587-00...