Table of Contents
Advertisement
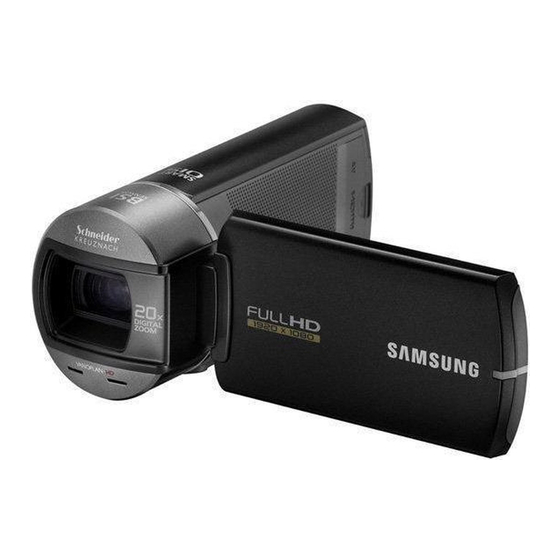
High Definition Digital Camcorder
www.samsung.com/register
For video recording, use a memory card that
supports faster write speeds.
- Memory Card: A Class 6 SDHC card or above.
user manual
HMX-Q10BP/HMX-Q11BP/HMX-Q100BP/HMX-Q130BP
HMX-Q10TP/HMX-Q11TP/HMX-Q100TP/HMX-Q130TP
HMX-Q10UP/HMX-Q11UP/HMX-Q100UP/HMX-Q130UP
HMX-Q10PP/HMX-Q11PP/HMX-Q100PP/HMX-Q130PP
Advertisement
Table of Contents

Related Manuals for Samsung HMX-Q10BP


Summary of Contents for Samsung HMX-Q10BP
-
Page 1: User Manual
High Definition Digital Camcorder www.samsung.com/register HMX-Q10BP/HMX-Q11BP/HMX-Q100BP/HMX-Q130BP HMX-Q10TP/HMX-Q11TP/HMX-Q100TP/HMX-Q130TP For video recording, use a memory card that HMX-Q10UP/HMX-Q11UP/HMX-Q100UP/HMX-Q130UP supports faster write speeds. - Memory Card: A Class 6 SDHC card or above. HMX-Q10PP/HMX-Q11PP/HMX-Q100PP/HMX-Q130PP... -
Page 2: Before Reading This User Manual
What the icons and signs in this user manual mean; About this user manual Safety Icon Meaning Thank you for purchasing this Samsung Camcorder. Please read There is a potential risk of death or serious injury. this user manual carefully before you use the camcorder and keep WARNING it handy for future reference. - Page 3 Intel Corporation in the United handling the camcorder or memory card, etc. Samsung will not provide compensation for damages due to the States and other countries. loss of recorded contents. • AMD and Athlon™ are either registered trademarks or trademarks • Make a backup of important recorded data.
-
Page 4: Safety Information
Safety information The safety precautions illustrated below are to prevent personal injury or material damages. Heed all instructions carefully. WARNING Prohibited action. Do not touch the product. There is a potential risk of death or serious injury. CAUTION Do not disassemble the product. This precaution must be followed. - Page 5 Samsung service centre. There is a risk of fire or injury. shock. There is a risk of fire or personal injury.
- Page 6 Safety information CAUTION Do not drop or expose the camcorder, Do not press the surface of the LCD Do not use the camcorder on a tripod Do not use the camcorder in direct battery, AC adaptor, or other (not supplied) in a place where it is sunlight or near heating equipment.
- Page 7 Keep important data separately. Only plug the adaptor plug into a socket Manufacturers of unauthorised accessories that is well ventilated. Samsung is not responsible for data that is easily accessible. If any problem compatible with this camcorder are loss. occurs with the product, you must pull responsible for their own products.
-
Page 8: Table Of Contents
Contents ZOOMING ................... 40 Quick start guide ........... 10 Basic playback ..........41 Getting to know the camcorder ...... 14 CHANGING THE PLAYBACK MODE ........... 41 WHAT'S INCLUDED WITH YOUR CAMCORDER ......14 PLAYING VIDEOS ............... 42 LOCATION OF CONTROLS ............15 VIEWING PHOTOS .............. - Page 9 Contents Format ..................77 Other settings ..........63 Default Set ................... 78 Video Resolution ................63 Language ..................78 Photo Resolution ................. 63 Demo ..................79 OIS Duo ..................64 Tele Macro .................. 64 Connecting to a TV ........80 Digital Zoom ................
-
Page 10: Quick Start Guide
STEP 2: Record with your camcorder Insert the battery to the camcorder. page 21 Recording start/stop button Make sure that the • SAMSUNG logo is Zoom dial facing down and the battery is placed as shown in the figure. Charge the battery fully. page 22 •... - Page 11 Quick start guide Recording videos Recording photos Your camcorder uses advanced H.264 compression technology Your camcorder can record high quality photos with a 16:9 aspect give you the clearest video quality. ratio. Open the LCD screen. Open the LCD screen. Select the video recording mode by touching the Video Select the photo recording mode by touching the Photo recording mode (...
- Page 12 Quick start guide STEP3: Play back videos or photos STEP4: Save recorded videos or photos Simple and fun! Enjoy the various features of the internal Viewing videos or photos on the LCD screen Intelli-studio programme on your Windows computer. Using the Intelli-studio programme built into your camcorder, you You can find recordings quickly by using the thumbnail index view.
- Page 13 Quick start guide Intelli-studio runs automatically after you connect your camcorder to a The new files are saved to your PC and registered to “Contents Windows computer if you have set “PC Software: ON” in the Settings Manager” on the Intelli-studio programme. menu.
-
Page 14: Getting To Know The Camcorder
Getting to know the camcorder WHAT'S INCLUDED WITH YOUR Checking your accessories CAMCORDER Your new camcorder comes with the following accessories. If any of these items is missing from your box, call Samsung’s Customer Care centre. Battery AC power adaptor Audio/Video cable... -
Page 15: Location Of Controls
Getting to know the camcorder LOCATION OF CONTROLS Front/Left Lens Internal microphone Charging indicator Home ( ) button LCD screen (Touch screen) Internal speaker Jack cover (AV/HDMI/USB) AV (Audio/Video) jack HDMI jack USB jack Be careful not to cover the internal microphone and lens during recording. - Page 16 Getting to know the camcorder Rear/Right/Bottom Lens open/close switch Grip belt DC IN jack Jack cover (DC IN) Zoom dial 10 11 Recording start/stop button Battery slot Memory card slot Battery/Memory card cover Battery release switch Tripod receptacle...
-
Page 17: Identifying The Screen Displays
Getting to know the camcorder IDENTIFYING THE SCREEN DISPLAYS The available functions vary depending on the operation mode you have selected. Different indicators appear depending on the setting values. • This On Screen Display (OSD) is shown in the video recording mode only. •... -
Page 18: Photo Recording Mode
Getting to know the camcorder • This On Screen Display (OSD) is shown in the photo recording mode only. • Select the photo recording mode. page 26 Photo recording mode Left of the LCD screen Right of the LCD screen 9999 9 9 9 9 Indicator... -
Page 19: Video Playback Mode: Single View
Getting to know the camcorder • This On Screen Display (OSD) is shown in the video playback mode only. • Select the video playback mode. page 41 Video playback mode : Thumbnail view Indicator Meaning Indicator Meaning Video thumbnail view tab Delete tab Video recording mode tab Photo thumbnail view tab... -
Page 20: Photo Playback Mode: Thumbnail View
Getting to know the camcorder • This On Screen Display (OSD) is shown in the photo playback mode only. • Select the photo playback mode. page 41 Photo playback mode: Thumbnail view Indicator Meaning Indicator Meaning Video thumbnail view tab Photo recording mode tab Photo thumbnail view tab Erase protection... -
Page 21: Getting Started
Close the battery slot cover. Close the battery slot cover. • Samsung is not responsible for problems that are caused by using unapproved batteries. If you use batteries from other manufacturers, there is a danger of overheating, fire, or explosion. •... -
Page 22: Charging The Battery
Getting started CHARGING THE BATTERY You can charge the battery using the AC power adaptor or the USB cable. • Insert the battery into the camcorder. page 21 • To charge, use the supplied AC power adaptor or the USB cable. Charge the battery using the AC power adaptor or the USB cable. -
Page 23: Checking The Battery State
Getting started Battery level display CHECKING THE BATTERY STATE The battery level display shows the You can check the charging state and remaining battery capacity. STBY 00:00:00 [253Min] amount of battery power remaining To check the charging state in the battery. The colour of the LED indicates the power or charging state. -
Page 24: About The Battery
• Times shown above are measured under Samsung’s test conditions. Your • Charge an extra battery before using the camcorder outdoors in cold times may differ, depending on your usage and conditions. -
Page 25: Basic Operation Of The Camcorder
Basic operation of the camcorder TURNING YOUR CAMCORDER ON/OFF • The camcorder operates the self-diagnosis function when you turn it pages 93~97 • If the Quick On STBY function is set to 5 Min and you close the LCD screen when the power is on, the power saving mode activates. Home ( ) button page 76... -
Page 26: Setting The Operation Modes
Basic operation of the camcorder SETTING THE OPERATION MODES USING THE TOUCH SCREEN You can easily switch the operating mode by touching the tabs on The touch screen lets you playback and recording with a simple the LCD screen. touch of your finger. Place your hand on the rear side of the LCD screen to support it. -
Page 27: Switching The Information Display Mode
Basic operation of the camcorder Drag Switching the information display mode Drag the touch screen to up, down, left, or right to select the desired You can switch the on-screen information display mode. items or files. Each time you touch the LCD screen, the full and minimum display modes alternate. -
Page 28: Setting The Time Zone And Date/Time For The First Time
Basic operation of the camcorder SETTING THE TIME ZONE AND DATE/TIME Touch the time ( ) tab, and then set the time by touching the corresponding item or dragging it to up or down. FOR THE FIRST TIME Date / Time Set Set the date and time of your local area when turning on this camcorder for the first time. -
Page 29: Selecting The Osd Language
Basic operation of the camcorder SELECTING THE OSD LANGUAGE Touch the desired language. Drag the LCD screen to up or down until the desired • You can select the language in which the camcorder displays the language appears. menu screen or messages. The camcorder retains the language setting even when you turn it off. -
Page 30: Getting Ready To Start Recording
Getting ready to start recording INSERTING/EJECTING A MEMORY CARD (NOT SUPPLIED) To insert a memory card To eject a memory card Slide and open the memory card cover as shown in the figure. Slide and open the memory card cover as shown in the figure. Insert the memory card into the card slot until it softly clicks. -
Page 31: Selecting A Suitable Memory Card (Not Supplied)
Getting ready to start recording SELECTING A SUITABLE MEMORY CARD Usable memory card (1GB~32GB) (NOT SUPPLIED) Protection tab Protection tab Compatible memory cards • This camcorder can be used with SD and SDHC cards. We recommend you use an SDHC card. SD cards up to 2GB are supported by this camcorder. - Page 32 • Do not use a damaged memory card. • Samsung is not responsible for data loss due to misuse, including • Be careful to keep the memory card out of the reach of children, loss caused by any PC virus.
-
Page 33: Recordable Time And Capacity
Getting ready to start recording RECORDABLE TIME AND CAPACITY Recordable number of photos Listed below are the available video recording times and the number of photos the camcorder can take, by card memory size and Storage media (Capacity) resolution. Refer to the recordable video time and the number of Resolution photos when recording videos or taking photos. -
Page 34: Using The Grip Belt
Getting ready to start recording USING THE GRIP BELT Switch grip (Either handed grip) The camcorder is designed for you to use conveniently with either Adjust the length of grip belt so that the camcorder is stable when your right or left hand. If you want to use this function, set “Switch you press the Recording start/stop button with your thumb. -
Page 35: Adjusting The Lcd Screen
Getting ready to start recording ADJUSTING THE LCD SCREEN When you reverse and close the LCD screen by rotating it to 180° towards the lens, the camcorder switches to the The wide LCD screen on your camcorder offers high quality image playback mode automatically. -
Page 36: Basic Recording
Basic recording RECORDING VIDEOS Press the Recording start/stop button. The recording ( ) indicator appears and recording starts. • This camcorder supports both High Definition (HD) and Standard Definition (SD) image resolutions. Set your desired resolution before 00:00:00 [253Min] recording. page 63 •... - Page 37 • Samsung is not responsible for any damage caused by a failure of • For the on-screen information display, see page 17 normal recording or playback operation because of memory card error.
-
Page 38: Recording Photos
Basic recording RECORDING PHOTOS Adjust the subject at the centre of the LCD screen, and press the Recording start/stop button. You can take photos and store them in the storage media. Set the The shutter sound is heard and the photo is recorded. •... -
Page 39: Recording With Ease For Beginners (Smart Auto)
Basic recording RECORDING WITH EASE FOR BEGINNERS Appears when recording at night. (Night) (SMART AUTO) Appears when recording images of landscapes with backlighting. (Backlight) User-friendly SMART AUTO optimises your camcorder to the recording conditions automatically, providing beginners with the Appears when recording people. (Portrait) best performance. -
Page 40: Zooming
Basic recording ZOOMING T: Telephoto This camcorder allows you to record using optical X10 zoom and digital zoom by rotating the Zoom dial or touching the Zoom ) tab on the LCD screen. T: Recording enlarged image (telephoto) W: Recording wide area (wide-angle) STBY 00:00:00 [253Min]... -
Page 41: Basic Playback
Basic playback CHANGING THE PLAYBACK MODE You can switch to the playback mode by selecting “Album” on the Home menu. You can also switch the operation mode directly into the playback thumbnail display by touching the Playback ( ) tab on the LCD screen. •... -
Page 42: Playing Videos
Basic playback PLAYING VIDEOS Find videos in various ways You can preview recorded videos in the thumbnail index view, find Drag the thumbnails to up and play your desired video directly. or down on the LCD screen to search the thumbnails •... - Page 43 Basic playback To adjust the volume during video playback Do not power off or eject the memory card during photo playback. Doing so may damage the recorded data. You can hear the sound through the internal speaker of the camcorder while the video is playing back on the LCD screen. •...
- Page 44 Basic playback Various playback operations Skip playback Touch the Reverse skip ( ) / Forward skip ( ) tab during playback. Playback / Pause / Stop • Touching the Forward skip ( ) tab plays the next video. • Playback and pause alternate when you touch the Playback •...
-
Page 45: Viewing Photos
Basic playback VIEWING PHOTOS Find photos in various ways You can view recorded photos by using various playback functions. Drag the thumbnails to up or down on the LCD screen • Insert a memory card. page 30 to search the thumbnails •... -
Page 46: Zooming During Photo Playback
Basic playback Viewing a slide show Zooming during photo playback You can view a photo slide show with background music. You can magnify a playback image. Touch the Slide Show ( ) tab during photo playback. Touch the desired photo. •... -
Page 47: Using The Menu Items
Using the menu items HANDLING MENUS Select the desired item, and then adjust the setting values you want. With Home menu, you can use various functions and change their • The White Balance function of “Manual” is used here as an settings according to your preference. -
Page 48: Menu Items
Using the menu items MENU ITEMS • The items available in each menu vary depending on the operating mode. • For item operation details, see the page number listed under Page in the table. Manual menu items Art Film menu items •... - Page 49 Using the menu items Settings menu items Items Default value Page Items Default value Page Shooting General Video Resolution Full HD 1080/50i Card Info Photo Resolution 4.9M 2944X1656 File No. Series OIS Duo Time Zone Home Tele Macro Date/Time Set 01/JAN/2011 00:00 Digital Zoom Date Type...
-
Page 50: Advanced Recordings
Advanced recordings White Balance Understanding White Balance White balance (WB) is the process of removing unrealistic colour The colour of your image depends on the type and quality of the casts, so that objects which appear white are rendered white in your light source. -
Page 51: Ev (Exposure Value)
Advanced recordings EV (Exposure Value) Back Light Depending on the intensity of the ambient light, your videos and When a subject is lit from behind, this function compensates for photos may be too bright or dark. In these cases, you can adjust the back lighting so that the subject does not appear too dark. -
Page 52: Self Timer
Advanced recordings Self Timer Super C.Nite When the self-timer is enabled, there is a time delay of 10 seconds Use to get better images of slowly moving subjects or subjects before recording starts. You can take photos of yourself. in dark places. When you turn the Super C.Nite function on, the camcorder adjusts the shutter speed so that the images are brighter Select the photo recording mode. -
Page 53: Cont. Shot
Advanced recordings Cont. Shot Focus The Continuous Shot function lets you capture up to eight photos in The camcorder usually focuses on a subject automatically (auto rapid. focus). When you turn the camcorder on, focus is always set to automatic. You can also set the focus manually. Select the photo recording mode. -
Page 54: Special Effects For Recordings
Special effects for recordings Fader Recording a video with Fade effect You can give your recording a professional look by using special Fade In (Approx.3 seconds) effects such as fade in at the beginning of a sequence or fade out at the end of a sequence. -
Page 55: Time Lapse Rec
Special effects for recordings Time Lapse REC After setting the Time Lapse REC mode, press the Recording start/stop button. Using the Time Lapse feature, you can programme your camcorder • The Time Lapse recording starts. to create a time lapse video by recording a series of frames over a Time Lapse REC only supports the 720/50p resolution. - Page 56 Special effects for recordings Example of Time Lapse Recording The Time Lapse Recording function records image frames at Total time for recording a predefined interval over the total recording time to produce a Recording interval time-lapse video. Time Lapse Recording is useful for filming the following subjects: •...
-
Page 57: Digital Effect
Special effects for recordings Digital Effect Submenu items Using the Digital Effect function gives your recording a creative look. Press the Home ( ) button touch “Art Film” touch the Digital Effect ( ) tab. Touch the desired submenu item. Off( Black &... -
Page 58: Editing Videos And Photos
Editing videos and photos Delete You can erase your recordings one by one or all at once. • Insert a memory card. page 30 • Select the video playback mode or photo playback mode. page 41 Touch the Delete ( ) tab on the thumbnail view display. -
Page 59: Protect
Editing videos and photos Protect 00:00:00/ 00:01:03 100_0001 You can protect important recordings from accidental erasure. The protected videos and photos cannot be deleted unless you format the memory card or cancel the protection. • Insert a memory card. page 30 •... -
Page 60: Divide
Editing videos and photos Divide 00:00:20/ 00:01:03 100_0001 Divide You can divide a video into two, and easily delete a section you no longer need. As this function edits the original file, make sure to back up the original before dividing it. •... -
Page 61: Combine
Editing videos and photos Combine Touch the ( ) tab. A message appears asking for your confirmation. • You can combine two different videos. As this function edits the original files, make sure to back up the original files before combining Touch “Yes”. -
Page 62: File Info
Editing videos and photos File Info You can see image information for each image. • Insert a memory card. page 30 • Select the video playback mode. page 41 Touch the desired file to view the file information. Touch the MENU ( ) tab touch “File Info”. -
Page 63: Other Settings
Other settings Video Resolution Photo Resolution You can select the resolution of video to be recorded on storage You can select the resolution of the photo to be recorded. media. Press the Home ( ) button touch “Settings” “Shooting” Press the Home ( ) button touch “Settings”... -
Page 64: Ois Duo
Other settings OIS Duo Tele Macro Reduce camcorder shake and prevent blurred images with Optical Using the Tele Macro function, you can get close up images which and Digital Image Stabilisation functions. are created by focusing on a small portion of a large object at a tele angle. -
Page 65: Digital Zoom
Other settings Digital Zoom The top of the bar shows the digital zooming zone. The zooming zone appears when you rotate the Zoom dial or use the Zoom ( ) tab. The images optically magnified by the lens can be electronically Digital range magnified up to the maximum 200 times. -
Page 66: Video Play Option
Other settings Video Play Option Slide Show Option You can set a specific playback style according to your preference. You can set the playback options for the slide show with the slide show setting menus. Press the Home ( ) button touch “Settings”... -
Page 67: Lcd Brightness
Other settings LCD Brightness Guideline This camcorder’s LCD brightness is optimised at the factory. Guideline displays straight line patterns on the LCD screen that can However, you can adjust the LCD brightness according to the help you set the image composition when recording images. The ambient environment. -
Page 68: Date/Time Display
Other settings Date/Time Display TV Display You can set the Date/Time Display function so that the date and When your camcorder is connected to a TV, you can select whether time appear on the LCD screen. the camcorder’s On Screen Display (OSD) appears on the TV screen. -
Page 69: Hdmi Tv Out
Other settings HDMI TV Out Auto LCD Off You can set the HDMI video output to match the TV you have You can set the LCD screen to darken automatically when there connected the camcorder to. is no user interaction for a period of time to decrease power consumption. -
Page 70: Pc Software
Other settings PC Software USB Connect If you set PC Software to On, you can use the built-in video and You can transfer data to a PC or print photos directly by establishing photo management software by connecting your camcorder to your the USB connection. -
Page 71: Tv Connect Guide
You can view the TV Connect Guide for instructions before you This camcorder supports Anynet+. Anynet+ is an AV network connect the camcorder to your TV set. system that lets you control all connected Samsung AV devices with a Samsung TV remote control that supports Anynet+. Press the Home ( ) button touch “Settings”... -
Page 72: Card Info
Other settings Card Info File No. This function shows you the storage information of the selected File names (numbers) are assigned to recorded images according to storage media, such as used memory space and available memory the numbering option you select. space, etc. -
Page 73: Time Zone
Other settings Time Zone Date/Time Set You can easily set the clock to the local time when using your By setting the date and time, you can display the date and time of camcorder while traveling. the recording during playback. page 28 Setting the local time Date Type... -
Page 74: Time Type
Other settings Time Type Beep Sound You can set the time display type to 12 hour or 24 hour. You can turn the beep that sounds when you touch tabs and buttons on the screen on or off. Press the Home ( ) button touch “Settings”... -
Page 75: Shutter Sound
Other settings Shutter Sound Auto Power Off You can turn the shutter sound that plays when taking a photo with You can set your camcorder to turn off automatically if it is idle for the Recording start/stop button on or off. 5 minutes without performing an operation. -
Page 76: Quick On Stby
Other settings Quick On STBY Submenu items When you are going to record frequently for an extended time, use • Off: Closing the LCD screen turns off the camcorder. the Quick On STBY function to reduce energy consumption and • 5 Min: Closing the LCD screen starts the Quick On STBY mode after a battery drain. -
Page 77: Switch Grip
Other settings Switch Grip Format The camcorder is designed for you to use conveniently with either Use this function if you want to delete all files completely or to your right or left hand. If the “Switch Grip” sets to “On”, you can correct problems on the storage media. -
Page 78: Default Set
Other settings Default Set Language You can restore all menu settings to the default conditions (factory You can select the language the camcorder uses to display the settings). menu and messages. page 29 Press the Home ( ) button touch “Settings” “General” >>... -
Page 79: Demo
Other settings Demo Using the Demo function The Demo mode is cancelled in the following cases: The Demo mode automatically shows you the major functions that - If the LCD screen is touched. are included with your camcorder so that you can use them more - If you press any button (Recording start/stop, Home ( ), etc.). -
Page 80: Connecting To A Tv
Connecting to a TV CONNECTING TO A HIGH DEFINITION TV Turn on the camcorder. If you do not turn on the camcorder first, the camcorder may WITH HDMI • fail to recognise the connected TV. You can view High Definition (HD) quality videos recorded in HD Connect the camcorder to the TV with a Mini HDMI cable. -
Page 81: Connecting To A Regular Tv
Connecting to a TV CONNECTING TO A REGULAR TV Connect the camcorder to a TV with an Audio/Video cable. You can view images recorded with your camcorder on a regular Set the TV’s input or source selector to the input you’ve TV that supports standard definition. -
Page 82: Viewing On A Tv Screen
Connecting to a TV VIEWING ON A TV SCREEN Image appearance depends on the TV screen aspect ratio Appearance on Appearance on Recording ratio Wide (16:9) TV 4:3 TV Images recorded in a 16:9 ratio • Adjust the volume to a moderate level. If the volume is too high, the video information may include noise. -
Page 83: Dubbing Videos
Dubbing videos DUBBING TO A VCR OR DVD/HDD Connect your camcorder to the recording device (VCR or DVD/ HDD recorder) with the Audio/Video cable. RECORDER Connect your camcorder to the input jacks of the recording • Videos recorded in this camcorder can be dubbed to a VCR or device. -
Page 84: Printing Photos
Printing photos DIRECT PRINTING WITH A PICTBRIDGE Turn your printer on. The photo thumbnails appear on the LCD screen. PRINTER • Touch the photos you want to print, and then touch the Print You can print photos directly by connecting your camcorder to a PictBridge printer (sold separately) using a USB cable. - Page 85 Printing photos To set the date/time imprint for Pictbridge printers • The date/time imprint option may not be supported by all printers. Check with your printer manufacturer. The date/time imprint option cannot be setup if the printer does not support the option. In the printer mode, touch the MENU ( ) tab “Date/Time”.
-
Page 86: Using With A Windows Computer
Using with a Windows computer WHAT YOU CAN DO WITH A WINDOWS System requirements COMPUTER The following requirements must be satisfied to use the internal editing software (Intelli-studio): You can perform the following functions by connecting your camcorder to your Windows computer with a USB cable and using Items Requirement the Intelli-studio editing software built into your camcorder. -
Page 87: Using The Intelli-Studio Programme
• 4. Disconnect the USB cable from the camcorder and PC. removable disk window may also appear. Use the provided USB cable. (Supplied by Samsung) • • Make sure you insert the USB plug into the USB jack with the plug facing in the correct direction. - Page 88 Using with a Windows computer Step 2. About the Intelli-studio main window When the Intelli-studio starts up, video and photo thumbnails appear in the main window. Description Menu items Display files in the selected folder. Switch to Photo edit mode. Switch to Video edit mode.
- Page 89 Using with a Windows computer Step 3. Playing back videos or photos Step 4. Editing videos or photos You can play back the recordings conveniently using the Intelli- You can edit the videos or photos in various ways with various studio application.
- Page 90 Using with a Windows computer Step 5. Sharing the videos/photos online Click “Upload” to start uploading. A pop up window appears asking for your ID and password. • Share your contents with the world by uploading photos and videos directly to a web site with one click. Choose the videos or photos you want to share.
-
Page 91: Using As A Removable Storage Device
87 The folder or files are copied from the storage media to the • The “Removable Disk” or “Samsung” window appears on the • PC’s screen after a moment. Select “Open folders to view files using Windows Explorer”, •... - Page 92 Using with a Windows computer Structure of folders and files on the storage media File format • The folder and file structure for storage media are below. Video files • File naming follows DCF (Design rule for Camera File System) rules.
-
Page 93: Troubleshooting
Troubleshooting Before contacting a Samsung authorised service centre, perform the following simple checks. They may save you the time and expense of an unnecessary call. WARNING INDICATORS AND MESSAGES Problems may occur because of the following reasons. Check the information and take corrective action. - Page 94 Troubleshooting Storage media Message Icon Informs that... Action Not Formatted The memory card is not formatted in this camcorder. • Format the memory card using this camcorder. • Files cannot be played as the memory card The memory card may have been formatted by Not Supported format is not supported by the camcorder.
- Page 95 Troubleshooting Recording Message Icon Informs that... Action • Delete unnecessary files from the storage media. • Back up files to your PC or another storage The limit of video media and delete files. files is reached. The number of video files that can be stored is 9,999. •...
- Page 96 Troubleshooting Playback Message Icon Informs that... Action • Use the camcorder to format the storage media A problem has occurred while the camcorder was Read Error after backing up important files to a PC or reading data from the storage media. another storage device.
- Page 97 Troubleshooting Message Icon Informs that... Action Fail Printer • Check the USB cable. Connecting A problem occurred when connecting the • Try the connection procedure again. Change 'USB camcorder via USB to a printer. • Switch “USB connect” function to “PictBridge”. Connect' Fail USB •...
-
Page 98: Symptoms And Solutions
Troubleshooting SYMPTOMS AND SOLUTIONS If these instructions do not solve your problem, contact your nearest Samsung authorised service centre. Power Symptom Explanation/Solution • The battery may not be installed in your camcorder. Insert the battery into the camcorder. • The inserted battery may be discharged. - Page 99 Troubleshooting Display Symptom Explanation/Solution • This occurs if you disconnect the AC power adaptor or remove the battery before turning An afterimage remains on the LCD screen. the power off. The image on the LCD screen looks dark. • Ambient light is too bright. Adjust the brightness and angle of the LCD. Recording Symptom Explanation/Solution...
- Page 100 Troubleshooting Recording Symptom Explanation/Solution • Set “Shutter Sound” to “ON”. You don’t hear the shutter sound when you • When the Mini HDMI cable or Audio/Video cable is connected to the camcorder, the record a photo image. Shutter Sound is not available. •...
- Page 101 Troubleshooting Adjusting the image during recording Symptom Explanation/Solution • Set “Focus” to “Auto”. (Video recording mode only) page 53 • The recording conditions are not suitable for auto focus. Adjust the focus manually. (Video Focus does not adjust automatically. recording mode only) page 53 •...
- Page 102 Troubleshooting Connecting/Dubbing with other devices (Recorder, PC, Printer, etc.) Symptom Explanation/Solution You cannot dub correctly using the HDMI • You cannot dub images using the HDMI cable. cable. • The Audio/Video cable is not connected properly. Make sure that the Audio/Video cable You cannot dub correctly using the Audio/ is connected to the proper jack, i.e.
- Page 103 Troubleshooting Connecting to a computer Symptom Explanation/Solution • Video playback or sound may stop temporarily depending on your computer. The video Your computer is not playing videos, images, or sound copied to your computer is not affected. or sound located on your camcorder •...
-
Page 104: Additional Information
Additional information • To clean the lens MAINTENANCE Use a blower brush to remove dust, and then wipe the lens gently with a soft cloth. The suggestions below will help you fulfill any warranty obligations If necessary, wipe gently with lens paper or tissue. and allow you to enjoy this product for many years. -
Page 105: Using Your Camcorder Abroad
• What can I do? - Turn the power off, detach the battery, and leave the camcorder The format transcoder is not provided by Samsung. in a dry area for 1~2 hours before using it. • Use the camcorder only after dew condensation has completely PAL-compatible countries/regions disappeared. -
Page 106: Glossary
Additional information GLOSSARY AF (Auto Focus) F. No (F-Number) A system that automatically focuses the camcorder lens on the subject. Your camcorder uses The f-number defines the brightness of lens. Smaller number lens has generally brighter image. the contrast to focus automatically. The f-number is directly proportional to the focal length and inversely proportional to the lens diameter. -
Page 107: Specifications
Specifications HMX-Q10BP/HMX-Q10TP/HMX-Q10UP/HMX-Q10PP HMX-Q11BP/HMX-Q11TP/HMX-Q11UP/HMX-Q11PP Model name HMX-Q100BP/HMX-Q100TP/HMX-Q100UP/HMX-Q100PP HMX-Q130BP/HMX-Q130TP/HMX-Q130UP/HMX-Q130PP Video signal Picture compression format H.264 (MPEG-4.AVC) Audio compression format AAC (Advanced Audio Coding) Image device 1/4” CMOS System Effective pixels 2.07 mega pixels Total pixels 5.1 mega pixels Lens F1.8 ~ F2.5, x10 Optical Zoom, x20 Digital Zoom Focal length 2.75mm ~ 27.5mm Angle of View... - Page 108 Contact SAMSUNG WORLD WIDE If you have any questions or comments relating to Samsung products, please contact the SAMSUNG customer care centre. Region Country Contact Centre Web Site Region Country Contact Centre Web Site www.samsung.com CANADA 1-800-SAMSUNG(726-7864) www.samsung.com...
- Page 109 0120-327-527 www.samsung.com SLOVAKIA 0800 - SAMSUNG(0800-726 786) www.samsung.com/sk MALAYSIA 1800-88-9999 www.samsung.com 1-800-10-SAMSUNG(726-7864) for PLDT SPAIN 902 - 1 - SAMSUNG (902 172 678) www.samsung.com 1-800-3-SAMSUNG(726-7864) for Digitel PHILIPPINES www.samsung.com SWEDEN 0771 726 7864 (SAMSUNG) www.samsung.com 1-800-8-SAMSUNG(726-7864) for Globe Asia www.samsung.com/ch...
- Page 110 Correct disposal of batteries in this product Correct Disposal of This Product (Waste Electrical & Electronic Equipment) (Applicable in the European Union and other European countries with separate battery return (Applicable in the European Union and other systems) European countries with separate collection This marking on the battery, manual or packaging systems) indicates that the batteries in this product should...
- Page 111 Samsung Electronics Co., Ltd. 129, Samsung-Ro, Yeongtong-Gu, Suwon-Si, Gyeonggi-Do 443-742 Korea Samsung Electronics Euro QA Lab. Blackbushe Business Park Saxony Way, Yateley, Hampshire GU46 6GG, UK RoHS compliant Our product complies with “The Restriction Of the use of certain Hazardous Substances in electrical and electronic equipment”, and we...