Kenwood KCA-BT200 Instruction Manual
Bluetooth unit
Hide thumbs
Also See for KCA-BT200:
- Instruction manual (80 pages) ,
- Product information (52 pages) ,
- Training manual (52 pages)
Table of Contents
Advertisement
KCA-BT200
Bluetooth UNIT
INSTRUCTION MANUAL
Bluetooth
Declaration of Conformity with regard to the R&TTE Directive
1999/5/EC
Manufacturer:
Kenwood Corporation
2967-3 Ishikawa-machi, Hachioji-shi, Tokyo, 192-8525 Japan
EU Representative's:
Kenwood Electronics Europe BV
Amsterdamseweg 37, 1422 AC UITHOORN, The Netherlands
© B64-4124-00/00 (MW/IW)
Advertisement
Table of Contents

Related Manuals for Kenwood KCA-BT200


Summary of Contents for Kenwood KCA-BT200
- Page 1 Bluetooth UNIT INSTRUCTION MANUAL Bluetooth Declaration of Conformity with regard to the R&TTE Directive 1999/5/EC Manufacturer: Kenwood Corporation 2967-3 Ishikawa-machi, Hachioji-shi, Tokyo, 192-8525 Japan EU Representative's: Kenwood Electronics Europe BV Amsterdamseweg 37, 1422 AC UITHOORN, The Netherlands © B64-4124-00/00 (MW/IW)
-
Page 2: Table Of Contents
The Bluetooth word mark and logos are owned by SMS (Short Message Service) the Bluetooth SIG, Inc. and any use of such marks by Kenwood Corporation is under license. Other trademarks and trade names are those of their respective owners. -
Page 3: Before Use
• The units supporting the Bluetooth function have been certified for conformity with the Bluetooth Standard Kenwood Receivers available for this unit following the procedure prescribed by Bluetooth Operation methods are classified into groups by SIG. -
Page 4: Basic Operation Of Hands-Free Phoning (Model-A)
Basic Operation of hands-free phoning (Model-A) Before Use 2-2. Select a name or phone number Push the Control knob towards up or down. • You need to register your cell-phone before using 2-3. Make a call it with this unit. For more details, see <Registering Press the [38] button for at least 1 second. -
Page 5: Receiving A Call
Receiving a call Other functions Answering a Phone Call Clearing the Disconnection Message Model-A-1: Press the Control knob or one of [1] – [6] Press the [AUTO]/ [TI] button for at least 1 second. buttons Switching between Display Modes Model-A-2: Press the [VOL] button or one of [1] – [6] Press the [AUTO]/ [TI] button. -
Page 6: Basic Operation Of Hands-Free Phoning (Model-B)
Basic Operation of hands-free phoning (Model-B) Before Use Calling a number in the call log ( 2-1. Select the "OUT-CALL" (outgoing call), "IN-CALL" • You need to register your cell-phone before using (incoming call), or "MIS-CALL" (missed call) display. it with this unit. For more details, see <Registering 2-2. -
Page 7: Receiving A Call
Receiving a call Registering to the Preset Dial Number List 1. Enter the phone number you wish to register Answering a Phone Call Enter the phone number with reference to the Press the [AUD] button or one of [1] – [6] buttons. following: ☞... -
Page 8: Basic Operation Of Hands-Free Phoning (Model-C)
Basic Operation of hands-free phoning (Model-C) Before Use 2-3. Make a call Press the [38] button for at least 1 second. • You need to register your cell-phone before using Calling a number in the Phone Book ( it with this unit. For more details, see <Registering 2-1. -
Page 9: Receiving A Call
Receiving a call Other functions Answering a Phone Call Clearing the Disconnection Message Press the Control knob or one of [1] – [6] buttons. Press the [ATT] button for at least 1 second. ☞ Inserting a disc such as a CD will disconnect your call. Switching between Display Modes Rejecting an Incoming Call Press the [SE] button. -
Page 10: Basic Operation Of Hands-Free Phoning (Model-D)
Basic Operation of hands-free phoning (Model-D) Before Use 2-3. Make a call Press the [DIRECT] button on the remote controller. • You need to register your cell-phone before using ☞ You can input max 32 digits. it with this unit. For more details, see <Registering Speed dialing (Preset dial) Bluetooth device>... -
Page 11: Receiving A Call
Receiving a call Registering to the Preset Dial Number List 1. Enter the phone number you wish to register Answering a Phone Call Enter the phone number with reference to the Model-D-1, 2, 3: following: Press the [AUDIO] button or one of [1] – [6] buttons. Dial a number/ Calling a number in the call log/ Model-D-4: Calling a number in the Phone Book... -
Page 12: Function Operation
Function Operation If "Pairing Success"/"PAIRING OK"/"PAIR OK" is Registering Bluetooth device displayed, registration is completed. To make your Bluetooth device (cell-phone or audio Return to the device list player) usable with this unit, you need to register Model-A, C: it (pairing). You can register up to five Bluetooth Press the [38] button (Control knob). -
Page 13: Registering Pin Code
⁄ Downloading the Phone Book • If the device name is not in the list, select "Other Phone". Download the phone book data from the cell- phone to this unit so that you can use the Phone Book of this unit. Function of Model-A/ Model-B/ Model-C To download automatically Registering PIN Code... -
Page 14: Deleting A Registered Bluetooth Device
Select the Bluetooth Firmware update item For how to update the firmware, access our website. during Menu mode http://www.kenwood.com/bt/information/ Select the “BT F/W Update" display. • For Model-D, the audio player is displayed on the device list after the registration. However, the audio player on Enter the Bluetooth Firmware update mode the list cannot be selected. - Page 15 End registration Model-A, B: Press the [38] button (Control • For how to update the firmware, access our website. knob). http://www.kenwood.com/bt/information/ Model-C: Press the [38] button. Return to step 2. You can register another voice tag continuously. Function of Model-A/ Model-B/ Model-C ☞...
- Page 16 Function Operation Function of Model-A/ Model-B/ Model-C Select a mode. SMS (Short Message Service) Model-A-1: Turn the Control knob. Model-A-2, C: Push the Control knob towards The SMS arrived at the cell-phone is displayed on up or down. the receiver. Model-B: Push the Control knob towards right A newly arrived message is displayed.
-
Page 17: Remote Control
Remote control Bluetooth Audio Making a call Before Use • You need to register your Bluetooth Audio player Enters the dialing method selection mode before using it with this unit. For more details, see ] button <Registering Bluetooth device> (page 12). •... -
Page 18: Of Hands-Free Phoning (Model-E)
Operation of hands-free phoning (Model-E) 3 Displays the Incoming Calls screen. Before Use (See the <Calling a number in the call log>, page • You need to register your cell-phone before using it with this unit. For more details, see <Registering 4 Switches between the private and hands-free Bluetooth device>... -
Page 19: Remote Controller
is displayed if information about it cannot be • Increasing the volume excessively is more likely obtained. to produce echo. If echo is produced, turn down the volume as low as possible. Echo increases in proportion to the volume. Remote Controller Key Operation j [u]/ [d] key u [SRC] key... -
Page 20: Making A Call
(incoming call) button. 4. Confi rm the destination Press the [ ] button. AUTO Incoming Calls 5. Make a call Kenwood 1234567890 Press the [ ] button. Kenwood ☞ To use the Phone Book, it must have been downloaded 1234567890 Kenwood from the cell-phone. -
Page 21: Other Functions
AUTO Phone Select 2. Select the button you wish to register Press the [ ] – [ ] button for at least 2 Kenwood 1 seconds. Kenwood 2 Kenwood 3 Setting up the Hands-Free Phone Press the [ S e t Up... -
Page 22: Appendix
For details on the compatible receivers to be released KDC-W7541U B-1 OFF OFF OFF KDV-412 in the future, access the following URL: KDC-W9537U D-2 OFF OFF KDV-5234 http://www.kenwood.com/bt/information/ KDC-X491 D-1 OFF OFF KDV-MP6333 KDC-X492 OFF OFF KDV-MP6433 Model name Group Type switch... - Page 23 • “ANS”/ “Auto Answer” (Setting the Time Interval • Switching between Display Modes for Automatic Answer) • Depending on the type of your control unit, the This function automatically answers (responds following restrictions are placed. to) a call after lapse of the preset time interval for - Up to 19 characters can be displayed.
-
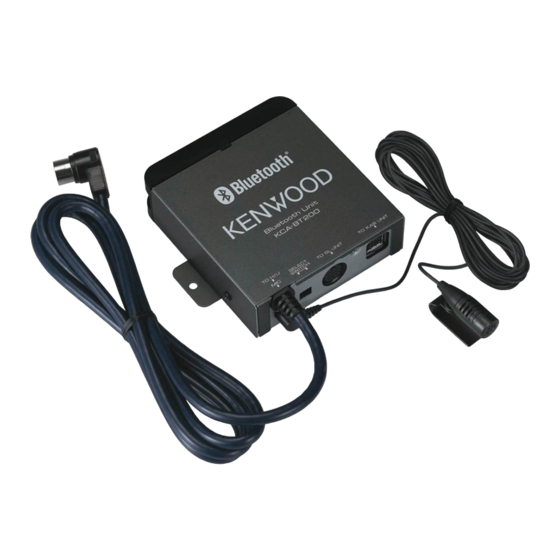
Page 24: Accessories/ Installation Procedure
Accessories/ Installation Procedure Accessories Setting the Type Switch Set the Type switch according to the type of the control unit connected. See the model list in <Appendix> (page 22)...1 ..1 3 m (9.5 ft) ..2 ..1 Installation Procedure 1. To prevent a short circuit, remove the key from the 1: Display Character Conversion Function ignition and disconnect the - battery. -
Page 25: Connection
Connection Installation Installation the Microphone Unit Control Unit (KAB connector) Check the installation position of the microphone Control Unit (accessory 1). (5L connector) Remove oil and other dirt from the installation surface. Install the microphone. Wire the microphone cable up to the hands-free box with it secured at several positions using tape Accessory 4 or the like. -
Page 26: Troubleshooting Guide
Installation Troubleshooting Guide What might seem to be a malfunction in your unit Installation the Bluetooth unit may just be the result of slight misoperation or ¤ miswiring. Before calling service, first check the following table for possible problems. • Determine the installation position after making sure that the unit can communicate with the Bluetooth device. -
Page 27: Specifications
Specifi cations No Data/ NO DATA : Bluetooth section • There is no outgoing call list. Technology • There is no incoming call list. : Bluetooth 1.2 Certified No Entry/ NO ENTRY : Frequency The cell-phone has not been registered : 2.402 –... - Page 28 KCA-BT200...
- Page 29 ⁄ ⁄...
- Page 30 2-1. 2-2. 2-3. 2-4. 2-1. 2-2. ☞ ¢ 2-3. ☞ ☞ ☞ 2-1. 2-2. 2-3. ☞ 2-1. 2-2. 2-3. KCA-BT200...
- Page 31 ☞...
- Page 32 2-1. 2-2. 2-3. 2-1. 2-2. 2-3. 2-4. 2-1. 2-2. ¢ 2-3. ☞ ☞ 2-1. 2-2. ☞ ☞ 2-3. ☞ KCA-BT200...
- Page 33 ☞...
- Page 34 2-1. 2-2. 2-3. 2-1. 2-2. 2-3. 2-4. 2-1. 2-2. ¢ 2-3. ☞ 2-1. 2-2. ☞ 2-3. ☞ ☞ ☞ KCA-BT200...
- Page 35 ☞...
- Page 36 2-1. 2-2. ¢ 2-3. ☞ 2-1. 2-2. 2-3. ☞ 2-1. 2-2. 2-3. 2-1. 2-2. 2-3. 2-4. KCA-BT200...
- Page 37 ☞...
- Page 38 ⁄ ⁄ KCA-BT200...
- Page 39 ☞ ☞ ⁄ ⁄...
- Page 40 ✱ ✱ ✱ ✱ ⁄ ☞ ⁄ ⁄ KCA-BT200...
- Page 41 ☞...
- Page 42 ¤ ⁄ ⁄ KCA-BT200...
- Page 43 ¢ ☞ ¢ ⁄ ⁄...
- Page 44 AUTO AUTO Hands F r e e K E N WO O D 0 1 2 3 4 5 6 7 8 9 ⁄ Clear Return S e t Up DV D V I D E O 13:50 TIME SCRL N e x t N e x t T i t l e 1...
- Page 45 ∞ ⁄...
- Page 46 Phone Book L i s t 1234567890 Name Name Name ☞ Clear Name Return Name ☞ ☞ ⁄ AUTO Incoming Calls Kenwood 1234567890 Kenwood 1234567890 Kenwood D I S P 1234567890 Kenwood 1234567890 Kenwood Return 1234567890 AUTO Phone Book L i s t Return...
- Page 47 S e t Up S e l e c t S e l e c t AUTO Phone Select Kenwood 1 Kenwood 2 Kenwood 3 S e t Up Kenwood 4 AUTO Hands Free Set Up Kenwood 5 Return Au t o A n s w e r i n g...
- Page 48 OFF OFF OFF OFF OFF OFF OFF OFF OFF OFF OFF OFF OFF OFF OFF OFF OFF OFF OFF OFF OFF OFF OFF OFF OFF OFF OFF OFF OFF OFF OFF OFF OFF OFF OFF OFF OFF OFF OFF OFF OFF OFF OFF OFF OFF OFF...
- Page 49 ☞ ☞...
- Page 50 ¤ KCA-BT200...
- Page 51 1 2 3 ⁄ TO HEAD UNIT TO CHANGER 1 TO CHANGER 2 ⁄ ¤...
- Page 52 ¤ ✔ ☞ ✔ ☞ ✔ ☞ ✔ ☞ ✔ ☞ ✔ ☞ ✔ ☞ ✔ ☞ ✔ ☞ ☞ ⁄ KCA-BT200...