Table of Contents
Advertisement
Available languages
Available languages
Quick Links
PHONES
0 (800) 800 130
(050) 462 0 130
(063) 462 0 130
(067) 462 0 130
CAR RECEIVERS — Receivers • Media receivers and stations • Native receivers • CD/DVD changers • FM-modulators/USB adapters • Flash memory • Facia plates and adapters • Antennas • Accessories |
CAR AUDIO — Car audio speakers • Amplifiers • Subwoofers • Processors • Crossovers • Headphones • Accessories | TRIP COMPUTERS — Universal computers • Model computers • Accessories |
GPS NAVIGATORS — Portable GPS • Built-in GPS • GPS modules • GPS trackers • Antennas for GPS navigators • Accessories | VIDEO — DVR • TV sets and monitors • Car TV tuners • Cameras • Videomodules
• Transcoders • Car TV antennas • Accessories | SECURITY SYSTEMS — Car alarms • Bike alarms • Mechanical blockers • Immobilizers • Sensors • Accessories | OPTIC AND LIGHT — Xenon • Bixenon • Lamps
• LED • Stroboscopes • Optic and Headlights • Washers • Light, rain sensors • Accessories | PARKTRONICS AND MIRRORS — Rear parktronics • Front parktronics • Combined parktronics • Rear-view mirrors
• Accessories | HEATING AND COOLING — Seat heaters • Mirrors heaters • Screen-wipers heaters • Engine heaters • Auto-refrigerators • Air conditioning units • Accessories | TUNING — Vibro-isolation
• Noise-isolation • Tint films • Accessories | ACCESSORIES — Radar-detectors • Handsfree, Bluetooth • Windowlifters • Compressors • Beeps, loudspeakers • Measuring instruments • Cleaners • Carsits
• Miscellaneous | MOUNTING — Installation kits • Upholstery • Grilles • Tubes • Cable and wire • Tools • Miscellaneous | POWER — Batteries • Converters • Start-charging equipment • Capacitors
• Accessories | MARINE AUDIO AND ELECTRONICS — Marine receivers • Marine audio speakers • Marine subwoofers • Marine amplifiers • Accessories | CAR CARE PRODUCTS — Additives • Washer fluid •
Care accessories • Car polish • Flavors • Adhesives and sealants | LIQUID AND OIL — Motor oil • Transmission oil • Brake fluid • Antifreeze • Technical lubricant
In store "130" you can find and buy almost all necessary goods for your auto in
Kyiv and other cities, delivery by ground and postal services. Our experienced
consultants will provide you with exhaustive information and help you to chose
the very particular thing. We are waiting for you at the address
https://130.c om.ua
Internet store of
autogoods
SKYPE
km-130
Advertisement
Chapters
Table of Contents

Related Manuals for Kenwood KCA-R100


Summary of Contents for Kenwood KCA-R100
- Page 1 Internet store of PHONES SKYPE 0 (800) 800 130 autogoods km-130 (050) 462 0 130 (063) 462 0 130 (067) 462 0 130 CAR RECEIVERS — Receivers • Media receivers and stations • Native receivers • CD/DVD changers • FM-modulators/USB adapters • Flash memory • Facia plates and adapters • Antennas • Accessories | CAR AUDIO —...
- Page 2 Record the serial number, found on the back of the unit in the spaces designated on the warranty card, and in the space provided below. Refer to the model and serial numbers whenever you can upon your KENWOOD dealer for information or service on the product. Model KCA-R100...
- Page 3 Autogoods “130”...
-
Page 4: Table Of Contents
Contents Before Use…………………………………………………………………………………... Precautions for Use……………………………………………………………………..Accessories ………………………………………………………………………………….. Parts Name ………………………………………………………………………………….. Installation and Connection ……………………………………………………………... Specifications ……………………………………………………………………………….. English Autogoods “130”... -
Page 5: Before Use
Before Use The screen images and operation examples in this document were created for explaining the • operating procedures. There may be screen images that differ from the actual screens or examples of operations not • actually performed. Disclaimer Please note that JVCKENWOOD shall not be responsible for any damages suffered by the •... - Page 6 Precautions for installation • Install the device in a position where it will not block the view of the driver. Install the device within the wiping range if equipped the wiper. • • Take care not to install the device over the vehicle inspection sticker or other sticker. •...
-
Page 7: Accessories
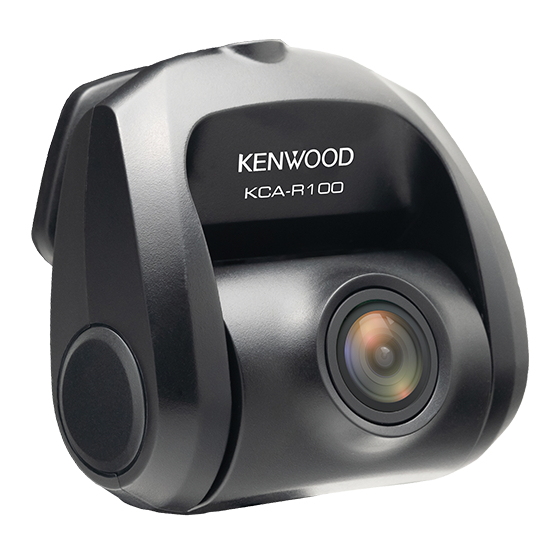
Accessories Before you get started, check you have everything below. Rear Camera 8m Mini USB Cable Adhesive Pads Adhesive mount * Product apperance may differ slightly from that shown above. Parts Name Rear Camera Rear camera. Rear camera cable connector. Adhesive mount. -
Page 8: Installation And Connection
Installation and Connection Recommended installation position • Install the device in a position where it will not block the view of the driver. • Install the device within the wiping range if equipped the wiper. Caution When passing the power cord through the front pillar or another part, observe the points below when performing the wiring work. - Page 9 For the first installation, follow the instructions below: Step 1: Locate the Rear Camera. Connect the device to the adhesive mount Attach the device onto (3) the adhesive mount. Make sure you align the device within the adhesive mount for proper installation. Connect Rear Camera Cable Connector Connect (2) Rear Camera connector to (6) cable connector.
- Page 10 Connect the Rear Cam Insert (7) CAM-IN connector into the CAM-IN port on compatible dashboard camera. Select installation position Start the engine to power up the rear cam, then turn on Wireless Link mode to connect with mobile device. Using the App to view the image and adjust the installation position.
- Page 11 Putting on an adhesive mount After selecting the best installation position and angle, remove (3) Adhesive protective film and protective lens film, stick it on the rear windshield, keep press and add pressure for 30 seconds. - Make sure that Cable can be connected at the installation location. - Windshield should be thoroughly cleaned and mounting area is wiped dry and at room temperature before applying the adhesive (Avoid under direct sunlight).
-
Page 12: Specifications
Specifications Image Sensor 1/2.8” CMOS Sensor Frame Rate 30fps 1920 x 1080 (2.0M) Recording Resolution H.264 (MOV) Recording Format F=2.0 Fixed Focus Lens Lens Field of View Horizontal :129° / Vertical: 66° / Diagonal: 161° Operating Voltage DC5.0V Current Consumption 110mA Operating Temperature -10°C to 60°C... - Page 13 Inhalt Vor dem Einsatz ..………………………………………………………………………….. Wichtige Hinweise zum Gebrauch …………………………………………………..Zubehör …………………………………………………………………………………..Teilbezeichnung …………………………………………………………………………..Installation und Anschluss ……………………………………………………………..Technische Daten ………………………………………………………………………….. Deutsch Autogoods “130”...
-
Page 14: Vor Dem Einsatz
Vor dem Einsatz Bildschirmabbildungen und Bedienungsbeispiele in diesem Dokument dienen zum • Veranschaulichen der Bedienung. Es kann vorkommen, dass Bildschirmabbildungen von tatsächlichen Bildschirminhalten abweichen • und einzelne Bedienschritte nicht nachvollzogen werden können. Haftungsausschluss Bitte beachten Sie, dass JVCKENWOOD für keinerlei Schäden haftet, die Kunden oder Dritten •... - Page 15 Wichtige Hinweise zur Installation • Installieren Sie das Gerät an einer Stelle, an der es die Sicht des Fahrers nicht behindert. Bringen Sie das Gerät so an, dass sein Sehfeld in dem Bereich liegt, der von den Scheibenwischern • gereinigt wird. •...
-
Page 16: Zubehör
Zubehör Vergewissern Sie sich, dass die folgenden Dinge zur Hand sind, bevor Sie loslegen. Rückkamera Mini-USB-Kabel Klebepolster Klebehalterung (8 m lang) * Das Aussehen des Produktes kann sich etwas von den Abbildungen unterscheiden. Teilbezeichnung Rückkamera Rückkamera. Rückkamera-Kabelanschluss. Klebehalterung. Montageport. Fixierring. Rückkamera-Kabel Kabelverbinder. -
Page 17: Installation Und Anschluss
Installation und Anschluss Empfohlene Installationsstelle • Installieren Sie das Gerät an einer Stelle, an der es die Sicht des Fahrers nicht behindert. Bringen Sie das Gerät so an, dass sein Sehfeld in dem Bereich liegt, der von den • Scheibenwischern gereinigt wird. Achtung Wenn Sie das Stromversorgungskabel an der A-Säule oder durch andere Teile verlegen, achten Sie bitte auf die nachstehenden Punkte. - Page 18 Führen Sie bei der ersten Installation die nachstehenden Schritte aus: Schritt 1: Wählen Sie eine Position für die Rückkamera. Gerät an der Klebehalterung anbringen Bringen Sie das Gerät an der Klebehalterung (3) an. Achten Sie darauf, dass Gerät richtig und wackelfrei an der Klebehalterung sitzt. Rückkamera-Kabelverbinder anschließen Schließen Sie den Rückkamera-Verbinder (2) an den Kabelverbinder (6) an.
- Page 19 Rückkamera verbinden Verbinden Sie den CAM-IN-Verbinder (7) mit dem CAM-IN-Anschluss der kompatiblen Dashboard-Kamera. Installationsort wählen Schalten Sie die Zündung ein, damit die Rückkamera mit Strom versorgt wird, und schalten Sie dann den Wireless-Link-Modus zur Verbindung mit dem Mobilgerät ein. Schauen Sie sich das Kamerabild mit der App an, korrigieren Sie den Installationsort bei Bedarf entsprechend.
- Page 20 Klebehalterung anbringen Wenn Sie den optimalen Installationsort nebst Winkel bestimmt haben, ziehen Sie die Schutzfolie (3) vom Klebepolster und die Schutzfolie vom Objektiv ab, und drücken Sie das Kleberpolster anschließend etwa 30 Sekunden lang mit etwas Kraft gegen die Heckscheibe. TIPP - Vergewissern Sie sich vor dem Fixieren, dass sich das Kabel nach dem Anbringen anschließen und trennen lässt.
-
Page 21: Technische Daten
Technische Daten Bildsensor CMOS-Sensor, 1/2,8-Zoll Bildfrequenz 30 Hz 1920 × 1080 (2 Megapixel) Aufnahmeauflösung H.264 (MOV) Aufnahmeformat Fixfokusobjektiv, f 2,0 Objektiv Horizontal :129° / Vertikal: 66° / Diagonal: 161° Sehfeld Betriebsspannung 5 V Gleichspannung Stromverbrauch 110mA Umgebungstemperatur -10 bis 60 °C im Betrieb Abmessungen 63mm x 66mm x 36mm... - Page 22 Table des matières Avant utilisation …………………………………………………………………………... Précautions d'utilisation………………………………………………………………..Accessories ………………………………………………………………………………….. Nom des pièces …………………………………………………………………………….. Installation et raccordement ……………………………………………………………... Spécifications ……………………………………………………………………………….. Français Autogoods “130”...
-
Page 23: Avant Utilisation
Avant utilisation • Les images d'écran et les exemples d'utilisation dans ce document ont été créés pour expliquer la procédure d'utilisation. • Il est possible que certaines images d'écran diffèrent de l'affichage réel ou que des exemples d'opérations ne soient pas réellement effectués. Limitation de responsabilité... - Page 24 Précautions à prendre lors de l’installation Installez l'appareil à un endroit où il ne bloquera pas la visibilité du conducteur. • • Installez l'appareil dans la zone d'essuyage du pare-brise si l'essuie-glace est équipé. • Veillez à ne pas installer l'appareil sur l'autocollant d'inspection du véhicule ou sur un autre autocollant. •...
-
Page 25: Accessories
Accessories Avant de commencer, vérifiez que vous avez tous les éléments ci-dessous. Coussinets adhésifs Caméra arrière Câble mini Support adhésif USB de 8m * L'apparence du produit peut différer légèrement de celle montrée ci-dessus. Nom des pi è ces Caméra arrière Caméra arrière. -
Page 26: Installation Et Raccordement
Installation et raccordement Endroit de montage recommandée • Installez l'appareil à un endroit où il ne bloquera pas la vue du conducteur. Installez l'appareil dans la zone d'essuyage du pare-brise si l'essuie-glace est • équipé. Attention Lors du passage du cordon d'alimentation à travers le montant avant ou une autre partie frontale, observez les points ci-dessous lors de l'exécution des travaux de câblage. - Page 27 Lors de la première installation, suivez les instructions ci-dessous: Étape 1 : Trouvez la caméra arrière. Connecter l'appareil au support adhésif Fixez l'appareil sur (3) le support adhésif. Veillez à aligner l'appareil à l'intérieur du support adhésif pour une installation correcte.
- Page 28 Connecter la caméra arrière Insérez le (7) connecteur CAM-IN dans le port CAM-IN de la caméra de dashboard compatible. Sélectionner la position de montage Démarrez le moteur pour mettre sous tension la caméra arrière, puis activez le mode Liaison sans fil pour connecter à un appareil mobile. Utilisez l'application pour visualiser l'image et régler la position d'installation.
- Page 29 Installation du support adhésif Après avoir choisi la meilleure position et le meilleur angle d'installation, retirez le (3) film de protection de l'adhésif et le film de l'objectif, collez-le sur le pare-brise arrière, maintenez la pression en l'augmentant petit à petit pendant 30 secondes. CONSEIL - Veillez à...
-
Page 30: Spécifications
Spécifications Capteur d’image Capteur CMOS 1/2,8" Vitesse d’image 30 ips 1920 x 1080 (2.0M) Résolution d'enregistrement Format d’enregistrement H.264 (MOV) Objectif à mise au point fixe F=2,0 Objectif Champ de vision Horizontal : 129° / Vertical : 66° / Diagonale : 161° Tension de fonctionnement CC de 5,0V Consommation actuelle... - Page 31 Inhoudsopgave Voor gebruik………………………………………………………………………………... Voorzorgen bij het gebruik …………………………………………………………..Accessoires ………………………………………………………………………………….. Naam onderdeel …………………………………………………………………………… Installatie en aansluiting…………………………………………………………...……… Specificaties ……………………………………………………………………………….… Nederlands Autogoods “130”...
-
Page 32: Voor Gebruik
Voor gebruik De schermafbeeldingen en gebruiksvoorbeelden in dit document zijn gemaakt om de • bedieningsprocedures te verduidelijken. Sommige schermafbeeldingen kunnen afwijken van de feitelijke schermen of voorbeelden van • handelingen worden in feite niet uitgevoerd. Disclaimer JVCKENWOOD aanvaardt geen aansprakelijkheid voor schade ondervonden door de •... - Page 33 Richtlijnen voor installatie • Installeer het apparaat zo, dat dit het uitzicht van de bestuurder niet hindert. • Installeer het apparaat binnen het wisbereik van de ruitenwisser. • Installeer het apparaat niet over een sticker voor de voertuiginspectie of een andere sticker. •...
-
Page 34: Accessoires
Accessoires Controleer of u alle onderstaande zaken hebt voordat u aan de slag gaat. Houder met Achtercamera 8 meter Zelfklevende tape mini-USB-kabel zelfklevende tape * Het product kan er iets anders uitzien dan in de afbeelding. Naam onderdeel Achtercamera Achtercamera. Kabelaansluiting achtercamera. -
Page 35: Installatie En Aansluiting
Installatie en aansluiting Aanbevolen installatiestand Installeer het apparaat zo, dat dit het uitzicht van de bestuurder niet hindert. • Installeer het apparaat binnen het wisbereik van de ruitenwisser. • Let op Let op de volgende punten wanneer u het stroomsnoer door de voorste zuil of een ander onderdeel heen trekt. - Page 36 Volg onderstaande instructies bij de eerste installatie: Stap 1: Lokaliseer de achtercamera. Het apparaat met de houder met zelfklevende tape verbinden Bevestig het apparaat op (3) de houder. Lijn het apparaat binnen de houder uit voor een goede installatie. De kabelconnector voor de achtercamera aansluiten Sluit de (2) connector voor de achtercamera aan op de (6) kabelaansluiting.
- Page 37 De achtercamera aansluiten Steek de (7) CAM-IN connector in de CAM-IN poort op de compatibele dashboard camera. De installatiestand selecteren Start de motor om de achtercamera van stroom te voorzien, schakel vervolgens de modus Draadloze verbinding in om verbinding te maken met het mobiele apparaat. Gebruik de app om het beeld weer te geven en de installatiestand aan te passen.
- Page 38 De houder met zelfklevende tape bevestigen Verwijder na het kiezen van de beste installatiestand en hoek de (3) beschermende film van de tape en de beschermende lensfilm, druk hem tegen de achterruit en blijf gedurende 30 seconden drukken. - Zorg ervoor dat de kabel kan worden aangesloten op de installatielocatie. - Maak de achterruit goed schoon en veeg de plaats van montage droog en breng de ruit op kamertemperatuur voordat u het plakband opplakt (niet in rechtstreeks zonlicht doen).
-
Page 39: Specificaties
Specificaties Beeldsensor 1/2.8” CMOS Sensor Beeldsnelheid 30fps 1920 x 1080 (2.0M) Opnameresolutie H.264 (MOV) Opnameformaat F=2.0 Lens met vaste brandpuntsafstand Lens Beeldhoek Horizontaal :129° / Verticaal: 66° / Diagonaal: 161° Bedrijfsspanning 5,0 V DC Stroomverbruik 110mA Bedrijfstemperatuur -10°C tot 60°C 2-1/2”... - Page 40 Contenuti Prima dell’uso………………………………………………………………………………... Precauzioni per l’uso……………………………………………………………………..Accessori …………………………………………………………………………………..Nomi delle parti …………………………………………………………………………….. Installazione e connessione……………………………………………………………..Specifiche ………………………………………………………………………………..…… Italiano Autogoods “130”...
-
Page 41: Prima Dell'uso
Prima dell’uso Le immagini sullo schermo e gli esempi di funzionamento in questo documento sono stati • creati per spiegare le procedure operative. Alcune immagini potrebbero essere differenti dalla realtà, oppure potrebbero esserci esempi • di operazioni non effettuabili realmente. Dichiarazione di limitazione di responsabilità... - Page 42 Precauzioni per l’installazione • Installare il dispositivo in una posizione tale da non ostruire la vista del guidatore. Installare il dispositivo in modo che si trovi entro il raggio d'azione del tergicristallo. • • Fare attenzione a non installare il dispositivo sul bollo della revisione del veicolo o su un altro bollo.
-
Page 43: Accessori
Accessori Prima di iniziare, assicurarsi di avere tutto il necessario. Videocamera Cavo Mini Cuscinetti adesivi Supporto adesivo posteriore USB da 8m * L'aspetto del prodotto potrebbe essere lievemente diverso da quanto mostrato sopra. Nomi delle parti Videocamera posteriore Videocamera posteriore. Connettore a cavo della videocamera posteriore. -
Page 44: Installazione E Connessione
Installazione e connessione Posizione di installazione raccomandata • Installare il dispositivo in una posizione tale da non ostruire la vista del guidatore. • Installare il dispositivo in modo che si trovi entro il raggio d'azione del tergicristallo. Attenzione Quando viene fatto passare il cavo di alimentazione tramite il pilastro frontale o un'altra componente, osservare i seguenti punti relativi al cablaggio. - Page 45 Per la prima installazione, attenersi alle seguenti istruzioni: Fase 1: Localizzare la videocamera posteriore. Connettere il dispositivo al supporto adesivo Attaccare il dispositivo sul (3) supporto adesivo. Assicurarsi di allineare il dispositivo all'interno del supporto adesivo per un’installazione corretta. Connettere il connettore a cavo della videocamera posteriore Connettere il (2) connettore della videocamera posteriore al (6) connettore a cavo.
- Page 46 Connettere la videocamera posteriore Inserire il (7) Connettore CAM-IN nella porta CAM-IN sulla videocamera dashboard compatibile. Selezionare la posizione di installazione Avviare il motore per alimentare la videocamera posteriore, in seguito attivare la modalità Wireless Link per la connessione al dispositivo mobile. Utilizzare l’APP per visualizzare l’immagine e regolare la posizione di installazione.
- Page 47 Installare il supporto adesivo Dopo aver selezionato la posizione e l’angolo di installazione migliori, rimuovere la (3) pellicola protettiva adesiva e la pellicola protettiva della lente, attaccarlo al parabrezza posteriore, premere e aggiungere pressione per 30 secondi. Consigli - Assicurarsi che il cavo possa essere connesso nella posizione di installazione. - Il parabrezza dovrebbe essere pulito attentamente e l’area di montaggio dovrebbe essere asciutta e a temperatura ambiente prima dell’applicazione dell'adesivo (Evitare la luce solare diretta).
-
Page 48: Specifiche
Specifiche Sensore delle immagini Sensore CMOS da 1/2,8” Velocità fotogrammi 30fps 1920 x 1080 (2.0M) Risoluzione di registrazione H.264 (MOV) Formato di registrazione Lente a focus fisso F=2.0 Lente Campo visivo Orizzontale :129° / Verticale: 66° / Diagonale: 161° Tensione di funzionamento CC5.0V Consumo corrente 110mA... - Page 49 Contenido Antes de utilizar el producto……………………………………………………………... Precauciones de uso……………………………………………………………………..Accesorios ………………………………………………………………………………….. Nombre de las piezas …………………………………………………………………….. Instalación y conexión……………………………………………………………………... Especificaciones …………………………………………………………………………….. Espa ñ Autogoods “130”...
-
Page 50: Antes De Utilizar El Producto
Antes de utilizar el producto Las imágenes de la pantalla y los ejemplos de funcionamiento de este documento se crearon • para explicar los procedimientos de funcionamiento. Puede ver imágenes de la pantalla que sean diferentes a las pantallas reales o ejemplos de •... - Page 51 Precauciones para la instalación • Instale el dispositivo en una posición donde no obstaculice la visión del conductor. • Instale el dispositivo dentro del alcance de limpieza si cuenta con limpiaparabrisas. • Tenga cuidado de no instalar el dispositivo sobre la pegatina de inspección del vehículo u otra pegatina.
-
Page 52: Accesorios
Accesorios Antes de comenzar, compruebe que tiene todo lo que se indica a continuación. Cámara trasera Cable Mini-USB Almohadillas Soporte adhesivo adhesivas de 8 m * La apariencia del producto puede ser ligeramente diferente a la que se muestra anteriormente. Nombre de las piezas Cámara trasera Cámara trasera. -
Page 53: Instalación Y Conexión
Instalación y conexión Posición de instalación recomendada • Instale el dispositivo en una posición donde no obstaculice la visión del conductor. • Instale el dispositivo dentro del alcance de limpieza si cuenta con limpiaparabrisas. Precaución Cuando pase el cable de alimentación a través del pilar frontal o de otra parte, tenga en cuenta los puntos que se indican a continuación cuando realice el cableado. - Page 54 Para la primera instalación, siga las instrucciones que se indican a continuación: Paso 1: Localizar la cámara trasera. Conectar el dispositivo al soporte adhesivo Acople el dispositivo en el soporte adhesivo (3). Asegúrese de alinear el dispositivo dentro del soporte adhesivo para realizar una instalación adecuada.
- Page 55 Conectar la cámara trasera Inserte el conector ENTRADA-CÁMARA (7) al puerto de la cámara para salpicadero compatible. Seleccionar la posición de instalación Arranque el motor para encender la cámara trasera y, a continuación, active el modo Enlace inalámbrico para realizar la conexión con el dispositivo móvil. Utilice la aplicación para ver la imagen y ajustar la posición de instalación.
- Page 56 Colocar un soporte adhesivo Después de seleccionar la mejor posición y ángulo de instalación, quite la película protectora adhesiva (3) y la película de la lente de protección, péguela en el parabrisas trasero, manténgala presionada y presione durante 30 segundos. SUGERENCIA - Asegúrese de que el cable se puede conectar a la ubicación de instalación.
-
Page 57: Especificaciones
Especificaciones Sensor de imagen Sensor CMOS de 1/2,8” Tasa de fotogramas 30fps 1920 x 1080 (2.0M) Resolución de grabación H.264 (MOV) Formato de grabación Lente de enfoque fijo F=2.0 Lente Horizontal :129° / Vertical: 66° / Diagonal: 161° Campo de visión Voltaje de funcionamiento DC5.0V Consumo de corriente... - Page 58 Índice Antes de utilizar …………………………………………………………………………... Precauções de utilização ……………………………………………………………..Acessórios ………………………………………………………………………………….. Nome das peças ………………………………………………………………………….. Instalação e ligação ……………………………………………………………………... Especificações …………………………………………………………………………….. Português Autogoods “130”...
-
Page 59: Antes De Utilizar
Antes de utilizar As imagens do ecrã e exemplos de operação neste documento foram criados para explicar os • procedimentos de operação. Podem incluir imagens de ecrã diferentes dos ecrãs reais ou exemplos de operações que não • estão disponíveis. Exclusão de Responsabilidade Tenha em atenção que a JVCKENWOOD não se responsabiliza por quaisquer danos sofridos •... - Page 60 Precauções de instalação • Instale o dispositivo numa posição que não obstrua a visão do condutor. • Instale o dispositivo dentro dos limites do limpa-para-brisas. • Não instale o dispositivo sobre o autocolante de inspeção do veículo ou outro autocolante. •...
-
Page 61: Acessórios
Acessórios Antes de começar, verifique se possui todos os itens indicados abaixo. Cabo mini Câmara traseira Discos adesivos Suporte adesivo USB de 8 mm * O aspeto do produto pode ser levemente diferente do produto apresentado acima. Nome das peças Câmara traseira Câmara traseira. -
Page 62: Instalação E Ligação
Instalação e ligação Posição de instalação recomendada • Instale o dispositivo numa posição que não obstrua a visão do condutor. • Instale o dispositivo dentro dos limites do limpa-para-brisas. Atenção Quando passar o cabo de alimentação pelo pilar frontal ou outra parte, tenha em atenção os pontos abaixo quando executar a ligação de cabos. - Page 63 Para a primeira instalação, siga as instruções abaixo: Passo 1: Localize a câmara traseira. Instale o dispositivo no suporte adesivo Instale o dispositivo no (3) suporte adesivo. Alinhe o dispositivo com a fita adesiva para uma instalação correta. Ligue o conetor do cabo da câmara traseira Ligue o (2) conetor da câmara traseira ao (6) conetor do cabo.
- Page 64 Ligue a câmara traseira Insira o conetor CAM-IN (7) na porta CAM-IN na câmara frontal compatível. Selecione a posição de instalação Arranque o motor para ligar a câmara traseira e, em seguida, ative o modo Wireless Link para ligar ao dispositivo móvel. Utilize a aplicação para ver a imagem e ajuste a posição de instalação.
- Page 65 Coloque um suporte adesivo Depois de selecionar a melhor posição e ângulo de instalação possível, retire a (3) película de proteção do adesivo e a película de proteção da lente, cole-o no vidro traseiro, pressione e mantenha a pressão durante 30 segundos. SUGESTÃO - Certifique-se de que é...
-
Page 66: Especificações
Especificações Sensor de imagem Sensor CMOS 1/2,8" Velocidade de fotogramas 30fps 1920 x 1080 (2,0M) Resolução de gravação H.264 (MOV) Formato de gravação Lente com focagem fixa F=2.0 Lente Horizontal: 129 ° / Vertical: 66° / Diagonal: 161° Campo de visão Tensão de funcionamento DC 5,0 V Consumo de energia... - Page 67 Содержание ……………………………………………………………………... ………………………………………..…………………………………………………………………………….. …………………………………………………………………….. ………………………………………………………………... …………………………………………………………….. Pусский Autogoods “130”...
- Page 68 Перед использованием • Изображения экрана и примеры операций в данном документе представлены для объяснения процедур управления устройством. • Фактические изображения на экране могут быть иными, а некоторые примеры операций могут не требоваться. Ограничение ответственности • Обратите внимание, что компания JVCKENWOOD не несет ответственности за какой-либо ущерб, понесенный...
- Page 69 В случае загрязнения объектива осторожно протрите его мягкой тканью, смоченной водой. • Протирание объектива с усилием сухой тканью может привести к образованию на нем царапин. В случае неполадок в работе устройства, выключите его и обратитесь к продавцу устройства или в ближайший авторизованный сервисный центр KENWOOD. Autogoods “130”...
- Page 70 Принадлежности Камера Клейкие накладки Клейкое основание Кабель Mini USB заднего вида длиной 8 м * Внешний вид изделия может несколько отличаться от показанного выше. Перечень компонентов Камера заднего вида Камера заднего вида. Разъем кабеля камеры заднего вида. Клейкое основание. Монтажное отверстие. Фиксирующее...
- Page 71 Установка и подключение Рекомендуемое место для установки Установите устройство таким образом, чтобы оно не загораживало обзор • водителю. Установите устройство в зоне действия стеклоочистителя, если он предусмотрен. • Внимание! При прокладке кабеля питания по передней стойке и другим деталям автомобиля соблюдайте...
- Page 72 При первой установке выполните приведенные ниже инструкции. Шаг 1. Установка камеры заднего вида Совместите устройство с клейким основанием Зафиксируйте устройство на клейком основании (3). Для надлежащей установки тщательно совместите устройство с клейким основанием. Подключение разъема кабеля камеры заднего вида Подключите разъем камеры заднего вида (2) к кабельному разъему (6). При подключении...
- Page 73 Подключение камеры заднего вида Подсоедините (7) разъем CAM-IN к порту CAM-IN на совместимом видеорегистраторе. Выбор места установки Запустите двигатель автомобиля, чтобы включить камеру заднего вида, затем включите режим беспроводной связи Wireless Link, чтобы установить соединение с мобильным устройством. Просматривая изображение с помощью приложения, выберите...
- Page 74 Фиксация на клейком основании Выбрав оптимальное место и ориентацию установки, удалите защитную пленку с клейкого основания (3) и защитную пленку с объектива, прикрепите основание к заднему стеклу и прижимайте его в течение 30 секунд. СОВЕТ - Удостоверьтесь, что в месте установки устройства возможно подключить кабель. - Необходимо...
- Page 75 Технические характеристики Светочувствительная матрица КМОП-матрица размером 1/2,8” Частота кадров 30 к/с 1920 x 1080 (2,0 Мпикс) Разрешение записи Формат записи H.264 (MOV) F=2.0, с постоянным фокусным расстоянием Объектив По горизонтали: 129°, Поле обзора по вертикали: 66°, по диагонали: 161° Рабочее напряжение 5,0 В...
- Page 76 Spis treści Przed rozpoczęciem użytkowania ……………………………………………………... Środki ostrożności podczas użytkowania…………………………………………..Akcesoria ………………………………………………………………………………….. Nazwa części ……………………………………………………………………………….. Montaż i podłączanie ……………………………………………………………………... Parametry techniczne …………………………………………………………………….. Polska Autogoods “130”...
-
Page 77: Przed Rozpoczęciem Użytkowania
Przed rozpoczêciem u¿ytkowania • Obrazy ekranu i przykłady operacji w tym dokumencie służą tylko wyjaśnieniu procedur operacyjnych. • W podręczniku mogą występować obrazy ekranu, które różnią się od rzeczywistych, bądź przykłady operacji, których w rzeczywistości nie wykonuje się. Wy³¹czenie odpowiedzialności •... -
Page 78: Środki Ostrożności Podczas Użytkowania
Środki ostrożności podczas mocowania • Urządzenie należy mocować w miejscu, w którym nie będzie zasłaniało pola widzenia kierowcy. • Urządzenie należy mocować w polu działania wycieraczek, jeżeli znajdują się na wyposażeniu. • Nie należy mocować urządzenia na naklejce przeglądu technicznego pojazdu bądź naklejce innego rodzaju. -
Page 79: Akcesoria
Akcesoria Przed rozpoczęciem należy sprawdzić kompletność poniższych elementów. Pady Kamera tylna Przewód mini Mocowanie samoprzylepne USB 8 m samoprzylepne * Wygląd produktu może różnić się nieznacznie od przedstawionego powyżej. Nazwa czêści Kamera tylna Kamera tylna. Z³¹czka przewodu do kamery tylnej. Mocowanie samoprzylepne. -
Page 80: Montaż I Podłączanie
Monta¿ i pod³¹czanie Zalecane po³o¿enie mocowania • Urządzenie należy mocować w miejscu, w którym nie będzie zasłaniało pola widzenia kierowcy. Urządzenie należy mocować w polu działania wycieraczek, jeżeli znajdują się na • wyposażeniu. Przestroga Gdy przewód zasilający ma być prowadzany przez słupek przedni lub przez inną część, podczas kładzenia kabli należy przestrzegać... - Page 81 Przy pierwszym montażu należy postępować zgodnie z poniższymi instrukcjami: Krok 1: Umieśæ kamerê tyln¹. Pod³¹czenie urz¹dzenia do mocowania samoprzylepnego Zamocuj urządzenie na mocowania samoprzylepnego (3). Upewnij się, że urządzenie jest dopasowane do mocowania samoprzylepnego w celu właściwego montażu. Pod³¹cz z³¹czkê przewodu kamery tylnej Podłącz złączkę...
- Page 82 Pod³¹cz kamerê tyln¹ Włóż złączkę CAM-IN (7) do gniazda CAM-IN w kompatybilnej kamerze samochodowej. Wybierz miejsce mocowania Uruchom silnik, aby zasilić kamerę tylną, następnie włącz tryb Wireless Link, aby podłączyć do urządzenia mobilnego. Użyj aplikacji, aby uzyskać podgląd obrazu i dopasuj odpowiednio miejsce mocowania.
- Page 83 Nak³adanie mocowania samoprzylepnego Po wybraniu najlepszego miejsca mocowania oraz ustawieniu kąta usuń folię ochronną z materiału samoprzylepnego (3) oraz folię ochronną obiektywu, przyklej do szyby tylnej i dociskaj przez 30 sekund. WSKAZÓWKA - Należy upewnić się, że w miejscu mocowania można podłączyć przewód. - Szyba powinna być...
-
Page 84: Parametry Techniczne
Parametry techniczne Czujnik obrazu Czujnik CMOS 1/2,8” Częstotliwość odświeżania 30 kl./s Rozdzielczość nagrywania 1920 x 1080 (2.0M) H.264 (MOV) Format nagrywania Obiektyw Obiektyw stałoogniskowy f=2.0 Poziomo: 129° / Pionowo: 66° / Ukośnie: 161° Pole widzenia Napięcie robocze DC 5 V Zużycie prądu 110 mA Temperatura robocza... - Page 85 Obsah Před použitím……………………………………………………………………………... Zásady používání ……………………………………………………………………..Příslušenství ……………………………………………………………………………….. Název dílu ………………………………………………………………………………….. Instalace a připojení ……………………………………………………………………... Technické údaje ………………………………………………………………………….. Èesky Autogoods “130”...
- Page 86 Pøed použitím Obrázky obrazovek a příklady použití v tomto dokumentu slouží k vysvětlení postupů při • používání. Obrázky obrazovek se mohou od skutečných obrazovek lišit nebo se postupy uvedené v • příkladech nemusí provádět. Právní omezení Společnost JVCKENWOOD nenese odpovědnost za žádné škody, které vzniknou •...
- Page 87 Zásady pøi instalaci • Zařízení umístěte tak, aby nebránilo výhledu řidiče. • Zařízení umístěte v dosahu stěrače (pokud je k dispozici). • Zařízení neumísťujte tak, aby zakrývalo kontrolní štítek vozu ani jiný štítek. • Zařízení neumísťujte tak, aby rušilo řízení nebo aktivaci airbagu. •...
- Page 88 Pøíslušenství Než začnete, zkontrolujte, zda máte k dispozici všechny následující položky. Zadní kamera Lepicí podložky Kabel mini Lepicí držák USB 8 m * Vzhled výrobku se může mírně lišit od výše uvedeného zobrazení. Název dílu Zadní kamera Zadní kamera. Konektor kabelu zadní kamery. Lepicí...
- Page 89 Instalace a pøipojení Doporuèená poloha instalace Zařízení umístěte tak, aby nebránilo výhledu řidiče. • Zařízení umístěte v dosahu stěrače (pokud je k dispozici). • Upozornìní Při umísťování napájecího kabelu do předního sloupku nebo jiné části dodržujte následující zásady. • Umístěte napájecí kabel před nebo za airbag tak, aby kabel nekolidoval s airbagem.
- Page 90 Při první instalaci postupujte podle následujících pokynů: Krok 1: Identifikujte zadní kameru. Pøipojení zaøízení k lepicímu držáku Nasaďte zařízení na (3) lepicí držák. Aby byla zajištěna správná instalace, musí být zařízení zorientováno s lepicím držákem. Pøipojení konektoru kabelu zadní kamery Připojte (2) konektor zadní...
- Page 91 Pøipojení zadní kamery Zasuňte (7) konektor CAM-IN do portu CAM-IN na kompatibilní autokameře. Výbìr umístìní instalace Nastartujte motor, aby se zapnulo napájení zadní kamery. Potom zapněte režim bezdrátového připojení pro připojení k mobilnímu zařízení. Pomocí aplikace zobrazte obraz a upravte umístění instalace. Poznámka: Po zapnutí...
- Page 92 Nasazení lepicího držáku Po výběru optimální polohy a úhlu sejměte (3) ochranný film z lepicí plochy a ochranný film z objektivu, přilepte na zadní sklo, přitlačte a podržte po dobu 30 sekund. - Zkontrolujte, zda lze v místě instalace připojit kabel. - Před přilepením (nepřilepujte na přímém slunci) je nutno zadní...
- Page 93 Technické údaje Snímač obrazu Snímač CMOS 1/2.8” Frekvence snímků 30 snímků/s 1920 x 1080 (2.0M) Rozlišení záznamu H.264 (MOV) Formát záznamu Objektiv s pevným zaostřením F=2,0 Objektiv Vodorovně: 129° / svisle: 66° / úhlopříčně: 161° Pole zobrazení Provozní napětí 5,0 V= Proudová...
- Page 94 Conținut Înainte de utilizare………………………………………………………………………... Precau ii pentru utilizare ……………………………………………………………..Accesorii …………………………………………………………………………………….. Păr ile componente ……………………………………………………………………….. Instalare și conectare ……………………………………………………………………... Specifica ii ………………………………………………………………………………….. Româna Autogoods “130”...
-
Page 95: Înainte De Utilizare
Înainte de utilizare Imaginile de ecran și exemplele de utilizare în acest document au fost create pentru a explica • procedurile de operare. Pot exista imagini de ecran care diferă de la ecranul actual sau exemple de operare care nu se •... - Page 96 Precauții pentru instalare • Instala i dispozitivul într-o pozi ie unde nu va bloca vederea șoferului. Instala i dispozitivul în zona de ștergere dacă este echipat cu ștergător. • • Ave i grijă să nu instala i dispozitivul peste etichete de inspec ie ale vehiculului sau alte etichete. •...
-
Page 97: Accesorii
Accesorii Înainte de a începe verifica i că ave i toate de mai jos. Camera spate Cablu mini Tampoane adezive Montaj adeziv USB 8mm * Produsul poate diferi ușor de imagine de mai sus Pãrțile componente Camera spate Camera spate. Conector cablu camera spate. -
Page 98: Instalare Și Conectare
Instalare și conectare Poziție recomandatã de instalare Instala i dispozitivul într-o pozi ie unde nu va bloca vederea șoferului. • Instala i dispozitivul în zona de ștergere dacă este echipat cu ștergător. • Atenție Atunci când trece i cablul de alimentare la stâlpul fa ă sau în altă parte, ave i în vedere punctele de mai jos atunci când efectua i lucrările de cablare. - Page 99 Pentru prima instalare urma i instruc iunile de jos: Pasul 1: Localizați camera spate. Conectați dispozitivul la montajul adeziv. Atașa i dispozitivul la montajul adeziv (3). Asigura i-vă că alinia i dispozitivul cu montajul adeziv pentru o instalare corespunzătoare. Conecta i conectorul de cablul camerã spate Conecta i conectorul de cameră...
- Page 100 Conectați camera spate Introduce i conectorul CAM-IN (7) în portul CAM-IN de pe camera de bord compatibilă. Selectați poziția de instalare Porni i motorul pentru a alimenta camera spate, după care porni i legătura fără fir pentru a se conecta cu dispozitivul mobil. Folosind aplica ia pute i vizualiza imaginea și să...
- Page 101 Atașarea unui montaj adeziv După ce a i selectat cea mai bună pozi ie de montaj și unghi, îndepărta i folia de protec ie de pe adeziv (3) și folia de protec ie de pe obiectiv, apăsa i pe lunetă, ine i apăsat și presat pentru 30 de secunde.
-
Page 102: Specifica Ii
Specificații Senzor imagine Senzos CMOS 1/2.8” Rată cadre 30fps 1920 x 1080 (2.0M) Rezolu ie înregistrare H.264 (MOV) Format înregistrare F=2.0 focalizare fixă Obiectiv Unghi de vedere Orizontală :129° / Verticală: 66° / Diagonală: 161° Tensiune de func ionare DC5.0V Consum curent 110mA Temperatură... - Page 103 Information on Disposal of Old Electrical and Electronic Equipment (applicable for countries that have adopted separate waste collection systems) Products with the symbol (crossed-out wheeled bin) cannot be disposed of as household waste. Old electrical and electronic equipment should be recycled at a facility capable of handling these items and their waste by products.
- Page 104 Kanagawa 221-0022, JAPÃO JVCKENWOOD Europe B.V. Representante na UE: Amsterdamseweg 37, 1422 AC UITHOORN, HOLLANDA JVCKENWOOD Europe B.V. Amsterdamseweg 37, 1422 AC UITHOORN, PAÍSES BAIXOS “ ” , “ ” KENWOOD, Условия хранения: –20°C +60°C Информация о продукции 3-12, 221-0022, Autogoods “130”...
- Page 105 : KCA-R100 RU -JP. 01. .88705/19 14.11.2019 13.11.2024 TP TC 020/2011 « » Cansonic Company Limited 3/F, Building 1, Guanlan Industrial Park, Grain Group,299 Guanping Road, Dafu Community, Guanlan South, Longhua New District, Shenzhen, China( Autogoods “130”...
- Page 106 Supplier’s Declaration of Conformity Trade Name: KENWOOD Products: Rear Camera Model Name: KCA-R100 Responsible Party: JVCKENWOOD USA CORPORATION 2201 East Dominguez Street, Long Beach, CA 90810, U.S.A. PHONE: 310 639-9000 THIS DEVICE COMPLIES WITH PART 15 OF THE FCC RULES. OPERATION IS SUBJECT TO THE FOLLOWING TWO...
- Page 107 Autogoods “130”...
- Page 108 Autogoods “130”...
- Page 109 Autogoods “130”...