Table of Contents
Advertisement
Available languages
Available languages
Operator's
Manual
CRRFr MRN
21" SNOW THROWER
Model No. 247.88704
CAUTION:
Before
using
this product,
read this
manual
and follow
all
safety
rules
and operating
instructions.
o SAFETY
ASSEMBLY
OPERATION
MAINTENANCE
PARTS LIST
o ESPANOL
Sears, Roebuck and Co., Hoffman
Estates,
IL 60179, U.S.A.
Visit our website:
www.craftsman.com
FORM1/0. 769-05022
6/18/2009
Advertisement
Table of Contents

Related Manuals for Craftsman 88704 - 123cc 4 Cycle Single Stage Snow Thrower


Summary of Contents for Craftsman 88704 - 123cc 4 Cycle Single Stage Snow Thrower
- Page 1 SAFETY ASSEMBLY OPERATION MAINTENANCE PARTS LIST CAUTION: Before using o ESPANOL this product, read this manual and follow safety rules and operating instructions. Sears, Roebuck and Co., Hoffman Estates, IL 60179, U.S.A. Visit our website: www.craftsman.com FORM1/0. 769-05022 6/18/2009...
- Page 2 Sears store, Sears Parts & Repair Service Center, or other Craftsman outlet in the United States for free repair (or replacement if repair proves impossible).
- Page 3 This machinewas builtto be operatedaccordingto the safeopera- This symbolpointsout importantsafetyinstructionswhich,if not tion practicesin this manual.As with anytype of powerequipment, followed,couldendangerthepersonalsafetyand/orpropertyof carelessnessor error on the partof the operatorcan resultin serious yourselfand others. Readand followall instructionsin this manual injury.This machineis capableof amputatingfingers,hands,toes beforeattemptingto operatethis machine.Failureto complywith and feet and throwingdebris.Failureto observethe followingsafety these instructionsmay resultin personalinjury.Whenyou seethis...
- Page 4 Safe Handling of Gasoline • Exerciseextremecautionwhenoperatingon or crossinggravel surfaces.Stay alertfor hidden hazardsor traffic. Toavoidpersonalinjuryor propertydamageuseextremecare in handlinggasoline.Gasolineis extremelyflammableand the vaporsare • Exercisecautionwhenchangingdirectionand whileoperatingon explosive.Seriouspersonalinjurycan occurwhengasolineis spilled slopes. on yourselfor yourclotheswhichcan ignite.Washyour skin and • Planyoursnow-throwing patternto avoiddischargetowards changeclothesimmediately. windows,walls,cars etc. Thus,avoidingpossibleproperty •...
- Page 5 MAINTENANCE & STORAGE DO NOT MODIFY ENGINE • Nevertamperwith safetydevices.Checktheirproperoperation Toavoidseriousinjuryor death,do not modifyengine in any way. regularly.Referto the maintenance and adjustmentsectionsof Tampering with the governorsettingcanlead to a runawayengineand this manual. cause it to operateat unsafespeeds.Nevertamperwithfactory setting of engine governor. •...
- Page 6 SAFETY SYMBOLS This pagedepictsand describessafetysymbolsthat mayappear on this product. Read,understand,and followall instructionson the machine beforeattemptingto assembleand operate. READ THE OPERATOR'S MANUAL(S) Read, understand, and follow all instructions in the manual(s) before attempting to assemble operate WARNING-- ROTATING BLADES Keep hands out of inlet and discharge openings while machine is running.
- Page 7 NOTE:References to rightor left sideof the snowthrowerare Tightenthe wingknobs to securethe handlein place. determined from behindthe unit in the operatingposition(standing See Figure2. directlybehindthe snow thrower,facingthe handlepanel). REMOVING FROM CARTON Cut the cornersof thecarton and lay the sidesflat on the ground. Removeand discard all packinginserts.
-
Page 8: Adding Oil
NOTE:Do notoverfill.Overfillingtheengine with oil may resultin the Adding engine smoking,hard startingor spark plugfouling. ADJUSTMENTS Theengineis shippedwithoutoil in theengine.Youmustfill the Chute Assembly enginewith oil beforeoperating.Runningthe enginewith insufficient The pitch of thechute assemblycontrolstheangle at whichthe snow oil can causeseriousenginedamageand void the productwarranty. isthrown. - Page 9 This page left intentionallyblank.
-
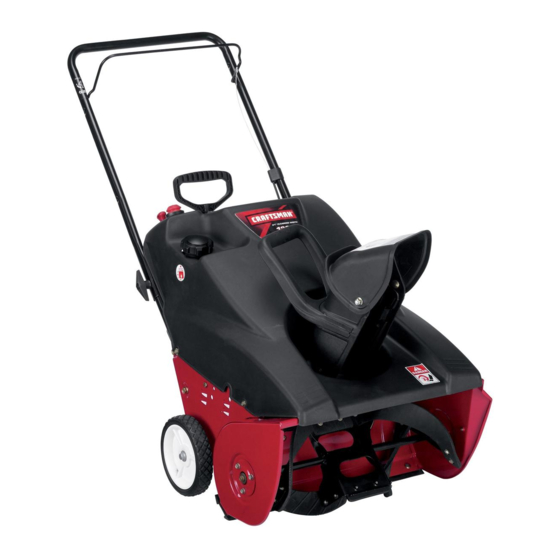
Page 10: Product View And Features
Recoil Starter er Control Primer Gas Ca Handle Spark Plug/ "_ Chok Boot Exhaust _\/\_l//_ Recoil Oil Fill Cap..w_ Shave Plate pStart+r w/Dipstick Hand_ Oil Drain t Auger Figure6 Nowthat youhaveset up yoursnowthrower,it's importantto become acquainted with its controlsand features.Referto Figure6. The key isa safetydevice.It mustbe fully inserted in CHOKE CONTROL... -
Page 11: Starting And Stopping Engine
CHUTE ASSEMBLY Pushin the primerbuttonfive to seven(5-7) times,makingsureto coverthe vent hole whenpushing. Rotatethe dischargechute to the left or rightusingthe chute handle. If the engineis warm,pushthe primerbuttononlyonce. Thepitch of the dischargechute controlsthe angleat which the snow is thrown.Loosenthewing knobon the side of the dischargechute NOTE:Alwayscoverthe vent hole in the primerbuttonwhenpushing. - Page 12 Thispage leftintentionally blank.
- Page 13 MAINTENANCE SCHEDULE Before performing anytypeofmaintenance/service, disengage all Followthe maintenance schedulegiven below.This chart describes controls and stoptheengine. W aituntilall moving partshavecometo serviceguidelinesonly. Usethe ServiceLog columnto keeptrackof a completestop.Disconnect sparkplugwireandgrounditagainst t he completedmaintenance tasks.To locate the nearest Sears Service enginetoprevent u nintended starting. A lwayswearsafetyglasses during Centeror to scheduleservice,simplycontactSearsat 1-800-4-MY-HOME@.
-
Page 14: Service And Maintenance
Removethe sparkplug bootand usea spark plugwrenchto removethe plug,Figure10. Thoroughly wash yourhandswith soapand wateras soon as possibleafter handlingusedoil. Spar Plug NOTE:Pleasedisposeof usedmotoroil in a mannerthat is friendlyto the environment. T akeit to a recyclingcenteror othercollectioncenter. Oil Recommendations © Whenaddingoil to the engine,refertothe viscositychart below (Figure9). - Page 15 Loosenthefour lock nuts and bolts whichsecurethe shave Checkthat thespark plug washeris in good conditionand thread the sparkplug in by handto preventcross-threading. plateto the housing.See Figure12.Movethe shaveplateto the desiredpositionand retightenthe nuts and bolts securely. Afterthe sparkplug is seated,tightenwith a spark plugwrenchto compressthe washer, NOTE:Wheninstallinga newsparkplug,tighten 1/2-turnafter the spark plugseatsto compressthe washer.Whenreinstalling a used...
- Page 16 Control Cable Removethe belt bygraspingit from thebottomof the augerpulley and pullingoutward. As a resultof both thecontrolcableand the auger drivebelt stretching due to wear,periodicadjustmentsmay be necessary.If the auger NOTE:Pushdownon the idler pulleyto releasethe belt fromunder the seemsto hesitatewhenrotating,proceedas follows: beltkeeper.See Figure14. Theupper hole in the controlhandle providesfor an adjustmentin To replacethe beltfollow theseinstructionsand referto Figure15: cabletension.Toadjust,disconnectthe end of controlcablefrom the...
- Page 17 REPLACING AUGER PADDLES The snowthrowerauger'srubberpaddlesare subjectto wearand shouldbe replacedifany signsof excessivewearare present. Do NOTallowthe auger'srubberpaddlesto wearto the pointwhere Iportionsof the metalauger itselfcancome in contactwith the pave- lment. Doingsocan resultin seriousdamageto yoursnowthrower. Tochangethe rubberpaddles,proceedas follows: Removethe existingrubberpaddlesby unscrewingthe self- tappingscrewswhich securethemto theauger.See Figure16. / +, ..
- Page 18 If the snowthrowerwillnot be usedfor30 daysor longer,or if it is the end of the snowseasonwhenthe last possibilityof snowis gone,the equipmentneedsto be storedproperly.Followstorageinstructionsbelowto ensuretop performance from the snowthrowerfor manymoreyears. PREPARING SNOW THROWER PREPARING ENGINE Whenstoringthe snowthrowerin an unventilatedor metal stor- Enginesstoredover30 days need to be drainedof fuel to prevent age shed,careshouldbe taken to rustprooftheequipment.Using deterioration and gumfrom formingin fuel systemor on essential a light oil or silicone,coat theequipment,especiallyanychains,...
- Page 19 Beforeperforming anytypeof maintenance/service, disengage all controlsandstoptheengine.Waituntilall moving partshavecometo a complete stop.Disconnect sparkplugwireandgrounditagainsttheengine to Iprevent u nintended starting. A lways wearsafetyglassesduringoperation orwhileperforming anyadjustments o r [repairs. Thissectionaddresses minorservice issues.To locate the nearest Sears Service Centeror to scheduleservice,simplycontactSears at 1-800-4-MY-HOME®. Enginefails to start Fueltank empty,or stalefuel.
- Page 20 Craftsman Snow Thrower Model 247.88704...
-
Page 21: Parts List
Craftsman Snow Thrower IViodel 247.88704 684-04236A Shroud 710-04669 HexScrew,10-16x .625 710-1090 Hex FlangeScrew,5/16-18x 1.25 712-04063 FlangeLock Nut,5/16-18 710-1882 Hex FlangeScrew,5/16-18x 1.50 710-0895 HexScrew,1/4-15x .750 720-04072A Wing Nut,5/16-18 710-04071 CarriageBolt,5/16-18x 1.00 712-04063 FlangeLock Nut,5/16-18 710-0451 CarriageBolt,5/16-18x .750 731-04426A UpperChute 731-04388A ChuteHandle... - Page 22 Craftsman Snow Thrower Model 247.88704...
- Page 23 Craftsman Snow Thrower IViodel 247.88704 751-10487 790-00238A-0637 idler Bracket FuelCap 951-10023 FuelTank,2 Qt. 684-04168 idler PulleyAssembly,1.917 790-00134-0637 FuelTankBracket 750-04571 ShoulderSpacer,.280x .785x .538 747-04236 FuelTankSupportWire 710-0106 HexScrew,1/4-20x 1.25 726-0205 HoseClamp,.490 726-0299 PushCap, 1/2 751-10349 FuelLine Hose 738-0924A ShoulderScrew, 756-0625 CableRoller 712-04064...
- Page 24 Craftsman Engine Model ZS161=JWA For Snow Thrower Model 247.88704 - 32 ,_33 77 108 _© _/43 •...
- Page 25 Craftsman Engine IViodel ZS161-JWA For Snow Thrower IViodel 247.88704 " 710-04920 FlangeBolt 951-10657 MufflerStudAssembly 715-04092 Dowel Pin,7 x 14 715-04090 DowelPin, 10x 16 714-04074 GovernorArm Clip 710-04909 CarburetorStuds 710-04906 DrainPlug Bolt 715-04089 DowelPin,9 x 14 736-04440 DrainPlug Washer 726-04101 Hose Clamp...
- Page 26 Craftsman Engine IViodel ZS161=JWA For Snow Thrower IViodel 247.88704 951-11097 CrankcaseKit 951-11063A ValveCoverKit 951-11054A ValveCover Bearing ValveCoverGasket CrankcaseComplete Oil Seal 951-10370 Oil DrainPlugand Washer Assembly 951-11096 CrankshaftKit 710-04906 Oil DrainPlug Bearing 736-04440 Oil DrainPlugWasher CrankshaftAssembly 951-10950A ShortBlockAssembly Bearing 710-04920 FlangeBolt...
- Page 27 Craftsman Snow ThrowerModel 247.88704 777533124 777X43688 .... DOHOT ....USEE85 ORFUEL..CONTAiNiNG MORE 1. KEEP AWAY FROM ROTATING AUGER CONTACT THAN10% ETHAHOL WiTHAUGER C AN AMPUTATE HANDS A NDFEET. 2. DISENGAGE CLUTCH LEVERS, S TOP ENOiHE, AHD REiYIAIH BEHIHD H ANDLES UNTIL A LL MOVING PARTS HAVE STOPPED B EFORE UHCLOGGING SERViCiNG M ACHINE.
- Page 28 MTD CONSUMER GROUP INC (MTD), the California Air Resources Board (CARB) and the United States Environment Protection Agency (U. S. EPA) Emission Control System Warranty Statement (Owner's Defect Warranty Rights and Obligations) EMISSION CONTROLSYSTEM COVERAGE IS APPLICABLE TOCERTIFIEDENGINESPURCHASED IN CALIFORNIA IN 2005 ANDTHERE- AFTER,WHICHARE USEDIN CALIFORNIA, A NDTO CERTIFIED MODELYEAR2005 AND LATERENGINESWHICHARE PURCHASED AND USEDELSEWHERE IN THE UNITEDSTATES.
- Page 29 (4)Repair orreplacement ofany warranted part under the warranty provisions ofthis article m ust beperformed atnocharge tothe owner ata warranty station. (5)Notwithstanding the provisions ofSubsection (4) above, warranty services orrepairs must beprovided atallMTD distribution centers that are franchised toservice the subject engines. (6)The owner must not b echarged fordiagnostic labor that l eads tothe determination that a warranted...
- Page 30 Look For Relevant Emissions Durability Period and Air index information On Your Engine Emissions Label Engines that are certified to meet the California Air Resources Board (CARB) Tier 2 Emission Standards must display information regarding the Emissions Durability Period and the Air Index. Sears, Roebuck and Co., U.S.A. makes this information available to the consumer on our emission labels.
- Page 31 Congratulations on makinga smart purchase.YournewCraftsman® Once youpurchasethe Agreement,a simplephonecall isall that it productis designedand manufactured for yearsof dependableopera- takesfor youto scheduleservice.Youcan call anytimedayor night, or tion. But likeall products,it mayrequirerepairfrom time to time.That's schedulea serviceappointmentonline. whenhavinga RepairProtectionAgreementcan saveyoumoneyand The RepairProtectionAgreement i sa risk-freepurchase.If you cancel aggravation.
- Page 32 Cuando son operados y mantenidos de acuerdo con las instrucciones suministradas en su totalidad, si la nieve esta Craftsman lanzador falla debido a un defecto de material o mano de obra dentro de dos a_os a partir de la fecha de compra, el retorno a cualquier tienda Sears, Sears partes del Centro de Servicio y Reparaci6n, u otros Craftsman salida en los Estados Unidos para la reparaci6n gratuita (si la reparaci6n o la sustituci6n resulte imposible).
- Page 33 Lapresencia deeste simbolo indica quesetrata Esta m_quina rue construida para ser operada de acuerdo deinstrucciones importantes deseguridad que con las reglas de seguridad contenidas en este manual. sedeben respetar para evitar p oner e npeligro AI igual que con cualquier tipo de equipo motorizado, suseguridad personal y/omaterial y ladeotras descuido o error por parte del operador...
- Page 34 NIANEJO SEGURO DE LA GASOLINA Nuncaenciendael motor en espacioscerradoso en una zona con pocaventilaci6n.El escapedel motorcontienernon6xidode Paraevitar lesionespersonales o da_osrnateriales tengarnucho carbono,un gas inodoroy letal. cuidadocuandotrabajecon gasolina.La gasolinaes surnarnente Noutilice la rn_.quina b ajo la influenciadel alcoholo las drogas. inflarnabley sus vaporespuedencausarexplosiones. S i se derrarna gasolinaencirnao sobrela ropa se puedelesionargravernente ya que El silenciadory el motorse calientany puedencausar se puedeencender.
- Page 35 DESPEJE DE UN CANAL DE DESCARGA 14. SegOn la Comisi6nde Seguridad de Productosparael Consumidor d e los EstadosUnidos(CPSC)y la Agencia OBSTRUIDO de Protecci6nAmbientalde los EstadosUnidos(EPA),este El contactode lasmanoscon el impulsor r otatorioque est,. dentrodel productotieneuna vide dtilmedie de siete(7) a_os 6 60 horasde canalde descargaes la causa m_.scomQn de lesionesasociadascon funcionamiento.
- Page 36 Simbolos de seguddad En esta p_igina se presentan y describen los simbolos de seguridad que pueden aparecer en este producto. Lea, entienda y cumpia todas las instrucciones incluidas en la m_iquina antes de intentar realizar el montaje de la unidad y utilizarla. LEA EL(LOS) MANUAL(ES) DEL OPERADOR Lea, entienda y cumpla...
- Page 37 NOTA:Lasreferenciasa lado derechoo izquierdode la m_.quina Ajuste las periNas de aletas para sujetarla barra en su lugar. Vea la Figura2. quitanievesedeterminansitu_.ndose detr_.sde la unidaden posici6n de operaci6n(permaneciendo directamente detr&sde la m_.quina quitanieve,mirandohaciael panelde la manija). EXTRACCION DE LA UNIDAD DE LA CAJA Corte lasesquinasde la cajade cart6ny extiendalosladosde maneraque quedenpianossobreel piso Quitey descartetodos los insertosde empaque.
- Page 38 1. Extraiga latapa del c ombustible, controle elnivel ycargue rn_.s NOTA:NoIo Ileneen exceso.El Ilenadoexcesivode aceite puede combustible deser necesario. hacerque el motorgenerehurno,que cuestearrancarloo que falle la bujia. Procedimiento para agregar aceite AJUSTES Elmotor se envia s in aceite e nelmotor. Antes deponer larn_quina IViontaje del canal enrnarcha debe c argar aceite enelmotor.
- Page 39 Esta pdtginase dej6 en blanco intencionalmente.
- Page 40 IVlanija del arrancador de retroceso Cebador Tape de combustible Plata de raspado Figura6 ARRANCADOR DE RETROCESO Ahoraque ya ha ajustadosu m_.quina quitanieveparael funcionamiento, es importantefamiliarizarse con suscontrolesy La manijadel arrancadorse utiliza paraarrancarel motor. caracteristicas. C onsultela Figura6. TAPA DEL COMBUSTIBLE I÷1 I'.,I Saque la tapade la gasolinaparaagregarcombustible.
- Page 41 iVIONTAJE DEL CANAL NOTA:Siernprecubrael orificiode ventilaci6nen el bot6ncebador cuandoIo presiona.Talvez debacebarla rn_.quina rn_.s parael Hagarotarel rnontajedel canalhaciaizquierdao derechausadola arranqueinicialsi la ternperatura es rnenora 15grados Fahrenheit. rnanijadel canal.La inclinaci6ndel canalde descargacontrolael Tomela rnanijadel arrancadory tire de la soga lentarnente hasta _.ngulo con el que searroja la nieve.Aflojela perillade aletasdel que quede un poco rn_.s tirante.Dejeque la cuerdase enrolle costadodel canalde descargaantes de girar el canalde descarga lentarnente.
- Page 42 Esta pdtginase dej6 en blanco intencionalmente.
- Page 43 PROGRAMA DE MANTENIMIENTO Antesde realizar c ualquier t ipode mantenirniento o servicio, Sigael cronograrnade rnantenirniento que se presentaa continuaci6n. desenganche todosloscontroles y detenga el motor.Espere a quese Estatabla s61o describepautasde servicio.Utilicela colurnnaRegistro detengan cornpletarnente todaslaspiezasrn6viles. D esconecte el cable de Serviciopara hacerel seguirniento de las tareasde rnantenirniento de la bujiay p6ngalo haciendo rnasacontrael motorparaevitarque se cornpletadas.Paraubicar el Centro de Servicio Searsm_s cercano encienda accidentalrnente.
- Page 44 Retirela fundade la bujiay utilice unaIlavepara bujiaspara extraerla,Figura10. L&vesebien las manoscon agua yjab6n inmediatamente despu_s de tocar aceiteusado. NOTA:Elimineel aceiteusadodel motorde una maneraque no perjudiqueel medioambiente.Ll_veloa un centrode recicladou otro centrode recolecci6n. Recomendaciones sobre el aceite f ....NO utiliceaceitessin detergenteni aceite para motorde dos tiempos. Podria reducirsela vida Otildel motor.
- Page 45 Unavez que la bujfaest,. colocadaen su lugar,aprieteconuna Afiojelas cuatrotuercasy pernosde seguridadque fijanla placa Ilavepara bujia paracornprirnirla arandela. de raspadoa la caja. Vea la Fig. 16.Muevala placade raspado hacia la posici6ndeseaday vuelvaa apretarlas tuercasy los NOTA:Cuandoinstaleuna bujfanueva,apriete1/2vuelta,despu_s pernosbien ajustados. que la bujfaseencuentracolocadaen su lugar,para cornprirnirla arandela.Cuandoreinstaleuna bujfausada,ajuste1/8-a 1/4de giro, despu_sque la bujia se encuentracolocadaen su lugar,a finde cornprirnirla arandela.
- Page 46 Cable de control ¢AMBIO DE CORREA Es posibleque necesiterealizarajustesperi6dicosdebidoal Correa de transrnisi6n de la barrena estiramiento del cablede controly de la correade transmisi6n Parasacar la cubiertade la correasaquelos cincotornillos ocasionadoper el desgaste.Si la barrenaparecetitubearmientras hexagonales que la sujetanal bastidor.Vea la Figura14. gira,haga Io siguiente: Retirela correasujet_.ndola per la basede la poleade la barrena El agujerosuperiorde la manijade control tieneen cuentael ajustede...
- Page 47 Empujela correaporencima de la basede la poleade la barrena. Vuelvaa instalarla cubiertade la correaque sac6anteriormente. REEMPLAZO DE LAS PALETAS DE LA BARRENA Laspaletas de caucho de [abarrena de[am&quina quitanieve s edesgastan y se[asdebecambiar s i sepresentan signos de desgaste excesivo. NOpermita quelaspaletas de caucho de la barrena sedesgasten hasta el puntoen quepartesde la barrena met_.lica m isma toquenel pavimento.
- Page 48 Si no se va a utilizarel equipodurante30 dfas o rn_.s, o si es el finalde la ternporadade nievey ya no existeposibiNdad de que nieve,es necesarioalrnacenarel equipode rnaneraadecuada.Sigalas instruccionesde alrnacenarniento q ue se indicana continuaci6nparagarantizarel rendirniento rn_.xirno de la rn_.quina quitanieve duranternuchosa_osrn_.s. PREPARACI6N DEL MOTOR PREPARACI6N...
- Page 49 Antes derealizar cualquier tipo dernantenirniento oservicio, desenganche todos los controles ydetenga el motor. Espere aque se detengan cornpletarnente todas las piezas rn6viles. Desconecte elcable d elabujfa y p6ngalo haciendo rnasa contra elmotor para e vitar que se encienda accidentalrnente. Utilice siernpre anteojos [de segur dad durante e func onarn ento o rn entras ajusta o repara este equ po.
- Page 52 MTD CONSUMER GROUP, iNC. (MTD), el Bordo de Recursos de Aire de California (CARB) y la Agencia de Protecci6n Medioambiental de Estados Unidos (U. S. EPA) Declaraci6n de Garantia del Sistema de Control de Emisiones (Derechos y obligaciones del propietario seg_n la garantia contra defectos) LA COBERTURADESISTEMADECONTROLDEEMISIONES APLICABLE A MOTORES CERTIFICADOS COMPRADOS ENCALIFORNIA EN2005 Y A PARTIRDE ENTONCES, QUESON USADOS EN CALIFORNIA, Y HASTA ANO2005 DE MODELOCERTIFICADO Y MOTORES POSTERIORES QUESON COMPRADOS Y USADOSENOTRAPARTEEN LOSESTADOS UNIDOS.
- Page 53 reernplazada segQn lagarantia segarantizar_, por e lresto d el p eriodo degarantia. (3) Cualquier pieza g arantizada que est_ prograrnada para reernplazo segQn elrnantenirniento requerido deconforrnidad con lasinstruc- clones escritas delaSubsecci6n (c)segarantiza por e lperiodo detiernpo anterior alaprirnera fecha d ereernplazo prograrnada para e sa pieza.
- Page 54 Busque el periodo de duraci6n de emisiones importantes yla informaci6n de clasificaci6n de aire en la etiqueta de emisiones de su motor Los motores cuyo cumpiimiento con los estAndares de emisi6n Tier 2 de la Comisi6n de Recursos Ambientales de California (CARB) est6 certificado deben exhibir la informaci6n relacionada con el perJodo de duraci6n de las emisiones y la clasificaci6n de aire.
- Page 55 Felicitaciones por haberrealizadouna adquisici6ninteligente.El Unavezadquiridoel Acuerdo,puedeprograrnar el serviciocon productoCraftsman@ que ha adquiridoest_ dise_adoy fabricado tan s61orealizaruna Ilarnadatelef6nica.PuedeIlarnaren cualquier para brindarrnuchosa_osde funcionarniento confiable.Perocorno mornento del dia o de la nocheo prograrnar un servicioen linea. todoslos productosa vecespuederequerirde reparaciones.Esen El Acuerdode Protecci6nde Reparaci6n es una cornprasin riesgo. esernornentocuandoel disponerde un Acuerdode protecci6npara Si ustedanula por alguna raz6nduranteel periodode garantiade reparaciones le puedeahorrardineroy problernas.
- Page 56 Your Home For expert troubleshooting and home solutions advice: www.managemyhome.com For repair - in your home - of all major brand appliances, lawn and garden equipment, or heating and cooling systems, no matter who made it, no matter who sold it! For the replacement parts, accessories owner's manuals that you need to do-it-yourself.