Table of Contents
Advertisement
Quick Links
Download this manual
See also:
User Manual
Advertisement
Table of Contents

Related Manuals for HTC Mogul


Summary of Contents for HTC Mogul
- Page 1 Sprint Power Vision Smart Device Mogul™ by HTC Getting Started Guide www.sprint.com © 2007 Sprint Nextel. All rights reserved. SPRINT and other trademarks are trademarks of Sprint Nextel. Printed in the U.S.A.
-
Page 2: Please Read Before Proceeding
Please Read Before Proceeding THE BATTERY MUST BE CHARGED BEFORE YOU CAN USE THE DEVICE. DO NOT REMOVE THE BATTERY PACK WHEN THE DEVICE IS CHARGING. YOUR WARRANTY IS INVALIDATED IF YOU OPEN OR TAMPER WITH THE DEVICE’S OUTER CASING. PRIVACY RESTRICTIONS Some countries require full disclosure of recorded telephone conversations, and stipulate that you must inform the person with whom you are speaking that the... - Page 3 The information is provided “as is” without warranty of any kind and is subject to change without notice. HTC also reserves the right to revise the content of this document at any time without prior notice.
-
Page 4: Table Of Contents
Table of Contents Section 1 Getting Started ...............1 Setting Up Service ..............2 Your Device ................... 6 Battery Information ..............12 Starting Up ................. 15 The Today Screen ..............17 Programs ..................21 Section 2 Entering Information ............23 Using the Hardware Keyboard ..........24 Entering Information ............... - Page 5 Section 5 Synchronizing Information With Your Computer ..41 Setting Up ActiveSync on Windows XP ....... 42 Setting Up Windows Mobile Device Center on Windows Vista ................43 Synchronizing With Your Computer ........45 Section 6 Organizing Contacts, Appointments, Tasks, and Other Information ............47 Contacts ..................
- Page 6 Section 9 Getting Connected ............71 Comm Manager ................ 72 Internet Explorer Mobile ............73 Using Bluetooth ................ 74 Using Wi-Fi ................. 78 Section 10 Experiencing Multimedia ..........81 10.1 Using the Built-in Camera ............82 10.2 Using Pictures & Videos ............89 10.3 Using Windows Media Player ..........
-
Page 7: Getting Started
Section 1 Getting Started In This Section Setting Up Service Your Device Battery Information Starting Up The Today Screen Programs... - Page 8 Setting Up Service Setting up service on your new Mogul smart device is quick and easy. This section walks you through the necessary steps to set up your device's phone, set up your voicemail, establish passwords, and contact Sprint for assistance with your Sprint service.
-
Page 9: Section
Sprint Account Passwords As a Sprint customer, you enjoy unlimited access to your personal account information, your voicemail account, and your Sprint Vision account. To ensure that no one else has access to your information, you will need to create passwords to protect your privacy. - Page 10 To reach Sprint Customer Service: You can reach Sprint Customer Service many different ways: From the Phone screen, dial Sign on to your account at www.sprint.com. Call us toll-free at 1-888-211-4727 (Consumer customers) or 1-888-788-4727 (Business customers). Write to us at Sprint Customer Service, P.O. Box 8077, London, KY 40742.
-
Page 11: Section
What You Need Your smart device box contains the following: Hardware Mogul Smart Device. Rechargeable battery. AC Phone Charger. USB sync cable. Stereo headset. 2.5mm Headset Adapter Two Mini USB Adapter Pouch. Stylus. 512 MB microSD memory card (preinstalled). Documentation Read This First poster. -
Page 12: Your Device
Your Device Front Components 10 11 1. Messaging Key Press to access your messages. 2. Notification LED 1 Bi-color LED on the left side: Blue and Green for Bluetooth status and availability, and Wi-Fi status. When both Bluetooth and Wi-Fi are enabled, blue and green lights blink alternately. -
Page 13: Section
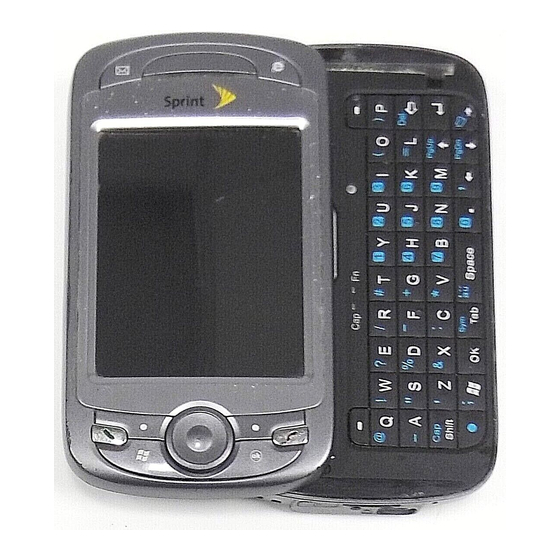
6. Hardware Keyboard This is a QWERTY-style keyboard just like the computer keyboard. Slide the touch-screen panel to the left to reveal the keyboard. For more information, see “Using the Hardware Keyboard” in Section 2. Note: The protective film on the sliding keyboard can be removed. -
Page 14: Section
Left, Back and Right Components Section 1: Getting Started... -
Page 15: Section
6. Flash Light Allows you to capture images even in a dark environment. To turn on the flash, tap the Flash icon ( ) when in Camera mode. 7. Speaker Listen to media from here. 8. Car Antenna Connect your device to an external antenna if you Connector need better reception. -
Page 16: Section
Bottom Components 1. microSD Card Slot Insert a microSD memory card for storing data. 2. Microphone Speak into the microphone when receiving or making a phone call or when recording a voice note. 3. Strap Holder Attach a strap for carrying your device. 4. -
Page 17: Section
Accessories 1. AC Phone Charger Recharges the battery. 2. USB Sync cable Connects your device to a PC and synchronizes data. 3. Mini-USB Stereo Provides a volume control slider and a Send/ headset End button. Press the Send/End button to pick up a call or put a call on hold;... -
Page 18: Battery Information
5. Two Mini USB Adapter Lets you connect the supplied AC Phone Charger and mini-USB stereo headset to your device at the same time. 6. 2.5mm Headset Lets you connect the supplied AC Phone Adapter Charger and a standard 2.5mm stereo headset to your device at the same time. -
Page 19: Installing And Charging The Battery
Installing and Charging the Battery New batteries are shipped partially charged. Before you start using your device, you need to install and charge the battery. To install the battery: 1. Press the battery cover latch downward to release the battery cover. Press the battery cover latch downward and then remove the battery cover. -
Page 20: Low Battery
To charge the battery: Some batteries perform best after several full charge/ discharge cycles. The time needed to fully charge the battery is less than 4 hours. You can charge the battery in one of the following ways: Connect your device directly to an electrical outlet using the AC Phone Charger. -
Page 21: Starting Up
Starting Up Turning Your Device On and Off To turn on your device, press and hold the Power Key at the right side of the device. When you turn on your device for the first time, a Quick Start Wizard will guide you through the calibration process and the setup of regional settings, date and time, and password. -
Page 22: Key Lock
If your device does not accurately respond to screen taps, please follow these steps to recalibrate it: 1. Tap Start > Settings > System tab > Screen. 2. On the General tab, tap Align Screen, and follow the instructions on the screen. Key Lock It is possible to lock the buttons on the device, so that the applications may not be accidentally launched. -
Page 23: The Today Screen
The Today Screen The Today screen displays important information, such as upcoming appointments and status indicators. You can tap a section on the screen to open the associated program. To access the Today screen, tap Start > Today. To customize the Today screen display, including the background image, tap Start >... - Page 24 10. Tap to lock the device. The icon changes to . Tap Unlock on the Today screen to unlock again. 11. Reminds you of the appointment(s). Tap to open Calendar. 12. Displays the task(s) that you need to do. Tap to open Tasks. 13.
- Page 25 Icon Description Searching for phone service 1xRTT available EVDO available Data connection is active and transmitting data Data connection is active but idle Roaming Connection is active Connection is not active Synchronization in progress Synchronization error ActiveSync notification Wi-Fi function enabled, but device not connected to a wireless network yet Wireless network(s) detected Connecting to wireless network (arrows moving);...
-
Page 26: The Start Menu
Icon Description Bluetooth headset detected Serial USB connection active The USB to PC ( ) icon appears on the Today Screen when Note: you enable a serial USB connection between your device and computer. The Start Menu The Start menu, located at the top left corner of the Today screen, displays a list of programs. -
Page 27: Programs
Programs The following are some of the icons for the programs that are already installed on your device. Programs in the Start Menu Icon Description Office Mobile Use the complete suite of Microsoft® Office applications for your mobile device. Excel Mobile Create new workbooks or view and edit Microsoft®... - Page 28 Icon Description AudibleAir Provide you with the service to download your audiobooks and subscriptions wirelessly. AudiblePlayer Listen to the audiobooks, magazines, newspaper, and radio programs on your device. Camera Take photos or shoot video clips with accompanying audio. File Explorer Organize and manage files on your device. GetGood Launch the Web browser and connect to GoodLink to get the stuff you want.
-
Page 29: Entering Information
Section 2 Entering Information In This Section Using the Hardware Keyboard Entering Information Using the Onscreen Keyboard Using Symbol Pad... - Page 30 Using the Hardware Keyboard Your device provides you with a QWERTY keyboard, which is similar to a standard computer keyboard. Slide the screen panel to the left to reveal the keyboard. Shift Key / Caps Lock LED Left softkey Right softkey Function Key LED Function Key Section 2: Entering Information...
- Page 31 When you slide open the hardware keyboard, the screen automatically changes to landscape view. The screen changes back to portrait view when you close the hardware keyboard. You can do the following with the QWERTY keyboard: To type lowercase letters, press the keys using your thumbs or fingers.
- Page 32 Entering Information When you start a program or select a field that requires text or numbers, the Input Panel icon becomes available on the menu bar. Tap the Input Selector arrow (which appears next to the Input Panel icon) to open a menu where you can select a text input method and customize input options.
- Page 33 Using the Onscreen Keyboard The onscreen keyboard is available when text entry is possible. You can enter text by tapping keys on the keyboard that are displayed on the screen. To enter text using the onscreen keyboard: 1. In a program, tap the Input Selector arrow, and then tap Keyboard.
- Page 34 To open Symbol Pad and select a symbol: 1. Create or open a document, such as a Word document. 2. Tap the Input Selector arrow, and then tap Symbol Pad; —or— Using the hardware keyboard, press and then press 3. Tap on the Symbol Pad screen to browse through the pages of symbols.
- Page 35 Section 3 Using Phone Features In This Section Using the Phone Making a Call Receiving a Call In-Call Options Phone Settings...
- Page 36 Using the Phone Like a standard wireless phone, you can use your device to make, receive, and keep track of calls and send SMS messages. You can also take notes while talking and dial directly from Contacts. The Phone Screen From the Phone screen, you can access Call History, Speed Dial, and Phone settings.
-
Page 37: Using Phone Features
To adjust the device volume: 1. Tap the Speaker icon ( 2. Under Volume, do the following: Adjust the phone volume ( ) or device volume ) by moving the slider to the desired volume level. Tap On, Vibrate, or Off to change both the system and ringer volume settings. -
Page 38: Making A Call
Making a Call With your device, you can make a call from Phone, Contacts, Call History, and Speed Dial. Making a Call From the Phone Screen On the Phone screen, tap the desired phone number, and tap Talk at the lower right of the screen. If you tap a wrong number, tap the back arrow ( ) to erase individual numbers one at a time. -
Page 39: Making A Call From Call History
To dial one of the phone numbers of a contact: By default, the wireless telephone number for a contact is dialed when you make a call from Contacts. However, you can specify that a different phone number is dialed instead. 1. -
Page 40: Receiving A Call
To create a speed dial entry from Contacts, tap and hold the contact name, tap Add to Speed Dial, and then select an available location for the new Speed Dial. Tips: To delete a speed dial, in the Speed Dial list, tap and hold the desired entry, and then tap Delete. - Page 41 To set up a conference call: Conference call, or three-way calling, allows you to talk to two different people at the same time. When using this feature, the normal airtime rates will be charged for each of the two calls. 1.
-
Page 42: Phone Settings
Phone Settings You can customize phone settings, such as the ring type and ring tone to be used for incoming calls and the keypad tone to be used when entering phone numbers. To access phone settings: Tap Start > Settings > Personal tab > Phone; ... -
Page 43: Setting Up Your Device
Section 4 Setting Up Your Device In This Section Personalizing Your Device Resetting Your Device... - Page 44 Personalizing Your Device To set an alarm: 1. Tap Start > Settings > System tab > Clock & Alarms > Alarms tab. 2. Tap <Description> and enter a name for the alarm. 3. Tap the day of the week for the alarm. You can select multiple days by tapping each desired day.
- Page 45 Resetting Your Device Soft Reset Occasionally you may need to reset your device. A soft (or normal) reset of your device clears all active program memory and shuts down all active programs. This can be useful when the device is running slower than normal, or a program is not performing properly.
- Page 46 To perform a hard reset: 1. Press and hold both softkeys on the device. Keep these keys pressed, and at the same time, use the stylus to lightly press and hold the RESET button on the bottom of your device. Left softkey Right softkey RESET button...
-
Page 47: Synchronizing Information With Your Computer
Section 5 Synchronizing Information With Your Computer In This Section Setting Up ActiveSync on Windows XP Setting Up Windows Mobile Device Center on Windows Vista Synchronizing With Your Computer... - Page 48 Setting Up ActiveSync on Windows XP The Software Installation CD that comes with your device contains Microsoft ActiveSync 4.5 or later. Follow the steps in this section to install and set up ActiveSync on Windows XP or other compatible Windows systems. For a list of compatible Windows systems, please go to: Note: http://www.microsoft.com/windowsmobile/activesync/...
-
Page 49: Setting Up Windows Mobile Device Center On Windows Vista
Setting Up Windows Mobile Device Center on Windows Vista Microsoft Windows Mobile® Device Center is the replacement for Microsoft® ActiveSync® on Windows Vista™. Setting up synchronization When you connect your device to your PC and start Windows Mobile Device Center for the first time, you are asked to create a Windows Mobile partnership with your device. -
Page 50: Using Windows Mobile Device Center
Using Windows Mobile Device Center To open Windows Mobile Device Center, click Start > All Programs > Windows Mobile Device Center on your Windows Vista PC. On Windows Mobile Device Center, you can do the following: Click Mobile Device Settings to view and change synchronization settings. -
Page 51: Synchronizing With Your Computer
Synchronizing With Your Computer Connect and synchronize your device with your PC using the USB Sync cable or Bluetooth connection. Starting and stopping synchronization You can manually synchronize either from your device or PC. From your device 1. Tap Start > Programs > ActiveSync. 2. -
Page 52: Synchronizing Via Bluetooth
Synchronizing via Bluetooth You can connect and synchronize your device with the PC using Bluetooth. 1. Set up Windows Mobile Device Center or ActiveSync on your PC to synchronize through Bluetooth. See the program’s Help for instructions. 2. On your device, tap Start > Programs > ActiveSync. 3. -
Page 53: Organizing Contacts, Appointments, Tasks, And Other Information
Section 6 Organizing Contacts, Appointments, Tasks, and Other Information In This Section Contacts Calendar Tasks Notes... -
Page 54: Contacts
Contacts Contacts is your address book and information storage for the people and businesses you communicate with. Store phone numbers, email addresses, home addresses, and any other information that relates to a contact, such as a birthday or an anniversary date. You can also add a picture or assign a ringer to a contact. - Page 55 Organizing and searching To work with the Contacts list: There are several ways to use and customize the Contacts list. Here are a few tips: 1. Tap Contacts on the Today screen. 2. In the Contacts list, do any of the following: In Name view, you can search for a contact by entering a name or number, or by using the alphabetical index.
-
Page 56: Calendar
Calendar Use Calendar to schedule appointments, including meetings and other events. Your appointments for the day can be displayed on the Today screen. If you use Outlook on your PC, you can synchronize appointments between your device and PC. You can also set Calendar to remind you of appointments with a sound or flashing light, for example. -
Page 57: Sending Appointments
To set a default reminder for all new appointments: You can have a reminder automatically turned on for all new appointments you schedule. 1. Tap Calendar on the Today screen. 2. Tap Menu > Options > Appointments tab. 3. Select the Set reminders for new items check box. 4. -
Page 58: Tasks
Tasks Use Tasks to keep track of things you need to do. A task can occur once or repeatedly (recurring). You can set reminders for your tasks and you can organize them using categories. Your tasks are displayed in a task list. Overdue tasks are displayed in red. - Page 59 To set a default reminder for all new tasks: You can have a reminder automatically turned on for all new tasks you create. 1. Tap Start > Programs > Tasks. 2. Tap Menu > Options. 3. Select the Set reminders for new items check box. 4.
-
Page 60: Notes
Notes Notes helps you to quickly capture thoughts, questions, reminders, to-do lists, and meeting notes. You can create handwritten and typed notes, record voice notes, convert handwritten notes to text for easy readability, and send notes to others. Entering Information in Notes There are several ways to enter information in a note. -
Page 61: Recording Voice Notes
To select handwritten text, tap and hold near the text. As soon as dots appear, and before they form a complete Note: circle, quickly drag across the text. (If a letter crosses three ruled lines, it is treated as a drawing rather than text.) To draw in a note: 1. - Page 62 7. If you are recording in an open note, an icon will appear in the note. 8. If you are creating a stand-alone recording, the recording will appear in the note list. To quickly create a recording, press and hold the Voice Tip: Command Key, and then you can begin to record after a beep sound.
-
Page 63: Exchanging Messages
Section 7 Exchanging Messages In This Section Messaging Text Messages Setting Up Email Accounts Using Email... -
Page 64: Messaging
Messaging Messaging is where your text (SMS) and email messages are located. When you receive new messages, you can open them from the Today screen. Simply tap the type of message that you want to open. New message(s) To select a messaging account: Tap Start >... -
Page 65: Text Messages
Text Messages Sending text messages 1. Tap Start > Programs > Messaging. 2. Tap Text Messages on the Account Selection screen. 3. Tap Menu > New. 4. Enter the email address or wireless phone number of one or more recipients, separating each with a semicolon. To access addresses and phone numbers from Contacts, tap To. -
Page 66: Setting Up Email Accounts
Setting Up Email Accounts E-mail Setup Wizard Windows Mobile’s E-mail Setup Wizard lets you easily set up your personal and work email accounts. You can add an email account from an Internet Service Provider (ISP) or other email provider as well as Web-based accounts. -
Page 67: Using Email
Using Email Creating and sending messages To compose and send a message: 1. Tap Start > Programs > Messaging, and then select an email account. 2. Tap New. 3. Enter the email address of one or more recipients, separating them with a semicolon. To access addresses from Contacts, tap To. - Page 68 Viewing and replying to messages To read an incoming message: By default, only the first few kilobytes of a message are shown when you open an incoming message. To read the whole message, do one of the following: In the message list, select a message then tap Menu > ...
-
Page 69: Downloading Messages
To see more header information, scroll up. To always include the original message, from the list view, tap Menu > Tools > Options > Message tab, and select the Tips: When replying to e-mail, include body check box. In the Outlook Email account, you will send less data if you do not edit the original message. - Page 70 To send and receive email for a POP3 or an IMAP4 account: If you have an email account with an ISP or a work account that you access using a VPN server connection, you send and receive messages through a remote email server. Before sending and downloading messages, you need to connect to the Internet or your corporate network.
-
Page 71: Working With Company Email And Meeting Appointments
Section 8 Working With Company Email and Meeting Appointments In This Section Synchronizing Your Device with the Exchange Server Working With Company Email Managing Meeting Requests Finding Contacts in the Company Directory... - Page 72 Synchronizing Your Device with the Exchange Server To keep up-to-date with your company email and meeting schedules while you’re out of the office, you can connect your device to the Internet wirelessly and synchronize this information with your company’s Exchange Server. You can also access your company address book anytime.
- Page 73 8. To change synchronization settings for an information type, for example, E-mail, select the type of information and tap Settings. 9. Tap Finish. Starting synchronization Before you start synchronizing with the Exchange Server, make sure your device has been set up with a data connection to the Internet so that you can synchronize wirelessly.
-
Page 74: Scheduled Synchronization
To compose and send a message: 1. On the Today screen, tap the Comm Manager icon ( 2. On the Comm Manager screen, tap the Direct Push button The button will turn to ; this indicates that you will receive email messages as they arrive. When the button is in the state, you need to manually retrieve your email messages. - Page 75 Managing Meeting Requests When you schedule and send meeting requests from your device, you can invite attendees to your meeting and check their status to know about their availability. When you receive a meeting request, you can reply by accepting or declining the request.
- Page 76 Finding Contacts in the Company Directory In addition to contacts stored on your device, you can access contact information from your organization’s Company Directory. By having over-the-air access to the Company Directory, you can easily send email messages and meeting requests to anyone in your company. 1.
-
Page 77: Getting Connected
Section 9 Getting Connected In This Section Comm Manager Internet Explorer Mobile Using Bluetooth Using Wi-Fi... - Page 78 Comm Manager Comm Manager acts as a central switcher that lets you enable or disable phone features as well as manage your data connections easily. To open Comm Manager: Tap the Comm Manager icon ( ) on the Today screen. ...
- Page 79 Internet Explorer Mobile Internet Explorer Mobile is a full-featured Internet browser that is optimized for use on your wireless device. To start Internet Explorer Mobile: Tap Start > Internet Explorer. To choose a Home page: 1. In the address bar on top of the Internet Explorer Mobile screen, enter a Web page address.
-
Page 80: Using Bluetooth
Using Bluetooth Bluetooth is a short-range wireless communications technology. Devices with Bluetooth capabilities can exchange information over a distance of about 10 meters without requiring a physical connection. You can even beam information to a device in a different room, as long as it is within the Bluetooth signal coverage range. -
Page 81: Bluetooth Partnerships
To turn Bluetooth on and make your device visible: 1. On your device, tap Start > Settings > Connections tab > Bluetooth. 2. From the Mode tab, select the Turn on Bluetooth and Make this device visible to other devices check boxes. 3. -
Page 82: Beaming Information Using Bluetooth
7. Wait for the paired device to accept the partnership. The receiving party needs to enter the same passcode that you specified. 8. The name of the paired device is then displayed. You may edit and enter a new name for that device. 9. - Page 83 If your computer has Windows XP SP2 and your computer’s built-in or external Bluetooth adapter is supported by Windows XP SP2, open Bluetooth Devices from the Control Panel. Click the Options tab, and then select the Turn discovery on and the Allow Bluetooth devices to connect to this computer options.
-
Page 84: Using Wi-Fi
If the device you want to beam to does not appear in the Note: box, make sure that it is turned on and visible. To receive a Bluetooth beam: Your device will not detect and notify you of incoming Bluetooth beams unless you set it up to do this. 1. - Page 85 To connect to a wireless network 1. After Wi-Fi has been turned on, your device then scans for available wireless networks in your area. The network names of the detected wireless networks will be displayed on a pop-up message window. Tap a wireless LAN, and then tap OK.
- Page 86 Wi-Fi networks are self-discoverable, which means no additional steps are required for your device to connect Note: to a Wi-Fi network. It may be necessary to provide a user name and password for certain closed wireless networks, however. Section 9: Getting Connected...
-
Page 87: Experiencing Multimedia
Section 10 Experiencing Multimedia In This Section 10.1 Using the Built-in Camera 10.2 Using Pictures & Videos 10.3 Using Windows Media Player... - Page 88 10.1 Using the Built-in Camera Taking photos and capturing video clips along with audio is easy with the built-in camera on your device. To open the Camera screen Press and hold the Camera Key on your device. Camera Key —or—...
-
Page 89: Supported File Formats
Current capture mode The available capture modes of the camera are as follows: Photo to capture standard still images. Video to capture video clips, with or without accompanying audio. Contacts Picture to capture a still image with the option to immediately assign it as a Photo ID for a contact. -
Page 90: Camera Controls
Camera Controls Use the following device buttons and onscreen controls to take photos or video clips and to modify settings. The Camera Key, ENTER button, and Jog Wheel The Camera Key, ENTER button, and Jog Wheel can all be used as the shutter release. - Page 91 Mode Switching control. Tapping the left/right arrow ) on the screen allows you to switch the capture mode. Resolution. The resolution icon ( indicates the current resolution. Tap to toggle between different resolutions. Storage. Tap to toggle between saving captured photos or video clips to the device memory ( ) or to the memory card (...
- Page 92 12 Self-timer. Tap to set the self-timer to 2 seconds, 10 seconds, or off when in the Photo or Contacts Picture mode. When you press the ENTER button or the Camera Key to capture a still image, the self-timer begins counting, and then captures a still image after the assigned time (2 seconds or 10 seconds).
-
Page 93: Video Capture Mode
Panorama mode 16 Stop. The Stop icon ( ) appears only in Panorama mode. Tap this icon if you want to stop capturing the remaining shots and start composing the panorama. 17 Exit. Tap the Exit icon ( ) to exit the Camera program. Still Image Capture Modes While using Still Image capture modes, such as Photo, Contacts Picture, Picture Theme, Panorama, Sports, and Burst, you can... -
Page 94: The Review Screen
The Review Screen After taking a still image or recording a video clip, you can view the image or video clip on the Review screen. In addition, you can tap the icons at the bottom of the Review screen to delete a captured image or video, send an image or video via email, and more. - Page 95 6. Browse. After you have taken photos in Sports or Burst mode, the total number of consecutive shots is shown in the lower right corner of the Review screen. Tap the up/down arrow ( ) to browse through the sequence of photos.
- Page 96 To play GIF animation files 1. Tap Start > Programs > Pictures & Videos. 2. Select a GIF animation file and tap View. The GIF Animation program then opens and plays the animation. To play videos with audio 1. Tap Start > Programs > Pictures & Videos. By default, the contents of the My Pictures folder will be shown.
- Page 97 Tap anywhere on the screen to display the Slide Show toolbar, which you can use to stop or pause the slide show, rotate the view, and more. To sort pictures and video clips If you store a large number of pictures or video clips on your device, you may find it helpful to sort them to quickly find a specific picture or clip.
- Page 98 10.3 Using Windows Media Player You can use Microsoft Windows Media Player 10 Mobile for Pocket PC to play digital audio and video files that are stored on your device or on a network, such as on a Web site. Using Windows Media Player, you can play both audio and video files.
-
Page 99: About The Controls
About the controls 2 3 4 The following are available controls on the Windows Media Player. Control Function Displays the video in full screen. Displays a Web site where you can find music and videos to play. Adjusts the playback progress of a selected file. Skips to the beginning of the current file or to the previous file. -
Page 100: About The Screens And Menus
About the Screens and Menus Windows Media Player has three primary screens: Playback screen. The default screen that displays the playback controls (such as Play, Pause, Next, Previous, and Volume) and the video window. Now Playing screen. The screen that displays the Now Playing playlist. - Page 101 Synchronizing video and audio files Use the latest version of Microsoft Windows Media Player on your PC to synchronize digital media files from your PC to your device. This ensures that protected files and album art are copied to your device correctly.
-
Page 102: Playing Media
To synchronize content manually to your device: 1. If you have not set up media synchronization between your device and PC, follow steps 1 to 3 in “To synchronize content to your device automatically.” 2. Click the Sync tab on the Windows Media Player of your PC. -
Page 103: Troubleshooting
4. Select a category (for example, My Music or My Playlists). 5. Tap and hold the item that you want to play (such as a song, album, or artist name), and then tap Play. To play a file that is stored on your device but is not in a library, on the Library screen, tap Menu >... -
Page 105: Using Other Applications
Section 11 Using Other Applications In This Section 11.1 Microsoft® Office Word Mobile 11.2 Microsoft® Office Excel® Mobile 11.3 Microsoft® Office PowerPoint Mobile 11.4 Adobe Reader LE 11.5 Windows Live™ 11.6 Using Voice Speed Dial... - Page 106 11.1 Microsoft® Office Word Mobile Microsoft® Office Word Mobile is a streamlined version of Microsoft Word. Word documents created on your PC can be opened and edited on your device. You can also create and edit documents and templates in Word Mobile and save them as *.doc, *.rtf, *.txt, and *.dot files. You can have only one document open at a time.
- Page 107 11.2 Microsoft® Office Excel Mobile Microsoft® Office Excel Mobile makes it easy for you to open and edit Excel workbooks and templates created on your PC. You can also create new workbooks and templates on your device. To create an Excel file: 1.
- Page 108 11.3 Microsoft® Office PowerPoint Mobile With Microsoft® Office PowerPoint Mobile, you can open and view slide show presentations created on your PC. Slide shows in *.ppt and *.pps format created using PowerPoint '97 and later can be viewed in PowerPoint Mobile. Many presentation elements built into the slide shows such as slide transitions and animations will play back on the device.
- Page 109 11.4 Adobe Reader LE Adobe Reader LE allows you to open and view Portable Document Format (PDF) files. These files usually have a *.pdf file extension. To open a PDF file on your device: 1. Tap Start > Programs > Adobe Reader LE. 2.
-
Page 110: 11.5 Windows Live
To customize page view and orientation: 1. Open a PDF file you want to view. 2. Tap Tools > View. 3. Select an option to suit your view. To find text in a PDF file: 1. Open a PDF file you want to view. 2. -
Page 111: Setting Up Windows Live
Setting up Windows Live The first time you use Windows Live, sign in by using your Windows Live ID, which is your Windows Live Mail or Hotmail address, and password. 1. Tap Start > Programs > Windows Live. 2. Tap Sign in to Windows Live. 3. -
Page 112: The Windows Live Interface
The Windows Live interface On the main interface of Windows Live, you will see a search bar, navigation bar, and an area you can customize to show your picture. Live Search Bar. Tap the left or right arrow to switch between Windows Live Messenger, Live Mail, and Sync status. -
Page 113: Live Search Bar
Live Search Bar Use the Live Search Bar to easily find information on the Internet. It is integrated into the Windows Live interface. To find information on the Internet: 1. Enter your keywords in the search bar. 2. Tap or Search. Internet Explorer Mobile then launches and displays links to related Web sites. -
Page 114: 11.6 Using Voice Speed Dial
11.6 Using Voice Speed Dial You can record voice tags so that you can dial a phone number or launch programs simply by speaking into your device. To create a voice tag for a phone number: 1. Tap Contacts on the Today screen to open the Contacts list. - Page 115 5. When you create a voice tag for the item, you can do any of the following: Tap the Record button ( ) to rebuild the voice tag. Tap the Play button ( ) to play the voice tag. Tap the Delete button ( ) to delete the voice tag.
-
Page 117: Appendix
Appendix In This Section Regulatory Notices Additional Safety Information Warranty... -
Page 118: A.1 Regulatory Notices
Regulatory Notices Regulatory Agency Identifications For regulatory identification purposes, your Mogul is assigned a model number of TITA100. FCC ID: NM8TITA100. IC: 4115A-TITA100. To ensure continued reliable and safe operation of your device, use only the accessories listed below with your Mogul. - Page 119 FCC RF EXPOSURE INFORMATION In August 1996, the Federal Communications Commission (FCC) of the United States with its action in Report and Order FCC 96-326 adopted an updated safety standard for human exposure to radio frequency electromagnetic energy emitted by FCC regulated transmitters. Those guidelines are consistent with the safety standard previously set by both U.S.
- Page 120 M-Ratings: Phones rated M3 or M4 meet FCC requirements and are likely to generate less interference to hearing devices than phones that are not labeled. M4 is the better/higher of the two ratings. Mogul is rated M3. Hearing devices may also be rated. Your hearing device manufacturer or hearing health professional may help you find this rating.
-
Page 121: Sar Information
SAR Information SAR: 1.130 W/kg @1g (USA) THIS MODEL DEVICE MEETS THE GOVERNMENT’S REQUIREMENTS FOR EXPOSURE TO RADIO WAVES. For body-worn operation, this phone has been tested and meets the FCC RF exposure guidelines when used with the High Tech Computer Corp. accessories supplied or designated for this product. - Page 122 150 meters of the actual location for 95 percent of calls. Mogul’s ALI CAPABILITY The Mogul is an ALI-capable smart device equipped with a GPS (Global Positioning System) receiver supporting a satellite-based GPS ALI-capable network to comply with the FCC’s ALI requirements.
-
Page 123: Compliance With Other Fcc Regulations
E911 signal is transmitted and over which UT Starcom has no control. Finally, customers are advised that the Mogul’s ALI capability is to be used for E911 purposes only. Compliance with Other FCC Regulations... -
Page 124: Weee Notice
WEEE Notice The Directive on Waste Electrical and Electronic Equipment (WEEE), which entered into force as European law on 13th February 2003, resulted in a major change in the treatment of electrical equipment at end-of-life. The purpose of this Directive is, as a first priority, the prevention of WEEE, and in addition, to promote the reuse, recycling and other forms of recovery of such wastes so as to reduce disposal. - Page 125 ELECTRICAL SAFETY This product is intended for use when supplied with power from the designated battery or power supply unit. Other usage may be dangerous and will invalidate any approval given to this product. SAFETY PRECAUTIONS FOR PROPER GROUNDING INSTALLATION CAUTION: Connecting to an improperly grounded equipment can result in an electric shock to your device.
- Page 126 SAFETY PRECAUTIONS FOR DIRECT SUNLIGHT Keep this product away from excessive moisture and extreme temperatures. Do not leave the product or its battery inside a vehicle or in places where the temperature may exceed 60°C (140°F), such as on a car dashboard, window sill, or behind a glass that is exposed to direct sunlight or strong ultraviolet light for extended periods of time.
-
Page 127: Nonionizing Radiation
SAFETY PRECAUTIONS FOR RADIO FREQUENCY (RF) EXPOSURE Avoid using your device near metal structures (for example, the steel frame of a building). Avoid using your device near strong electromagnetic sources, such as microwave ovens, sound speakers, TV and radio. Use only original manufacturer-approved accessories, or accessories that do not contain any metal. - Page 128 Liquid has been spilled or an object has fallen into the product. The product has been exposed to rain or water. The product has been dropped or damaged. There are noticeable signs of overheating. The product does not operate normally when you follow the operating instructions.
-
Page 129: A.2 Additional Safety Information
Additional Safety Information This section provides more safety information in addition to the information at the beginning of the user manual. When Driving Do Not Use The PC Functions Of Your Smart Device While Driving Or Walking Never use the personal computer functions of your device while driving an automobile or any other moving vehicle. -
Page 130: When Using Your Device Near Other Electronic Devices
WARNING: Failure to follow these instructions could lead to serious personal injury and possible property damage. When Using Your Device Near Other Electronic Devices Your wireless handheld portable smart device is a low power radio transmitter and receiver. When it is ON, it receives and also sends out radio frequency (RF) signals. -
Page 131: Turn Off Your Device Before Flying
For more regulatory information about hearing devices, see “FCC Hearing- Aid Compatibility (HAC) Regulations for Wireless Devices.” OTHER MEDICAL DEVICES If you use any other personal medical device, consult the manufacturer of your device to determine if it is adequately shielded from external RF energy. -
Page 132: General Safety
POTENTIALLY EXPLOSIVE ATMOSPHERES Turn your device OFF when in any area with a potentially explosive atmosphere and obey all signs and instructions. Sparks in such areas could cause an explosion or fire resulting in bodily injury or even death. Areas with a potentially explosive atmosphere are often, but not always, clearly marked. -
Page 133: Antenna Safety
Antenna Safety Use only the supplied or an approved replacement antenna. Unauthorized antennas, modifications, or attachments could impair call quality, damage your device, or result in violation of FCC regulations. Please contact your local dealer for replacement antenna. Do not use the device with a damaged antenna. If a damaged antenna comes into contact with the skin, a minor burn may result. - Page 134 Never touch any fluid that might leak from the built-in battery. Such liquid when in contact with the eyes or skin, could cause injury to the skin or eyes. Should the liquid come into contact with the eyes, irrigate the eyes thoroughly with clean water and immediately seek medical attention.
-
Page 135: Warranty
Warranty 12 MONTH LIMITED WARRANTY UTStarcom Personal Communications (the Company) warrants to the original retail purchaser of this UTStarcom handheld portable cellular telephone, that should this product or any part thereof during normal consumer usage and conditions, be proven defective in material or workmanship that results in product failure within the first twelve (12) month period from the date of purchase, such defect(s) will be repaired or replaced (with new or rebuilt parts) at the Company’s option, without... - Page 136 When sending your wireless device to UTStarcom Personal Communications for repair or service, please note that any personal data or software stored on the device may be inadvertently erased or altered. Therefore, we strongly recommend you make a back up copy of all data and software contained on your device before submitting it for repair or service.
- Page 137 Some states or provinces do not allow limitations on how long an implied warranty lasts or the exclusion or limitation of incidental or consequential damage so the above limitation or exclusions may not apply to you. This Warranty gives you specific legal rights, and you may also have other rights, which vary from state to state or province to province.
-
Page 139: Index
Index... - Page 140 Contacts 48 Contacts Picture capture mode About licenses and protected media 94 ActiveSync - overview 21 Delete pictures and videos 91 - use ActiveSync 42 Digital Rights Management Adobe Reader LE (DRM) 94 - overview 21 - use 103 Excel Mobile 21 Battery - battery information 12 File Explorer 22...
- Page 141 Play videos 90 PowerPoint Mobile 21 Library screen (Windows Media Programs Player Mobile) 94 - ActiveSync 21 - Adobe Reader LE 21, 103 - AudibleAir 22 Messaging - AudiblePlayer 22 - overview 22 - Calculator 21 - Camera 22, 82 - Excel Mobile 21, 101 Notes 21, 54 - File Explorer 22...
- Page 142 Regulatory notices 112 Wi-Fi 78 Reset device 39 Windows Media Player Mobile Review screen (Camera) 88 - file formats 92 Ring tone 36 - menus 94 Ring type 36 - overview 22 - troubleshoot 97 Wireless network 78 Word Mobile 21 Search 22 Sliding keyboard 24 Sports capture mode 83...