Table of Contents
Advertisement
Quick Links
RS-4000 Instruction Manual
Please read this instruction manual carefully before use.
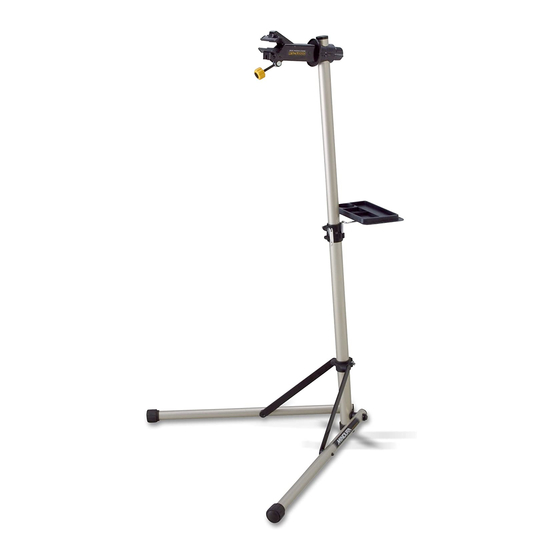
Thank you for purchasing the Minoura RS-4000 bicycle repair stand.
The RS-4000 holds your bike by clamping the seat post or frame to make repairs and maintenance much
easier.
In addition, the RS-4000 is made of lightweight aluminum alloy tubing and foldable design with quick
release skewers, so you can transport this stand anywhere you need then it becomes your work space.
The clamp jaws rotate a full 360 degrees so you can work on specific areas of your bicycle.
We recommned you to maintain your bike everytime before you ride with using this stand for your
safety.
HOW TO SET-UP YOUR RS-4000
The RS-4000 is already fully assembled so you can start using this
stand within a minute.
To set-up your RS-4000, follow these steps.
Loosen the Lower Quick Release Skewer and raise up the
1
Upper Frame to open the Leg with sliding down the Lower
Bracket until it touches the Frame Stopper. (see Fig. A)
- 1 -
(Fig. A)
Advertisement
Table of Contents

Related Manuals for MINOURA RS-4000


Summary of Contents for MINOURA RS-4000
- Page 1 Please read this instruction manual carefully before use. Thank you for purchasing the Minoura RS-4000 bicycle repair stand. The RS-4000 holds your bike by clamping the seat post or frame to make repairs and maintenance much easier. In addition, the RS-4000 is made of lightweight aluminum alloy tubing and foldable design with quick release skewers, so you can transport this stand anywhere you need then it becomes your work space.
- Page 2 (Fig. B) (Fig. C) After completing opening the Leg, tighten the Lower Quick Release Skewer firmly to fix the position. (see Fig. D) (Fig. D) 1. Tighten the Nut until you feel some resistance when you push down the Lever at the half position. (see Fig. E) 2.
- Page 3 Loosen the Upper Quick Release Skewer and pull out the Upper Frame from the Lower Frame. (see Fig. F) Lengthen the Upper Frame as you need, then fix its position with tightening the Upper Quick Release Skewer. (see Fig. G) (Fig.
- Page 4 HOW TO CLAMP YOUR BIKE ON THE RS-4000 Place the RS-4000 on flat and horizontal floor or the ground. (see Fig. M) And make sure if the Lower Bracket reaches the Stopper. (see Fig. N) Otherwise the stand will be unbalanced.
- Page 5 To adjust the Clamp Jaws, turn the small Knob on the Clamp Lever. If you turn the knob in the direction of the counter-clockwise, the jaws will open wider. If you turn the knob in the direction of clockwise, the jaws will be narrower.
- Page 6 If you wish to clamp the seat post or the seat tube instead of the top tube, adjust the angle of the Clamp Jaws before placing your bike. (see Fig. V) (Fig. V) Clamp the seat post firmly with referencing the above Step:6. (see Fig.
- Page 7 Insert the tip of the bolt to the rear roll nut (may be hidden in the square tubing) and keep this position. (see Fig. AA) This bolt has a special thread that is opposite to the one on farthest part. This system makes both roll nuts come together when you tighten the bolt.
- Page 8 For placing the tools and the removed parts. Installed on the top of the main frame. Made of durable Nylon. Good for transporting and storage. FOR MORE INFORMATION MINOURA JAPAN HEAD OFFICE MINOURA NORTH AMERICA MADE IN JAPAN - 8 -...