Table of Contents
Advertisement
Advertisement
Table of Contents

Related Manuals for Kurzweil MICROPIANO


Summary of Contents for Kurzweil MICROPIANO
- Page 1 I N T R O D U C T I O N T H E MicroPiano...
- Page 2 INSTRUCTIONS PERTAINING TO A RISK OF FIRE, ELECTRIC SHOCK, OR INJURY TO PERSONS IMPORTANT SAFETY AND INSTALLATION INSTRUCTIONS WARNING - When using electronic products, basic precautions should always be followed. Read all of the Safety and Installation Instructions before using the product. Do not use this product near water, such as near a bathtub, sink, in a wet basement, near a swimming pool, or the like.
-
Page 3: Table Of Contents
Pull-out Chart of Effects............18 List of Distributors..............19 ©1993 All rights reserved. Kurzweil is a product line of Young Chang Co.; Kurzweil and MicroPiano are trademarks of Young Chang Co. All other products and brand names are trademarks or registered trademarks of their respective companies. -
Page 5: Introduction And Overview
KurzweilÕs superior piano sound tech- nology. As with our other Kurzweil products, we think youÕll Þnd the sounds to be very realistic. This manual will serve to walk you though hook- ing up your MicroPiano safely and using it to its greatest capacity. -
Page 6: Setting Up And Caring For Your
MIDI system until the MicroPiano is connected. If you desire to mount the MicroPiano in your current equipment rack, Kurzweil recom- mends you purchase a standard half-rack adapter from your local dealer. Enclosed with the MicroPiano are four screws... -
Page 7: Connecting Your Micropiano
Holes for mounting unit to a standard half-rack adapter. Apply a rubber foot in each corner approximately as shown. MicroPiano Mounting Diagram Be sure to USE THE SCREWS THAT COME WITH THE UNIT. They are in length and 3/8" intended for use in conjunction with the rubber feet. -
Page 8: Playing Your Micropiano
Look at the back of the MicroPiano. It looks like this: 1.0A LEFT THRU (MONO) RIGHT MIDI AUDIO OUT MicroPiano Rear Panel The MIDI IN and MIDI THRU ports work as follows: Plug the MIDI OUT from your keyboard into the MIDI IN port on the MicroPiano, using any standard MIDI cable. -
Page 9: Midi Indicator
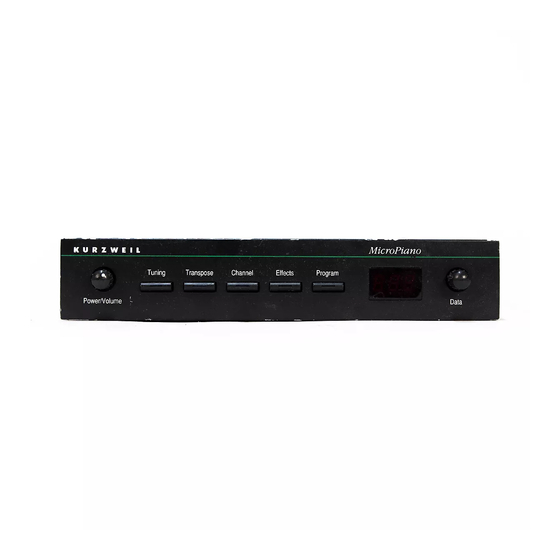
After connecting the power, audio, and MIDI cables, turn the MicroPiano on by rotating the Power/Volume knob slightly clockwise until it clicks. Within one second, all of the front panel LEDs and all of the display segments will light brießy. The LEDs then turn off, and the display changes to show the software version number. -
Page 10: Program
Program Press the Program button then dial up the desired sound with the Data knob. Pick one and try it out! The default setting for the PROGRAM mode is Ó1,Ó which corresponds to Classical Piano. You can select from the following sounds: MicroPiano Programs Program... -
Page 11: Effects
Effects Press the Effects button then turn the Data knob to access the following effects: MicroPiano Effects MIDI #83 Name Value No Effect Room Bright Room Stage Bright Stage Hall Bright Hall Large Hall Large Bright Hall Chorus Room + Chorus Bright Room + Chorus Stage + Chorus Bright Stage + Chorus... -
Page 12: Channel
The default setting for the EFFECTS mode when the MicroPiano is turned on is ÒPrg.Ó Remember, each program has its own pre- determined effect, so changing a program when in the PROGRAM mode will change the effect. See pages 6 and 7 or the pull-out charts on pages 17 and 18, for a listing of the MicroPianoÕs pro- grams and effects. -
Page 13: Tuning
The default setting for TRANSPOSE is Ò0Ó when the MicroPiano is turned on. Note: If the MicroPianoÕs transpositions are extreme, certain notes on an 88-key controller (the highest and lowest ones) may be out of range for the MicroPiano and will not sound. Tuning The Tuning button allows you to tune the unit plus or minus 50 cents (one quarter step) in 1 cent... -
Page 14: Link Mode Conþguration
Link Mode Configuration The MicroPiano can be set to respond to certain MIDI note numbers. This is done by pressing the Channel button and turning the Data knob while in CONFIGURATION mode. If the LED reads , the MicroPiano will respond to ALL notes sent to it. -
Page 15: Velocity Response Curves
Velocity Response Curves Many programs in the MicroPiano are designed for a full range of velocity sensitivity. The touch response and MIDI velocity transmission vary with each controller keyboard. With this feature, you can adjust how the MicroPiano responds to different velocity curves sent from particular controllers. - Page 16 MIDI MIDI IN receives MIDI MODULE information from other MIDI equipment. MIDI MIDI THRU duplicates the information received MIDI MIDI MIDI MIDI by IN and passes it to THRU THRU other equipment. MicroPiano MicroPiano Tuning Transpose Channel Effects Program Tuning Transpose Channel Effects...
-
Page 17: Midi Implementation Chart
MIDI IMPLEMENTATION CHART Manufacturer: Date: Nov. 1993 Young Chang Model: Kurzweil MicroPiano Sound Module Function Transmitted Recognized Remarks Basic Channel Default Changed 1-16 Mode Default always in Mode 3 Messages Altered Note Number 0-127 key range: True Voice 12-108 C0-C8... -
Page 18: In Case Of Difþculty
Below is a list of the most commonly encountered problems and diagnoses for each. If, after trying a solution the problem persists, please contact your Kurzweil dealer or refer to the listing on the inside back cover. PROBLEM: POSSIBLE REASONS/SOLUTIONS:... - Page 19 ¥ MIDI cable not securely plugged in at DEMO song plays both ends. but MicroPiano ¥ MIDI source not sending data. does not respond ¥ MIDI source sending data on wrong to MIDI channel (MicroPiano default is Channel 1). ¥ MicroPiano volume control not turned Sound level from completely up.
-
Page 20: Product Speciþcations
MicroPiano PRODUCT SPECIFICATIONS Audio Output Connection: 2 x 1/4" Mono Phone Plug Impedance: 2K Ohms Output Level: 3.5 Volts RMS Max 1 Volt RMS Nominal Dynamic Range: >103 dB ÒAÓ Weighted Electrical Requirements Input Voltage: 9 Volts AC Power Consumption: 1 Amp Environment Operating... -
Page 21: Pull-Out Chart Of Programs
PULL OUT LIST OF PROGRAMS Program Program Number Name Classical Piano, solo tuning (beat-tuned) Stage Piano, solo tuning (beat-tuned) Classical Piano, ensemble tuning (440-tuned) Stage Piano, ensemble tuning (440-tuned) Bright Piano Sustain Piano Stage Piano & Strings Piano & String Pad Tack Piano Bright Electric Grand Tight Electric Grand... -
Page 22: Pull-Out Chart Of Effects
PULL OUT LIST OF EFFECTS MIDI #83 Name Value No Effect Room Bright Room Stage Bright Stage Hall Bright Hall Large Hall Large Bright Hall Chorus Room + Chorus Bright Room + Chorus Stage + Chorus Bright Stage + Chorus Hall + Chorus Bright Hall + Chorus Deep Space... -
Page 23: List Of Distributors
YOUNG CHANG DISTRIBUTORS Contact the nearest Young Chang ofÞce listed below to locate your local Young Chang/Kurzweil representative. For technical support in the United States, call (562) 926-3200. Young Chang America, Inc. 13336 Alondra Blvd. Cerritos, CA 90703-2245 Tel: (562) 926-3200 Fax: (562) 404-0748 Young Chang Co., Ltd. - Page 24 Kurzweil is a product line of Young Chang Akki Company, Ltd. Part Number: 910228...