Table of Contents
Advertisement
Available languages
Available languages
Quick Links
Advertisement
Table of Contents

Related Manuals for Delta 14-65l


Summary of Contents for Delta 14-65l
- Page 1 Hollow Chisel Mortiser Mortaiseuse à bédane creux Mortajadora de cincel hueco A19592 - 09-15-06 Copyright © 2006 Delta Machinery Instruction Manual Manuel d’utilisation Manual de instrucciones FRANÇAIS (15) ESPAÑOL (27) www.deltamachinery.com (800) 223-7278 - US (800) 463-3582 - CANADA 14-651...
-
Page 2: Table Of Contents
IMPORTANT SAFETY INSTRUCTIONS ...2 SAFETY GUIDELINES - DEFINITIONS ...3 GENERAL SAFETY RULES ...3 ADDITIONAL SPECOFOC SAFETY RULES ...4 FUNCTIONAL DESCRIPTION ...6 CARTON CONTENTS ...6 ASSEMBLY ...7 OPERATION ...10 IMPORTANT SAFETY INSTRUCTIONS Read and understand all warnings and operating instructions before using any tool or equipment. -
Page 3: General Safety Rules
GENERAL SAFETY RULES Failure to follow these rules may result in serious personal injury. FOR YOUR OWN SAFETY, READ THE INSTRUCTION MANUAL BEFORE OPERATING THE MACHINE. Learning the machine’s application, limitations, and specific hazards will greatly minimize the possibility of accidents and injury. WEAR EYE AND HEARING PROTECTION. -
Page 4: Additional Specific Safety Rules
BIT, CUTTING TOOL, OR SANDING DRUM TO STOP TURNING prior to cleaning the work area, removing debris, removing or securing work-piece, or changing the angle of the table. A moving drill bit or cutting tool can cause serious injury. PROPERLY SUPPORT LONG OR WIDE work-pieces. - Page 5 All grounded, cord-connected machines: In the event of a malfunction or breakdown, grounding provides a path of least resistance for electric current to reduce the risk of electric shock. This machine is equipped with an electric cord having an equipment-grounding conductor and a grounding plug.
-
Page 6: Functional Description
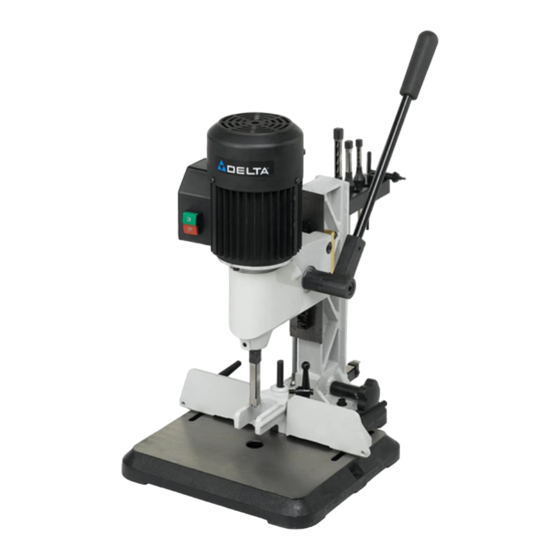
FOREWORD The Delta Model 14-651 is easier to operate than a conventional drill press equipped with a mortising attachment. The model 14-651 is made of cast-iron and steel for rigidity and stability, and comes with a standard 3-jaw type chuck for positive gripping of mortising bits. -
Page 7: Assembly
For your own safety, do not connect the machine to the power source until the machine is completely assembled and you read and understand the entire instruction manual. Assembly for this machine takes less than 30 minutes. RAISING AND LOWERING THE HANDLE 1. - Page 8 FASTENING THE MACHINE TO A SUPPORTING SURFACE If the machine has any tendency to tip over, slide, or walk on the supporting surface, you must secure the base of the machine to a supporting surface with fasteners (not supplied) through the two holes (A) Fig. 7, located in the mortiser base.
- Page 9 5. Adjust the flat portion of the bit to a minimum of 1/16" below the bottom of the chisel. Certain types of wood may require an increase in this gap up to a maximum of 3/16". ATTACHING THE COLUMN EXTENSION You can extend the column to mortis taller workpieces.
-
Page 10: Operation
NOTE: Reverse the procedure to remove the column extension. To prevent damage to the unit, place the rack cover over the gear. This action will prevent the cover from being trapped between the rack and the gear. OPERATIONAL CONTROLS AND ADJUSTMENTS STARTING AND STOPPING THE MACHINE The power switch is located on the left side of the mortiser. - Page 11 ADJUSTING THE HOLD-DOWN The hold-down (C) Fig. 23 prevents the workpiece (E) from lifting as the chisel rises out of the hole. To adjust the hold-down, loosen the handle (F), position the hold- down so that it just touches the top of the workpiece (E), then tighten the handle.
-
Page 12: Troubleshooting
ROTATING THE COLUMN 180 DEGREES The column (A) Fig. 27 can be rotated 180 degrees for special cuts. To rotate the column, remove the four screws, two of which are shown at (B), rotate the column (A) 180 degrees, and replace the four screws (B). You must secure the base to a supporting surface. -
Page 13: Service
REPLACEMENT PARTS Use only identical replacement parts. For a parts list or to order parts, visit our website at servicenet.deltamachinery.com. You can also order parts from your nearest factory-owned branch, or by calling our Customer Care Center at 1-800-223-7278 to receive personalized support from highly-trained technicians. -
Page 14: Warranty
WARRANTY To register your tool for warranty service visit our website at www.deltamachinery.com. Two Year Limited New Product Warranty Delta will repair or replace, at its expense and at its option, any new Delta machine, machine part, or machine accessory which in normal use has proven to be defective in workmanship or material, provided that the customer returns the product prepaid to a Delta factory service center or authorized service station with proof of purchase of the product within two years and provides Delta with reasonable opportunity to verify the alleged defect by inspection. -
Page 15: Français
LES INSTRUCTIONS IMPORTANTES DE SURETE Lire et comprendre toutes instructions d'avertissements et opération avant d'utiliser n'importe quel outil ou n'importe quel équipement. En utilisant les outils ou l'équipement, les précautions de sûreté fondamentales toujours devraient être suivies pour réduire le risque de blessure personnelle. L'opération déplacée, l'entretien ou la modification d'outils ou d'équipement ont pour résultat la blessure sérieux et les dommages de propriété. - Page 16 RÈGLES DE SÉCURITÉ GÉNÉRALES L’inobservation de ces règles peut conduire à des blessures graves. POUR SA SÉCURITÉ PERSONNELLE, LIRE LA NOTICE D’UTILISATION, AVANT DE METTRE LA MACHINE EN MARCHE, et pour aussi apprendre l’application et les limites de la machine ainsi que les risques qui lui sont particuliers ainsi, les possibilités d’accident et de blessures seront beaucoup réduites.
- Page 17 BIT, CUTTING TOOL, OR SANDING DRUM TO STOP TURNING prior to cleaning the work area, removing debris, removing or securing work-piece, or changing the angle of the table. A moving drill bit or cutting tool can cause serious injury. PROPERLY SUPPORT LONG OR WIDE work-pieces.
- Page 18 Toutes les machines avec cordon mis à la terre: la terre fournit un trajet de moindre résistance permettant de réduire le risque de décharge électrique. Cette machine est dotée d’un cordon électrique possédant unconducteur de mise à la terre de l’équipement ainsi que d’unefiche mise à la terre. La fiche doit être branchée dans une prisede courant correspondante, installée de façon adéquate etmise à...
-
Page 19: Description Fonctionnelle
DESCRIPTION FONCTIONNELLE AVANT-PROPOS Le modèle 14-651 de Delta est plus facile à utiliser qu’une perceuse à colonne traditionnelle dotée d’un accessoire pour mortaise. Pour plus de rigidité et de stabilité, l’outil est fabriqué en fonte et en acier et livré avec un mandrin standard à trois mâchoires pour la fixation solide des bédanes. - Page 20 For your own safety, do not connect the machine to the power source until the machine is completely assembled and you read and understand the entire instruction manual. OUTILS NÉCESSAIRES POUR L’ASSEMBLEE L'ESTIMATION DE TEMPS D'ASSEMBLEE L’Assemblée pour cette machine prend moins de 30 minutes. ABAISSEMENT ET RELÈVEMENT DE LA POIGNÉE Fixer le moyeu du module de la poignée (A), fig.
- Page 21 FIXATION DE LA MACHINE SUR UNE SURFACE DE SUPPORT Si la machine tend à basculer, à glisser ou à se déplacer sur la surface portante, fixer solidement la base de la machine à celle-ci en insérant des attaches (non fournies) dans les deux trous (A), fig.
- Page 22 La portion plane de la mèche doit dépasser la partie inférieure du bédane d’au moins 1,6 mm (1/16 po). Certains types de bois exigent un accroissement de cet écart jusqu’à un maximum de 4,8 mm (3/16 po). INSTALLATION DE LA RALLONGE DE COLONNE Il est possible de prolonger la colonne pour mortaiser des pièces plus épaisses.
- Page 23 REMARQUE : inverser la procédure pour retirer la rallonge de colonne. Pour éviter d’endommager l’appareil, installer le couvercle de la crémaillère sur le système d’engrenages. Ainsi, le couvercle ne se coincera pas entre la crémaillère et les engrenages. L'OPERATION CONTROLE DE LE ET LES DÉMARRAGE ET ARRÊT DE MACHINE L’interrupteur est situé...
- Page 24 RÉGLAGE DE LA PIÈCE DE RETENUE La pièce de retenue (C), fig. 23, empêche la pièce (E) de se soulever lorsque le bédane sort du trou. Pour régler la pièce de retenue, desserrer la poignée (F), positionner la pièce de retenue de sorte qu’elle touche la partie supérieure de la pièce de bois (E), puis resserrer la poignée.
- Page 25 L’UTILISATION DE MÈCHES AVEC QUEUES EXTRA LONGUES Lors de l’utilisation de mèches avec queues extra longues, enlever la rallonge (A), fig. 28. Insérer un tournevis dans la rainure (B), fig. 29, à l’extrémité de l’arbre d’induit sur le dessus du moteur. Utiliser une clé de mandrin pour dévisser et retirer le mandrin (C), fig.
- Page 26 REMPLACEMENT GRATUIT DE L'ÉTIQUETTE Si vos étiquettes d'avertissement deviennent illisibles ou sont manquantes, composez le 1-800-223-7278 pour obtenir une étiquette de remplacement gratuite. ENTRETIEN ET RÉPARATION Tous les outils de qualité finissent par demander un entretien ou un changement de pièce. Pour de plus amples renseignements à...
-
Page 27: Español
INSTRUCCIONES DE SEGURIDAD IMPORTANTES Lea y entienda todas advertencias y las instrucciones operadoras antes de utilizar cualquier instrumento o el equipo. Cuando se usa instrumentos o equipo, las precauciones básicas de la seguridad siempre se deben seguir para reducir el riesgo de la herida personal. La operación impropia, la conservación o la modificación de instrumentos o equipo podrían tener como resultado el daño grave de la herida y la propiedad. -
Page 28: Normas Generales De Seguridad
NORMAS GENERALES DE SEGURIDAD Si no se siguen estas normas, el resultado podría ser lesiones graves. PARA SU PROPIA SEGURIDAD, LEA EL MANUAL DE INSTRUCCIONES ANTES DE UTILIZAR LA MÁQUINA. Al aprender la aplicación, las limitaciones y los peligros específicos de la máquina, se minimizará enormemente la posibilidad de accidentes y lesiones. - Page 29 NORMAS ESPECÍFICAS ADICIONALES DE SEGURIDAD Si no se siguen estas normas, el resultado podría ser lesiones personales graves. NO OPERE ESTA MÁQUINA hasta que no esté armada e instalada completamente según las instrucciones. Una máquina montada de manera incorrecta puede provocar lesiones graves.
- Page 30 Todas las máquinas conectadas con cordón conectadas a tierra: En caso de mal funcionamiento o avería, la conexión a tierra proporciona una ruta de resistencia mínima para la corriente eléctrica, con el fin de reducir el riesgo de descargas eléctricas. Esta máquina está equipada con un cordón eléctrico que tiene un conductor de conexión a tierra del equipo y un enchufe de conexión a tierra.
- Page 31 DESCRIPCIÓN FUNCIONAL PROLOGO El modelo Delta 14-651 es más fácil de operar que una prensa de taladro convencional equipada con un dispositivo para cortar mortajas. El modelo 14-651 está fabricado en hierro fundido y acero para mayor rigidez y estabilidad y viene con un portabrocas estándar de 3 mordazas para buen agarre de las brocas para cortar mortajas.
- Page 32 Para su propia seguridad, no conecte la maquina a la fuente de energia hasta que la maquina haya sido ensamblada por completo y usted haya leido y entendido completamente el manual del propietario. HERRAMIENTAS DE ENSAMBLAJE REQUERIDAS ESTIMACIÓN DEL TIEMPO DE ENSAMBLAJE Assembly for this machine takes less than 30 minutes.
- Page 33 SUJECIÓN DE LA MÁQUINA A UNA SUPERFICIE DE APOYO Si la máquina tiende a inclinarse, deslizarse o moverse sobre la superficie de apoyo, debe asegurar la base de la máquina a una superficie de apoyo con sujetadores (no suministrados) a través de los dos orificios (A) Fig.
- Page 34 Ajuste la parte plana de la broca 1,6 mm (1/16") como mínimo debajo de la parte inferior del cincel. Ciertos tipos de madera pueden requerir una brecha mayor hasta un máximo de 4,8 mm ( 3/16"). AJUSTE DE LA PROLONGACIÓN DE COLUMNA Puede extender la columna para cortar mortajas en piezas de trabajo más altas.
- Page 35 NOTA: Realice el procedimiento inverso para quitar la prolongación de columna. To prevent damage to the unit, place the rack cover over the gear. This action will prevent the cover from being trapped between the rack and the gear. CONTROLES Y AJUSTES OPERACIONALES ARRANCANDO Y DETENIENDO LA MAQUINA El interruptor de energía se encuentra en el costado izquierdo de la mortajadora.
- Page 36 AJUSTE DE LA PLANTILLA DE GUÍA La plantilla de guía (C) Fig. 23 evita que la pieza de trabajo (E) se levante cuando el cincel sale del orificio. Para ajustar la plantilla de guía, afloje el mango (F), coloque la plantilla de guía de manera que toque apenas la parte superior de la pieza de trabajo (E), luego ajuste el mango.
- Page 37 GIRAR LA COLUMNA 180 GRADOS La columna (A), Fig. 27 se puede girar 180 grados para cortes especiales. Para girar la columna, quite los cuatro tornillos, dos de los cuales se muestran en (B), gire la columna (A) 180 grados y vuelva a colocar los cuatro tornillos (B).
- Page 38 PIEZAS DE REPUESTO Utilice sólo piezas de repuesto idénticas. Para obtener una lista de piezas o para solicitar piezas, visite nuestro sitio web en servicenet.deltamachinery.com. También puede solicitar piezas en nuestro centro más cercano, o llamando a nuestro Centro de atención al cliente al 1-800-223-7278 para obtener asistencia personalizada de nuestros técnicos capacitados. REEMPLAZO GRATUITO DE LAS ETIQUETAS DE ADVERTENCIA Si las etiquetas de advertencia se tornan eligibles o se pierden, llame al 1-800-223-7278 para reemplazarlas sin costo alguno.
- Page 39 Para registrar la herramienta para obtener el mantenimiento cubierto por la garantía de la herramienta, visite nuestro sitio web en www.deltamachinery.com. Garantía limitada de dos años para productos nuevos Delta reparará o reemplazará, a expensas y opción propias, cualquier máquina nueva, pieza de máquina nueva o accesorio de máquina nuevo Delta que durante el uso normal haya presentado defectos de fabricación o de material, siempre que el cliente devuelva el producto con el transporte prepagado a un centro de servicio de fábrica Delta o una estación de servicio autorizado Delta, con un comprobante de compra del producto, dentro del plazo de dos años y dé...
- Page 40 The following are trademarks for one or more Porter-Cable and Delta products: Les marques suivantes sont des marques de commerce se rapportant à un ou plusieurs produits Porter-Cable ou Delta : Las siguientes son marcas comerciales para uno o más productos de Porter-Cable y Delta: 2 BY 4 ®...