Table of Contents
Advertisement
Quick Links
Advertisement
Table of Contents

Related Manuals for Russound ComPoint ISK4


Summary of Contents for Russound ComPoint ISK4
- Page 1 ISK4 ComPoint Camera Door Station ® Instruction Manual...
-
Page 2: Important Safety Instructions
Important Safety Instructions CAUTION: TO REDUCE THE RISK OF ELECTRIC 7. Heat - The appliance should be situated away from SHOCK, DO NOT REMOVE THE COVER. NO heat sources such as radiators, heat registers, USER-SERVICEABLE PARTS INSIDE. REFER SER- stoves, or other appliances (including amplifi ers) VICING TO QUALIFIED SERVICE PERSONNEL. -
Page 3: Product Overview
Camera Applications The camera in the ISK4 constantly provides a composite video signal that can be fed into a dedicated security monitor or an RF modulator for viewing on a TV channel. It can also be fed into a page video input on a multiroom controller such as the Russound CAV6.6. -
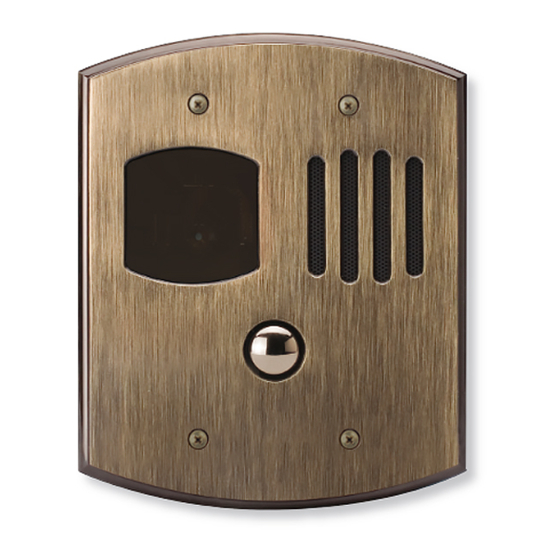
Page 4: Front View
Front View CAMERA – Provides a constant video CALL BUTTON – Rings doorbell and signal for a monitor or CCTV system initiates communication MICROPHONE AND SPEAKER – Provide COVER PLATE – Protects circuits and two-way communication with interior components from the weather keypads... -
Page 5: Rear View
Rear View BR BR/W G G/W O O/W BL BL/W 110 PUNCH-DOWN BLOCK – For CAT-5 MULTIPIN CONNECTOR – Accepts camera intercom cable connection power and video adapter cable (included) POTENTIOMETER – Sets speaker volume DOORBELL TERMINALS – Screw terminals for external doorbell connection CAMERA –... - Page 6 Since the camera angle can be adjusted to place visitors within the fi eld of view, the ISK4 can be positioned to the left or right of the door. However, if the camera is facing toward the sun or a bright light, the picture may be severely degraded.
-
Page 7: Intercom Connection
4 seconds when the Call button is pressed. Connect the cable from the ISK4 to the doorbell according to the doorbell system instructions. A typical connection is shown below. - Page 8 Brown/White Black 4. Cut the connector off the end of the output cable of a Russound 846C power supply. Butt splice the power supply leads to the brown pair on the other end of the CAT-5, observing polarity as shown above.
- Page 9 Video lead Adapter cable (included) Power leads Butt splice Camera connection using CAT-5 cable for video and power Note: The ISK4 camera requires a regulated 12 VDC power supply. Use the Russound 846C or equivalent to power the camera.
- Page 10 Black Black Black 2. Cut the connector off the end of the output cable of a Russound 846C power supply. Butt splice the power supply leads to the other end of the 2-conductor cable, observing polarity as shown above. Note: Use only insulated butt splices approved for use according to applicable wiring codes.
- Page 11 Butt splice (included) 2-conductor cable Power leads Camera connection using RG-59 cable for video and 2-conductor cable for power Note: The ISK4 camera requires a regulated 12 VDC power supply. Use the Russound 846C or equivalent to power the camera.
-
Page 12: Camera Adjustment
Note: We recommend connecting the adapter cable to the camera before adjusting it. The ISK4 camera is mounted in a yoke that allows both pan and tilt adjustments so you can point the camera toward visitors at the door. To adjust the camera angle: 1. - Page 13 Yoke mounting screw Adjusting the horizontal camera angle Tilt screws Adjusting the vertical camera angle...
-
Page 14: Operation
Powering Up After making all connections and installing the ISK4 in the wall box, plug the camera power supply into an AC receptacle and power up the ComPoint system. Also power up the video display being used to receive the camera signal. -
Page 15: Technical Specifications
Warranty The Russound ISK4 Camera Door Station is fully guaranteed for two (2) years from the date of purchase against all defects in materials and workmanship. For this warranty to apply, the unit must be installed and used according to its written instruc- tions. -
Page 16: Instruction Manual
Tel 603.659.5170 • Fax 603.659.5388 www.russound.com Technical Support: tech@russound.com 28-1301 1/15/08 Copyright © 2008 Russound. All rights reserved. All trademarks are the property of their respective owners. Specifi cations are subject to change without notice. Russound is not responsible for typographical errors or omissions.