Table of Contents
Advertisement
Advertisement
Table of Contents

Related Manuals for DigiTech RP14D


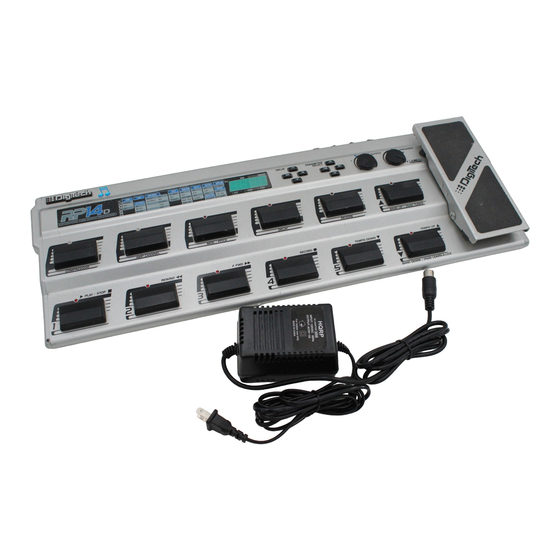
Summary of Contents for DigiTech RP14D
- Page 2 IMPORTANT SAFETY INSTRUCTIONS WARNING FOR YOUR PROTECTION, PLEASE READ THE FOLLOWING: KEEP THESE INSTRUCTIONS HEED ALL WARNINGS FOLLOW ALL INSTRUCTIONS CLEAN ONLY WITH A DAMP CLOTH DO NOT BLOCK ANY OF THE VENTILATION OPENINGS, INSTALL IN ACCORDANCE WITH THE MANUFACTURERS INSTRUCTIONS. DO NOT INSTALL NEAR ANY HEAT SOURCES SUCH AS RADIATORS, HEAT The symbols shown above are internationally accepted symbols that warn of potential REGISTERS, STOVES;...
-
Page 3: Declaration Of Conformity
8760 S. Sandy Parkway Sandy, Utah 84070, USA Tel: 801-566-8800 Fax: 801-566-7005 Effective May 31, 1999 European Contact: Your Local Digitech Sales and Service Office or International Sales Office 8760 S. Sandy Parkway Sandy, Utah 84070, USA Tel. 801-568-7638 Fax 801-568-7642... -
Page 4: Warranty
7. The foregoing is in lieu of all other warranties, expressed or implied, and Digitech neither assumes nor authorizes any person to assume any obligation or liability in connection with the sale of this product. In no event shall Digitech or its dealers be liable for special or consequential damages or from any delay in the performance of this warranty due to causes beyond their control. -
Page 5: Table Of Contents
Included Items ......................1 Flanger ....................14 RP14D Features......................1 Phaser....................14 Quick Start......................2 Vibrato ....................15 Tremolo ....................15 A Guided Tour of the RP14D ..............3 Panner ....................16 The Front Panel..................3 Detuner....................16 The Rear Panel ..................4 Pitch Shifting ..................16 Getting Started ....................5 Pitch Bend (Whammy) ................16 Making Connections ................5... -
Page 6: Section One - Introduction
Digitech RP14D! The DigiTech RP14D is the perfect sound shaping tool for the serious guitarist. The RP14D’s Amp Modeling utilizes the warmth and dynamic response that only a real 12AX7 tube can provide and is complimented by a library of the best effects available. The simple user interface lets you quickly create Programs and assign functions to the built in expression pedal. -
Page 7: Quick Start
Turn the Output knob on the front panel of the RP14D all the way down (fully counter clockwise). Connect the plug of the PS0920 power supply to the power jack on the RP14D. Connect the other end of the PS0920 power supply to an AC outlet. Turn the power of your amplifier(s) to the on position and adjust the volume(s). -
Page 8: A Guided Tour Of The Rp14D
Down Parameter buttons are used to select the Parameter of the selected Effect. Simply follow the horizontal and vertical LEDs across the Matrix to the point where they intersect. This will be the parameter you are about to edit. 8. Output Level - This knob controls the level of signal coming out of the RP14D. -
Page 9: The Rear Panel
6. Power Input - This connector is used to power the RP14D. Use only the DigiTech PS0920 power supply provided. 7. S/PDIF Output - This is the digital output from the RP14D. The signal at this output is in a digital format, and is to be connected to a... -
Page 10: Getting Started
Before connecting the RP14D, make sure that the power to your amplifier is turned off, and that the power to the RP14D is disconnected. There is no power switch on the RP14D. To turn the RP14D on, simply plug the power supply in to an AC outlet. To turn the RP14D off, unplug the power supply from the AC outlet. -
Page 11: Direct To A Mixing Console
Once the audio connections have been made, turn the Output Level all the way down (counterclockwise). Connect the 4 pin connector of the power adapter to the power jack on the back of the RP14D and the other end to an AC outlet. Turn the power to your amplifier(s) on. Set the amp(s) to a clean tone setting and set the tone controls to a flat EQ response (on most amps, this would be 0 or 5 on the tone controls). -
Page 12: The Footswitches
As you go through the different Programs that came in the RP14D, you will find that the expression pedal has different functions. This pedal can be assigned to control any one of 13 different parameters in the RP14D. Rocking the pedal back and forth will change the value of the parameter that the pedal has been assigned to control. -
Page 13: Section Two - Editing Functions
Once a Program has been edited to your liking, you may store those settings to any of the 50 User Program locations. Remember that the User Programs are duplicates of the Factory Programs so, you are not at risk of losing any of the sounds that the RP14D came with. -
Page 14: Storing/Copying A Program
RP14 UserÕs Guide Section Two - Editing Functions Storing/Copying a Program Once you have modified the Parameters and Effects to your liking, you can store them to a user Program location. When editing a Program, the Store LED will light indicating that you have changed a Parameter and need to store the changes. The following steps outline the proce- dure for storing a preset: 1. -
Page 15: Section Three - Effects And Parameters
About the Parameter Matrix The Parameter Matrix displays all the Effects and Parameters found in the RP14D. The Parameters are arranged in horizontal rows and the Effects are in vertical columns. Use the Parameter Select keys to navigate the matrix. The Effects and their Parameters are as follows:... -
Page 16: Expression Pedal
Display will show Off, or one of the Parameter abbreviations. The Parameters and their abbreviations available for Expression control in the RP14D are listed below. Use the Value Up or Down buttons to select the Parameter you wish to control. You can then set minimum and maximum values which are stop points for the top and bottom positions on the Expression Pedal. -
Page 17: Amp Modeling
The Amp Model Effect occupies two columns on the Matrix. The first press of the Edit button will automatically default the RP14D to the first Amp Model column. Using the Value Up or Down buttons will select the Type of Amp Model that you want. -
Page 18: Noise Gate
Threshold The RP14D’s Noise Gate is designed to eliminate noise while you are not playing. It looks at the strength of the incoming signal and if the sig- nal exceeds the value set by the Threshold parameter, the gate will open and allow the signal to pass. If your signal level drops below the Threshold, the gate will close and allow nothing through until the Threshold is exceeded again. -
Page 19: Chorus
Depth * The RP14D offers a chorus that is unique in both character and sound. A Chorus adds a short delay to your signal and modulates the delay time which takes the delayed signal slightly in and out of tune. The delayed signal is then mixed back with the original signal to create a thicker texture as if two guitars were playing the same part. -
Page 20: Vibrato
Section Three - Effects and Parameters The RP14D’s adjustable Phase Shifting effect is reminiscent of the classic Phasers used in mid-70’s keyboard and guitar sounds. A phaser splits the incoming signal, and then changes the phasing of the signal. This signal is then taken in and out of phase and mixed back in with the original signal. -
Page 21: Panner
Amount * The RP14D’s Pitch Shifter will make a copy of your incoming signal, and then shift the pitch of the copy to a different note. As you play one note the pitch shifter is simultaneously playing a note higher, or lower with you. The RP14D is capable of shifting the signal from 0 to 24 semi-tones (2 octaves) above or below the pitch of the input signal. -
Page 22: Harmony
Key * The RP14D also includes an intelligent Harmony Pitch Shifter. The difference between a Pitch Shifter and an intelligent Pitch Shifter is that the Pitch Shifter stays parallel to your note at the specified interval, and an intelligent Pitch Shifter knows which notes to make sharp or flat in order to keep the shifted pitches within the specified key and scale. -
Page 23: Ya Ya
0 ..40 Regeneration * A YaYa is an effect exclusive to DigiTech products. It combines the characteristics of a wah and a flanger together providing a unique talk box type of effect. The YaYa parameters are as follow: Amount Determines the quantity of sweep in the YaYa effect. -
Page 24: Auto Ya
This type of effect is also referred to as an echo because it basically echoes the original signal. Delay Parameters are as follows: Determines the type of delay. The RP14D’s Delay employs four types of Delay circuits: dig (Digital Delay with Type... -
Page 25: Reverb
Pre/Post FX The RP14D includes a digital output which allows you to connect directly into a digital recording device or digital mixer without multiple analog to digital, and digital to analog conversions. This maintains the integrity of your signal. The RP14D’s pre/post feature lets you select where the digital output takes its signal from. -
Page 26: Speaker Simulator
On/Bypass The RP14D’s Speaker Simulator circuitry allows you to use it in both recording and live situations without lugging heavy amps and/or cabi- nets around. Just connect the RP14D’s outputs to a mixing console and engage the Speaker Simulator. No miking hassles, no heavy equip- ment, just full on miked cabinet sound. -
Page 27: Section Four - Tutorial
Phaser sound with the Expression Pedal controlling the Phaser Speed, no Delay, and a little bit of a Hall reverb. The fol- lowing steps will guide you through the procedure for creating just such a Program in the RP14D. -
Page 28: Adjust The Gain, Eq, And Level
Amp Gain When you select a particular amp type in the Model section of the RP14D, the EQ settings automatically default to give you the settings of the selected amp type. However you can boost or cut these to suit your taste and in our example Program we wanted some heavy bass. Press the Parameter Down button again and by following the grid across you will find that this is the Bass Parameter. -
Page 29: Select Phaser
RP14 UserÕs Guide Section Four - Tutorial Select the Phaser Next we wanted a classic Phaser Effect in our custom Program. Press the Parameter Right button again and the horizontal LED in the Mod/Pitch column should light. Use the Parameter Up or Down buttons to light the top vertical LED which corresponds to the Type of Modulation or Pitch Shifting Effect that we want. -
Page 30: Set Master Volume
Store the Program The last step that we need to do is to store our changes to a User Program. If we changed Programs or turned the RP14D off without storing these settings, it would forget what we had done and revert back to the original Program. Press the Store button once. A U begins flashing in the Display, which is asking us to select the User Bank and Program number that we wish to save our changes to. -
Page 31: Section Five - Appendix
1. Plug in the RP14D while holding down the Parameter Select Up button. 2. When reSt appears in the display window, release the Parameter Select Up button and press the Value Up button once. The RP14D will reset to factory condition. -
Page 32: Factory Program List
RP14 UserÕs Guide Section Five - Appendix Program List The following is a list of all the factory Programs in the RP14D. Bank 6: Alternative Bank 1: Showcase 61 Mosh Mellow 11 Big British Stack 62 Pedal Phase 12 Clean w/Chorus... -
Page 33: Specifications
Memory Capacity: Factory: 50 Programs User: 50 Programs Power Requirements (PS0920 Power Ratings): Power Input (from outlet) Power Output (to RP14D) US and Canada: 120 V AC, 60 Hz, 34 Watts 9 VAC @ 2.1 Amps Japan: 100 V AC, 50/60 Hz 9 VAC @ 2.1 Amps... - Page 34 RP14 UserÕs Guide Section Five - Appendix...
- Page 35 International Distribution 8760 S. Sandy Parkway Sandy, Utah 84070, USA Telephone 801-568-7638 Fax 801-568-7642 DigiTech, RP14D, and S-DISC II are Trademarks of the Harman Music Group Incorporated Copyright 1999 The Harman Music Group Incorporated Printed in the USA 6/99 Manufactured in the USA...