Table of Contents

Related Manuals for Genius GENIUS SCANNER

Summary of Contents for Genius GENIUS SCANNER
- Page 1 User’s Guide Genius Scanner All trademarks and brand names mentioned in this publication are property of their respective owners. © 2003 KYE Systems Corp. All rights reserved. No portion of this document may be reproduced without permission.
-
Page 2: Table Of Contents
Hardware Requirements ..................... 4 Installing and Setting up the Scanner ................. 5 Step 1. Hassle-Free Lock Mechanism ................5 Step 2. Connecting the Genius Scanner to Your Computer ..........6 Step 3. Installing the Software..................... 6 Software Setup Troubleshooting ................7 Installing Additional Software.................. -
Page 3: Introduction
Before you start installing your Genius scanner, check the box contents to make sure all parts are included. If any items are damaged or missing, please contact the vendor where you purchased your scanner or Genius’... -
Page 4: Conventions Of This Guide
NOTE: Windows NT 4.0 does not support Universal Serial Bus (USB) connectivity. Video card that supports 16-bit color or greater Higher requirements might be needed when you scan or edit a large quantity of image data. The system requirements herein are only a guideline, as in general the better the computer (motherboard, processor, hard disk, RAM, video graphic card), the better the results. -
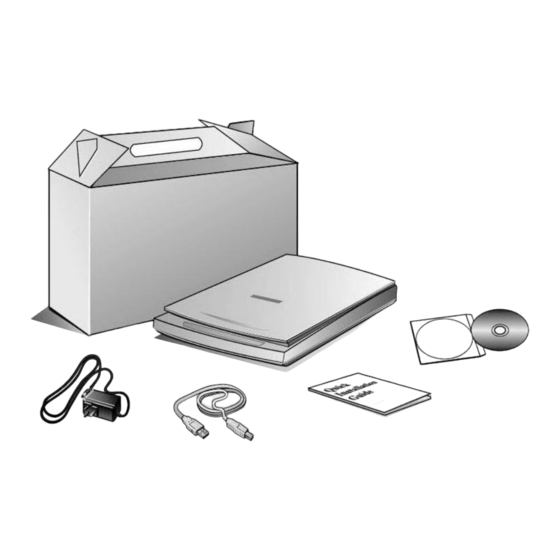
Page 5: Package Contents
• This User’s Guide (Electronic Version) Save the box and packing materials in case you need to transport this scanner in the future. The scanner illustration(s) may appear different than from the actual scanner itself. The bundled software may change at any time without prior notice. -
Page 6: Chapter I. Installing Genius Scanner
Plug and Play. To determine whether your computer is USB- capable, you must check the rear of your PC to locate a USB jack that looks the same as the one pictured below. Note that on some computers, the USB port at the rear of the computer may be occupied and additional ports may be found on the monitor or keyboard. -
Page 7: Installing And Setting Up The Scanner
USB Connector(s) If you don’t find such USB ports on your computer, then you need to purchase a certified USB interface card to add USB capabilities to your computer. Installing and Setting up the Scanner This scanner has an automatic locking mechanism to hold the scanning head in place during transportation. -
Page 8: Step 2. Connecting The Genius Scanner To Your Computer
Plug the power adapter into the scanner’s power receptor. Plug the other end of the power adapter into a standard AC power outlet. Plug the square end of the included USB cable to the USB port at the rear of the scanner. -
Page 9: Software Setup Troubleshooting
You are using the USB cable supplied with the scanner. • The square end of the USB cable is plugged into the rear of the scanner. • The rectangular end of the USB cable is plugged into the back of your computer. -
Page 10: Installing Additional Software
Setup Wizard. Reboot your computer when prompted, and plug the USB cable back into the scanner while your computer is still turned on. If you still need support, you can contact Genius at any office listed on the last page of this guide during normal business hours in that area. - Page 11 “Finish” button to restart your computer. Start installing your Windows XP upgrade software by following Microsoft’s related procedures. When the Windows XP upgrade is done, re-install the scanner’s hardware and software. Refer to the scanner setup quick guide for details. Genius Scanner...
-
Page 12: Chapter Ii. Usage And Maintenance
The capacity of the computer’s memory and free space on your hard drive can also limit the physical size of the document that you scan. Your scanner needs to be driven by some type of software program. Since all... -
Page 13: Scan And Image Editing
When Presto! ImageFolio opens, click on FILE and then SELECT SOURCE. In the window that opens, choose the model name of the scanner you have installed. Click on the SELECT button to close the window. This procedure allows Presto! ImageFolio to gain access to the scanner. -
Page 14: Scanner Utility Program
The Scanner Utility allows you to turn the scanning lamp on and off, and define an idle time for the scanning lamp to automatically turn itself off. Also, it allows you to define the exact position on the scanning glass where scanning will begin. -
Page 15: Connection Status
Make sure your scanner is plugged in and the USB cable is fit snugly into the rear of your scanner and computer. Secondly, determine the status of your USB hardware and software configuration. -
Page 16: Aligning The Scanner
You may also set the default time for the lamp to automatically turn off after a scan by clicking the up or down arrows next to the area that reads “minutes to turn off lamp.”... -
Page 17: Maintenance
To remove the cover, open it all the way. Place your other hand firmly at the back of the scanner and lift the document cover, separating it from the back of the scanner. To replace the cover, simply slide it back into place. -
Page 18: Appendix A: Specifications
Physical 456 x 272 x 62 mm dimensions Weight 2.4 Kgs (5.29 Lbs) Operating 10° C to 40° C (50° F to 104° F) Temperature Max. Scan Reflective: 8.5 x 11.69 in. (216 mm x 297 mm) Area Scan Method... -
Page 19: Appendix B: Customer Service And Warranty
Other USB devices installed We are continuously enhancing the performance of our product drivers. To check for the updated device driver you may visit our Web Site. (Please refer to the section of “Contacting Genius” on the last page of this manual.) -
Page 20: Fcc Radio Frequency Statement
FCC Radio Frequency Statement This equipment has been tested and found to comply with the limits for a Class B digital device, pursuant to part 15 of the FCC rules. These limits are designed to provide reasonable protection against harmful interference in a residential installation. - Page 21 √ Connect the equipment to an outlet on a circuit different from that which the receiver is connected. √ Shielded interconnect cables and shielded power cord which are supplied with this equipment must be employed with this equipment to ensure compliance with the pertinent RF emission limits governing this device.
-
Page 22: Contacting Genius
Web Site: http://www.kye.co.uk Asia Pacific Asia Pacific KYE Systems Corp. KYE Systems (M) SDN BHD No.492, Sec. 5, Chung Hsin Rd., San NO. 2, Jalan BK 1/12, Kinrara Industrial Chung, Taipei Hsien, 241, Taiwan, Park R.O.C. Bandar Kinrara, 6 1/2 Miles, Jalan Tel:...