Advertisement
Advertisement
Table of Contents

Related Manuals for Omron IntelliSense IW2


Summary of Contents for Omron IntelliSense IW2
- Page 1 INSTRUCTION MANUAL Automatic Wrist Blood Pressure Monitor !"#$%&' Model...
-
Page 2: Table Of Contents
Contents Introduction ........2 Notes on Safety .......3 Know Your Unit . -
Page 3: Introduction
Perfect for quick, easy readings at home, at work, and while traveling. It also stores up to 90 sets of measurements in memory and displays an average reading based on the three most recent measurements. -
Page 4: Notes On Safety
Battery liquid may leak and damage the main unit. Please observe the following points. • When you are not going to use the unit for a long period of time (approximately three months or more), take out the batteries. • Replace old batteries with new ones immediately. -
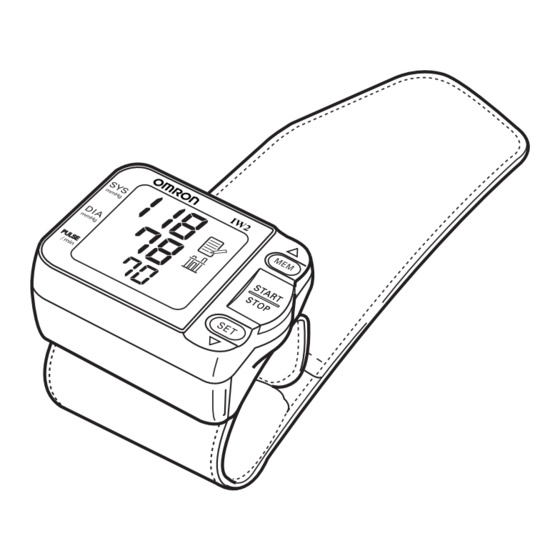
Page 5: Know Your Unit
MEM Button START/STOP Button SET Button Battery Compartment Display Heart Symbol (Flashes when the monitor is at the correct position.) Systolic Blood Pressure Memory Value Symbol (Displayed when viewing Diastolic Blood Pressure values stored in memory.) Battery Low Symbol Average Value Display... -
Page 6: Suggestions For Measuring Blood Pressure
You should also try to measure your blood pressure at the same time each day. Measurement should be taken in a quiet place and you should be in a relaxed, seated position. 1. Align the wrist cuff with the level of your heart and gently support your left arm with your right hand. -
Page 7: Initial Set-Up
3. Replace the battery cover. Note: * Make sure that the battery cover is securely in position. Caution: * Use two identical 1.5V AAA batteries. Note: * The measurement values continue to be stored in memory even after the batteries are replaced. Battery Installation/Replacement... - Page 8 • The dry cell batteries provided are for monitoring and may run down before 300 readings. • If the battery low symbol blinks while measuring or if pressure is not applied when the START/STOP button is pressed, replace both batteries (use the same type).
-
Page 9: How To Set The Date And Time
• Set the monitor to the correct date and time before taking a measurement for the first time. • If the batteries have been removed for a long period of time, the date and time setting will need to be reset. - Page 10 Initial Set-Up 4. Repeat steps 2 and 3 to set the month and date (day). 5. Repeat steps 2 and 3 to set the hour and minutes for the time. Note: * The monitor will automatically turn itself off after you press the SET button to confirm the minute setting.
-
Page 11: Correct Usage
2. Place the wrist cuff over your left wrist with your left thumb facing upward. 3. Hold the bottom part of the wrist cuff and wrap it around the wrist while pulling so that it fits comfortably. -
Page 12: How To Take A Reading
Notes: * If your wrist is too low or too high, the position sensor alarm will emit a series of two short bleeps similar to a heartbeat. * Sit still and do not talk or move until the measurement is completed. - Page 13 ) is shown frequently, please notify your doctor. Note: * Do not use this monitor to measure blood pressure for more than one person since the measurement values are automatically stored in memory and an average value based on the last three measurements is calculated.
- Page 14 What is Arrhythmia? A heartbeat is stimulated by electrical signals that cause the heart to contract. Arrhythmia is a condition where the heartbeat rhythm is abnormal due to flaws in the bio-electrical system that drives the heartbeat. Typical symptoms are skipped heartbeats, premature contraction, an abnormally rapid (tachycardia) or slow (bradycardia) pulse.
-
Page 15: How To Use The Memory Function
* To ensure that the measurement results are recorded correctly, make sure that the date and time are set correctly before taking a measurement. * When 90 sets of readings are stored in memory, the oldest set will be deleted to store a new set. - Page 16 Correct Usage 2. Press the MEM button repeatedly to cycle through the readings. 3. Press the SET button, while the average reading is displayed, to view readings from the earliest stored in memory. 4. Press the SET button repeatedly to cycle through the readings.
-
Page 17: How To Modify The Settings
1. Press the SET button until the Position Sensor Symbol ( ) appears on the display. 2. Press the MEM button to select “on” or “oFF”. When “on” is selected, the monitor displays symbols to indicate how close your wrist is to the correct measuring position. - Page 18 How to Modify the Settings 2. Press the MEM button to select “on1”, “on2”, or “oFF”. Turning Right Wrist Measurement On/Off 1. Press the SET button until the right wrist measurement symbol ( ) appears on the display. Select “on” to measure your blood pressure using your right wrist.
-
Page 19: Troubleshooting
Keep still and do not talk or moving your hands during measurement. during measurement? The blood pressure is Blood pressure readings constantly vary with time different each time. The of measurement and psychological condition. Take reading is extremely deep breaths to relax before taking a low (or high). - Page 20 Troubleshooting Error Symbol Cause Correction Cuff over inflated. Press the START/STOP button once to turn off After several seconds the power. Sit still restart measurement and keep still and do not talk during measurement. Movement during measurement After several seconds Carefully read and repeat the steps in “How...
-
Page 21: Care And Maintenance
•Washing the cuff or exposing the cuff or monitor to water. •Disassembling the monitor. •Subjecting the monitor to strong shocks or vibrations. Do not drop the monitor. •Cleaning the monitor with volatile liquids. The MONITOR SHOULD BE CLEANED WITH A SOFT, DRY CLOTH. -
Page 22: Specifications
Weight of Main Unit : Approximately 110 g (not including batteries) External Dimensions : 70 mm (w) x 54 mm (h) x 37 mm (d) (not including the wrist cuff) Measurable Circumference of Wrist : Approximately 135 mm to 215 mm...