
Related Manuals for Pyle PLDMR27NBK


Summary of Contents for Pyle PLDMR27NBK
- Page 1 PLDMR27NBK Marine Stereo Receiver Power Amplifier AM/FM/MP3/USB/BT/AUX/DVD/CD Marine Stereo Receiver, Double DIN, 30 Preset Memory Stations, LCD Display with Remote Control...
-
Page 2: Installation Opening
To ensure correct operation and avoid damage, please read this user manual carefully before using this product. INSTALLATION Installation Procedures 1. First complete the electrical connections and then check for correctness. 2. Disconnect the battery negative terminal of vehicle before beginning installation. Installation Opening This unit can be installed in any dashboard having an opening as shown below. -
Page 3: Wiring Connections
INSTALLATION Connect all wiring harness and slide the head unit into the mounting collar until it clicks into place. Wiring Connections V-OUT1 V-OUT2 AUX-L AUX-R 1. Speaker Connectors: 3. Fuse 10A Violet: Right Rear (+) 4. Audio / Video Inputs & Outputs Violet / Black:Right Rear (-) V-OUT1: Video Output 1 (Yellow) Gray: Right Front (+) -
Page 4: Overview Of The Controls
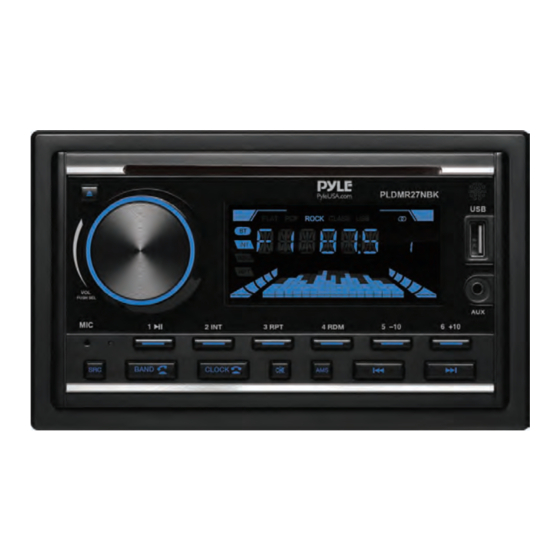
OVERVIEW OF THE CONTROLS (power)/Volume knob and SEL (select/menu) button 2. SRC (source) button 3. BAND (band) button, (answer call) button 4. AMS (automatic store/preset station scan, automatic music search) button (pause/play), Preset station1 button 6. INT (intro), Preset station 2 button 7. -
Page 5: General Operation
GENERAL OPERATION Turn Unit on/o , Adjust the volume (VOL), Adjust Menu Options (SEL) • Press the power (VOL knob) button button to turn on the unit. • Press and hold the power (VOL knob) button to turn the unit o . •... -
Page 6: Radio Operation
Change the Source (MODE) Press the SRC button to switch between RADIO, DISC (with a DVD/VCD/CD/MP3 disc inserded), USB (with USB device inserted), BT and AUX-IN (auxiliary input) modes. Setting the Clock (CLOCK) 1. To display clock time, press the CLOCK button. 2. - Page 7 To Store/Recall Preset Stations The radio can be stored 6 preset stations for each band (FM1, FM2, FM3, AM1 and AM2) for atotal of 30 preset stations. • To memorize a station: Press and hold the desired preset buttons (1-6) to save a radio station.
-
Page 8: Introduction Scan
Introduction Scan Press the INT button to play the rst 10 seconds of all track. Press again to stop theintroduction scan, and play the current track. Repeating the track • During DVD playback, press the RPT button to toggle between RPT CHA (repeat chapter), RPT TIT (repeat title), RPT ALL (repeat all), RPT OFF. - Page 9 Refer to owner’s manual for your device for more details. 2. When the phone nds the car audio system, the “Pyle” name will be displayed. Choose the “Pyle” from the device list to pair and connect with the car audio system.
-
Page 10: Remote Control
REMOTE CONTROL 1. Band button, (answer call) button 2/6. VOL+/volume increase button, VOL- volume decrease button 3. MUTE button 4. SEL (selection) button 5/16. (Tune down, seek down; Chapter/ Title/Track down) button (Tune up, seek up, Chapter/Title/ Track up) button 7. -
Page 11: System Setup
SETUP In DVD/VCD playback, press the SETUP button on the remote control to enter the system setup for this unit. The system setup page will be visible on the connected monitor. A. SYSTEM SETUP 1. TV SYSTEM: This DVD player is compatible with playing discs recorded in either PAL or TV SYSTEM NTSC... -
Page 12: Language Setup
Rating 8: [ADULT] -- Select it to indicate that only adults are permitted to view. 6. DEFAULT: Set all values to the factory default values including radio preset stations and other preset memories of this unit. B. LANGUAGE SETUP: User can select the preferred OSD Language, OSD LANGUAGE ENGLISH Audio Language, Subtitle Language and Menu... - Page 13 Features: • AM/FM/MP3/DVD/CD/USB/AUX Marine Stereo Receiver • Double DIN WIRELESS BT Connectivity: • Black Panel • Built-in BT for Wireless • Rear AUX RCA Input Music Streaming • Subwoofer Output • Built-in Microphone for • 2 Pairs Of AV RCA Output Hands-Free Calling •...
- Page 14 Questions? Issues? We are here to help! Phone: (1) 718-535-1800 Email: support@pyleusa.com...